交通标志识别
本项目使用YOLO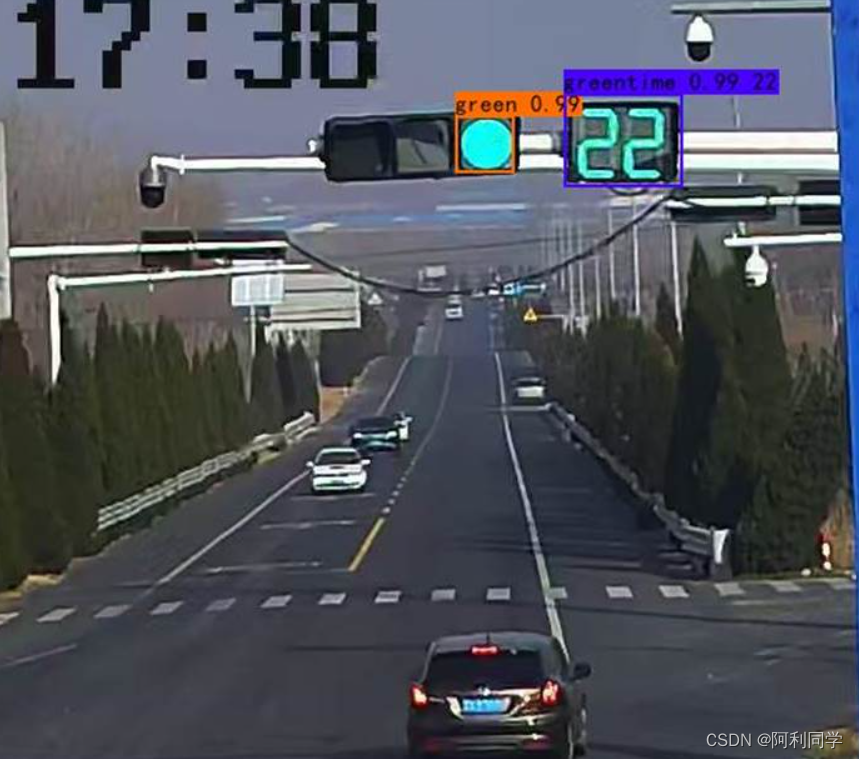
模型,并在对数字信号灯进行数字识别时采用opencv算法。
环境安装
所需环境 python =3.7.11 torch==1.2.00
使用
pip install -r requirements.txt
安装所需的包。
文件下载
训练所需的预训练权重可在百度网盘中下载。
链接:https://pan.baidu.com/s/1gKmRdwpQ05fMu1H-mi38zg 提取码:1234
作者训练结果可在下方链接中下载。
链接:https://pan.baidu.com/s/1cLSoWbra612Ezx1EsqOFGQ 提取码: 1234
训练过程
1.数据集的准备
本文使用VOC格式进行训练,训练前需要自己制作好数据集,
训练前将标签文件放在VOCdevkit文件夹下的VOC2007文件夹下的Annotation中。
训练前将图片文件放在VOCdevkit文件夹下的VOC2007文件夹下的JPEGImages中。
2.数据集的处理
在完成数据集的摆放之后,我们需要利用voc_annotation.py获得训练用的2007_train.txt和2007_val.txt。
修改voc_annotation.py里面的参数。第一次训练可以仅修改classes_path,classes_path用于指向检测类别所对应的txt。
训练自己的数据集时,可以自己建立一个cls_classes.txt,里面写自己所需要区分的类别。
model_data/cls_classes.txt文件内容为:
左转红灯
左转绿灯
...
其中内容也可以换成自己需要的。
3. 开始网络训练
训练的参数较多,均在train.py中,大家可以在下载库后仔细看注释,其中最重要的部分依然是train.py里的classes_path。
classes_path用于指向检测类别所对应的txt,这个txt和voc_annotation.py里面的txt一样!训练自己的数据集必须要修改!
修改完classes_path后就可以运行train.py开始训练了,在训练多个epoch后,权值会生成在logs文件夹中。
4. 训练结果预测
训练结果预测需要用到两个文件,分别是yolo.py和predict.py。在yolo.py里面修改model_path以及classes_path。
model_path指向训练好的权值文件,在logs文件夹里。
classes_path指向检测类别所对应的txt。
完成修改后就可以运行predict.py进行检测了。运行后输入图片路径即可检测。
后处理
- 由于本项目不仅要对红绿灯进行识别,还要对倒计时识别,先采用CNN网络预先对数码管数据集进行训练。然后采用OpenCV对第一步预测出来的结果进行切割,然后把切割出来的图像进行二值化,再进行识别。
预测过程
在yolo.py文件里面,在如下部分修改model_path和classes_path使其对应训练好的文件;model_path对应logs文件夹下面的权值文件,classes_path是model_path对应分的类。
_defaults = {


    #--------------------------------------------------------------------------#
    #   使用自己训练好的模型进行预测一定要修改model_path和classes_path!
    #   model_path指向logs文件夹下的权值文件,classes_path指向model_data下的txt
    #   如果出现shape不匹配,同时要注意训练时的model_path和classes_path参数的修改
    #--------------------------------------------------------------------------#
    "model_path"        : 'model_data/yolo_weights.pth',
    "classes_path"      : 'model_data/coco_classes.txt',
    #---------------------------------------------------------------------#
    #   anchors_path代表先验框对应的txt文件,一般不修改。
    #   anchors_mask用于帮助代码找到对应的先验框,一般不修改。
    #---------------------------------------------------------------------#
    "anchors_path"      : 'model_data/yolo_anchors.txt',
    "anchors_mask"      : [[6, 7, 8], [3, 4, 5], [0, 1, 2]],
    #---------------------------------------------------------------------#
    #   输入图片的大小,必须为32的倍数。
    #---------------------------------------------------------------------#
    "input_shape"       : [416, 416],
    #---------------------------------------------------------------------#
    #   只有得分大于置信度的预测框会被保留下来
    #---------------------------------------------------------------------#
    "confidence"        : 0.5,
    #---------------------------------------------------------------------#
    #   非极大抑制所用到的nms_iou大小
    #---------------------------------------------------------------------#
    "nms_iou"           : 0.3,
    #---------------------------------------------------------------------#
    #   该变量用于控制是否使用letterbox_image对输入图像进行不失真的resize,
    #   在多次测试后,发现关闭letterbox_image直接resize的效果更好
    #---------------------------------------------------------------------#
    "letterbox_image"   : False,
    #-------------------------------#
    #   是否使用Cuda
    #   没有GPU可以设置成False
    #-------------------------------#
    "cuda"              : True,
}
def __init__(self, **kwargs):
        self.__dict__.update(self._defaults)
        for name, value in kwargs.items():
            setattr(self, name, value)

        #---------------------------------------------------#
        #   获得种类和先验框的数量
        #---------------------------------------------------#
        self.class_names, self.num_classes  = get_classes(self.classes_path)
        self.anchors, self.num_anchors      = get_anchors(self.anchors_path)
        self.bbox_util                      = DecodeBox(self.anchors, self.num_classes, (self.input_shape[0], self.input_shape[1]), self.anchors_mask)

        #---------------------------------------------------#
        #   画框设置不同的颜色
        #---------------------------------------------------#
        hsv_tuples = [(x / self.num_classes, 1., 1.) for x in range(self.num_classes)]
        self.colors = list(map(lambda x: colorsys.hsv_to_rgb(*x), hsv_tuples))
        self.colors = list(map(lambda x: (int(x[0] * 255), int(x[1] * 255), int(x[2] * 255)), self.colors))
        self.generate()

    #---------------------------------------------------#
    #   生成模型
    #---------------------------------------------------#
    def generate(self):
        #---------------------------------------------------#
        #   建立yolo模型,载入yolo模型的权重
        #---------------------------------------------------#
        self.net    = YoloBody(self.anchors_mask, self.num_classes)
        device      = torch.device('cuda' if torch.cuda.is_available() else 'cpu')
        self.net.load_state_dict(torch.load(self.model_path, map_location=device))
        self.net    = self.net.eval()
        print('{} model, anchors, and classes loaded.'.format(self.model_path))

        if self.cuda:
            self.net = nn.DataParallel(self.net)
            self.net = self.net.cuda()

    #---------------------------------------------------#
    #   检测图片
    #---------------------------------------------------#
    def detect_image(self, image, imgname):
        #---------------------------------------------------#
        #   计算输入图片的高和宽
        #---------------------------------------------------#
        image_shape = np.array(np.shape(image)[0:2])
        #---------------------------------------------------------#
        #   在这里将图像转换成RGB图像,防止灰度图在预测时报错。
        #   代码仅仅支持RGB图像的预测,所有其它类型的图像都会转化成RGB
        #---------------------------------------------------------#
        image       = cvtColor(image)
        #---------------------------------------------------------#
        #   给图像增加灰条,实现不失真的resize
        #   也可以直接resize进行识别
        #---------------------------------------------------------#
        image_data  = resize_image(image, (self.input_shape[1],self.input_shape[0]), self.letterbox_image)
        #---------------------------------------------------------#
        #   添加上batch_size维度
        #---------------------------------------------------------#
        image_data  = np.expand_dims(np.transpose(preprocess_input(np.array(image_data, dtype='float32')), (2, 0, 1)), 0)

        with torch.no_grad():
            images = torch.from_numpy(image_data)
            if self.cuda:
                images = images.cuda()
            # width = 16
            # w = image.size[0]
            # h = image.size[1]
            # w += 2 * width
            # h += 2 * width
            # img_new = Image.new('RGB', (w, h), (255, 255, 255))
            # img_new.paste(image, (width, width))
            # images = img_new
            #---------------------------------------------------------#
            #   将图像输入网络当中进行预测!
            #---------------------------------------------------------#
            outputs = self.net(images)
            outputs = self.bbox_util.decode_box(outputs)
            #---------------------------------------------------------#
            #   将预测框进行堆叠,然后进行非极大抑制
            #---------------------------------------------------------#
            results = self.bbox_util.non_max_suppression(torch.cat(outputs, 1), self.num_classes, self.input_shape,
                        image_shape, self.letterbox_image, conf_thres = self.confidence, nms_thres = self.nms_iou)

            if results[0] is None:
                return image

            top_label   = np.array(results[0][:, 6], dtype = 'int32')
            top_conf    = results[0][:, 4] * results[0][:, 5]
            top_boxes   = results[0][:, :4]
        #---------------------------------------------------------#
        #   设置字体与边框厚度
        #---------------------------------------------------------#
        #font = ImageFont.truetype(font='model_data/simhei.ttf',size=20)
        font        = ImageFont.truetype(font='model_data/simhei.ttf', size=np.floor(3e-2 * image.size[0] + 0.5).astype('int32'))
        thickness   = int(max((image.size[0] + image.size[1]) // np.mean(self.input_shape), 1))

        #---------------------------------------------------------#
        #   图像绘制
        #---------------------------------------------------------#
        for i, c in list(enumerate(top_label)):
            predicted_class = self.class_names[int(c)]
            box             = top_boxes[i]
            score           = top_conf[i]

            top, left, bottom, right = box

            top     = max(0, np.floor(top).astype('int32'))
            left    = max(0, np.floor(left).astype('int32'))
            bottom  = min(image.size[1], np.floor(bottom).astype('int32'))
            right   = min(image.size[0], np.floor(right).astype('int32'))

            label = '{}'.format(predicted_class)
            # 判断倒计时灯颜色, 进行预处理
            if predicted_class == '红色倒计时':
                np_image = np.array(image)
                np_image = cv2.cvtColor(np_image, cv2.COLOR_RGB2BGR)
                roi = np_image[top:bottom, left:right]
                # roi = np_image[top-1:bottom+1, left-1:right+1]
                cv2.imwrite('./analysis/%s_roi.jpg'%imgname, roi)
                # gray_image = cv2.cvtColor(roi, cv2.COLOR_BGR2GRAY)
                gray_image = tomygray(roi, predicted_class)
                cv2.imwrite('./analysis/%s_gray_img.jpg'%imgname, gray_image)
                predict_text = main_test(gray_image, imgname)
                # label = '{} {}'.format(predicted_class, predict_text)
                label = '倒计时:{}'.format(predict_text)

            elif predicted_class == '绿色倒计时':
                np_image = np.array(image)
                roi = np_image[top:bottom, left:right]
                # roi = np_image[top-1:bottom+1, left-1:right+1]
                gray_image = tomygray(roi, predicted_class)
                predict_text = main_test(gray_image, imgname)
                # label = '{} {}'.format(predicted_class, predict_text)
                label = '倒计时:{}'.format(predict_text)
            elif predicted_class == '黄色倒计时':
                np_image = np.array(image)
                roi = np_image[top:bottom, left:right]
                # roi = np_image[top-1:bottom+1, left-1:right+1]
                gray_image = cv2.cvtColor(roi, cv2.COLOR_BGR2GRAY)
                predict_text = main_test(gray_image, imgname)
                # label = '{} {}'.format(predicted_class, predict_text)
                label = '倒计时:{}'.format(predict_text)
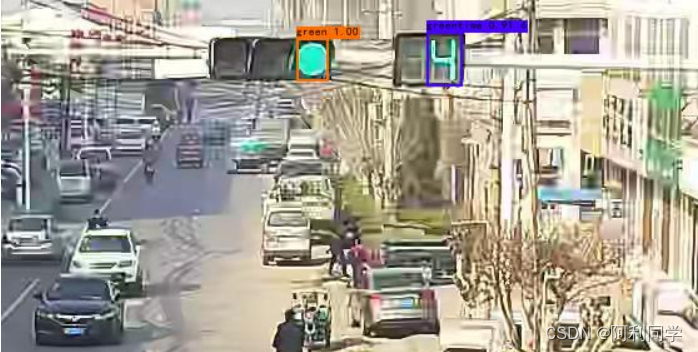
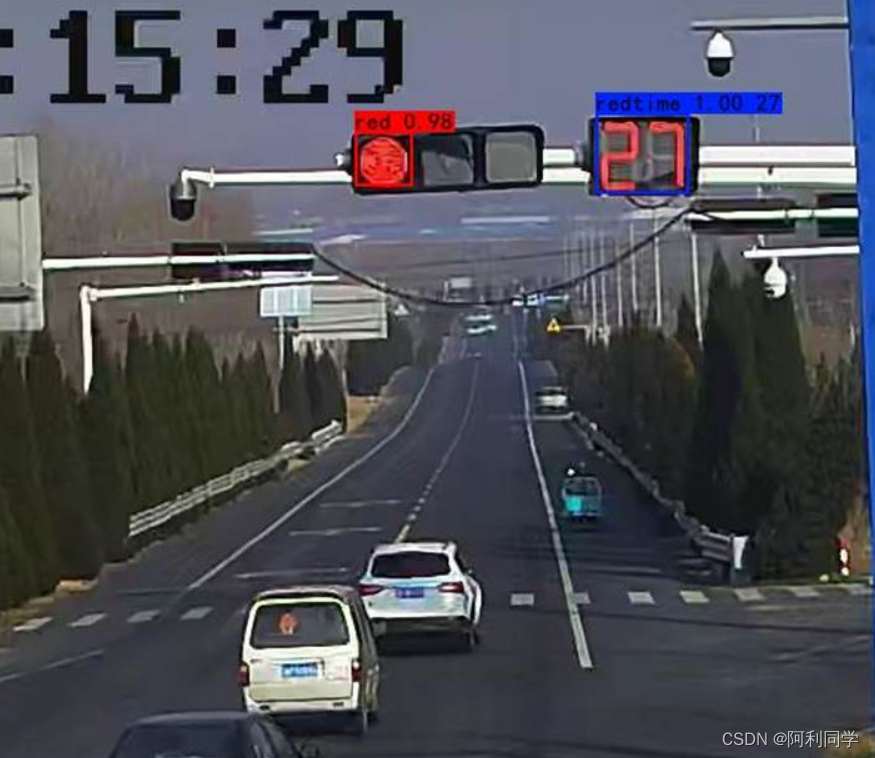
预测结果