##个人首次使用UniAPP使用注意事项以及踩坑
1.vscode 插件
uni-create-view 快速nui-app页面的
uni-helper uni-app代码提示的
uniapp小程序扩展 鼠标悬停查文档
Error Lens 行内提示报错
"types": ["@dcloudio/types", "miniprogram-api-typings", "@uni-helper/uni-app-types","@uni-helper/uni-ui-types"]

miniprogram-api-typings  是一种增强小程序开发体验的工具,特别适用于使用 TypeScript 进行小程序开发的开发者。
@uni-helper/uni-app-types 是一个用于增强 uni-app 开发体验的 TypeScript 类型声明库,它可以帮助你在编写跨平台应用时获得更准确的代码提示和类型检查,提高代码质量和开发效率。
@uni-helper/uni-ui-types 是一个为 uni-ui 组件库提供的 TypeScript 类型声明库。
2.统一代码风格
- 安装
eslint+prettier
pnpm i -D eslint prettier eslint-plugin-vue @vue/eslint-config-prettier @vue/eslint-config-typescript @rushstack/eslint-patch @vue/tsconfig
新建 .eslintrc.cjs 文件,添加以下 eslint 配置
/* eslint-env node */
require('@rushstack/eslint-patch/modern-module-resolution') // 加载模块解析的修复补丁。
// 导出一个对象,该对象包含ESLint的配置信息。
module.exports = {


  root: true, // 指定该配置文件为根配置文件。
  extends: [ // 指定扩展的规则集,这里包括了一些规则的插件和扩展。
    'plugin:vue/vue3-essential', // Vue.js 3.x项目的基本规则。
    'eslint:recommended', // ESLint官方推荐的规则。
    '@vue/eslint-config-typescript', // Vue.js项目中使用TypeScript的规则。
    '@vue/eslint-config-prettier',// 与Prettier代码格式化工具一起使用的规则。
  ],
  // 小程序全局变量
  globals: {

     //指定全局变量,这些变量可以在代码中直接使用而不需要声明。
    uni: true,
    wx: true,
    WechatMiniprogram: true,
    getCurrentPages: true,
    getApp: true,
    UniApp: true,
    UniHelper: true,
    App: true,
    Page: true,
    Component: true,
    AnyObject: true,
  },
  parserOptions: {

     //指定解析器选项,这里将ECMAScript版本设置为最新。
    ecmaVersion: 'latest',
  },
  rules: {

     //指定自定义的规则,这里列出了一些自定义规则的配置。
    'prettier/prettier': [ //使用Prettier的规则进行代码格式化,包括使用单引号、省略分号、限制一行的最大字符数、使用逗号结尾等。
      'warn',// 表示如果代码与这些配置不符合,ESLint将发出警告。具体的配置包括:
      {


        singleQuote: true, // 使用单引号而不是双引号。
        semi: false, //不使用分号结尾。
        printWidth: 100, // 限制一行的字符数为100。
        trailingComma: 'all', // 使用逗号结尾的方式。
        endOfLine: 'auto', // 自动识别换行符。
      },
    ],
    'vue/multi-word-component-names': ['off'], // 禁用在Vue组件名中使用多个单词的规则。
    'vue/no-setup-props-destructure': ['off'], // 禁用在Vue组件props中使用解构赋值的规则。
    'vue/no-deprecated-html-element-is': ['off'], // 禁用使用已废弃的`is`属性的规则。
    '@typescript-eslint/no-unused-vars': ['off'], // 禁用未使用的TypeScript变量的规则。
  },
}
package.json 中添加
{


  "script": {


    // ... 省略 ...
    "lint": "eslint . --ext .vue,.js,.ts --fix --ignore-path .gitignore"
  }
}
然后 运行 pnpm lint 自动修复了
- https://prettier.io/docs/en/options.html 常见规则
vscode 开启 eslint 自动修复
json
"editor.codeActionsOnSave": {
        "source.fixAll": true,
    },
3.使用uCharts
组件方式 快速上手
npm i @qiun/ucharts
4.报错相关
Some selectors are not allowed in component wxss, including tag name selectors, ID selectors, and attribute selectors.
不能用标签选择器 如 button text 这样的 应该加类名
5.获取屏幕边界到安全区域的距离
// 获取屏幕边界到安全区域距离
const {

     safeAreaInsets } = uni.getSystemInfoSync()
6.分享
onShareAppMessage
// 分享的信息
onShareAppMessage((res) => {


  // 分享事件来源:menu(右上角分享按钮)
  return {


    title: '请来填写一下个人信息!',
    path: '/pages/addInfo/index',
  }
})
7.内置组件picker的踩坑
    <view class="uni-title uni-common-pl">地区选择器</view>
    <view class="uni-list">
      <view class="uni-list-cell">
        <view class="uni-list-cell-left"> 当前地区为: </view>
        <view class="uni-list-cell-db">
          <picker
            mode="region"
            :value="regionList"
            @change="onRegionChange"
            @cancel="onRangeCancel"
            level="city"
          >
            <view class="" v-if="regionList.length">{

    {

     regionList[0] }} - {

    {

     regionList[1] }}</view>
            <view v-else>{

    {

     '请选择城市' }}</view>
          </picker>
        </view>
      </view>
    </view>
源码里面是有 选择器层级的 province 省级 city 市级 region 区级 sub-district 街道级
但是官网文档没有显示 然后微信开发者工具也不好使,一度以为废弃了,偶然间发现*****mmp的手机预览就可以
8.安全区域问题预览与真机调试
const {

     safeAreaInsets } = uni.getSystemInfoSync()
console.log(safeAreaInsets, 'safeAreaInsets')
:style="{ bottom: safeAreaInsets?.bottom + 'px' }"

但是如果是 空标签 加上<view :style="{ height: safeAreaInsets?.bottom + 'px' }" style="width: 100%" />
就可以 我也没搞清楚两个组件写法是一样的 只不过一个是一上来就加载 一个通过boolean 去显示之后就可以使用了 我怀疑是声明周期的问题
但是如果给获取这段代码 放在生命周期里面 页面加载就会闪,我看网上一般都是直接放在setup语法糖里面就很奇怪
后来不好使的这个页面 我就用css变量替换了
  bottom: 0;
  bottom: constant(safe-area-inset-bottom); // 修复 真机调试情况下 css动态设置失效问题 采用变量控制
  bottom: env(safe-area-inset-bottom);
or 上面的 苹果手机弹性 会看到透明区域
  bottom: 0;
  // bottom: constant(safe-area-inset-bottom); // 修复 真机调试情况下 css动态设置失效问题 采用变量控制
  // bottom: env(safe-area-inset-bottom);
  left: 0;
  height: calc(110rpx + env(safe-area-inset-bottom));
  background-color: #fff;
在预览模式下 可以使用 在真机模式下 safeAreaInsets为undefined
具体为什么我也不知道!!!
文档:https://ask.dcloud.net.cn/article/35564
9.键盘弹出高度
//  监听键盘高度变化
  uni.onKeyboardHeightChange((obj) => {


    // 获取系统信息
    let _sysInfo = uni.getSystemInfoSync()
    let _heightDiff = _sysInfo.screenHeight - _sysInfo.windowHeight
    let _diff = obj.height - _heightDiff
    // 键盘高度
    let height = (_diff > 0 ? _diff : 0) - 2 + 'px'
    console.log(height, 'heightheight')
  })
10.样式覆盖
::v-deep
      uni-data-select {
        flex: 1;

        ::v-deep.uni-select {
          border: none;
          padding: 0;
        }
      }
11.全局组件自动导入问题
(1).src\components\hbcy-icon-title.vue
(2).src\types\components.d.ts
// src/types/components.d.ts 全局组件类型声明
import HbcyIconTitle from '@/components/hbcy-icon-title.vue'
declare module '@vue/runtime-core' {


  export interface GlobalComponents {


    HbcyIconTitle: typeof HbcyIconTitle
  }
}
(3).src\pages.json 与 "pages"同级
// 组件自动导入
	"easycom": {


		// 是否开启自动扫描 @/components/$1/$1.vue 组件
		"autoscan": true,
		"custom": {


			// uni-ui 规则如下配置
			"^uni-(.*)": "@dcloudio/uni-ui/lib/uni-$1/uni-$1.vue",
			// 以 hbcy- 开头的组件,在 components 目录中查找
			"^hbcy-(.*)": "@/components/hbcy-$1.vue"
		}
	}
(4).使用
<hbcy-icon-title />
12.input 样式自定义
placeholder的样式自定义可以用
placeholder-style or placeholder-class
 <input
   class="item-input"
   placeholder="请输入缴费基数"
   placeholder-style="font-size:28rpx"
   type="digit"
   focus
 />
  ::v-deep.input-placeholder {
    font-size: 28rpx;
  }
https://uniapp.dcloud.net.cn/component/input.html#属性说明

13.表单回显小知识
需求: A页面填完信息跳转到B页面,当B页面返回的时候,A页面需要保留刚刚没跳转B之前的信息
正常来说利用本地存储,跳转之前存一下,跳转之后回显
但是小程序orUniapp有一个回调上一页功能uni.navigateBack()如果使用它,那么没有变化的数据就不需要去再次存储以及回显
(左上角返回 和 uni.navigateBack() 是一样的功能)
因为返回的这个操作类似于浏览器回退(不刷新数据) 需要刷新的时候可以写 onShow!
const onClickSend = () => {


  // TODO
  uni.navigateBack()
  // uni.navigateTo({


  //   url: '/pages/addInfo/index',
  // })
  setTimeout(() => {


    uni.showToast({


      title: '保存成功',
      icon: 'none',
      mask: true,
    })
  }, 500)
}
扩展
setTimeout(() => uni.navigateBack({


   delta: 1
   // success() {


   //   let pages = getCurrentPages() // 获取当前挂载的路由数组
   //   let prePage = pages[pages.length - 2] as any // 获取 上一个页面
   //   if (prePage.route === 'enterpriseZone/enterpriseZoneSubmitOrder/enterpriseZoneSubmitOrder') {


   //     prePage.orderDetails() // 当返回成功的时候调用上一级页面的回调
   //   }
   // }
 }), 1000)
13.元素节点操作-uni.createSelectorQuery()
注意:想要拿到元素实例,需要在实例已经挂载到页面上才可以
 //1、首先导入当前组件的实例
import {

    getCurrentInstance} from "vue";
var currentInstance = getCurrentInstance();
//2、添加上in方法
const inputQuery =  uni.createSelectorQuery().in(currentInstance)
  // 获取输入框
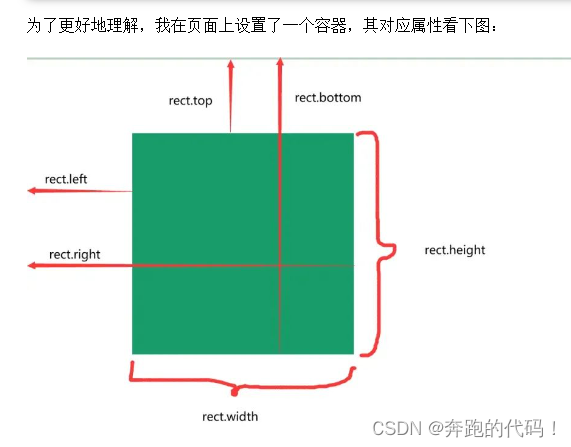
inputQuery.select('#input').boundingClientRect((rect) => {


     console.log("得到节点信息" , rect);
    })
    .exec()
示例图:
