编写一个客户端向服务端发送“Hello World”的简易示例
依赖
<dependency>
    <groupId>io.netty</groupId>
    <artifactId>netty-all</artifactId>
    <version>4.1.39.Final</version>
</dependency>
服务端
import io.netty.bootstrap.ServerBootstrap;
import io.netty.channel.ChannelHandlerContext;
import io.netty.channel.ChannelInboundHandlerAdapter;
import io.netty.channel.ChannelInitializer;
import io.netty.channel.nio.NioEventLoopGroup;
import io.netty.channel.socket.nio.NioServerSocketChannel;
import io.netty.channel.socket.nio.NioSocketChannel;
import io.netty.handler.codec.string.StringDecoder;
import io.netty.handler.logging.LoggingHandler;
/**
 * 示例代码来自黑马程序员
 */
public class HelloServer {


    public static void main(String[] args) {


        // 1. 启动器,负责组装 netty 组件,启动服务器
        new ServerBootstrap()
            // 2. BossEventLoop, WorkerEventLoop(selector,thread), group 组
            .group(new NioEventLoopGroup())
            // 3. 选择 服务器的 ServerSocketChannel 实现
            .channel(NioServerSocketChannel.class) // OIO BIO
            // 4. boss 负责处理连接 worker(child) 负责处理读写,决定了 worker(child) 能执行哪些操作(handler)
            .childHandler(
                    // 5. channel 代表和客户端进行数据读写的通道 Initializer 初始化,负责添加别的 handler
                new ChannelInitializer<NioSocketChannel>() {


                    @Override
                    protected void initChannel(NioSocketChannel ch) throws Exception {


                        // 6. 添加具体 handler
                        ch.pipeline().addLast(new LoggingHandler());
                        ch.pipeline().addLast(new StringDecoder()); // 将 ByteBuf 转换为字符串
                        ch.pipeline().addLast(new ChannelInboundHandlerAdapter() {

     // 自定义 handler
                            @Override // 读事件
                            public void channelRead(ChannelHandlerContext ctx,Object msg) throws Exception {


                                System.out.println(msg); // 打印上一步转换好的字符串
                            }
                        });
                    }
                }
            )
            // 7. 绑定监听端口
            .bind(8080);
    }
}
这段代码是一个使用Netty框架实现的简单服务器示例。它监听本地主机的端口8080,并接收客户端发送的消息。
以下是代码的功能解释:
- 创建ServerBootstrap实例:
new ServerBootstrap():创建一个新的ServerBootstrap实例,用于配置和启动服务器。
- 添加EventLoop(事件循环):
.group(new NioEventLoopGroup()):创建一个NioEventLoopGroup实例,用于管理服务器的I/O事件循环组。这将为服务器提供异步事件处理能力。
- 选择服务器的通道实现:
.channel(NioServerSocketChannel.class):指定服务器使用NioServerSocketChannel作为通道实现。NioServerSocketChannel是Netty提供的基于Java NIO的套接字通道。
- 配置处理连接的处理器:
.childHandler()方法中传入一个ChannelInitializer实例,用于初始化客户端的通道。在initChannel()方法中,我们添加了以下处理器:
.pipeline().addLast(new LoggingHandler()):添加一个日志处理器,用于记录通道的事件和消息。
.pipeline().addLast(new StringDecoder()):添加一个字符串解码器,用于将接收到的字节缓冲区转换为字符串。
.pipeline().addLast(new ChannelInboundHandlerAdapter() {...}):添加一个自定义的处理程序适配器,用于处理入站事件和消息。
- 绑定监听端口:
.bind(8080):绑定服务器到本地主机的端口8080,开始监听该端口并接受客户端连接。
这段代码使用Netty框架创建了一个简单的服务器,它监听指定的端口并接收客户端发送的消息。通过使用Netty的API,可以方便地处理网络通信,而无需手动处理底层细节。在处理客户端请求时,服务器会添加不同的处理器来处理连接建立、消息解码和日志记录等操作。
客户端
import io.netty.bootstrap.Bootstrap;
import io.netty.channel.ChannelInitializer;
import io.netty.channel.nio.NioEventLoopGroup;
import io.netty.channel.socket.nio.NioSocketChannel;
import io.netty.handler.codec.string.StringEncoder;
import java.net.InetSocketAddress;
/**
 * 示例代码来自黑马程序员
 */
public class HelloClient {


    public static void main(String[] args) throws InterruptedException {


        // 1. 启动类
        new Bootstrap()
            // 2. 添加 EventLoop
            .group(new NioEventLoopGroup())
            // 3. 选择客户端 channel 实现
            .channel(NioSocketChannel.class)
            // 4. 添加处理器
            .handler(new ChannelInitializer<NioSocketChannel>() {


                @Override // 在连接建立后被调用
                protected void initChannel(NioSocketChannel ch) throws Exception {


                    ch.pipeline().addLast(new StringEncoder());
                }
            })
            // 5. 连接到服务器
            .connect(new InetSocketAddress("localhost", 8080))
            .sync()
            .channel()
            // 6. 向服务器发送数据
            .writeAndFlush("hello, world");
    }
}
这段代码是一个使用Netty框架实现的简单客户端示例。它连接到本地主机的端口8080,并向服务器发送一条"hello, world"的消息。
-
创建Bootstrap实例:
new Bootstrap():创建一个新的Bootstrap实例,用于配置和启动客户端。
-
添加EventLoop(事件循环):
.group(new NioEventLoopGroup()):创建一个NioEventLoopGroup实例,用于管理客户端的I/O事件循环组。这将为客户端提供异步事件处理能力。
-
选择客户端通道实现:
.channel(NioSocketChannel.class): 指定客户端使用NioSocketChannel作为通道实现。NioSocketChannel是Netty提供的基于Java NIO的套接字通道。
-
添加处理器:
.handler(new ChannelInitializer<NioSocketChannel>() {...}):添加一个ChannelInitializer处理器,用于在连接建立后初始化客户端的通道。在initChannel()方法中,我们添加了一个StringEncoder处理器,用于编码字符串消息。
-
连接到服务器:
.connect(new InetSocketAddress("localhost", 8080)):连接到指定的服务器地址和端口。这里使用的是本地主机的地址和端口8080。
-
.sync():同步等待连接建立完成。(阻塞住当前线程,直到nio线程连接建立完毕) -
.channel():获取连接的通道。 -
向服务器发送数据:
.writeAndFlush("hello, world"):通过通道向服务器发送消息,并立即刷新输出缓冲区,确保消息被发送到服务器。
这段代码使用Netty框架创建了一个简单的客户端,它连接到指定的服务器并发送一条消息。通过使用Netty的API,可以方便地处理网络通信,而无需手动处理底层细节。
先启动服务端,再启动客户端,可以看到服务端接收到Helloworld
v2简洁版
服务端:
        //创建两个线程组 boosGroup、workerGroup
        EventLoopGroup bossGroup = new NioEventLoopGroup();
        EventLoopGroup workerGroup = new NioEventLoopGroup();
        ServerBootstrap serverBootstrap = new ServerBootstrap();
        serverBootstrap.group(bossGroup, workerGroup)
                .channel(NioServerSocketChannel.class)
                .childHandler(
                        new ChannelInitializer<NioSocketChannel>() {


                            @Override
                            protected void initChannel(NioSocketChannel ch) throws Exception {


                                ch.pipeline().addLast(new LoggingHandler());
                                ch.pipeline().addLast(new StringDecoder()); // 将 ByteBuf 转换为字符串
                                ch.pipeline().addLast(new ChannelInboundHandlerAdapter() {

     // 自定义 handler
                                    @Override
                                    public void channelRead(ChannelHandlerContext ctx,Object msg) throws Exception {


                                        System.out.println("1:"+msg);
                                        super.channelRead(ctx, msg); // 让消息传递给下一个handler 或者使用:ctx.fireChannelRead(msg);
                                    }
                                });
                                ch.pipeline().addLast(new ChannelInboundHandlerAdapter() {

     // 自定义 handler
                                    @Override
                                    public void channelRead(ChannelHandlerContext ctx,Object msg) throws Exception {


                                        System.out.println("2:"+msg);
                                    }
                                });
                            }
                        }
                );
        serverBootstrap.bind(8081);
客户端:
        Bootstrap bootstrap = new Bootstrap();
        bootstrap.group(new NioEventLoopGroup())
                .channel(NioSocketChannel.class)
                .handler(new ChannelInitializer<NioSocketChannel>() {


                    @Override
                    protected void initChannel(NioSocketChannel ch) throws Exception {


                        ch.pipeline().addLast(new StringEncoder());
                    }
                });
        ChannelFuture channelFuture = bootstrap.connect(new InetSocketAddress("localhost", 8081));
        channelFuture = channelFuture.sync(); // 同步等待连接建立完成。(阻塞住当前线程,直到nio线程连接建立完毕)
        Channel channel = channelFuture.channel();
        channel.write("hello world");
        channel.write("hello everyone");
        channel.flush();
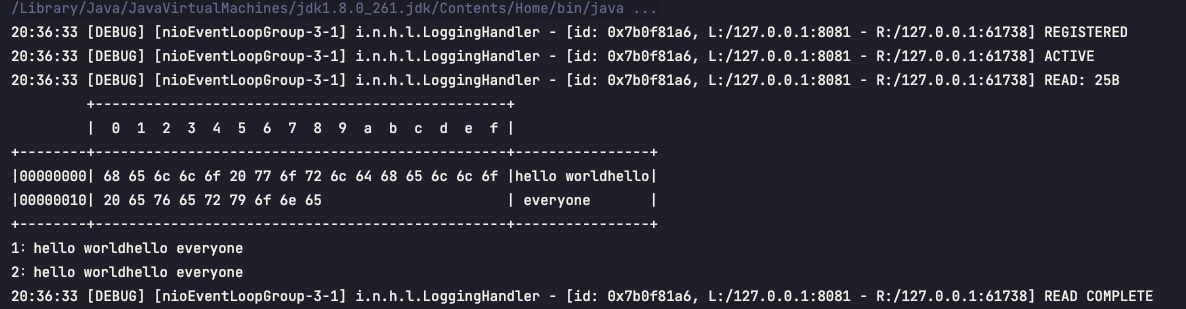
先启动服务端,再启动客户端。服务端输出:
在本次的服务端代码中:最开始创建了两个EventLoopGroup(线程组),第一个 bossGroup 大家可以理解成 Reactor 模式里的 Acceptor,也就是接收网络事件的线程;但是 Acceptor 并不处理网络事件,会把网络事件交给 Processor 线程,在这里就是 workerGroup 线程组。
参考:
https://www.bilibili.com/video/BV1py4y1E7oA
https://blog.csdn.net/yunqiinsight/article/details/107953180