今天小编使用到了SpringBoot+SpringSecurity进行公司项目开发,之前使用到项目都是采用xml配置来整合SpringSecurity,对于第一次使用SpringBoot整合SpringSecurity也是比较陌生,过程中也是遇到各种各样的问题,在CSDN的知识海洋中遗留的相关的整合教程也是五花八门,找一篇完整的教程简直像是大海捞针,so,小编决定亲自挥笔,整顿这种低质量博文
首先、我们创建一个SpringBoot项目工程,SpringBoot项目工程的搭建,小编这里就不做演示,比较简单 ,目前已经搭建并成功启动
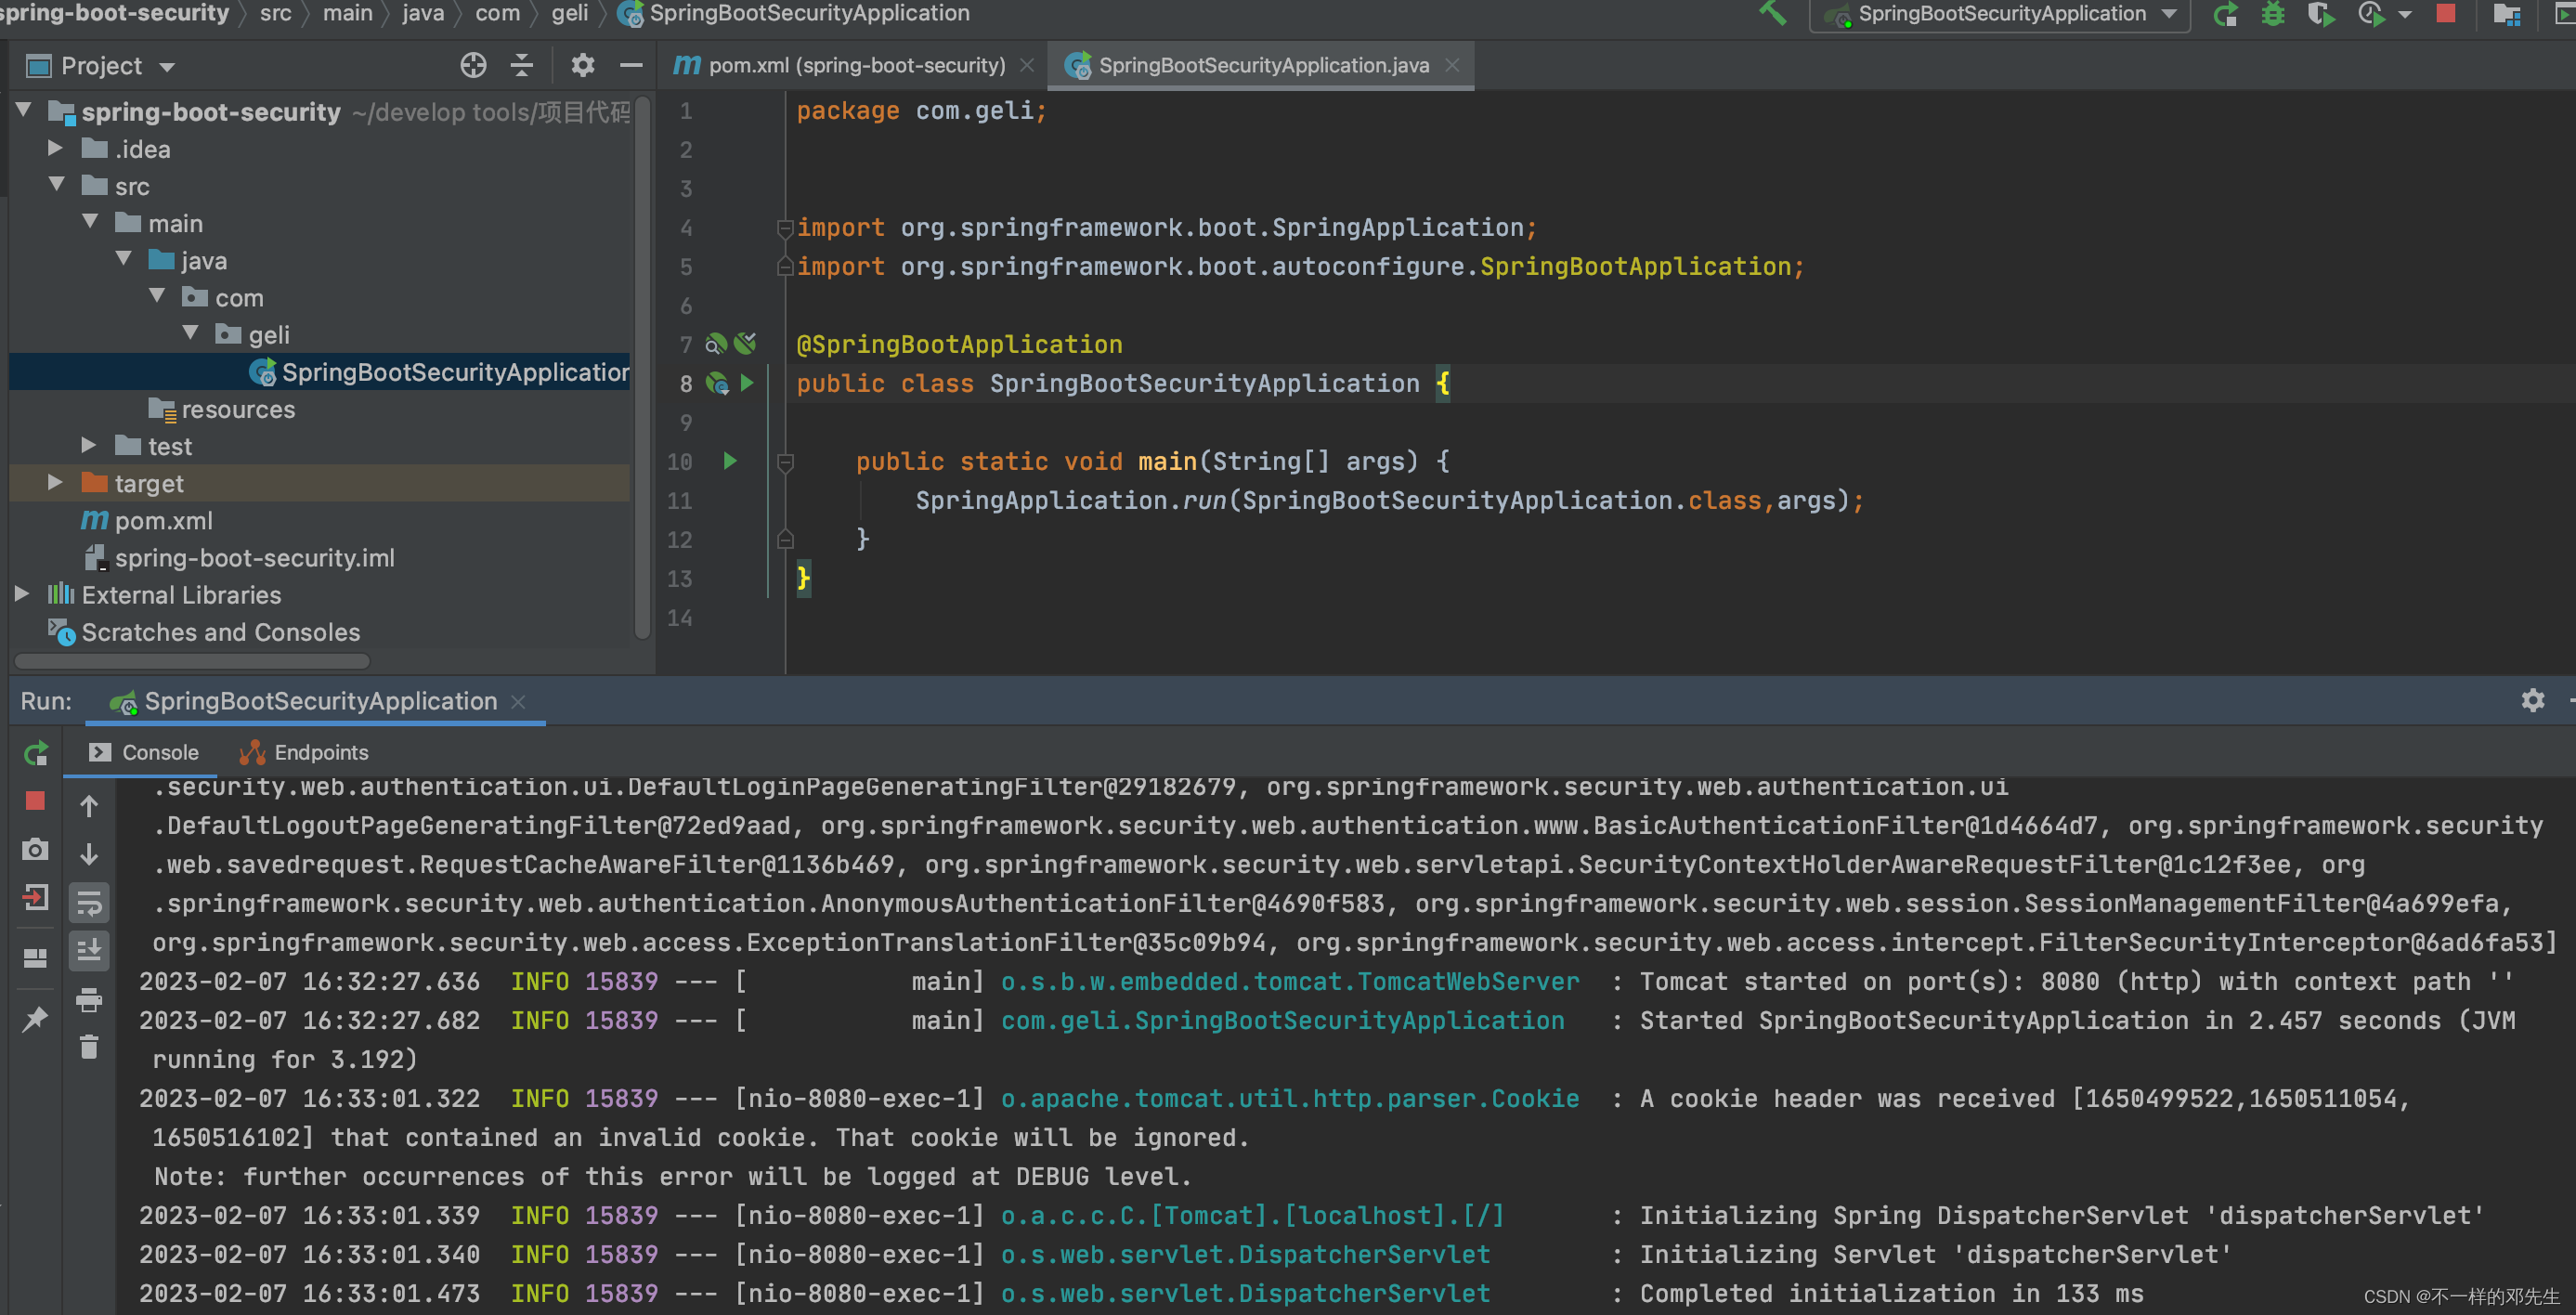
接下来、对于SpringBoot整合SpringSecurity最重要的一步,毫无疑问必然是SpringSecurity依赖导入,这里导入的是spring-boot-starter-security依赖
<!--springSecurity-->
<dependency>
     <groupId>org.springframework.boot</groupId>
     <artifactId>spring-boot-starter-security</artifactId>
</dependency>
依赖已经成功导入,此时你访问SpringBoot项目地址:http://localhost:8080/,你将会跳转到SpringSecurity默认的登录页面,由于小编这里只是讲解操作,所以就没有设置自定义的登陆页面,默认登陆页面如下:

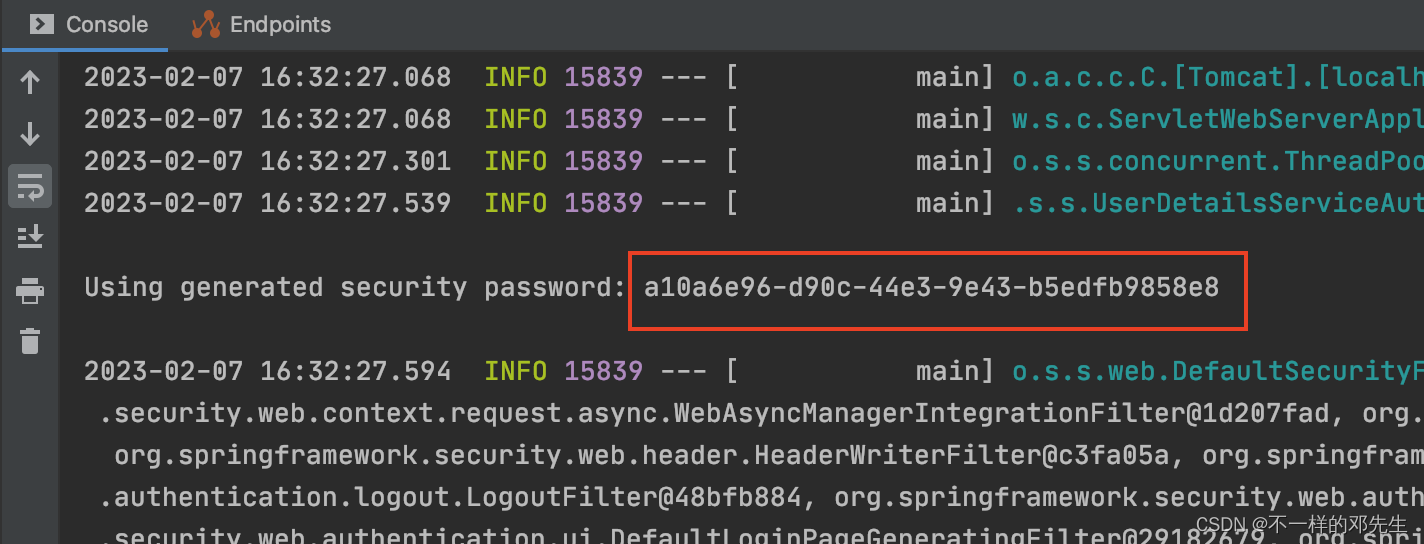
SpringSecurity其实设置的有默认的登录账号和密码,默认的账号是user,默认的登录密码在SpringBoot项目启动的时候会自动生成,图中红框部分就是SpringSecurity生成的初始密码,大家可以自行测试登陆
接下来的知识和操作就比较重要了,大家一定要收藏、关注加点赞,拿出自己的小本本记录下来,下面即将讲述SpringSecurity相关的配置操作
首先,建立一个config文件包,用来存储相关的SpringSecurity的配置文件类
第二、新建一个SpringSecurity的配置类SecurityConfig,继承于WebSecurityConfigurerAdapter,代码块如图所示,大家可以直接复制,下面会对其中存疑的代码进行解释
package com.geli.config;
import com.geli.service.impl.LoginUserDetailsService;
import org.springframework.beans.factory.annotation.Autowired;
import org.springframework.context.annotation.Bean;
import org.springframework.context.annotation.Configuration;
import org.springframework.security.config.annotation.authentication.builders.AuthenticationManagerBuilder;
import org.springframework.security.config.annotation.web.builders.HttpSecurity;
import org.springframework.security.config.annotation.web.builders.WebSecurity;
import org.springframework.security.config.annotation.web.configuration.WebSecurityConfigurerAdapter;
import org.springframework.security.crypto.bcrypt.BCryptPasswordEncoder;
import org.springframework.security.crypto.password.PasswordEncoder;
@Configuration
public class SecurityConfig extends WebSecurityConfigurerAdapter {
@Autowired
private LoginUserDetailsService loginUserDetailsService;
@Override
protected void configure(AuthenticationManagerBuilder auth) throws Exception {
auth.userDetailsService(loginUserDetailsService)// 设置自定义的userDetailsService
.passwordEncoder(passwordEncoder());
}
@Override
public void configure(WebSecurity web) throws Exception {
web.ignoring().antMatchers("/css/**","/fonts/**","/images/**","/js/**");
}
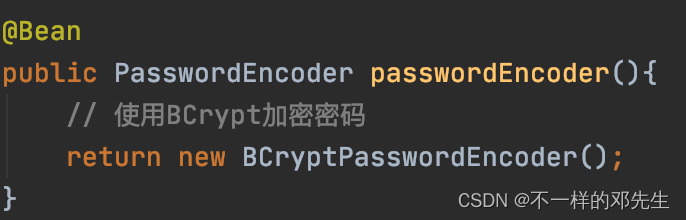
@Bean
public PasswordEncoder passwordEncoder(){
// 使用BCrypt加密密码
return new BCryptPasswordEncoder();
}
@Override
protected void configure(HttpSecurity http) throws Exception {
http.headers().frameOptions().disable();//开启运行iframe嵌套页面
http//1、配置权限认证
.authorizeRequests()
//配置不拦截路由
.antMatchers("/500").permitAll()
.antMatchers("/403").permitAll()
.antMatchers("/404").permitAll()
.antMatchers("/goLogin.do").permitAll()
.antMatchers("/login.do").permitAll()
.anyRequest() //任何其它请求
.authenticated() //都需要身份认证
.and()
//2、登录配置表单认证方式
.formLogin()
.loginPage("/goLogin.do")//自定义登录页面的url
.usernameParameter("username")//设置登录账号参数,与表单参数一致
.passwordParameter("password")//设置登录密码参数,与表单参数一致
// 告诉Spring Security在发送指定路径时处理提交的凭证,默认情况下,将用户重定向回用户来自的页面。登录表单form中action的地址,也就是处理认证请求的路径,
// 只要保持表单中action和HttpSecurity里配置的loginProcessingUrl一致就可以了,也不用自己去处理,它不会将请求传递给Spring MVC和您的控制器,所以我们就不需要自己再去写一个/user/login的控制器接口了
.loginProcessingUrl("/login.do")//配置默认登录入口
.defaultSuccessUrl("/goIndex.do")//登录成功后默认的跳转页面路径
.failureUrl("/goLogin.do?error=true")
.and()
//3、注销
.logout()
.logoutUrl("/logout.do")
.permitAll()
.and()
//4、session管理
.sessionManagement()
.invalidSessionUrl("/login.html") //失效后跳转到登陆页面
//单用户登录,如果有一个登录了,同一个用户在其他地方登录将前一个剔除下线
//.maximumSessions(1).expiredSessionStrategy(expiredSessionStrategy())
//单用户登录,如果有一个登录了,同一个用户在其他地方不能登录
//.maximumSessions(1).maxSessionsPreventsLogin(true) ;
.and()
//5、禁用跨站csrf攻击防御
.csrf()
.disable();
}
}
1、对于注入的loginUserDetailsService对象,马上就会讲到,后面会创建,大家不用着急
2、第二部分代码是认证管理器的,大家自行复制就行
3、第三部分是用来放行静态资源文件的,SpringSecurity会默认拦截静态资源文件

4、第四部分代码是用来设置加密方式的
5、最后一部分是用来设置权限认证配置
第三、新建上面缺少的LoginUserDetailsService类,该类需要添加@Service注解,所以小编放置在service包下面在,该类实现UserDetailsService接口,其中注入的是查询数据库的UserService,没有注入dao,只是为了方便测试,打开根据自己需要进行修改就是,目的只是为了查询数据库数据
package com.geli.service.impl;

import com.geli.domain.Permission;
import com.geli.domain.User;
import org.springframework.security.core.GrantedAuthority;
import org.springframework.security.core.authority.SimpleGrantedAuthority;
import org.springframework.security.core.userdetails.UserDetails;
import org.springframework.security.core.userdetails.UserDetailsService;
import org.springframework.security.core.userdetails.UsernameNotFoundException;
import org.springframework.stereotype.Service;

import javax.annotation.Resource;
import java.util.ArrayList;
import java.util.List;


@Service
public class LoginUserDetailsService implements UserDetailsService {
    @Resource
    private UserServiceImpl userService;


    @Override
    public UserDetails loadUserByUsername(String username) throws UsernameNotFoundException {
        User user = userService.findUserByUserName(username);
        if (user == null){
            throw new UsernameNotFoundException("not found");
        }
        //定义权限列表.
        List<GrantedAuthority> authorities = new ArrayList<>();
        // 用户可以访问的资源名称(或者说用户所拥有的权限) 注意:必须"ROLE_"开头
        if (user.getRole()!=null){
            authorities.add(new SimpleGrantedAuthority(user.getRole().getKeyWord()));
            if (user.getRole().getPermissionList() !=null && user.getRole().getPermissionList().size()>0){
                for (Permission permission : user.getRole().getPermissionList()) {
                    authorities.add(new SimpleGrantedAuthority(permission.getKeyWord()));
                }
            }
        }

        org.springframework.security.core.userdetails.User user1 = new org.springframework.security.core.userdetails.User(user.getUsername(), user.getPassword(), authorities);
        return user1;
    }
}
其中比较重要的就是添加用户角色和权限的部分,大家根据自己的实际需求进行修改就可以 ,就是图中这部分代码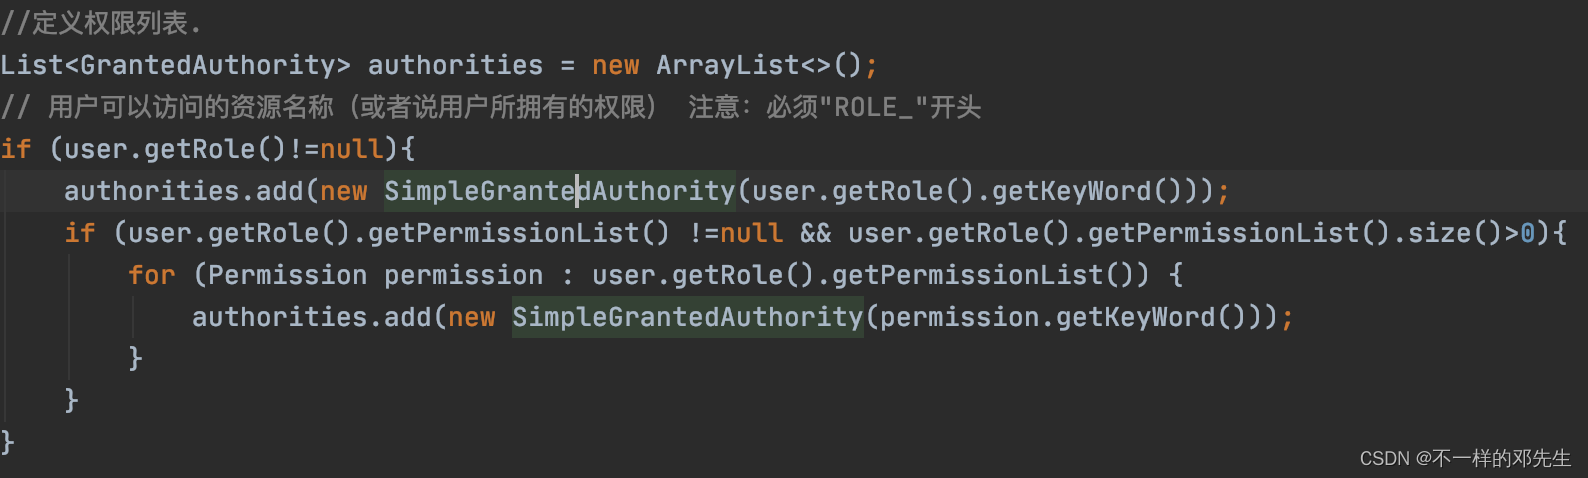
第四,小编这里贴一下自己的实体类代码,大家可以方便理解
用户实体类
package com.geli.domain;

import lombok.AllArgsConstructor;
import lombok.Data;
import lombok.NoArgsConstructor;
import java.io.Serializable;
import java.util.Date;

@NoArgsConstructor
@AllArgsConstructor
@Data
public class User implements Serializable {
    private Integer id; //用户id
    private String username;    //用户账号
    private String password;    //用户密码
    private String addUser;     //添加用户人员账号
    private String editUser;  //编辑用户人员账号
    private Date addDate;   //添加账号时间
    private Date updateDate;    //更新账号时间
    private Role role;  //用户角色

}
角色实体类
package com.geli.domain;

import lombok.AllArgsConstructor;
import lombok.Data;
import lombok.NoArgsConstructor;
import java.io.Serializable;
import java.util.Set;

@Data
@NoArgsConstructor
@AllArgsConstructor
public class Role implements Serializable {
    private Integer id;     //角色id
    private String name;    //角色名称
    private String keyWord; //角色关键字
    private String description; //角色描述
    private Set<Permission> permissionList;    //用户权限集合
}
权限实体类
package com.geli.domain;

import lombok.AllArgsConstructor;
import lombok.Data;
import lombok.NoArgsConstructor;
import java.io.Serializable;

@Data
@NoArgsConstructor
@AllArgsConstructor
public class Permission implements Serializable {
    private Integer id;     //权限id
    private String name;    //权限名称
    private String keyWord; //权限关键字
    private String description; //权限描述

}
第四、就下来就是测试SpringSecurity,小编在UserServiceImpl里面添加了一个用户账号,代码如图所示:
import com.geli.service.UserService;
import org.springframework.stereotype.Service;

@Service
public class UserServiceImpl implements UserService {
    @Override
    public User findUserByUserName(String username) {
        User user = new User();
        user.setId(1);
        user.setUsername("D46033");
  user.setPassword("$2a$10$Pgs46f8LzTjOvA5Sg6qDkOBbUoAtWQQdHFoEbbmWPak.34/NwJQrW");
        return user;
    }
}
进入登陆页面 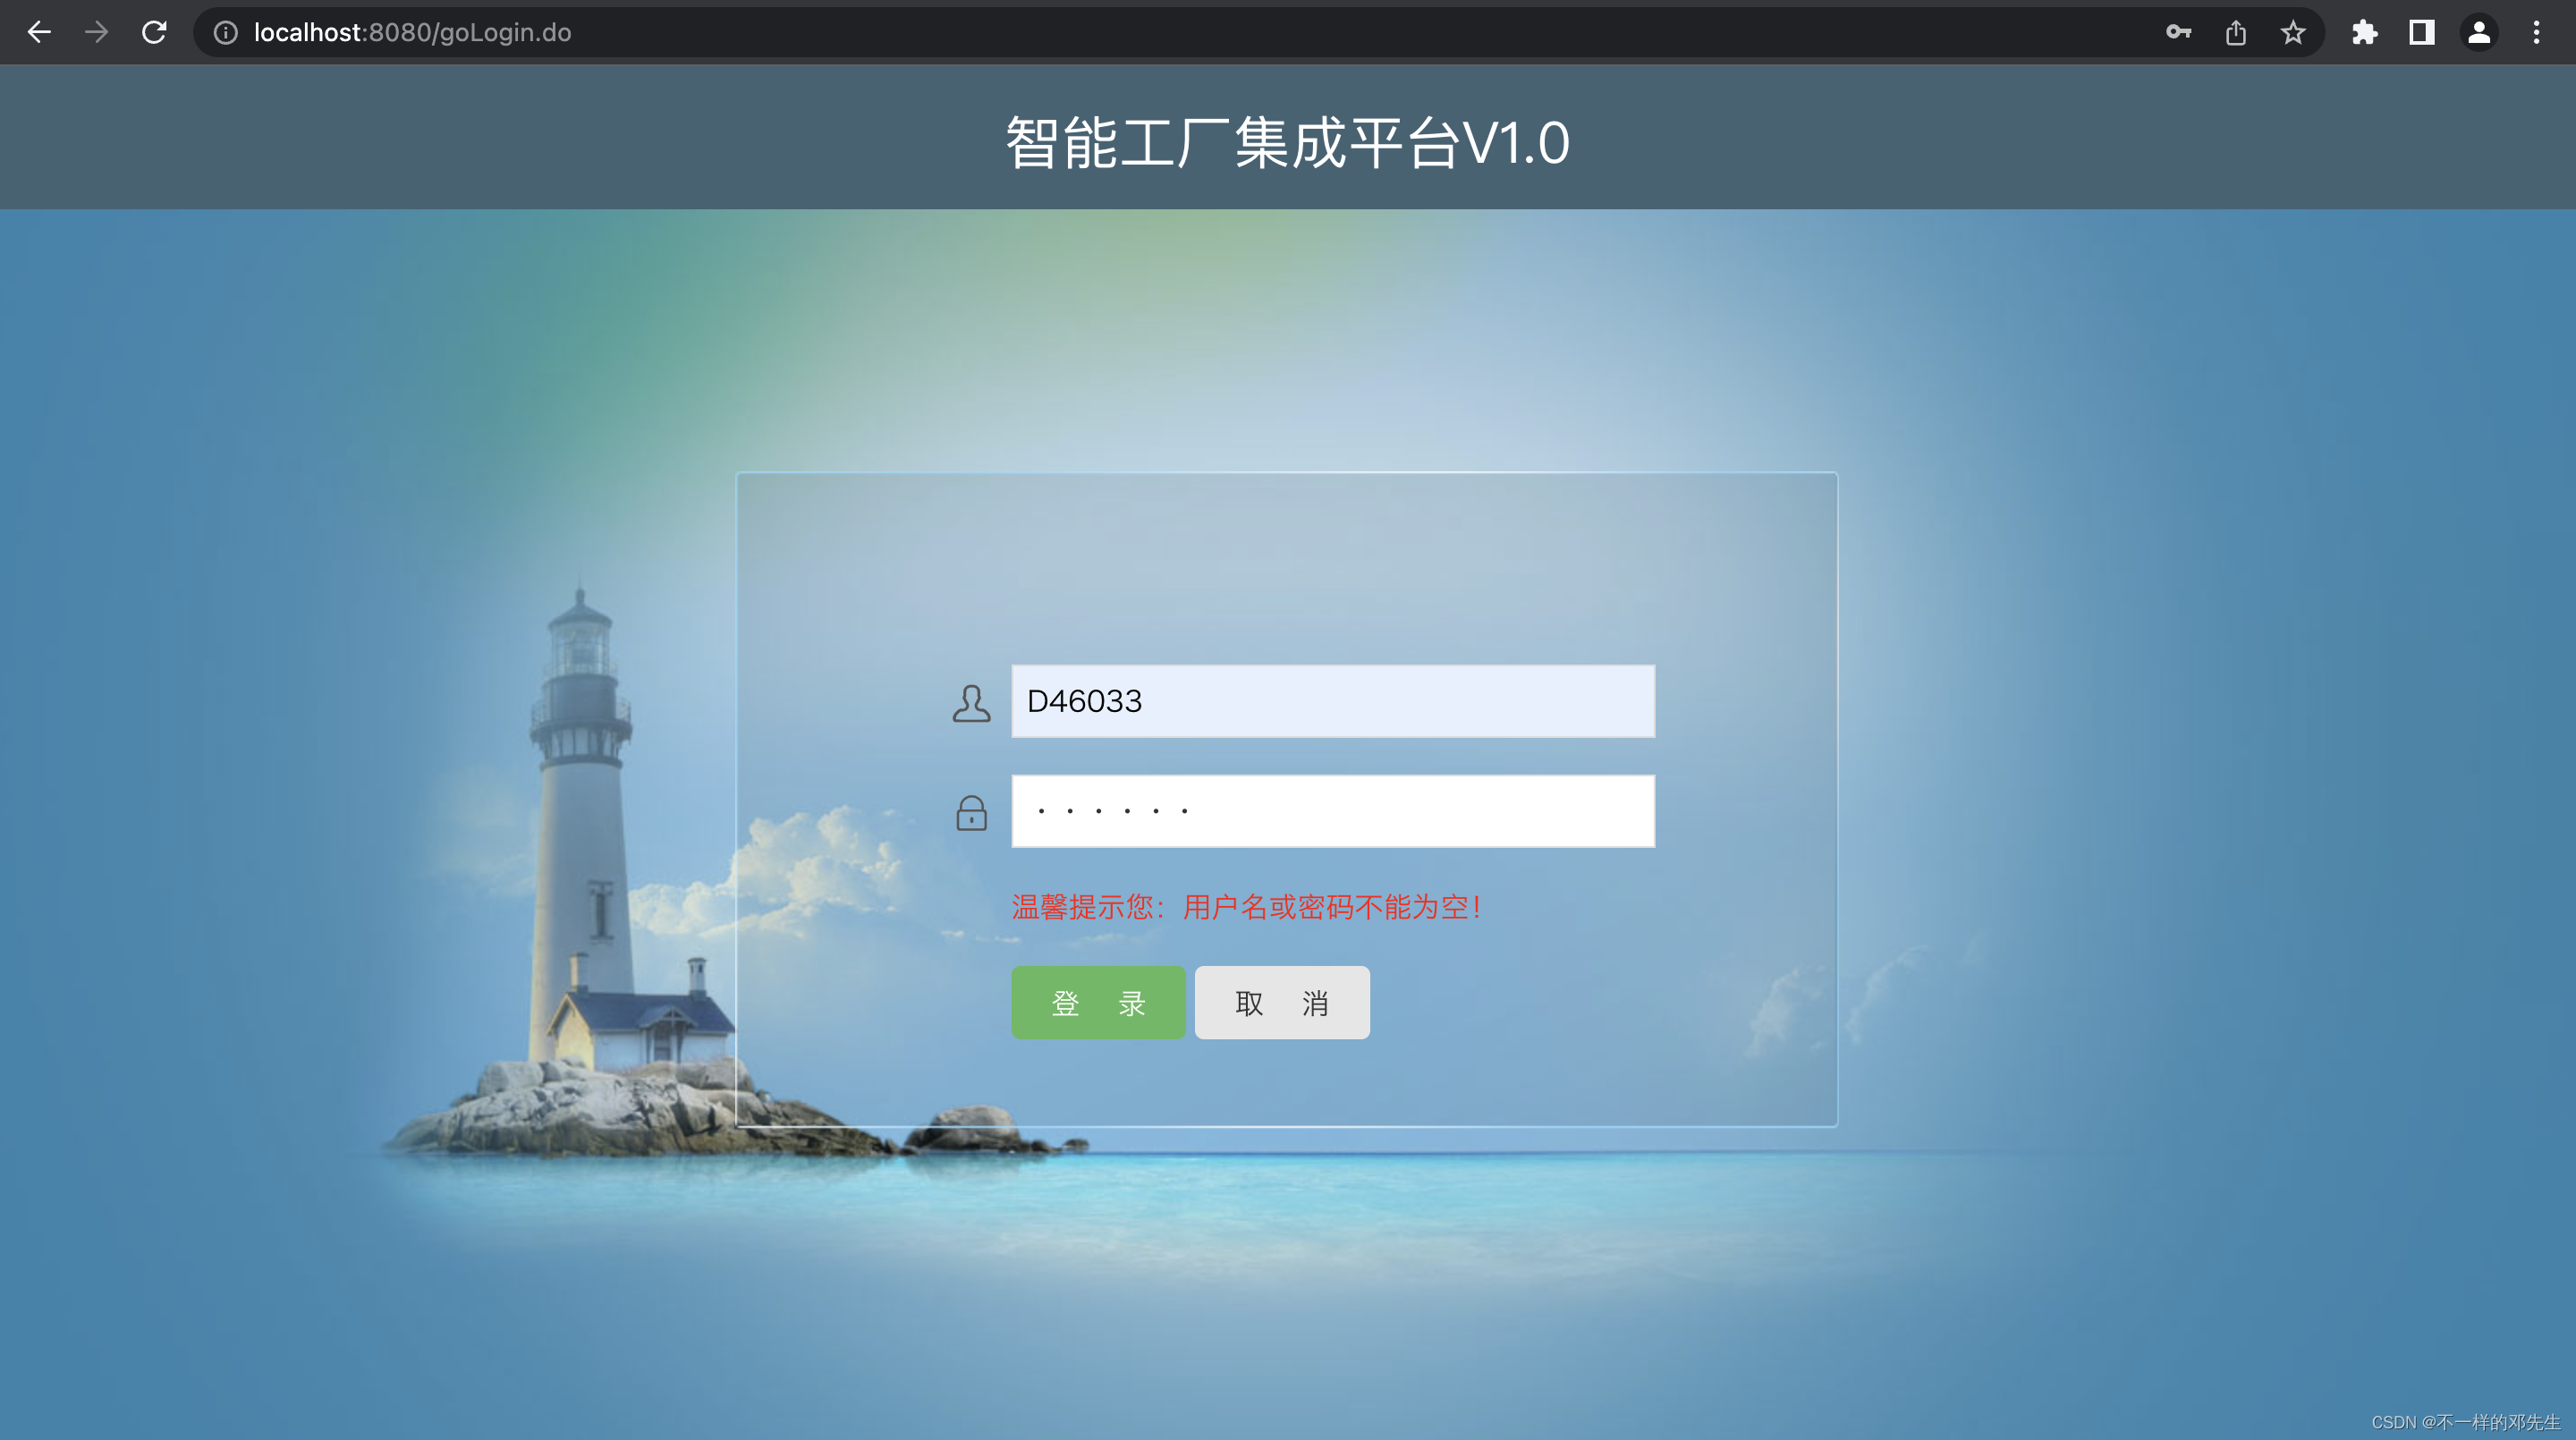
登陆成功之后自动跳转到自定义的index页面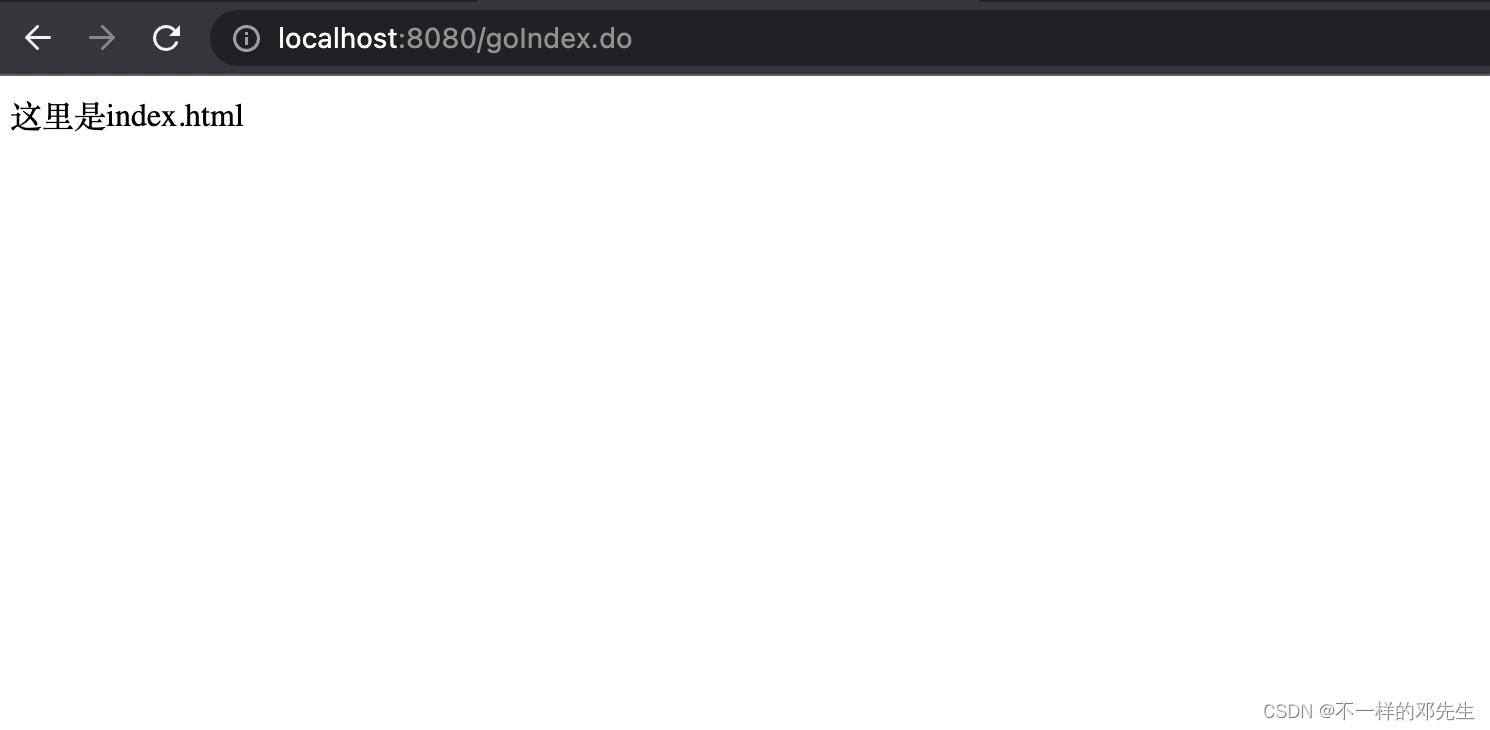
以上就是SpringBoot整合SpringSecurity的所有内容,中间测试过程中缺少了相关配置,与SpringSecurity无关,小编就不进行展示了,一篇小小的文章耗费的是作者众多实验的心血,希望大家多多支持,一键三连!