1.在Java⽬录下创建包,在Resources⽬录下创建⽂件夹,结构如下
├─java # java⽂件区
│ └─com
│ └─example
│ └─demo
│ ├─common # 公共类
│ ├─config # 配置类
│ ├─controller # 控制器层类
│ ├─dao # 数据库访问类
│ ├─exception # ⾃定义异常类
│ ├─interceptor # ⾃定义拦截器类
│ ├─model # 数据库实体对应模型类
│ ├─services # 业务服务层接⼝
│ │ └─impl # 业务服务层接⼝实现类
│ └─utils # 输助⼯具类
|
|
└─resources # 资源⽂件区
├─mapper # 数据库与模型映射⽂件
│ └─extension # 扩展数据库与模型映射⽂件,⾃定义业务⽅法
├─mybatis # Mybatis Generator 配置⽂件
├─static # 静态⽂件
└─templates # 模板⽂件
2.创建generatorConfig.xml
在src/main/resources下创建mybatis⽬录,在mybatis⽬录下创建generatorConfig.xml文件,内容如下:
<?xml version="1.0" encoding="UTF-8"?>
<!DOCTYPE generatorConfiguration
PUBLIC "-//mybatis.org//DTD MyBatis Generator Configuration 1.0//EN"
"http://mybatis.org/dtd/mybatis-generator-config_1_0.dtd">
<generatorConfiguration>
<!-- 驱动包路径,location中路径替换成自己本地路径 -->
<classPathEntry location="C:\Users\20278\.m2\repository\mysql\mysql-connector-java\5.1.49\mysql-connector-java-5.1.49.jar"/>
<context id="DB2Tables" targetRuntime="MyBatis3">
<!-- 禁用自动生成的注释 -->
<commentGenerator>
<property name="suppressAllComments" value="true"/>
<property name="suppressDate" value="true"/>
</commentGenerator>
<!-- 连接配置 -->
<jdbcConnection driverClass="com.mysql.jdbc.Driver"
connectionURL="jdbc:mysql://127.0.0.1:3306/java_forum?characterEncoding=utf8&useSSL=false"
userId="root"
password="123456">
</jdbcConnection>
<javaTypeResolver>
<!-- 小数统一转为BigDecimal -->
<property name="forceBigDecimals" value="false"/>
</javaTypeResolver>
<!-- 实体类生成位置 -->
<javaModelGenerator targetPackage="com.example.demo.model" targetProject="src/main/java">
<property name="enableSubPackages" value="true"/>
<property name="trimStrings" value="true"/>
</javaModelGenerator>
<!-- mapper.xml生成位置 -->
<sqlMapGenerator targetPackage="mapper" targetProject="src/main/resources">
<property name="enableSubPackages" value="true"/>
</sqlMapGenerator>
<!-- DAO类生成位置 -->
<javaClientGenerator type="XMLMAPPER" targetPackage="com.example.demo.dao"
targetProject="src/main/java">
<property name="enableSubPackages" value="true"/>
</javaClientGenerator>
<!-- 配置生成表与实例, 只需要修改表名tableName, 与对应类名domainObjectName 即可-->
<table tableName="t_article" domainObjectName="Article" enableSelectByExample="false"
enableDeleteByExample="false" enableDeleteByPrimaryKey="false" enableCountByExample="false"
enableUpdateByExample="false">
<!-- 类的属性用数据库中的真实字段名做为属性名, 不指定这个属性会自动转换 _ 为驼峰命名规则-->
<property name="useActualColumnNames" value="true"/>
</table>
<table tableName="t_article_reply" domainObjectName="ArticleReply" enableSelectByExample="false"
enableDeleteByExample="false" enableDeleteByPrimaryKey="false" enableCountByExample="false"
enableUpdateByExample="false">
<property name="useActualColumnNames" value="true"/>
</table>
<table tableName="t_board" domainObjectName="Board" enableSelectByExample="false" enableDeleteByExample="false"
enableDeleteByPrimaryKey="false" enableCountByExample="false" enableUpdateByExample="false">
<property name="useActualColumnNames" value="true"/>
</table>
<table tableName="t_message" domainObjectName="Message" enableSelectByExample="false"
enableDeleteByExample="false" enableDeleteByPrimaryKey="false" enableCountByExample="false"
enableUpdateByExample="false">
<property name="useActualColumnNames" value="true"/>
</table>
<table tableName="t_user" domainObjectName="User" enableSelectByExample="false" enableDeleteByExample="false"
enableDeleteByPrimaryKey="false" enableCountByExample="false" enableUpdateByExample="false">
<property name="useActualColumnNames" value="true"/>
</table>
</context>
</generatorConfiguration>3.运⾏插件⽣成⽂件
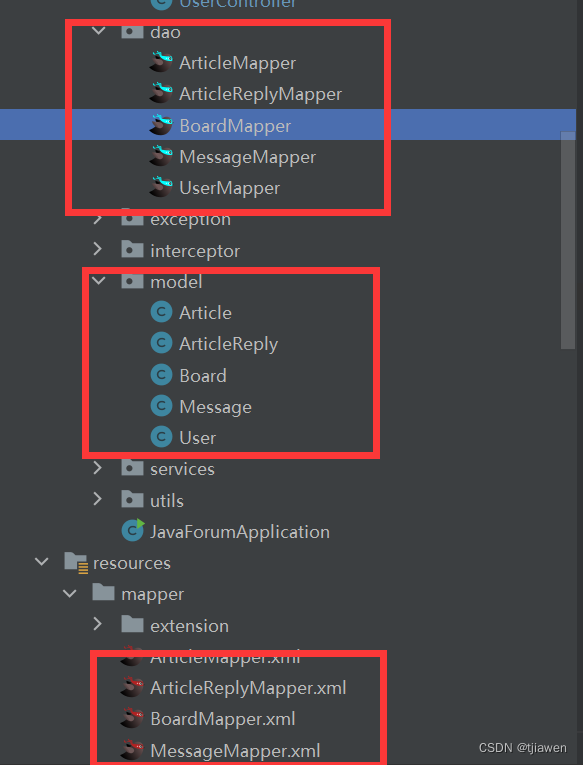
1)在src/main/resources下创建mapper⽬录
2)点下下图重新加载Maven项⽬,在Plugins节点下出现mybatis-generator,双击运⾏,在对应的⽬录下⽣成相应的类与映射⽂件,如下图所⽰:

4.在 Insert 标签中添加获取主键值的选项
<!-- useGeneratedKeys = true -->
<!-- keyProperty = 主键字段-->
<!-- 当插⼊⼀条数据后,可以通过user.getId()获取到⾃动⽣成的Id值,如果⽅法中需要⽴即获取Id值,加⼊这个配置 -->
 <insert id="insert" parameterType="com.example.demo.model.Article" useGeneratedKeys="true" keyProperty="id">
5.添加@Mapper注解
dao包下的每个xxxMapper.java加⼊@Mapper注解
package com.example.demo.dao;

import com.example.demo.model.Article;
import org.apache.ibatis.annotations.Mapper;
import org.apache.ibatis.annotations.Param;

import java.util.List;

@Mapper
public interface ArticleMapper {
    int insert(Article row);

    int insertSelective(Article row);

    Article selectByPrimaryKey(Long id);

    int updateByPrimaryKeySelective(Article row);

    int updateByPrimaryKeyWithBLOBs(Article row);

    int updateByPrimaryKey(Article row);
}
6.config包下新建MybatisConfig类,指定Mybatis的扫路径
package com.example.demo.config;

import org.mybatis.spring.annotation.MapperScan;
import org.springframework.context.annotation.Configuration;

// 配置类
@Configuration
// 指定Mybatis的扫描路径
@MapperScan("com.example.demo.dao")
public class MybatisConfig {
}
7.编写公共代码
1)定义状态码
对执⾏业务处理逻辑过程中可能出现的成功与失败状态做针对性描述,⽤枚举定义状态码,先定义⼀部分,业务中遇到新的问题再添加
在com.example.demo.common包下创建枚举类型命名为ResultCode
package com.example.demo.common;

//枚举类型
public enum ResultCode {
    SUCCESS                   (0, "操作成功"),
    FAILED                    (1000, "操作失败"),
    FAILED_UNAUTHORIZED       (1001, "未授权"),
    FAILED_PARAMS_VALIDATE    (1002, "参数校验失败"),
    FAILED_FORBIDDEN          (1003, "禁止访问"),
    FAILED_CREATE             (1004, "新增失败"),
    FAILED_NOT_EXISTS         (1005, "资源不存在"),
    FAILED_USER_EXISTS        (1101, "用户已存在"),
    FAILED_USER_NOT_EXISTS    (1102, "用户不存在"),
    FAILED_LOGIN              (1103, "用户名或密码错误"),
    FAILED_USER_BANNED        (1104, "您已被禁言, 请联系管理员, 并重新登录."),
    FAILED_TWO_PWD_NOT_SAME   (1105, "两次输入的密码不一致"),

    FAILED_BOARD_NOT_EXISTS   (1201, "版块不存在"),

    FAILED_ARTICLE_NOT_EXISTS (1301, "帖子不存在"),
    FAILED_ARTICLE_STATE      (1302, "帖子状态异常"),
    ERROR_SERVICES            (2000, "服务器内部错误"),
    ERROR_IS_NULL             (2001, "IS NULL.");
    //状态码
    int code;
    //错误描述
    String message;

    ResultCode(int code, String message) {
        this.code = code;
        this.message = message;
    }
    public int getCode() {
        return code;
    }

    public String getMessage() {
        return message;
    }

    @Override
    public String toString() {
        return "code = " + code + ",message = " + message + ".";
    }

}
2)定义返回结果
系统实现前后端分离,统⼀返回JSON格式的字符串,需要定义⼀个类,其中包含状态码,描述信息,返回的结果数据
a.在com.example.demo.common包下创建AppResult类
b.属性加⼊@JsonInclude(JsonInclude.Include.ALWAYS)表⽰⽆论是否为空必须序列化
package com.example.demo.common;

import com.fasterxml.jackson.annotation.JsonInclude;

public class AppResult<T> {

    //自定义状态码
    @JsonInclude(JsonInclude.Include.ALWAYS)
    private int code;
    //描述信息
    @JsonInclude(JsonInclude.Include.ALWAYS)
    private String message;
    //具体返回的数据
    @JsonInclude(JsonInclude.Include.ALWAYS)
    private T data;

    //构造方法
    public AppResult(int code, String message) {
        this.code = code;
        this.message = message;
    }

    public AppResult(int code, String message, T data) {
        this.code = code;
        this.message = message;
        this.data = data;
    }

    //成功方法,泛型方法
    /**
     *
     * @param message  描述信息
     * @param data  具体的数据
     * @return
     * @param <T>
     */
    public static <T> AppResult<T> success(String message,T data){
        return new AppResult<>(ResultCode.SUCCESS.code,message,data);
    }

    public static <T> AppResult<T> success(String message){
        return new AppResult<>(ResultCode.SUCCESS.code,message,null);
    }

    public static <T> AppResult<T> success(T data){
        return new AppResult<>(ResultCode.SUCCESS.getCode(),ResultCode.SUCCESS.getMessage(),data);
    }

    public static AppResult success(){
        return  new AppResult(ResultCode.SUCCESS.getCode(),ResultCode.SUCCESS.getMessage(),null);
    }

    //失败方法
    public static AppResult failed(){
        return new AppResult(ResultCode.FAILED.getCode(),ResultCode.FAILED.getMessage());
    }

    public static AppResult failed(String message){
        return new AppResult(ResultCode.FAILED.getCode(),message);
    }

    public static AppResult failed(ResultCode resultCode){
        return new AppResult(resultCode.getCode(), resultCode.getMessage());
    }

    public int getCode() {
        return code;
    }

    public void setCode(int code) {
        this.code = code;
    }

    public String getMessage() {
        return message;
    }

    public void setMessage(String message) {
        this.message = message;
    }

    public T getData() {
        return data;
    }

    public void setData(T data) {
        this.data = data;
    }
}
3)⾃定义异常
创建⼀个异常类,加⼊状态码与状态描述属性
在com.example.demo.exception包下创建ApplicationException
package com.example.demo.exception;

import com.example.demo.common.AppResult;
import com.example.demo.common.ResultCode;

public class ApplicationException extends RuntimeException{
    //自定义的异常描述
    private AppResult errorResult;

    public ApplicationException(AppResult appResult) {
        //构造异常中的Message属性
        super(appResult.getMessage());
        //自定义的错误描述
        this.errorResult = appResult;
    }

    public ApplicationException(String message) {
        super(message);
        //根据异常描述构建返回对象
        this.errorResult = new AppResult((ResultCode.FAILED.getCode()),message);
    }

    //指定异常
    public ApplicationException(Throwable cause){
        super(cause);
    }

    //自定义异常描述,异常信息
    public ApplicationException(String message,Throwable cause){
        super(message,cause);
    }

    public AppResult getErrorResult() {
        return errorResult;
    }

    public void setErrorResult(AppResult errorResult) {
        this.errorResult = errorResult;
    }
}
4)全局异常处理
使⽤@ControllerAdvice+@ExceptionHandler注解实现统⼀异常处理
@ControllerAdvice表⽰控制器通知类
在com.example.demo.exception包下创建GlobalExceptionHandler
package com.example.demo.exception;


import com.example.demo.common.AppResult;
import com.example.demo.common.ResultCode;
import lombok.extern.slf4j.Slf4j;
import org.springframework.web.bind.annotation.ControllerAdvice;
import org.springframework.web.bind.annotation.ExceptionHandler;
import org.springframework.web.bind.annotation.ResponseBody;

@Slf4j
@ControllerAdvice
public class GlobalExceptionHandler {

    //捕获自己的ApplicationException异常
    //以body形式返回
    @ResponseBody
    @ExceptionHandler(ApplicationException.class)
    public AppResult handleApplicationException(ApplicationException e){
        //打印异常,上传线上要注释掉
        e.printStackTrace();
        //记录日志
        log.error(e.getMessage());
        //获取异常信息
        if(e.getErrorResult() != null){
            //返回异常类中记录的状态
            return e.getErrorResult();
        }
        //默认返回异常信息
        return AppResult.failed(e.getMessage());
    }

    /**
     * 处理全部未捕获的其他异常
     * @param e
     * @return
     */

    @ResponseBody
    @ExceptionHandler(Exception.class)
    public AppResult handleException(Exception e){
        //打印异常
        e.printStackTrace();
        //记录日志
        log.error(e.getMessage());
        if(e.getMessage() == null){
            return AppResult.failed(ResultCode.ERROR_SERVICES);
        }
        //默认返回异常信息
        return AppResult.failed(e.getMessage());
    }

}
8.登录拦截器
在interceptor包下创建LoginInterceptor
package com.example.demo.interceptor;

import com.example.demo.config.AppConfig;
import org.springframework.beans.factory.annotation.Value;
import org.springframework.stereotype.Component;
import org.springframework.web.servlet.HandlerInterceptor;

import javax.servlet.http.HttpServletRequest;
import javax.servlet.http.HttpServletResponse;
import javax.servlet.http.HttpSession;

@Component
public class LoginInterceptor implements HandlerInterceptor {

    //从配置文件中获取默认登陆页的URL
    @Value("${java_forum.login.url")
    private String defaultURL;

    /**
     * 请求的前置处理
     * @param request
     * @param response
     * @param handler
     * @return true 校验成功,继续请求流程  <br/>false 中断请求流程
     * @throws Exception
     */
    @Override
    public boolean preHandle(HttpServletRequest request, HttpServletResponse response, Object handler) throws Exception {
        //获取session,并做已登录用户信息的校验
        HttpSession session = request.getSession(false);
        if(session != null && session.getAttribute(AppConfig.USER_SESSION_KEY) != null){
            //校验通过
            return true;
        }

        //保证跳转页面的路径正确性
        if(!defaultURL.startsWith("/")){
            defaultURL = "/" + defaultURL;
        }
        //校验未通过,跳转到登录页面
        response.sendRedirect(defaultURL);
        //中止请求

        return false;
    }
}
在interceptor包下创建AppInterceptorConfigurer
package com.example.demo.interceptor;

import org.springframework.context.annotation.Configuration;
import org.springframework.web.servlet.config.annotation.InterceptorRegistry;
import org.springframework.web.servlet.config.annotation.WebMvcConfigurer;

import javax.annotation.Resource;

@Configuration
public class AppInterceptorConfigurer implements WebMvcConfigurer {

    @Resource
    private LoginInterceptor loginInterceptor;

    @Override
    public void addInterceptors(InterceptorRegistry registry) {
        // 添加登录拦截器
        registry.addInterceptor(loginInterceptor)       // 添加用户登录拦截器
                .addPathPatterns("/**")                 // 拦截所有请求
                .excludePathPatterns("/sign-in.html")   // 排除登录HTML
                .excludePathPatterns("/sign-up.html")   // 排除注册HTML
                .excludePathPatterns("/user/login")     // 排除登录api接口
                .excludePathPatterns("/user/register")  // 排除注册api接口
                .excludePathPatterns("/user/logout")    // 排除退出api接口
                .excludePathPatterns("/swagger*/**")    // 排除登录swagger下所有
                .excludePathPatterns("/v3*/**")         // 排除登录v3下所有,与swagger相关
                .excludePathPatterns("/dist/**")        // 排除所有静态文件
                .excludePathPatterns("/image/**")
                .excludePathPatterns("/**.ico")
                .excludePathPatterns("/js/**");
    }
}
9.实现API⾃动⽣成
使⽤Springfox Swagger⽣成API,并导⼊Postman,完成API单元测试
10.编写配置类
在com.example.demo.config包下新建SwaggerConfig.java
package com.example.demo.config;
import org.springframework.boot.actuate.autoconfigure.endpoint.web.CorsEndpointProperties;
import org.springframework.boot.actuate.autoconfigure.endpoint.web.WebEndpointProperties;
import org.springframework.boot.actuate.autoconfigure.web.server.ManagementPortType;
import org.springframework.boot.actuate.endpoint.ExposableEndpoint;
import org.springframework.boot.actuate.endpoint.web.*;
import org.springframework.boot.actuate.endpoint.web.annotation.ControllerEndpointsSupplier;
import org.springframework.boot.actuate.endpoint.web.annotation.ServletEndpointsSupplier;
import org.springframework.boot.actuate.endpoint.web.servlet.WebMvcEndpointHandlerMapping;
import org.springframework.context.annotation.Bean;
import org.springframework.context.annotation.Configuration;
import org.springframework.core.env.Environment;
import org.springframework.util.StringUtils;
import springfox.documentation.builders.ApiInfoBuilder;
import springfox.documentation.builders.PathSelectors;
import springfox.documentation.builders.RequestHandlerSelectors;
import springfox.documentation.oas.annotations.EnableOpenApi;
import springfox.documentation.service.ApiInfo;
import springfox.documentation.service.Contact;
import springfox.documentation.spi.DocumentationType;
import springfox.documentation.spring.web.plugins.Docket;

import java.util.ArrayList;
import java.util.Collection;
import java.util.List;

/**
 * Swagger配置类
 *
 * @Author 比特就业课
 */
// 配置类
@Configuration
// 开启Springfox-Swagger
@EnableOpenApi
public class SwaggerConfig {

    /**
     * Springfox-Swagger基本配置
     * @return
     */
    @Bean
    public Docket createApi() {
        Docket docket = new Docket(DocumentationType.OAS_30)
                .apiInfo(apiInfo())
                .select()
                .apis(RequestHandlerSelectors.basePackage("com.example.demo.Controller"))
                .paths(PathSelectors.any())
                .build();
        return docket;

    }

    // 配置API基本信息
    private ApiInfo apiInfo() {
        ApiInfo apiInfo = new ApiInfoBuilder()
                .title("论坛系统API")
                .description("论坛系统前后端分离API测试")
                .contact(new Contact("Tech", "https://gitee.com/tanjiawe/java_forum", "[email protected]"))
                .version("1.0")
                .build();
        return apiInfo;
    }

    /**
     * 解决SpringBoot 6.0以上与Swagger 3.0.0 不兼容的问题
     * 复制即可
     **/
    @Bean
    public WebMvcEndpointHandlerMapping webEndpointServletHandlerMapping(WebEndpointsSupplier webEndpointsSupplier,
                                                                         ServletEndpointsSupplier servletEndpointsSupplier,
                                                                         ControllerEndpointsSupplier controllerEndpointsSupplier,
                                                                         EndpointMediaTypes endpointMediaTypes, CorsEndpointProperties corsProperties,
                                                                         WebEndpointProperties webEndpointProperties, Environment environment) {
        List<ExposableEndpoint<?>> allEndpoints = new ArrayList();
        Collection<ExposableWebEndpoint> webEndpoints = webEndpointsSupplier.getEndpoints();
        allEndpoints.addAll(webEndpoints);
        allEndpoints.addAll(servletEndpointsSupplier.getEndpoints());
        allEndpoints.addAll(controllerEndpointsSupplier.getEndpoints());
        String basePath = webEndpointProperties.getBasePath();
        EndpointMapping endpointMapping = new EndpointMapping(basePath);
        boolean shouldRegisterLinksMapping = this.shouldRegisterLinksMapping(webEndpointProperties, environment,
                basePath);
        return new WebMvcEndpointHandlerMapping(endpointMapping, webEndpoints, endpointMediaTypes,
                corsProperties.toCorsConfiguration(), new EndpointLinksResolver(allEndpoints, basePath),
                shouldRegisterLinksMapping, null);
    }

    private boolean shouldRegisterLinksMapping(WebEndpointProperties webEndpointProperties, Environment environment,
                                               String basePath) {
        return webEndpointProperties.getDiscovery().isEnabled() && (StringUtils.hasText(basePath)
                || ManagementPortType.get(environment).equals(ManagementPortType.DIFFERENT));
    }

}
11.创建MD5加密⼯具类
项⽬中使⽤commons-codec,它是Apache提供的⽤于摘要运算、编码解码的⼯具包。常⻅的编码解码⼯具Base64、MD5、Hex、SHA1、DES等。
在com.example.demo.utils包下创建MD5Utils类,代码如下:
package com.example.demo.utils;

import org.apache.commons.codec.digest.DigestUtils;

public class MD5Utils {
    /**
     * //返回一个用MD5加密后的字符串
     * @param str 原始字符串
     * @return
     */
    public static String md5(String str){
        return DigestUtils.md5Hex(str);
    }

    /**
     * 明文加盐生成最终的密文
     * @param str 要加密的明文
     * @param salt 盐
     * @return 密文
     */
    public static String md5Salt(String str, String salt){
        //先对明文进行MD5加密
        String s = DigestUtils.md5Hex(str);
        //加密后的原文与盐拼接在一起之后再进行一次MD5加密
        String ciphertext = DigestUtils.md5Hex(s + salt);
        //返回密文
        return ciphertext;
    }
}
12.创建⽣成UUID⼯具类
在com.example.demo.utils包下创建UUIDUtils类,代码如下:
package com.example.demo.utils;

import java.util.UUID;

public class UUIDUtils {

    /**
     * 生成一个UUID
     * @return
     */
    public static String UUID_36(){
        return UUID.randomUUID().toString();
    }

    /**
     * 生成一个32位的UUID
     * @return
     */
    public static String UUID_32(){
        return UUID.randomUUID().toString().replace("-","");
    }
}
13.创建字符串⼯具类
在com.example,demo.utils包下创建StringUtils类,代码如下:
package com.example.demo.utils;

public class StringUtils {
    /**
     * 校验字符串是否为空
     * @param value 待校验的字符串
     * @return true空,<br/>false非空
     */
    public static boolean isEmpty(String value){
        if(value == null ||value.isEmpty()){
            return true;
        }
        return false;
    }
}