一,目录文件结构讲解
简介:讲解SpringBoot目录文件结构和官方推荐的目录规范
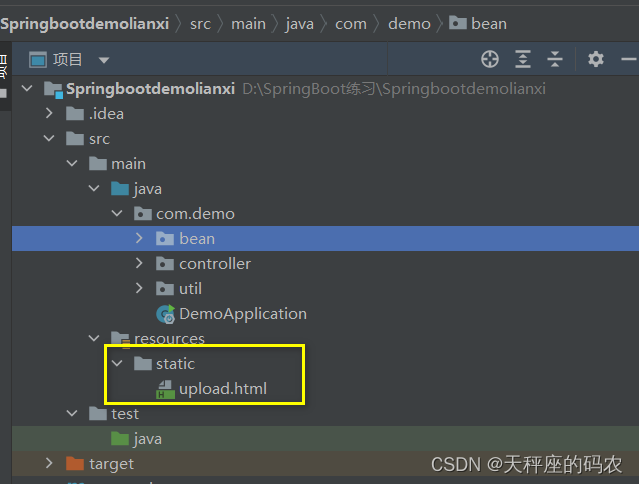
1、目录讲解
src/main/java:存放代码
src/main/resources
static: 存放静态文件,比如 css、js、image, (访问方式 http://localhost:8080/js/main.js)
templates:存放静态模板页面jsp,html,tpl
config:存放配置文件,application.properties
resources:
2、引入依赖 Thymeleaf,如果要访问templates文件夹下的资源,需要引入以下依赖。进行页面的转发方式访问。
		<dependency>
           <groupId>org.springframework.boot</groupId>
           <artifactId>spring-boot-starter-thymeleaf</artifactId>
        </dependency>
注意:如果不引入这个依赖包,html文件应该放在默认加载文件夹里面,比如resources、static、public这个几个文件夹,才可以访问
3、同个文件的加载顺序,静态资源文件
同个文件的加载顺序,静态资源文件
在 Spring Boot 中,默认情况下,一共有5个位置可以放静态资源,五个路径分别是如下5个:
1、classpath:/META-INF/resources/
2、classpath:/resources/
3、classpath:/static/
4、classpath:/public/
5、/
Spring Boot 默认会挨个从
META/resources > resources > static > public 里面找是否存在相应的资源,如果有则直接返回。
所以访问这些目录下的资源时,在路径中可以体现上面的几个路径。
4、默认配置
1)官网地址:https://docs.spring.io/spring-boot/docs/current/reference/html/boot-features-developing-web-applications.html#boot-features-spring-mvc-static-content
2)自己配置:
a.在resources目录下创建。 application.properties
b.重写静态资源加载:spring.resources.static-locations = classpath:/META-INF/resources/,classpath:/resources/,classpath:/static/,classpath:/public/
5、静态资源文件存储在CDN,他可以加快静态资源的访问速度。
在大型的公司中可能会实现静态资源和java代码的分离。把静态资源的加载放到另外一个工程中使用。
二,文件上传实战
简介:讲解HTML页面文件上传和后端处理实战
1、讲解springboot文件上传MultipartFile file,源自SpringMVC
1)静态页面直接访问,不需要进行controller转发:localhost:8080/index.html
注意点:
如果想要直接访问html页面,则需要把html放在springboot默认加载的文件夹下面
2)MultipartFile 对象的transferTo方法,用于文件保存(效率和操作比原先用FileOutStream方便和高效)
a.在static下创建一个upload.html。页面内容如下:
<!DOCTYPE html>
<html lang="en">
<head>
    <meta charset="UTF-8">
    <title>Title</title>
</head>
<body>
    <form action="/upload" method="post"  enctype="multipart/form-data" >
        文件:<input type="file"  name="head_img">
        姓名:<input name="username" >
        <input type="submit" value="上传">
    </form>
</body>
</html>
b. 控制类中的代码如下:
    @RequestMapping("/upload")
    public Object upload(@RequestParam("head_img")MultipartFile file){


        String fileFullName = "D://img//123.png";
        File file1 = new File(fileFullName);
        try {


            file.transferTo(file1);
        }catch (IOException e){


            e.printStackTrace();
        }
        return "ok";
    }
c.springboot的默认上传文件大小为1M,如果要上传大于1M的文件需要在application.properties文件中设置:
#单个文件大小和单次请求文件大小
spring.servlet.multipart.max-file-size = 10Mb
spring.servlet.multipart.max-request-size=100Mb
d.文件上传和访问需要指定磁盘路径
解决方式如下:
application.properties中增加下面配置
web.images-path=D:/img
# 在默认访问路径中 添加如上配置
spring.resources.static-locations= classpath:/META-INF/resources/,classpath:/resources/,classpath:/static/,classpath:/public/,classpath:/test/ , file:${web.images-path}
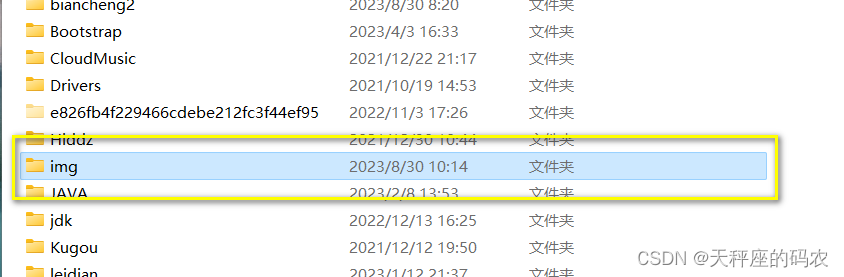
e.在D盘的目录里创建一个img的文件夹
测试请参考下面:
访问地址:http://localhost:8080/upload.html
选择好照片然后上传

上传之后会返回一个OK,这就代表上传成功

然后输入你设置的规定名字:123.png
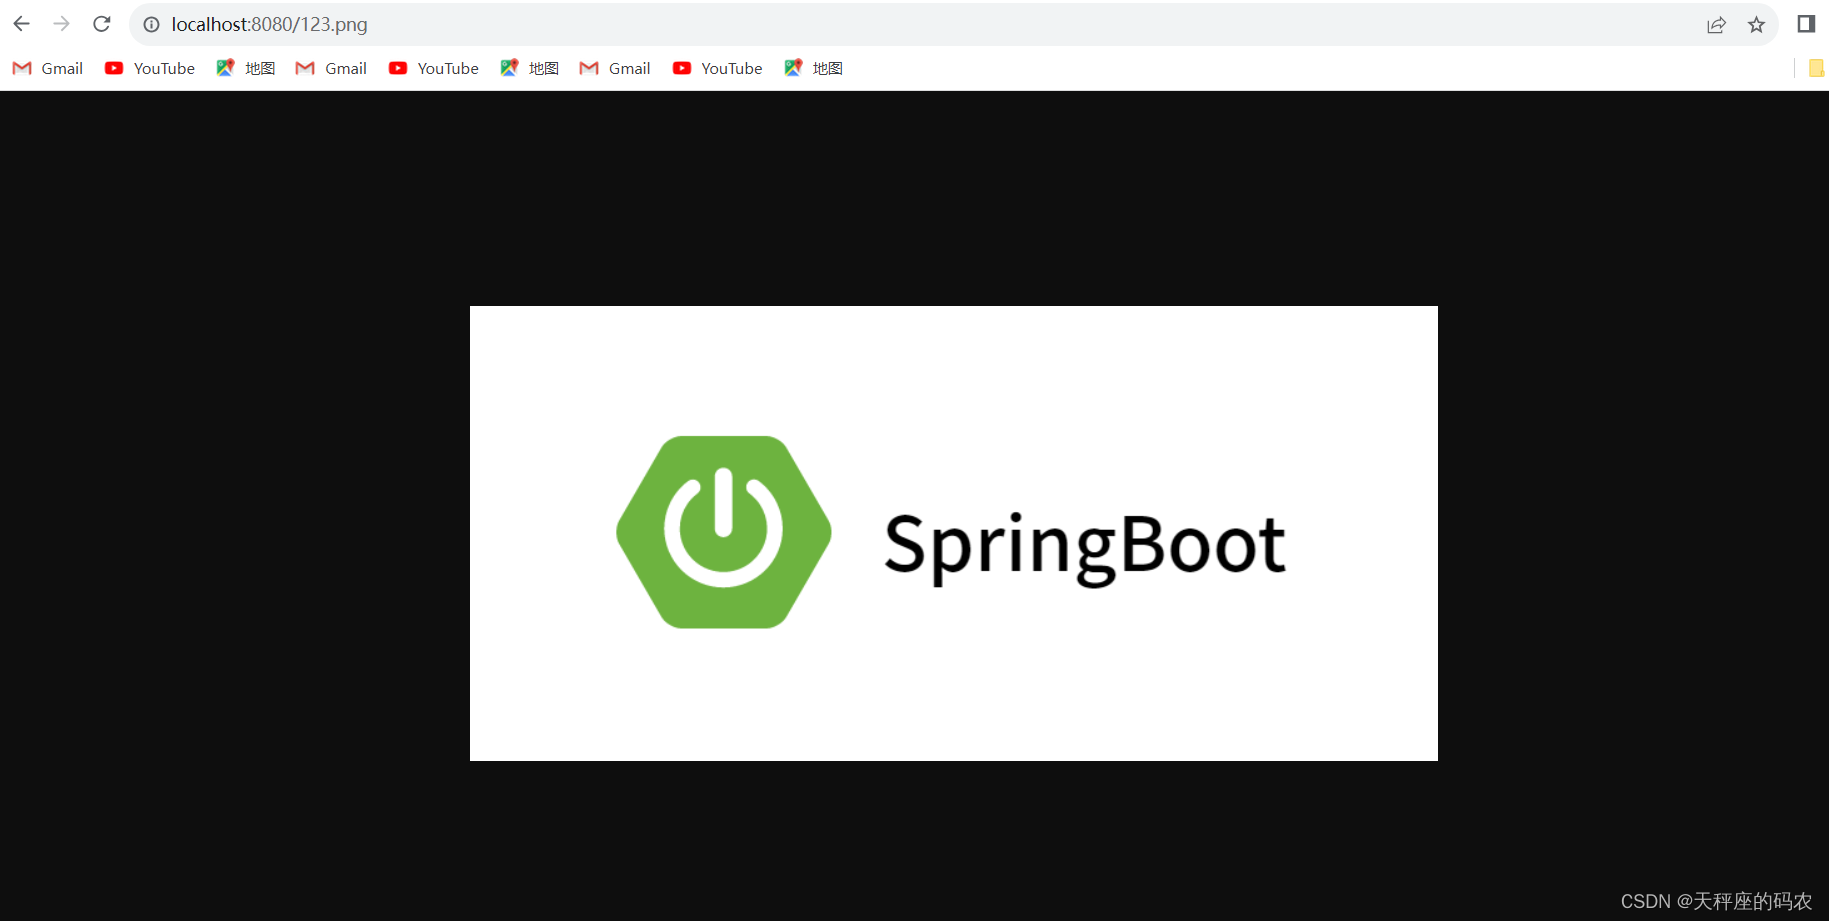
最后打开你在D盘创建的那个img文件夹,里面会有张照片

三,jar包方式运行web项目的文件上传和访问处理(核心知识)
1.在pom中添加依赖
    <build>
        <plugins>
            <plugin>
                <groupId>org.springframework.boot</groupId>
                <artifactId>spring-boot-maven-plugin</artifactId>
            </plugin>
        </plugins>
    </build>
2.先打jar包
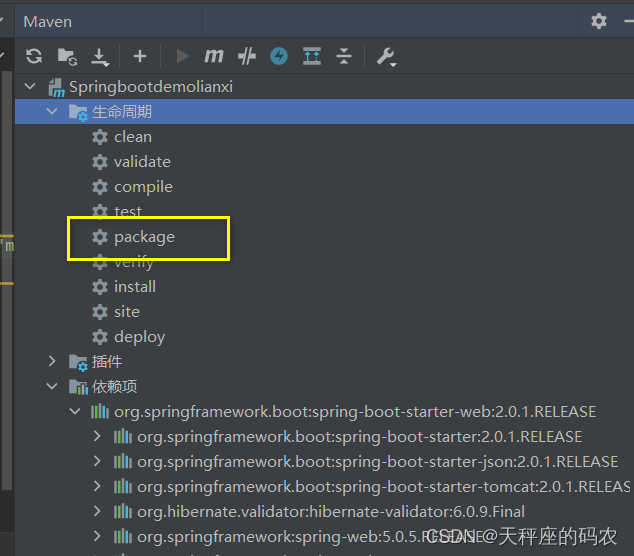
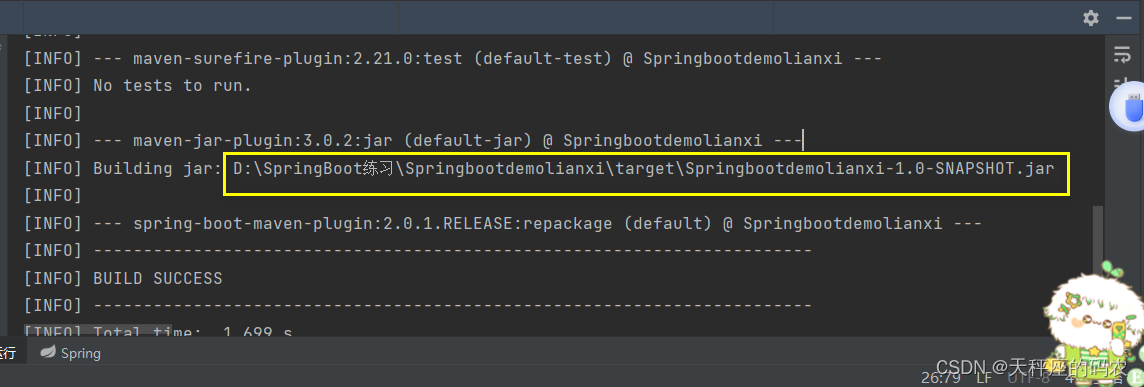
这个是你打好jar包的位置,然后在盘服中打开
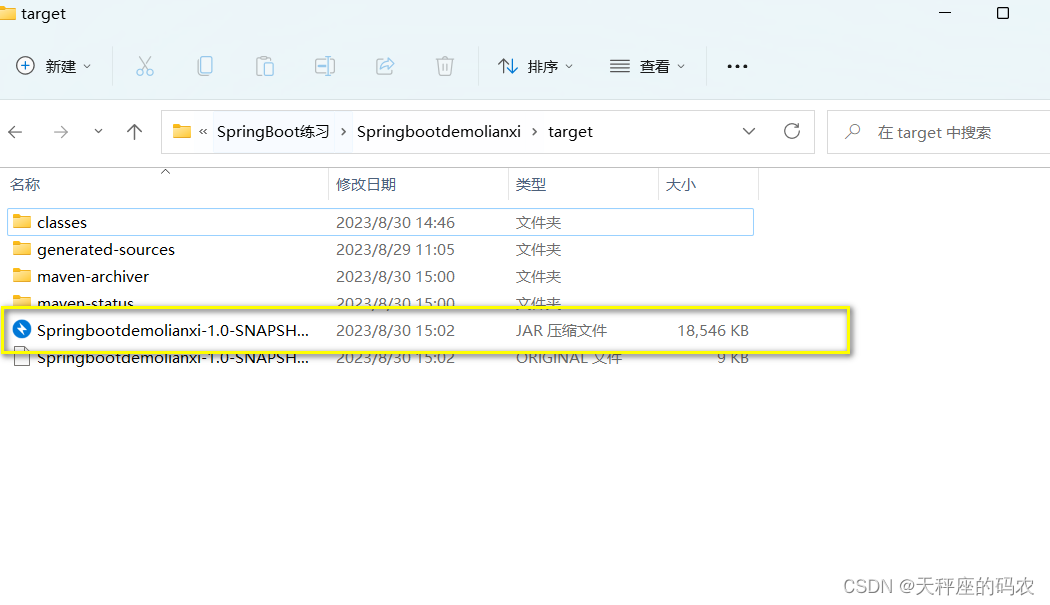
然后把那个jar包复制到D盘的根目录上

测试项目运行
使用java -jar 命令运行jar文件
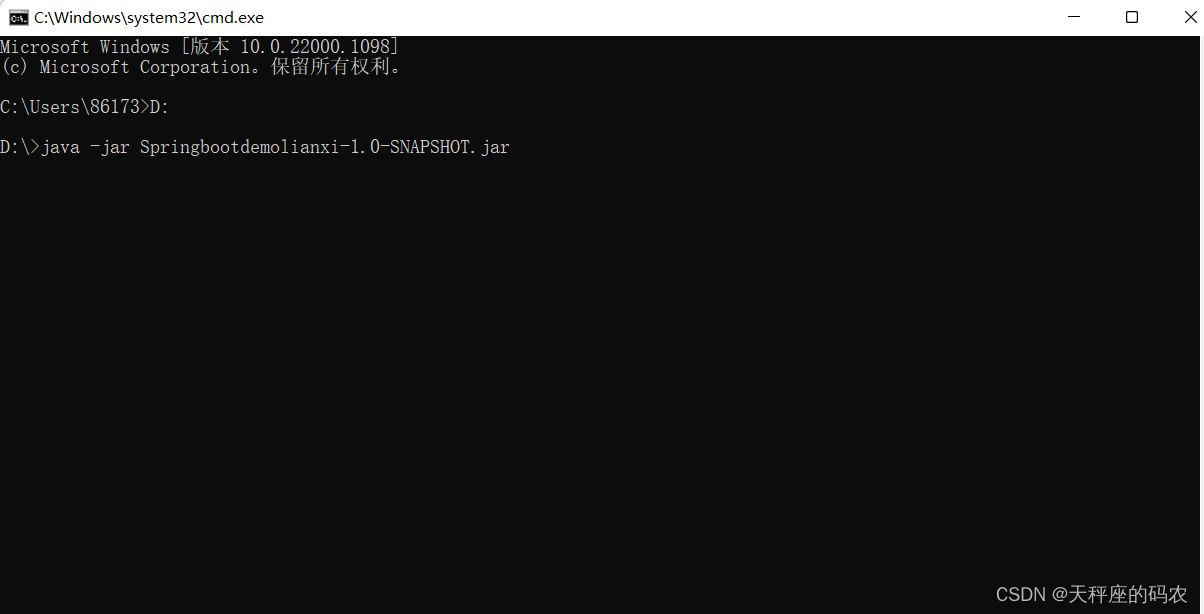
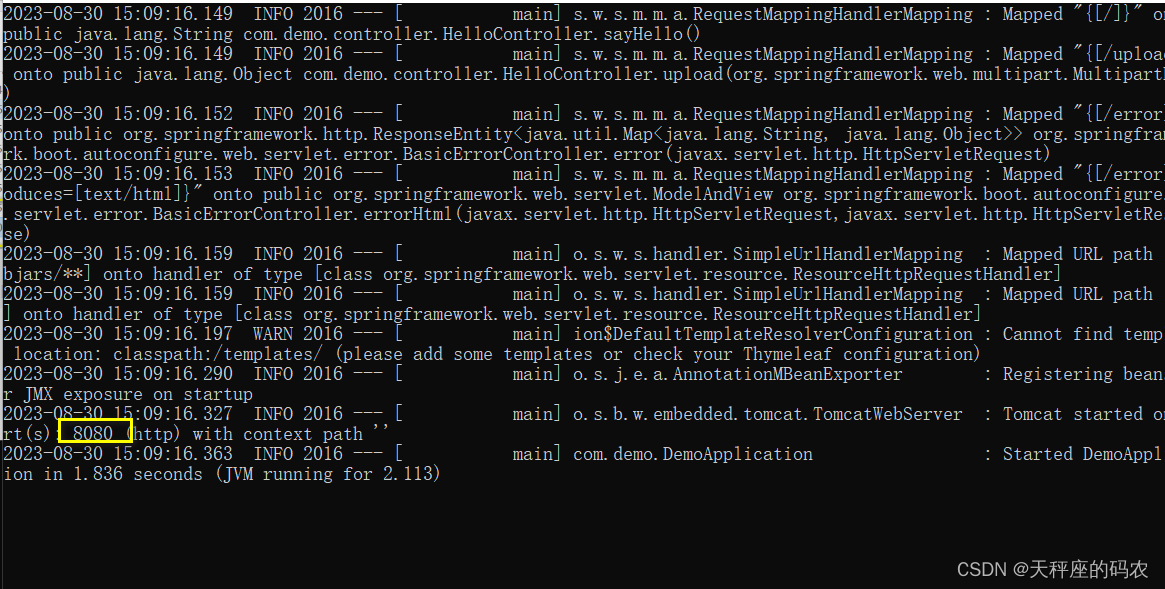
这样就运行成功
最后
送大家一句话:自律且努力,别让生活在安逸!!!!