一、父子通信
① props 父传子
父组件props.vue中
<template>
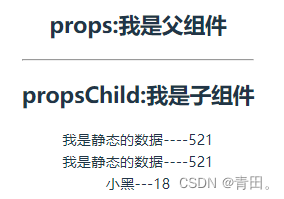
<h2>props:我是父组件</h2>
<hr>
<props-child msg="我是静态的数据" :num="num" :obj="{ name:'小黑',age:18 }">
</props-child>
</template>
<script setup lang="ts">
import { ref } from 'vue'
// props:可以实现父子组件的通讯,props数据还是只读的(不能修改!!)
import propsChild from './propsChild.vue';
let num = ref(521)
</script>子组件 propsChild.vue 中接收数据
<template>
  <h2>propsChild:我是子组件</h2>
  <!-- 在模板使用时,可以直接省略前面的props(两种方式都可以) -->
  <div>{

   {msg}}----{

   {num}}</div>
  <div>{

   {props.msg}}----{

   {props.num}}</div>
  <div>{

   { obj.name }}---{

   { obj.age }}</div>
</template>

<script setup lang="ts">
// v3使用的是defineProps方法接收父组件传递过来的数据(不需要引入直接使用)

// const props = defineProps(['msg','num']) //  1、 可以写数组也可以写对象
interface Iprops {
  name:string,
  age:number
}
const props = defineProps<{
  msg:String,
  num:Number,
  obj:Iprops
}>()
</script>
效果
② 子给父传 (自定义事件)
eventChild.vue 子组件通过一个事件去触发传值
  <template>
     <div>eventChild</div>
     <button @click="handleClick">子组件按钮</button>
  </template>

  <script setup lang="ts">
  // 利用defineEmits方法返回函数触发自定义事件(不需要引入直接用)
  // 未用 Ts 写法
  // const emit = defineEmits(["event"])
  // const handleClick = () => {
  //     emit('event','小黑')
  // }

    //用ts写法
    const emit = defineEmits<{
        (e:'event',myvalue:string):void
    }>()
    const handleClick = () => {
        emit('event','小黑')
    }
  </script>
eventFather.vue 父组件通过自定义事件接收
<template>
    <h2>event1</h2>
   <EventChild @event="eventFn"></EventChild>
</template>

<script setup lang="ts">
import EventChild from './eventChild.vue'

const eventFn = (val) => {
    console.log(val);
}
</script>
效果:

二、兄弟通信(全局事件总线)
需要借助插件 mitt
npm install --save mitt
① 引入(新建bus文件夹创建index.ts)

暴漏出方法
// 引入mitt :注意mitt是一个方法,执行后会返回bus对象
import mitt from "mitt";
const bus = mitt()
export default bus
② 兄弟之间传值eventBus1和eventBus2

③ 父级eventBus使用两兄弟
<template>
  <h2>eventBus全局总线</h2>
  <EventBus1></EventBus1>
  <EventBus2></EventBus2>
</template>

<script setup lang="ts">
import EventBus1 from './eventBus1.vue'
import EventBus2 from './eventBus2.vue'
</script>
④ eventBus2 传值给 eventBus1
<template>
  <h3>eventBus2</h3>
  <button @click="handler">点击给eventBus1传值</button>
</template>

<script setup lang="ts">
import bus from '../../bus'
const handler = () => {   //emit(送东西)
  bus.emit('msg', { name: '小黑'})
}
</script>
⑤ eventBus1接收
<template>
  <h3>eventBus1</h3>
</template>

<script setup lang="ts">
import bus from '../../bus/'
import { onMounted } from 'vue';
onMounted(()=> {
  // 第一个参数:为事件的类型,第二个参数为事件的回调
  bus.on('msg',(val)=> {   //on(收东西!!)
    console.log('val',val);
  })
})
</script>
⑥ 效果

三 、v-model (父子组件数据同步)
1、写一个
① 父组件 vModel.vue
<template>
  <h4>v-model(父组件)---{

   {num}}</h4>
  <vModelSon1 v-model="num"></vModelSon1>

   <!--  v-model相当于下面这个写法 相当于简化了-->
  <vModelSon1 :modelValue="num" @update:modelValue="handler"></vModelSon1>
</template>

<script setup lang="ts">
import { ref } from 'vue';
import vModelSon1 from './vModelSon1.vue'

let num = ref(100)
const handler = (sonNum) => {
    // 接收子组件传的数据
    num.value = sonNum
}
</script>
② 子组件vModelSon1.vue
<template>
  <div style="background:#ccc">
    <div><h4>vModelSon1(子组件)</h4></div>
    <div>{

   { modelValue }} ----接收父组件的值 </div>
    <button @click="sonClick">子组件按钮</button>
  </div>
</template>

<script setup lang="ts">
  let props = defineProps(['modelValue'])
  let emit = defineEmits(['update:modelValue'])
  const sonClick = () => {
    emit('update:modelValue',props.modelValue+2)
  }
</script>
即可完成父子组件数据同步

2、写多个
① 父组件 vModel.vue
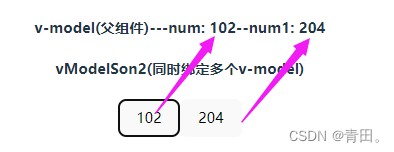
<template>
  <h4>v-model(父组件)---num: {

   {num}}--num1: {

   { num1 }}</h4>
  <!-- 就相当于传了两个props 而且相当于给子组件绑了两个自定义事件update:num和update:num1 -->
  <vModelSon2 v-model:num="num" v-model:num1="num1"></vModelSon2>
</template>

<script setup lang="ts">
  import { ref } from 'vue';
  import vModelSon2 from './vModelSon2.vue'

  let num = ref(100)
  let num1 = ref(200)
</script>
② 子组件vModelSon2.vue
<template>
  <h4>vModelSon2(同时绑定多个v-model)</h4>
  <button @click="numClick">{

   { num }}</button>
  <button @click="num1Click">{

   { num1 }}</button>
</template>

<script setup lang="ts">
let props = defineProps(['num','num1'])
let emit = defineEmits(['update:num','update:num1'])
const numClick = () => {
  emit('update:num',props.num+2)
}
const num1Click = () => {
  emit('update:num1',props.num1+4)
}
</script>
即可完成父子组件数据同步
四、 useAttrs
vue3框架提供了一个方法useAttrs方法,可以获取到组件身上的属性和事件
① 父组件attrs.vue
<template>
  <h3>父组件attrs</h3>
  <attrsSon type="primary"  title="名字" @event="handleEvent" @xxx="handle"></attrsSon>
</template>

<script setup lang="ts">
import attrsSon from './attrsSon.vue';
const handleEvent = () => {}
const handle = () => {}
</script>
② 子组件attrsSon.vue
<template>
  <div>
    子组件:{

   { attrs.title }}
  </div>
</template>

<script setup lang="ts">
// 引入useAttrs方法:获取组件(attrsSon)身上的属性和事件
import { useAttrs } from 'vue';
// 此方法会返回一个对象
let attrs = useAttrs()
console.log('attrs',attrs);

// 注:useAttrs和defineProps同时存在则defineProps优先级高
</script>
五、ref 和 $parent (父子通信)
① 通过 ref ( 父组件可以拿到子组件的属性和方法 )
父组件refather.vue
<template>
  <div style="color:#0ee993">
     父组件的数量:{

   { num }}
  </div>
  <button @click="fatherBtn">父按钮</button>
  <refParentSon ref="sonRef"></refParentSon>
</template>

<script setup lang="ts">
import refParentSon from './ref-parent-son.vue'
import {ref} from 'vue'
let num = ref(100)
// 获取子组件的实例
let sonRef = ref()
const fatherBtn =() => {
    num.value+=2
    sonRef.value.num-=2  //子组件的属性
    sonRef.value.fn()  //子组件的方法
}
</script>
子组件refParentSon.vue
<template>
  <div style="color:#000993">
    子组件的数量:{

   { num }}
  </div>
</template>

<script setup lang="ts">
import {ref} from 'vue'
let num = ref(10)
const fn = () =>{ console.log('我是子组件的方法')}
// 组件内部的数据对外关闭,如若想对外使用需通过defineExpose方法暴露
defineExpose({
  num,fn
})
</script>
① 通过$parent ( 可以在子组件内部获取到父组件的实例 )
父组件refather.vue
<template>
  <div style="color:#0ee993">
     父组件的数量:{

   { num }}
  </div>
  <refParentSon1></refParentSon1>
</template>

<script setup lang="ts">
import refParentSon1 from './ref-parent-son1.vue'
import {ref} from 'vue'
let num = ref(100)  //父组件的数据
const fatherFn = () => {console.log('父组件的方法')}
//父组件暴露数据
defineExpose({
    num,fatherFn
})

</script>
子组件ref-parent-son1.vue
<template>
  <div style="color: green">
    子组件的数量:{

   { num }}
  </div>
  <button @click="sonClick($parent)">子按钮</button>
</template>

<script setup lang="ts">
// 子组件内部拿父组件的数据
import {ref} from 'vue'
let num = ref(10)
const sonClick = ($parent) => {
  num.value+=2
  $parent.num-=2  //子组件拿父组件数据
  $parent.fatherFn() //子组件拿父组件方法
}
</script>
六、provide 和 inject
vue3提供provide(提供)与inject(注入)可以实现隔辈组件传递数据
父有子组件、子有孙组件(父组件数据儿可以用,孙也可以用)
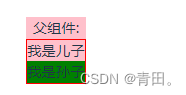
① 父组件(祖先组件)provideAndInject.vue 中
<template>
    <div style="background-color:pink">
        父组件: <provideAndInjectSon></provideAndInjectSon>
    </div>
</template>
<script setup lang="ts">
  import provideAndInjectSon from './provideAndInjectSon.vue'
//vue3提供provide(提供)与inject(注入)可以实现隔辈组件传递数据
  import {ref,provide} from 'vue'
  let msg = ref('我是祖先数据')
// 第一个参数是提供的数据key 第二个参数是提供的数据
  provide("Tian",msg)
</script>
② 儿组件 provideAndInjectGrandson.vue 中
<template>
    <div style="border:1px solid red">
        我是儿子用父的数据---{

   {msg}}
        <provideAndInjectGrandson></provideAndInjectGrandson>
    </div>
</template>

<script setup lang="ts">
  import {inject} from 'vue'
  import provideAndInjectGrandson from './provideAndInjectGrandson.vue'
 //需要的参数:即为祖先提供的key
  let msg = inject('Tian')
  console.log('msg',msg);
</script>
③ 孙组件 provideAndInjectGrandson.vue 中
<template>
    <div style="background:green">
        我是孙子用父的数据---{

   {msg}}
    </div>
</template>

<script setup lang="ts">
  import {inject} from 'vue'
  let msg = inject('Tian')
  console.log('msg',msg);
</script>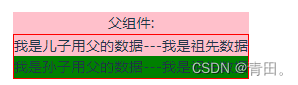
七、任意组件之间的通信 pinia
① 安装:
npm install pinia
② 创建文件夹

③ index.ts
import { createPinia } from 'pinia'
// createPinia方法可以用于创建大仓库
let store = createPinia()
export default store
④ main.ts
import { createApp } from 'vue'
import './style.css'
import App from './App.vue'
import router from './router'

import store from './store'

const app = createApp(App)

app.use(store)
app.use(router)
app.mount('#app')
⑤ 在modules文件下创建一个小仓库info.ts
import { defineStore } from "pinia";

// defineStore方法接收两个参数
// 第一个参数接收:仓库的名字
// 第二个参数:仓库的配置对象
// 返回一个函数作用就是让组件可以获取到仓库的数据
let useInfoStore = defineStore('info', {
    // 存储数据:state
    state: () => {
        return {
            num:10,
            arr:[1,2,3]
        }
    },
    actions: {
        updateNum(val){
            // this就是仓库的数据对象
            this.num+=val
        }
    },
    getters: {
        // 计算一下arr数组的和
        total() {
            let ress = this.arr.reduce((pre,nex)=> {
                return pre+nex
            },0)
            return ress
        }
    }
})


// 对外暴露出去
export default useInfoStore
⑥ 在页面使用
<template>
  <div>
    pinia--{

   { infoStore.num }}---总和:{

   { infoStore.total }}
    <button @click="addNum">修改仓库数据</button>
  </div>
</template>

<script setup lang="ts">
import useInfoStore from '../../store/modules/info'
// 获取小仓库对象
let infoStore = useInfoStore()
console.log('infoStore',infoStore);

const addNum = () => {
    // 仓库调用自身的方法修改仓库的数据(也可以传参数)
    infoStore.updateNum(6);
}
</script>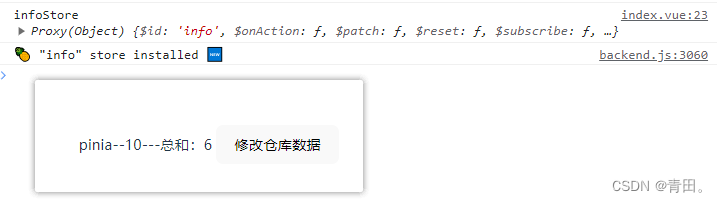
小案例:模拟登录login
<template>
  <el-form :model="loginForm">
    <el-form-item prop="username">
      <el-input
        :prefix-icon="User"
        v-model="loginForm.username"
        clearable
        placeholder="Username"
        size="large"
      ></el-input>
    </el-form-item>
    <el-form-item prop="password">
      <el-input
        type="password"
        :prefix-icon="Lock"
        show-password
        v-model="loginForm.password"
        size="large"
        placeholder="Password"
        clearable
      ></el-input>
    </el-form-item>
  </el-form>
  <el-form-item>
    <el-button
      :loading="loading"
      class="login_btn"
      type="primary"
      size="default"
      @click="login"
    >
      登录
    </el-button>
  </el-form-item>
</template>

<script setup lang="ts">
import { reactive,ref } from "vue";
import useUserStore from './store/modules/user'
import { User, Lock } from '@element-plus/icons-vue'
let useStore = useUserStore()
let loading = ref(false)
const loginForm = reactive({
  username: "admin",
  password: "123456",
});
const login = async () => {
  loading.value = true
  await useStore.userLogin(loginForm)
  loading.value = false
}
</script>
创建user.ts 仓库
import { defineStore } from 'pinia'
let useUserStore = defineStore('User', {
    // 小仓库存储数据的地方
    state: (): UserState => {
      return {

      }
    },
    // 异步|逻辑的地方
    actions: {
      //登录方法
       userLogin(data) {
        console.log('请求的参数',data);
      },
      // 退出登录
       userLogout() {

      },
    },
    getters: {},
  })

  export default useUserStore
以上为pinia选择式API的写法
---------------------------------------------------------------------------------------------------------
以下为pinia组合式API 的写法
① 新建一个仓库zuhe.ts
import { defineStore } from "pinia";
import {ref,computed} from 'vue'
let useZuheStore = defineStore('zuhe', () => {
    // 箭头函数返回一个对象:属性与方法可以提供给组件使用
    let data = ref([
        {id:1, name:'小黑子'},
        {id:2, name:'背带裤'},
    ])
    let arr =ref([1,2,3])
    const total = computed(() => {
       return arr.value.reduce((pre,nex)=> {
            return pre+nex
        },0)
    })
    const upData = () => {
        data.value.push({ id:3, name:'梳中分'})
    }
    return {
        data,
        arr,
        upData,
        total
    }
})


// 对外暴露出去
export default useZuheStore
② 页面使用
<template>
    <div>
      页面使用:{

   { zuheStore.data }} ---总和:{

   {zuheStore.total}}
    </div>
    <button @click="updateData">修改仓库数据</button>
</template>

<script setup lang="ts">
  import useZuheStore from '../../store/modules/zuhe'
  let zuheStore = useZuheStore()

  const updateData = () => {
    zuheStore.upData()
  }
</script>
八、插槽
分为三种插槽:默认插槽,具名插槽,作用域插槽
① 默认插槽
父组件slotDemo.vue
<template>
  <div>父级</div>
  <slotDemoSon>
    <h3>小黑子</h3>
  </slotDemoSon>
</template>

<script setup lang="ts">
import slotDemoSon from './slotDemoSon.vue';

</script>
子组件slotDemoSon.vue
<template>
  <div>Son--默认插槽</div>
  <slot></slot>
</template>

<script setup lang="ts">

</script>
② 具名插槽
父组件slotDemo.vue
<template>
  <div>父级</div>
  <slotDemoSon>
    <!-- 具名插槽 -->
    <template v-slot:xiao>
        <div>我是填充具名插槽xiao位置结构</div>
    </template>
    <template #hei>  <!--v-slot 可以简写为#号-->>
        <div>我是填充具名插槽hei位置结构</div>
    </template>
  </slotDemoSon>
</template>

<script setup lang="ts">
import slotDemoSon from './slotDemoSon.vue';

</script>
子组件slotDemoSon.vue
<template>
  <div>Son--具名插槽</div>
  <slot name="xiao"></slot>
  <slot name="hei"></slot>
</template>
③ 作用域插槽
可以传递数据的插槽。子组件可以将数据回传给父组件,父组件可以决定这些回传数据是以何种结构或者外观在子组件内部去展示
父组件slotDemo.vue
<template>
    <div>父级</div>
    <slotDemoSon :arrList="arrList">
    <template v-slot="{data,index}"> <!--回传过来是对象所以可以解构-->
        <p>
            {

   { data.name }}--{

   {index}}
        </p>
    </template>
  </slotDemoSon>
</template>
<script setup lang="ts">
import slotDemoSon from './slotDemoSon.vue';
import { ref } from 'vue'

let arrList = ref([
    { id:1, name:'小黑', type:false},
    { id:2, name:'小白', type:true},
    { id:3, name:'小蓝', type:false},
])
</script>
子组件slotDemoSon.vue
<template>
  <div>作用域插槽</div>
  <ul>
    <li v-for="(item,index) in arrList" :key="item.id">
      <!-- 作用域插槽:可以将数据回传给父组件 -->
      <slot :data="item" :index="index"></slot>
    </li>
  </ul>
</template>

<script setup lang="ts">
defineProps(['arrList'])
</script>
父组件可以决定这些回传数据是以何种结构或者外观在子组件内部去展示
上面父组件用了p标签进行展示
