1.Fragment 的基本了解
1.1 什么是Fragment
Fragment是Android3.0后引入的一个新的API,他出现的初衷是为了适应大屏幕的平板电脑, 当然现在他仍然是平板APP UI设计的宠儿,普通手机开发也会加入这个Fragment, 我们可以把他看成一个小型的Activity,又称Activity片段(碎片)!
如果一个很大的界面,我们 就一个布局,写起界面来会有多麻烦,而且如果组件多的话是管理起来也很麻烦!而使用Fragment 我们可以把屏幕划分成几块,然后进行分组,进行一个模块化的管理!从而可以更加方便的在 运行过程中动态地更新Activity的用户界面!
另外Fragment并不能单独使用,他需要嵌套在Activity 中使用,尽管他拥有自己的生命周期(见下文图2),但是还是会受到宿主Activity的生命周期的影响,比如Activity 被destory销毁了,它也会跟着销毁!
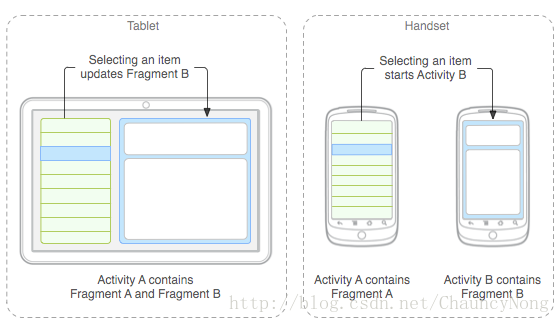
Fragment分别对应手机与平板间不同情况的处理图:
1.2Fragment的生命周期
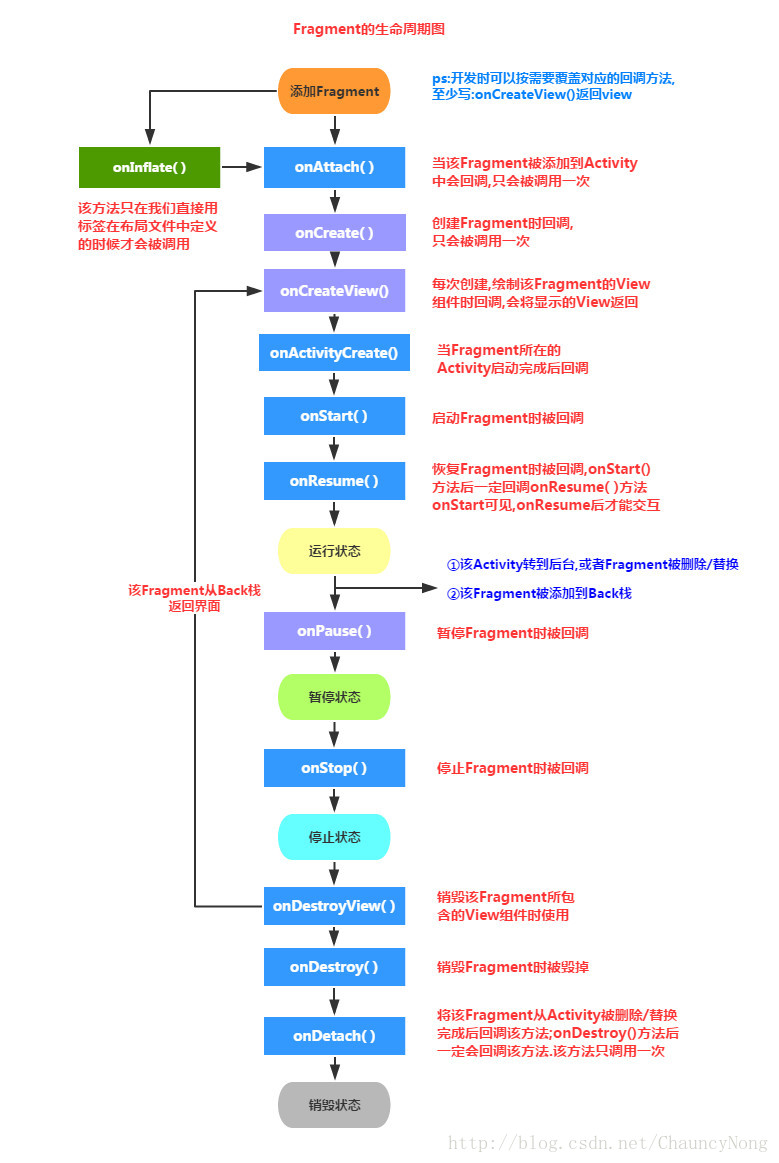
①Activity加载Fragment的时候,依次调用下面的方法: onAttach -> onCreate -> onCreateView -> onActivityCreated -> onStart ->onResume
②当我们弄出一个悬浮的对话框风格的Activity,或者其他,就是让Fragment所在的Activity可见,但不获得焦点 onPause
③当对话框关闭,Activity又获得了焦点: onResume
④当我们替换Fragment,并调用addToBackStack()将他添加到Back栈中 onPause -> onStop -> onDestoryView !!注意,此时的Fragment还没有被销毁哦!!!
⑤当我们按下键盘的回退键,Fragment会再次显示出来: onCreateView -> onActivityCreated -> onStart -> onResume
⑥如果我们替换后,在事务commit之前没有调用addToBackStack()方法将 Fragment添加到back栈中的话;又或者退出了Activity的话,那么Fragment将会被完全结束, Fragment会进入销毁状态 onPause -> onStop -> onDestoryView -> onDestory -> onDetach
1.3 Fragment的核心要点:
- 注意:为了更好的兼容性,建议用App包下的V4包!而选择了V4包,要注意一下:
- ①如果你使用了v4包下的Fragment,那么所在的那个Activity就要继承FragmentActivity哦! 案例:今天在xml文件中静态地载入fragment,然后重写了Fragment,但是在加载Activity的时候就报错了, 大概的提示就是Fragment错误还是找不到什么的,name属性改了几次还是错!最后才发现是用了 v4的包的缘故,只需让自己的Activity改成FragmentActivity即可!
- 如果还有报错,只需要把getFragmentManager( )改成getSupportFragmentManager( )就可以了
- 3.0版本后引入,即minSdk要大于11
- Fragment需要嵌套在Activity中使用,当然也可以嵌套到另外一个Fragment中,但这个被嵌套 的Fragment也是需要嵌套在Activity中的,间接地说,Fragment还是需要嵌套在Activity中!! 受寄主Activity的生命周期影响,当然他也有自己的生命周期!另外不建议在Fragment里面 嵌套Fragment因为嵌套在里面的Fragment生命周期不可控!!!
- 官方文档说创建Fragment时至少需要实现三个方法:onCreate( ),onCreateView( ),OnPause( ); 不过貌似只写一个onCreateView也是可以的...
- Fragment的生命周期和Activity有点类似:三种状态:
Resumed:在允许中的Fragment可见
Paused:所在Activity可见,但是得不到焦点
Stoped: ①调用addToBackStack(),Fragment被添加到Bcak栈 ②该Activity转向后台,或者该Fragment被替换/删除
ps:停止状态的fragment仍然活着(所有状态和成员信息被系统保持着),然而,它对用户 不再可见,并且如果activity被干掉,他也会被干掉.
1.4 Fragment的几个子类:
- DialogFragment(对话框:)
- ListFragment(列表:)
- PreferenceFragment(选项设置)
- WebViewFragment(WebView界面:)
<?xml version="1.0" encoding="utf-8"?>
<LinearLayout
    xmlns:android="http://schemas.android.com/apk/res/android"
    xmlns:app="http://schemas.android.com/apk/res-auto"
    xmlns:tools="http://schemas.android.com/tools"
    android:layout_width="match_parent"
    android:layout_height="match_parent"
    android:orientation="vertical"
    tools:context="com.example.chauncynong.day14_class0115_lp.MainActivity">
        <!--
         1.id
         2.class 会继承 Frament
         3.关联 class/name
         -->

        //static create
        <fragment
            class="com.example.chauncynong.day14_class0115_lp.fragment.MyFragment01"
            android:tag="MyFragment01"
            android:layout_width="match_parent"
            android:layout_height="300dp"
            tools:layout="@layout/fragment01" />

        <!--
         live create
            1.create container(LinearLayout or RelativiLayout)
            2.java Activity
         -->

    <RelativeLayout
        android:id="@+id/container"
        android:layout_width="match_parent"
        android:layout_height="200dp"
        />
    <LinearLayout
        android:orientation="horizontal"
        android:gravity="center"
        android:layout_width="match_parent"
        android:layout_height="wrap_content"
        >
        <Button
            android:id="@+id/btn1"
            android:onClick="fm1"
            android:text="页面1"
            android:layout_width="wrap_content"
            android:layout_height="wrap_content"
            />

        <Button
            android:id="@+id/btn2"
            android:onClick="fm1"
            android:text="页面2"
            android:layout_width="wrap_content"
            android:layout_height="wrap_content"
            />
    </LinearLayout>
</LinearLayout>
java代码(MainActivity.java))
package com.example.chauncynong.day14_class0115_lp;
import android.support.v4.app.FragmentManager;
import android.support.v4.app.FragmentTransaction;
import android.support.v7.app.AppCompatActivity;
import android.os.Bundle;
import android.view.View;
import com.example.chauncynong.day14_class0115_lp.fragment.MyFragment02;
public class MainActivity extends AppCompatActivity {
    MyFragment02 myFragment02;
    @Override
    protected void onCreate(Bundle savedInstanceState) {
        super.onCreate(savedInstanceState);
        setContentView(R.layout.activity_main);

        //1.new
        myFragment02 = new MyFragment02();

        //2.manager
        FragmentManager manager = getSupportFragmentManager();

        //3.Transaction
        FragmentTransaction ft = manager.beginTransaction();
        ft.add(R.id.container,myFragment02);

        //4.submit
        ft.commit();
    }
}
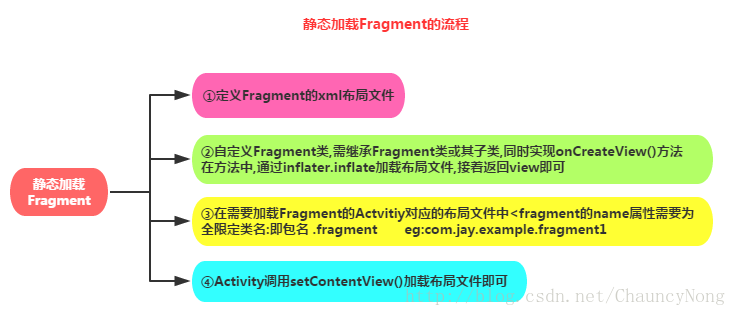
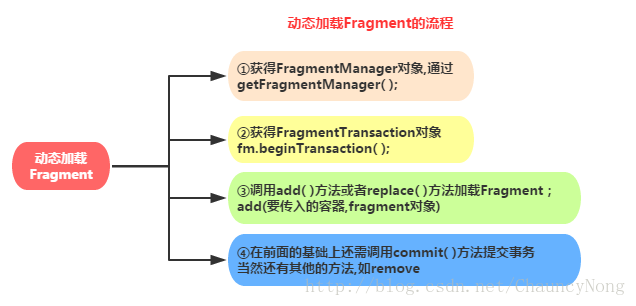
2-1)静态加载Fragment
实现流程:
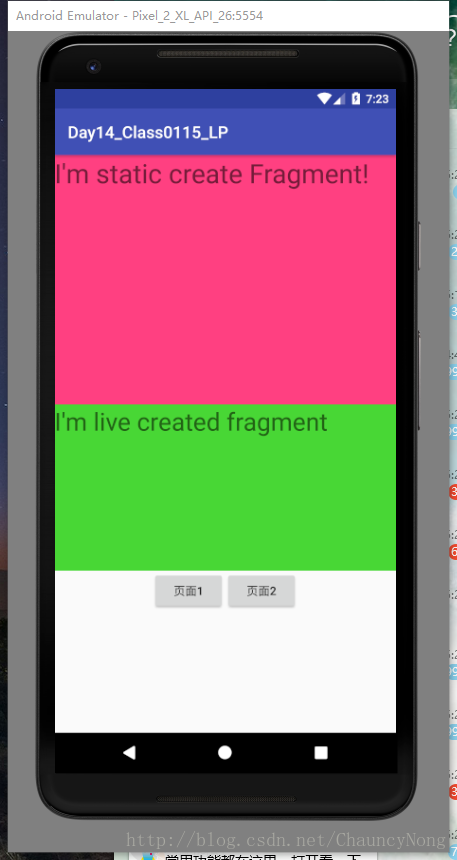
<?xml version="1.0" encoding="utf-8"?>
<LinearLayout
    xmlns:android="http://schemas.android.com/apk/res/android"
    android:orientation="vertical" android:layout_width="match_parent"
    android:layout_height="match_parent"
    android:background="@color/colorAccent">

    <TextView
        android:layout_width="wrap_content"
        android:layout_height="wrap_content"
        android:textSize="32sp"
        android:text="I'm static create Fragment!"
        />
</LinearLayout>
java代码:
public class MyFragment01 extends Fragment {

    /**
     *
     * @param inflater      布局
     * @param container     容器
     * @param savedInstanceState  保存临时的状态
     * @return
     */
    @Nullable
    @Override
    public View onCreateView(LayoutInflater inflater, @Nullable ViewGroup container, @Nullable Bundle savedInstanceState) {
        View view = inflater.inflate(R.layout.fragment01,container,false);
        return view;
    }
}
2-2)动态加载Fragment
<LinearLayout xmlns:android="http://schemas.android.com/apk/res/android"
    xmlns:tools="http://schemas.android.com/tools"
    android:layout_width="match_parent"
    android:layout_height="match_parent"
    android:background="#49d736"
    tools:context="com.example.chauncynong.day14_class0115_lp.fragment.MyFragment02">

    <!-- TODO: Update blank fragment layout -->
    <TextView
        android:layout_width="match_parent"
        android:layout_height="match_parent"
        android:textSize="30dp"
        android:text="I'm live created fragment" />

</LinearLayout>
public class MyFragment02 extends Fragment {

    public MyFragment02() {
        // Required empty public constructor
    }


    @Override
    public View onCreateView(LayoutInflater inflater, ViewGroup container,
                             Bundle savedInstanceState) {
        // Inflate the layout for this fragment
        return inflater.inflate(R.layout.fragment_my_fragment02, container, false);
    }
}
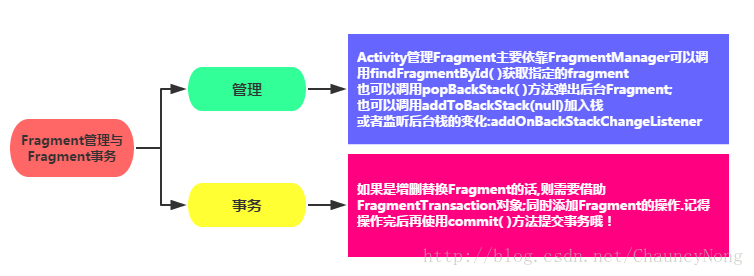
2-3)Fragment管理和事务
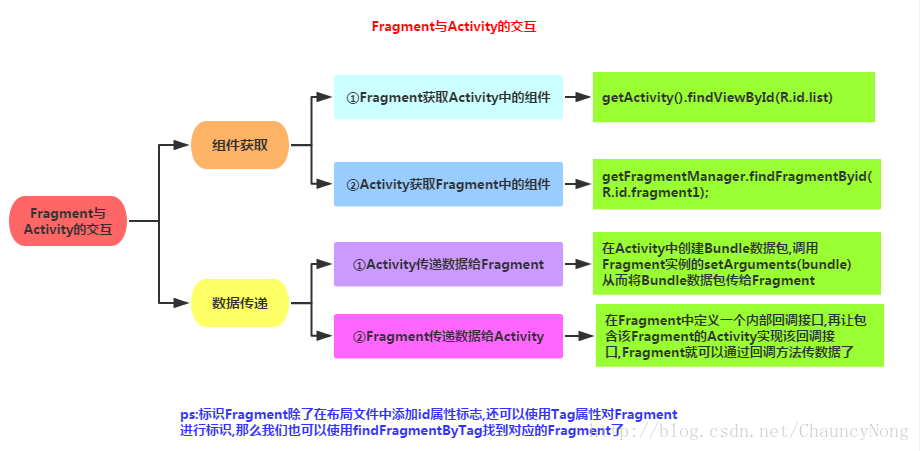
2-4)Fragment和Activity之间的交互