简单使用
绘制简单的线、形状
        canvas.getContext('2d'):   返回一个用于在画布上绘图的环境
        context.beginPath();       开始当前路径
        context.moveTo(100,100);   开始绘制点
        context.lineTo(150,200);   结束绘制点
        context.lineWidth = 3;     线条的宽度
        context.closePath();       结束当前路径
        context.fillStyle = "rgb(2,100,30)"; 设置填充的颜色
        context.fill();                      实现填充
        context.strokeStyle = "#005588";     设置线条的颜色
        context.stroke ();                   线条的绘制
//  1. 使用centext 绘制, 先设置绘制的状态
//  2. 再画出线条
 window.onload = function(){
           var canvas = document.getElementById('canv1');
           canvas.height = 500;
           canvas.width = 500;
           var context = canvas.getContext('2d');
           context.beginPath();
           //1.设置绘制的状态
           context.moveTo(100,100);
           context.lineTo(150,200);
           context.lineWidth = 3;
           context.lineTo(150,100);
           context.lineTo(100,100);  // 只要最后的结束点的坐标与开始点的坐标相同,就可以绘制成一个封闭的图形(三条线以上)
           context.closePath();
           context.fillStyle = "rgb(2,100,30)";
           context.fill();
          //2.画出线条
           context.strokeStyle = "#005588";
           context.stroke ();

         // 再画另外的一条线条,需要在绘制的状态首位添加:context.beginPath(); context.closePath();,否则前后定义的绘制状态会影响
           context.beginPath();
           context.moveTo(200,100);
           context.lineTo(150,200);
           context.closePath();
           context.strokeStyle = "red";
           context.stroke();
       }
画圆圈、画七巧板
 context.arc(
     centerx,centery,radius//圆心的坐标以及半径
     startingAngle, endingAngle,开始于哪个弧度,结束于哪个弧度
     anticlockwise = false;//false表示以顺时针绘制弧线(默认值),true表示逆时针绘制圆 >
  )
 startingAngle的位置为圆右边的位置0,0.5π在元下边,1π在左边,1.5π在上边,2π和0重合
// 圆
    window.onload = function(){
           let canvas = document.getElementById('canv1');
           canvas.height = 1024;
           canvas.width = 768;
           let context = canvas.getContext('2d');

           context.beginPath();
           context.strokeStyle= "#005588";
           context.arc(200,200,200,0,1.5*Math.PI);
           context.closePath();
           context.stroke();
     }
// 七巧板
// 1. 设置每一个板块的坐标、颜色
let tangram = [
{p:[{x:0,y:0},{x:800,y:0},{x:400,y:400}],color:"#caff67"},
{p:[{x:0,y:0},{x:400,y:400},{x:0,y:800}],color:"#67becf"},
{p:[{x:800,y:0},{x:800,y:400},{x:600,y:600},{x:600,y:200}],color:"#ef3d61"},
{p:[{x:600,y:200},{x:600,y:600},{x:400,y:400}],color:"#f9f51a"},
{p:[{x:400,y:400},{x:600,y:600},{x:400,y:800},{x:200,y:600}],color:"#a594c0"},
{p:[{x:200,y:600},{x:400,y:800},{x:0,y:800}],color:"#fa8ecc"},
{p:[{x:800,y:400},{x:800,y:800},{x:400,y:800}],color:"#f6ca29"},
];
window.onload = function () {
let canvas = document.getElementById('canv1');
canvas.width = 800;
canvas.height = 800;
let context = canvas.getContext('2d');
// 2. 遍历数组、呈现各个板块
for (let i = 0; i < tangram.length; i++) {
draw(tangram[i], context);
}
};
function draw(piece, cxt) {
cxt.beginPath();
cxt.moveTo(piece.p[0].x, piece.p[0].y);
for (let i = 1; i < piece.p.length; i++)
cxt.lineTo(piece.p[i].x, piece.p[i].y);
cxt.fillStyle = piece.color;
cxt.fill();
cxt.strokeStyle = "#005588";
cxt.stroke();
}
- 倒计时
1.绘制出用小圆圈实现的数字
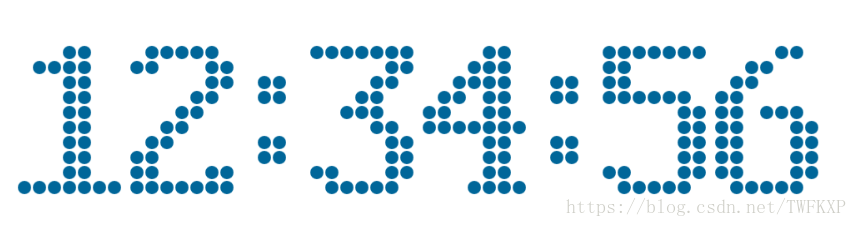
思路:
把要描述的数字和呈现的画布传给一个方法,该方法遍历数字在 digit.js 对应的数组,把每个圆遍历画出来。
2.绘制出有倒计时功能的数字
思路:
给出两个时间,动态计算时间差,使用思路1的方法,实现倒计时的效果
3.实现变换数字,生成彩色小球并脱落
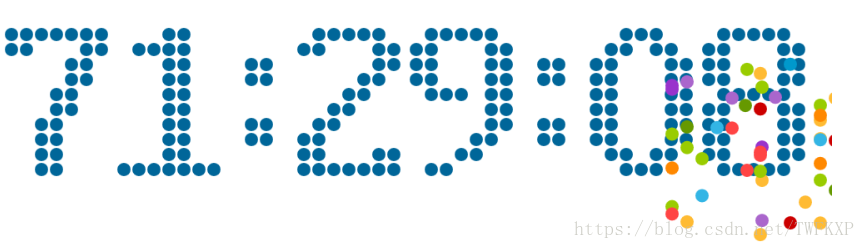
思路:
当前后的时间不同时,变换时间的时候会生成彩色的小球并在脱落,脱落后会有碰撞加速度减小的效果,而随着变换的越多,画布里的小球就越多,到一定程度,会影响浏览器的性能,因此就必须对画布中的小球实现优化。