redux基础知识
本篇文章主要介绍redux的基本使用方法,并简单封装,像vuex一样写redux
学习文档
-
英文文档: https://redux.js.org/
-
中文文档: http://www.redux.org.cn/
-
Github: https://github.com/reactjs/redux
redux是什么
redux和vuex几乎是一样的,都是一个状态管理库。只不过vuex是vue专用的。
-
redux是一个专门用于做状态管理的JS库(不是react插件库)。
-
它可以用在react, angular, vue等项目中, 但基本与react配合使用。
什么情况下需要使用redux
-
某个组件的状态,需要让其他组件可以随时拿到(共享)。
-
一个组件需要改变另一个组件的状态(通信)。
-
总体原则:能不用就不用。
redux的使用
依赖安装
npm i redux react-redux --save
react-redux帮我们在react项目中做了一些关于redux的封装,使我们可以更好的在react项目中使用redux。
引入
我们一般在store文件下的index.ts文件进行store编写(和vuex是一样的哦)
import {

     legacy_createStore } from 'redux'
// 一些初始数据
const defaultState = {


  customerId: null
}
// reducer 是一个函数,它接受先前的状态和当前的 action 作为参数,并返回新的状态。
let reducer = (state=defaultState) => {


  // 根据旧的state和action, 产生新的state的纯函数。
  return state
}
// 创建一个store
const store = legacy_createStore(reducer)
// 导出一个store
export default store
reducer 是一个函数,它接受先前的状态和当前的 action 作为参数,并返回新的状态。(其实可以简单的将reducer理解为vuex中action、mutation的融和,他就是来改变state状态值的)
注:为了便于学习,我们使用了legacy_createStore的早期写法,我们也可以使用createStore及configureStore。
目录优化
我们可以调整项目结构,使我们的代码层级更加清晰
src\store\index.ts
import {

     legacy_createStore } from 'redux''
import reducer from './reducer'
// 创建一个仓库
const store = legacy_createStore(reducer)
export default store
为了代码清晰,我们将reducer抽离单独封装。
src\store\reducer.ts
const defaultState = {


  customerId: null
}

let reducer = (state = defaultState) => {


  return state
}
export default reducer
使用useSelector读取state值
React Redux 库提供的 useSelector 钩子来简化获取 Redux 状态的过程。useSelector 允许你选择性地从 Redux 状态树中选择和返回所需的状态值。
import {

     useSelector } from 'react-redux';

function CounterDisplay() {


  // useSelector 接收一个回调函数,该回调函数可以访问 Redux 的状态树并返回所需的状态值。
  // state就是全局状态
  const customerId = useSelector(state =>state.customerId)
  return (
    <div>
    <p>{

    customerId}</p>
    </div>
  );
}
安装浏览器工具
我们可以给浏览器安装redux的调试工具Redux DevTools。它可以帮助我们更轻松地调试 Redux 应用程序
使用此工具,我们需要给项目安装相应的依赖
npm install --save-dev redux-devtools-extension
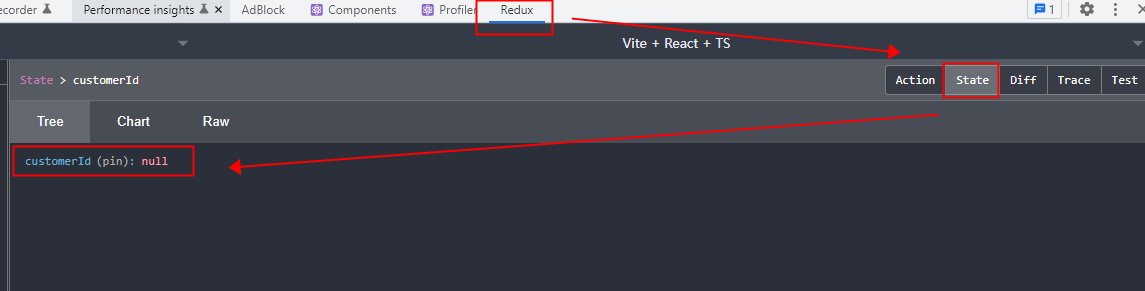
在创建 store 时,将 Redux DevTools 的中间件添加到 applyMiddleware 函数中:
// src\store\index.ts
import {

     legacy_createStore, applyMiddleware } from 'redux'
import {

     composeWithDevTools } from 'redux-devtools-extension'
import reducer from './reducer'

const store = legacy_createStore(reducer, composeWithDevTools(applyMiddleware()))

export default store
现在,我们就可以在控制台看到我们安装插件后的效果了
使用useDispatch修改state的状态值
Redux 中的状态是不可直接修改的,你需要通过触发一个 action,然后在 Reducer 中根据这个 action 的类型来修改状态。
import { useDispatch } from 'react-redux'

dispatch({ type: 'changeCustomerId', value: value })
src\store\reducer.ts
const defaultState = {


  customerId: null
}

let reducer = (state = defaultState, action: {

      type: string; value: any }) => {


  let newState = JSON.parse(JSON.stringify(state))
  switch (action.type) {


    case 'changeCustomerId':
      newState.customerId = action.value
      break
    default:
      break
  }
  return newState
}
export default reducer
上述代码中。我们根据action的type来判断是谁触发了函数,而做出响应的逻辑判断。
模块化封装
当我们有很多模块都使用dispatch触发了一个函数时,我们swicth里面需要写大量代码,代码难以维护。因此,我们对这里的代码进行模块化封装。
state与action抽离
首先,我们可以将state的写法和action的写法改造成类似vuex的写法。
假设我们有一个状态库,我们给这个状态库起名flexStore.ts,它的逻辑如下:
src\store\flexStore.ts
import {

     Store } from './reducer'

type State = {


  customerId: string
}
export default {


  state: {


    customerId: ''
  },
  action: {


    changeCustomerId(state, value) {


      state.customerId = value
    },
    demo1(state, value) {

    },
    demo2(state, value) {

    }
  }
} as Store<State>
然后,我们在reducer中使用,并遍历调用
import flexStore from "./felxStore.ts"

let reducer = (state =flexStore, action: {

      type: string; value: any }) => {


  let newState = JSON.parse(JSON.stringify(state))
    Object.keys(store.action).forEach((actionName: string) => {


      actionName === action.type && store.action[action.type](newState, action.value)
    })
  return newState
}
export default reducer
最后,入口文件引入reducer即可。
src\store\index.ts
import {

     legacy_createStore, applyMiddleware } from 'redux'
import {

     composeWithDevTools } from 'redux-devtools-extension'
import {

     reducer } from './reducer'

// Create a data warehouse
const store = legacy_createStore(reducer, composeWithDevTools(applyMiddleware()))

export default store
模块化管理
如果我们的项目不止一个flex状态库,还有其他状态库,如otherStore(这一点和vuex的modlue是一致的),那我们可以使用redux 的combineReducers实现多个状态库合并
src\store\otherStore.ts
import {

     Store } from './reducer'

type State = {


  a: string
}
export default {


  state: {


    a: ''
  },
  action: {


    changeCustomerId(state, value) {


      state.a = value
    },
  }
} as Store<State>
我们在reducer中分别引入不同的状态库,然后借助combineReducers即可完成不同状态库的组合
src\store\reducer.ts
import {

     combineReducers } from 'redux'
import flex from './flexStore'
import other from './otherStore'

export type Option<T> = {


  [actionName: string]: (state: T, value?: any) => void
}
export type Store<T> = {


  state: T
  action: Option<T>
}
const getModuleReducer = <T>(store: Store<T>) => {


  // 组合每个子模块的reducer,每个reducer必须返回最新的state对象。combineReducers的参数是合并后的state对象{state1:"value",state2:"value"}
  return (state = store.state, action: {

      type: string; value: any }) => {


    let newState = JSON.parse(JSON.stringify(state))
    Object.keys(store.action).forEach((actionName: string) => {


      actionName === action.type && store.action[action.type](newState, action.value)
    })
    return newState
  }
}
export const reducer = combineReducers({


  flex: getModuleReducer(flex),
  other: getModuleReducer(other),
})
getModuleReducer组合每个子模块的reducer,每个reducer必须返回最新的state对象。combineReducers的参数是合并后的state对象{state1:“value”,state2:“value”}
现在,我们就可以像vuex一样使用redux了,舒服!