一、App工程的项目结构
1.项目下面有两个分类
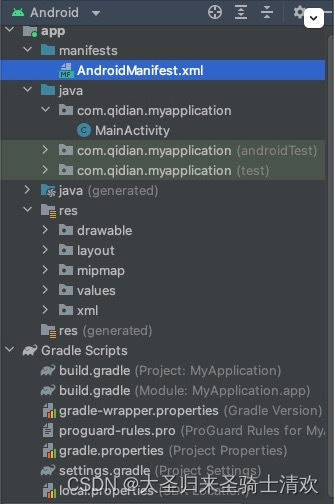
一个是app(代表app模块),另一个是Gradle Scripts。其中app下面又有3个子目录,其功能说明如下:
- manifests 子目录下面只有一个XML文件,即AndroidManifest.xml
- java子目录,下面有3个com.example.myapp包,其中第一个包存放当前模块的java源码,后面两个包存放测试用的Java代码
- res子目录,存放当前模块的资源文件。res下面有4个子目录:
- drawable 存放图形描述文件与图片文件
- layout 存放App页面的布局文件
- mipmap 存放APP的启动图标
- values 存放一些常量定义文件,例如字符串常量strings.xml、像素常量dimens.xml、颜色常量colors.xml、样式风格定义styles.xml
2.Gradle Scripts下面主要是工程的编译配置文件
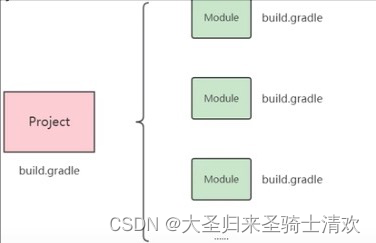
- build.gradle 该文件分为项目级与模块级两种,用于描述APP工程的编译规则,项目级别build.gradle指定了当前项目的总体编译规则,模块级别build.gradle对应于具体模块,每个模块都有自己的build.gradle,它指定了当前模块的详细编译规则。
- proguard-rules.pro 该文件用于描述java代码的混淆规则
- gradle.properties 该文件用于配置编译工程的命令行参数,一般无需改动
- settings.gradle 该文件配置了需要编译哪些模块。初始内容为include’:app’,表示只编译app模块
- local.properties 项目的本地配置文件,它在工程编译时自动生成,用于描述开发者电脑的环境配置,包括SDK的本地路径、NDk的本地路径等。
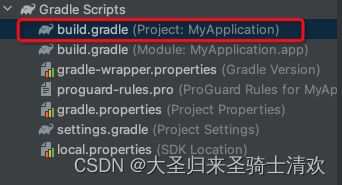
2.1项目级别build.gradle (Project: MyApplication)目录结构以及源码
plugins {
    id 'com.android.application' version '7.1.2' apply false
    id 'com.android.library' version '7.1.2' apply false
}
// buildScript块的repositories主要是为了Gradle脚本自身的执行,获取脚本依赖插件
buildscript {
    ext.kotlin_version = '1.6.10'
	// 代表仓库地址
    repositories {
        maven{ url 'https://maven.aliyun.com/repository/google'}
        maven{ url 'https://maven.aliyun.com/repository/gradle-plugin'}
        maven{ url 'https://maven.aliyun.com/repository/public'}
        maven{ url 'https://maven.aliyun.com/repository/jcenter'}
    }
    // 指定gradle插件版本
    dependencies {
        classpath 'com.android.tools.build:gradle:7.1.2' //配置gradle插件版本,下面的版本号就是Android Studio 的版本号
        classpath "org.jetbrains.kotlin:kotlin-gradle-plugin:$kotlin_version"
    }
}
// allprojects块的repositories用于多项目构建,为所有项目提供共同所需依赖包。而子项目可以配置自己的repositories以获取自己独需的依赖包。
allprojects {
    repositories {
        maven{ url 'https://maven.aliyun.com/repository/google'}
        maven{ url 'https://maven.aliyun.com/repository/gradle-plugin'}
        maven{ url 'https://maven.aliyun.com/repository/public'}
        maven{ url 'https://maven.aliyun.com/repository/jcenter'}
    }
}

rootProject.buildDir = '../build'
subprojects {
    project.buildDir = "${rootProject.buildDir}/${project.name}"
}
subprojects {
    project.evaluationDependsOn(':app')
}

task clean(type: Delete) {
    delete rootProject.buildDir
}
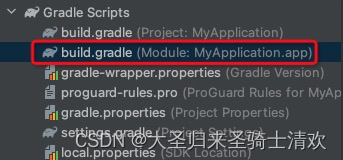
2.2下面是模块级别build.gradle (Module: MyApplication.app)目录结构以及源码
模块级别build.gradle 目录结构图片:
模块级别build.gradle 源码
def localProperties = new Properties()
def localPropertiesFile = rootProject.file('local.properties')
if (localPropertiesFile.exists()) {
    localPropertiesFile.withReader('UTF-8') { reader ->
        localProperties.load(reader)
    }
}

//apply plugin: 'com.android.application'

plugins {
    id 'com.android.application'
}
android {
   // 指定编译用的SDK版本号,比如33表示使用Android 12.0 编译
   compileSdkVersion 33
   // 指定编译工具的版本号,这里的头两位数字必须与compileSdkVersion保持一致,具体的版本号可以在SDK安装目录的"SDK/build-Tools"下找到
   buildToolsVersion "33.0.0"

    lintOptions {
        disable 'InvalidPackage'
    }

    defaultConfig {
        // 指定该模块的应用编号,也就是APP的包名
        applicationId "com.qidian.myapplication"
        // 指定APP适合运行的最小SDK版本号,比如19表示至少在Android 4.4 上运行
        minSdkVersion 19
        // 指定目标设备的SDK版本号,表示APP最希望在那个Android版本上运行
        targetSdkVersion 33
        // 指定APP的应用版本号
        versionCode 1
        // 指定APP的应用版本名称
        versionName "1.0"

        testInstrumentationRunner "androidx.test.runner.AndroidJUnitRunner"
    }

    signingConfigs {
        debug {
            //jks中key的别名
            keyAlias 'flutter_news_key.jks'
            //jks中key的密码
            keyPassword '123456'
            //jks的文件路径,可以是绝对路径也可以是相对路径
            storeFile file('./flutter_news_key.jks')
            //jks的密码
            storePassword '123456'
        }
        release {
            //jks中key的别名
            keyAlias 'flutter_news_key.jks'
            //jks中key的密码
            keyPassword '123456'
            //jks的文件路径,可以是绝对路径也可以是相对路径
            storeFile file('./flutter_news_key.jks')
            //jks的密码
            storePassword '123456'
        }
    }
    buildTypes {
        debug {
            // TODO: Add your own signing config for the release build.

            // Signing with the debug keys for now, so `flutter run --release` works.
            signingConfig signingConfigs.debug

            //关闭混淆, 否则在运行release包后可能出现运行崩溃, TODO后续进行混淆配置
            minifyEnabled false //删除无用代码
            shrinkResources false //删除无用资源
            // proguardFiles getDefaultProguardFile(proguard-android.txt),'proguard-rules.pro'
        }
        release {
            // TODO: Add your own signing config for the release build.
            // Signing with the debug keys for now, so `flutter run --release` works.
            manifestPlaceholders = [server_environment: "RELEASE", uses_cleartext_traffic: "true"]

            signingConfig signingConfigs.release

            //关闭混淆, 否则在运行release包后可能出现运行崩溃, TODO后续进行混淆配置
            minifyEnabled false //删除无用代码
            shrinkResources false //删除无用资源
        }
    }
}

// 指定app编译的依赖信息
dependencies {
    // 指定引用jar包的路径
    implementation fileTree(dir: 'libs', includes: ['*.jar'])
    // 指定编译Android的高版本支持库。如AppCompatActivity必须指定编译appcompat
    // appcompat 库个版本见 https://mvnrepository.com/artifact/androidx.appcompat/appcompat
    implementation 'androidx.appcompat:appcompat:1.3.0'
    // 指定单元测试编译用的junit版本号
    testImplementation 'junit:junit:4.13.2'
    implementation 'com.google.android.material:material:1.4.0'
    implementation 'androidx.constraintlayout:constraintlayout:2.0.4'
    androidTestImplementation 'androidx.test.ext:junit:1.1.3'
    androidTestImplementation 'androidx.test.espresso:espresso-core:3.4.0'
}
二、AndroidManifest.xml
<manifest xmlns:android="http://schemas.android.com/apk/res/android"
    xmlns:tools="http://schemas.android.com/tools"
    package="com.qidian.myapplication">

    <application
        android:allowBackup="true"
        android:dataExtractionRules="@xml/data_extraction_rules"
        android:fullBackupContent="@xml/backup_rules"
        android:icon="@mipmap/ic_launcher"
        android:label="@string/app_name"
        android:roundIcon="@mipmap/ic_launcher_round"
        android:supportsRtl="true"
        android:theme="@style/Theme.MyApplication"
        tools:targetApi="31">
        <activity
            android:name=".MainActivity"
            android:exported="true">
            <intent-filter>
                <action android:name="android.intent.action.MAIN" />

                <category android:name="android.intent.category.LAUNCHER" />
            </intent-filter>
        </activity>
    </application>

</manifest>
每个应用的根目录中都必须包含一个一个AndroidManifest.xml,并且文件名必须一模一样。
这个文件包含了APP的配置信息,系统需要根据里面的内容运行APP代码显示界面。
AndroidManifest.xml的根节点为manifest 为根节点,它的package属性指定了该APP包名,它下面有个application节点,它的各属性说明如下:
- android:allowBackup=“true” 是否允许应用备份。允许用户备份系统应用和第三方应用的apk的安装包和应用数据以便在刷机或者在数据丢失后恢复应用,用户即可通过adb backup 和 adb restore 来进行对应用数据的备份和恢复。true代表允许反之则不允许。
- android:icon 指定APP的icon
- android:label 指定APP的名称
- android:roundIcon 指定APP的圆角图标
- android:supportsRtl=“true” 是否支持阿拉伯语、波斯语这种从右往左的文字排版顺序
- android:theme 指定APP的显示风格
注意到application下面还有个activity节点,它是活动页面的注册声明,只有在AndroidManifest.xml正确配置了activity节点才能在运行时访问对应的活动页面。初始配置的MainActivity正是APP的默认主页,之所以说是主页它的activity节点内部还配置了一下过滤信息:
  <intent-filter>
      <action android:name="android.intent.action.MAIN" />
      <category android:name="android.intent.category.LAUNCHER" />
  </intent-filter>
其中action节点设置的 android.intent.action.MAIN表示该页面是APP的入口页面,启动APP时会先打开该页面,而category节点设置的android.intent.category.LAUNCHER是否在手机屏幕上显示APP图标,如果同时有两个activity节点内部设置了android.intent.category.LAUNCHER那么桌面就会显示两个APP图标。