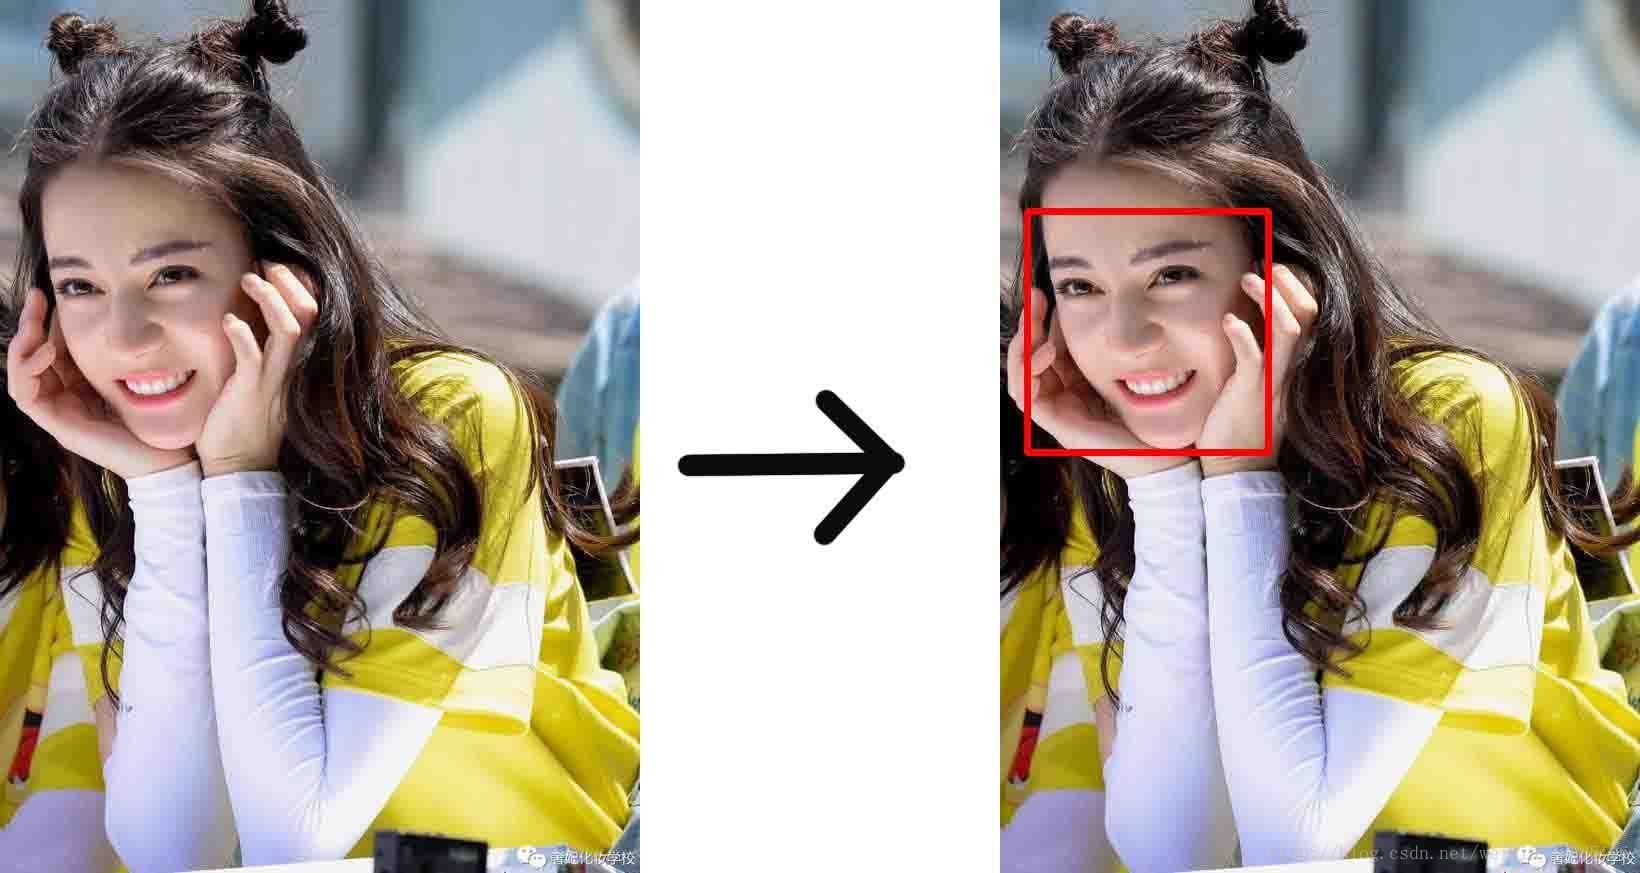
1.目的:输入一张图片,让机器在人脸的位置画出一个框
2.过程概要
- 训练一个能识别一张227*227的图像是否是人脸的二分类模型(使用AlexNet网络)
=>人脸
=>非人脸
- 修改训练好的网络模型,数据层改为输入层,全链接层改为全卷积层(起到窗口滑动的作用)
- 将输入的图片进行放大缩小变换scal变换
- 根据图像的大小,动态的修改网络模型的数据层
- 训练一个能识别一张227*227的图像是否是人脸的二分类模型(使用AlexNet网络)
环境
首先,要安装以下环境
- Ubuntu:
- python
- anaconda:机器学习的python环境,包含了许多必要的库,比如numpy
- opencv:机器视觉常用库
- caffe :网络训练的基础
- cuda:如果用Gpu 运行,需要安装的包
第一步:数据准备
1.标记好的数据
一般这些数据网上都有(http://blog.csdn.net/chenriwei2/article/details/50631212),不用我们自己制作。如果得到的是原始的数据(一张完整的图,指定人脸的区域),那么就需要进行样本采样
- 裁剪工具:http://www.jianshu.com/p/856d1d420854,或者使用opencv裁剪
2.正负样本采样
- 正样本采样:即人脸的部分 ,需要把图片中人脸的部分裁剪出来,要注意的是,裁剪出来后的图片要人工过一遍,数据的好坏对训练的结果影响很大。
- 负样本采样:在非人脸的部分进行随机的采样
    负样本的采样比较复杂,先随机在图片上取图,然后计算与人脸部分的iOU,即重叠率,设定一个阈值,小于这个阈值的就认为是非人脸
    - IOU: http://blog.csdn.net/eddy_zheng/article/details/52126641
- 1
- 2
- 3
- 4
- 5
3.制作lmdb数据
lmdb是caffe的训练数据格式,制作lmdb数据需要准备图片数据和标签数据
- 图片数据是我们上面裁剪好和做好分类的图片
- 标签数据是txt文件,格式是 图片路径+空格+标签 如:1/23039_nonface_0image30595.jpg 1
- 把数据集切分成训练集(train)和测试集合(val)
- 使用以下代码进行lmdb数据的生成
#!/usr/bin/env sh

EXAMPLE=~/code/learn # 输出的文件夹根目录
DATA=~/code/learn #存放标签数据的根目录,该文件夹下有对应的标签数据
TOOLS=~/code/caffe/build/tools  # caffe安装目录的tools文件夹

TRAIN_DATA_ROOT=~/code/learn/train/train/ # 存放训练数据集的目录
VAL_DATA_ROOT=~/code/learn/train/val/ # 存放测试数据集的目录

#resize图片的大小为227*227
RESIZE=true
if $RESIZE; then
  RESIZE_HEIGHT=227
  RESIZE_WIDTH=227
else
  RESIZE_HEIGHT=0
  RESIZE_WIDTH=0
fi

if [ ! -d "$TRAIN_DATA_ROOT" ]; then
  echo "Error: TRAIN_DATA_ROOT is not a path to a directory: $TRAIN_DATA_ROOT"
  echo "Set the TRAIN_DATA_ROOT variable in create_face_48.sh to the path" \
       "where the face_48 training data is stored."
  exit 1
fi

if [ ! -d "$VAL_DATA_ROOT" ]; then
  echo "Error: VAL_DATA_ROOT is not a path to a directory: $VAL_DATA_ROOT"
  echo "Set the VAL_DATA_ROOT variable in create_face_48.sh to the path" \
       "where the face_48 validation data is stored."
  exit 1
fi

echo "Creating train lmdb..."

# 生成训练集lmdb,生成结果在 $EXAMPLE/face_train_lmdb
GLOG_logtostderr=1 $TOOLS/convert_imageset \
    --resize_height=$RESIZE_HEIGHT \
    --resize_width=$RESIZE_WIDTH \
    --shuffle \
    $TRAIN_DATA_ROOT \
    $DATA/train.txt \
    $EXAMPLE/face_train_lmdb

echo "Creating val lmdb..."

# 生成测试集lmdb,生成结果在 $EXAMPLE/face_val_lmdb
GLOG_logtostderr=1 $TOOLS/convert_imageset \
    --resize_height=$RESIZE_HEIGHT \
    --resize_width=$RESIZE_WIDTH \
    --shuffle \
    $VAL_DATA_ROOT \
    $DATA/val.txt \
    $EXAMPLE/face_val_lmdb

echo "Done."
Status API Training Shop Blog About
- 1
- 2
- 3
- 4
- 5
- 6
- 7
- 8
- 9
- 10
- 11
- 12
- 13
- 14
- 15
- 16
- 17
- 18
- 19
- 20
- 21
- 22
- 23
- 24
- 25
- 26
- 27
- 28
- 29
- 30
- 31
- 32
- 33
- 34
- 35
- 36
- 37
- 38
- 39
- 40
- 41
- 42
- 43
- 44
- 45
- 46
- 47
- 48
- 49
- 50
- 51
- 52
- 53
- 54
- 55
- 56
- 57
- 58
4.结果
经过第一步,你应该获取的最终结果是
1.训练集合的lmdb文件:face_train_lmdb文件夹对应的data.mdb和lock.mdb
2.测试集合的lmdb文件:face_val_lmdb文件夹对应的data.mdb和lock.mdb
第二步:训练一个识别图片是否人脸的神经网络
在准备好了数据之后,第二步是训练一个能够识别一张227*227的图片是否是人脸的神经网络
1.网络模型配置
在这里我们不准备讲解这些具体的神经网络,假如你不知道什么是卷积,relu,池化,全连接层的话,你直接使用这些网络配置文件就好了,我们在这里使用的是AlexNet网络(AlexNet:参考http://blog.csdn.net/chaipp0607/article/details/72847422)
- caffe 网络配置 :train.prototxt
train.prototxt文件是定义网络模型的文件, 需要修改的是lmdb数据的路径,对应的训练集和测试集的lmdb数据,以及减均值的路径
############################  注意:这里只是train.prototxt文件的一部分,你需要下载完整的train.prototxt  #############################
layer {
  top: "data"
  top: "label"
  name: "data"
  type: "Data"
  data_param {
    source: "/home/tas/code/learn/face_train_lmdb" #训练集的lmdb路径
    backend:LMDB
    batch_size: 64
  }
  transform_param {
     #mean_file: "/home/tas/code/caffe/data/ilsvrc12/imagenet_mean.binaryproto" # caffe安装目录对应的文件,用于减均值计算
     mirror: true
  }
  include: { phase: TRAIN }
}
- 1
- 2
- 3
- 4
- 5
- 6
- 7
- 8
- 9
- 10
- 11
- 12
- 13
- 14
- 15
- 16
- 17
- 运行配置:solver.prototxt
参考:https://www.cnblogs.com/denny402/p/5074049.html
net: "/home/tas/code/learn/train.prototxt" # 定义的网络模型
test_iter: 100 # 测试时迭代的次数,batch_size(在train.prototxt定义)*test_iter要等于测试集合的大小
test_interval: 500 # 每训练500次进行一次测试
# lr for fine-tuning should be lower than when starting from scratch
base_lr: 0.001 # 基础学习率
lr_policy: "step"
gamma: 0.1
# stepsize should also be lower, as we're closer to being done
stepsize: 20000
display: 100
max_iter: 100000 # 训练的次数
momentum: 0.9
weight_decay: 0.0005
snapshot: 10000 # 每训练10000次保存一次模型
snapshot_prefix: "/home/tas/code/learn/model/" # 最后生成模型的保存路径
# uncomment the following to default to CPU mode solving
solver_mode: GPU # 这里使用GPU的话需要安装CUDA等环境,并且caffe编译时要注释掉CPU_only,否则使用CPU
- 1
- 2
- 3
- 4
- 5
- 6
- 7
- 8
- 9
- 10
- 11
- 12
- 13
- 14
- 15
- 16
- 17
- 运行文件:train.sh
#!/usr/bin/env sh

/home/tas/code/caffe/build/tools/caffe train --solver=/home/tas/code/learn/solver.prototxt \
#--snapshot=/home/tas/code/learn/model/_iter_72484.solverstate \ # 如果要接着上次的训练结果据需运行,取消注释这行,并制定到对应上次训练后生成的文件
#--gpu all # GPU模式取消注释这行
- 1
- 2
- 3
- 4
- 5
- 执行训练,打开终端,进入到train.sh的目录,在命令行里敲入以下代码就开始训练了
sh train.sh
- 1
2.防止过拟合
在我们训练的过程中,可能出现过拟合的情况,过拟合的情况就是在训练集里的效果很好,准确率很高,但是在测试集的测试的结果却很差,我们可以挑选效果最好的model,调低基础学习率,再次训练
3.GPU运行
- 安装CUDA
- caffe 中Makefile.config 注释 CPU_only,重新编译
- 设置GPU模式:solver.prototxt
-  train.sh选用GPU
- 1
- 2
- 3
- 4
- 5
4.结果
经过第二步,你得到的结果应该是一个.caffemodel文件
第三步,编写代码
1.修改模型
- 在写代码前,我们需要先调整下网络模型train.prototxt,修改后的文件为deploy_full_conv.prototxt,调整的目的
- 删除数据层,修改为输入层
由于我们现在没有数据的,每次输入一张图片输入模型进行运算,需要先删除掉data层,改为如下的代码
- 删除数据层,修改为输入层
name: "CaffeNet_full_conv"
input: "data"
input_dim: 1  # 每次输入一张图片
input_dim: 3    # 图片的RPG三通道
input_dim: 500  # 图片的宽
input_dim: 500  # 图片的高
- 1
- 2
- 3
- 4
- 5
- 6
- 把全链接层改为全卷积层达到窗口滑动的效果。
训练好的模型只能识别227*227大小的图片,我们需要把全连接层改为全卷积层,这样子能够达到一个窗口滑动的效果,扫描整张图片。所以就会的输出结果应该是多个结果的概率矩阵。
修改全连接层只需要把对应的layer层的type从InnerProduct 修改为 Convolution,并且修改全连接的参数inner_product_param为卷积的参数convolution_param,具体的参数是一样的,只需要再增加一个卷积核大小的参数kernel_size
修改前的第六层
layer {
  name: "fc6" type: "InnerProduct" bottom: "pool5" top: "fc6" param { lr_mult: 1 decay_mult: 1 }
  param {
    lr_mult: 2 decay_mult: 0 }
  inner_product_param {
    num_output: 4096 weight_filler { type: "gaussian" std: 0.005 }
    bias_filler {
      type: "constant" value: 0.1 }
  }
}
- 1
- 2
- 3
- 4
- 5
- 6
- 7
- 8
- 9
- 10
- 11
- 12
- 13
- 14
- 15
- 16
- 17
- 18
- 19
- 20
- 21
- 22
- 23
- 24
- 25
修改后
layer {
  name: "fc6-conv" type: "Convolution" bottom: "pool5" top: "fc6-conv" param { lr_mult: 1 decay_mult: 1 }
  param {
    lr_mult: 2 decay_mult: 0 }
  convolution_param {
    num_output: 4096 kernel_size: 6 weight_filler { type: "gaussian" std: 0.005 }
    bias_filler {
      type: "constant" value: 1 }
  }
}
- 1
- 2
- 3
- 4
- 5
- 6
- 7
- 8
- 9
- 10
- 11
- 12
- 13
- 14
- 15
- 16
- 17
- 18
- 19
- 20
- 21
- 22
- 23
- 24
- 25
- 26
同样对其他两层全连接层做一样的操作
- 删除两层pool层,增加计算精度
- 删除accuracy层和loss层,因为我们已经不需要计算精度了,我们只需要一个结果
- 增加Softmax层,将计算结果转化为概率输出
2.图片的scal变换
上面训练的模型只能识别一个227*227大小的,但是输入的图片内人脸的大小不一定是这么大,有可能偏大500*500,或者偏小50*50,所以需要对原图多次进行缩放后才作为结果输入,这样子总有一张图的头像区域的大小是接近227*227的。
3. 动态修改模型
由于每张输入的图片大小都可能不一样,需要动态的修改输入层图片的大小
4.非最大值抑制(NMS)
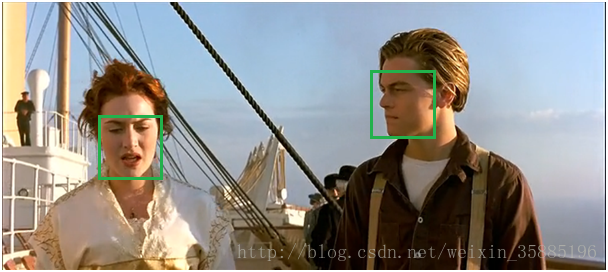
一个人脸可能被多次识别,但是我们只需要一个最准确的结果就可以了,
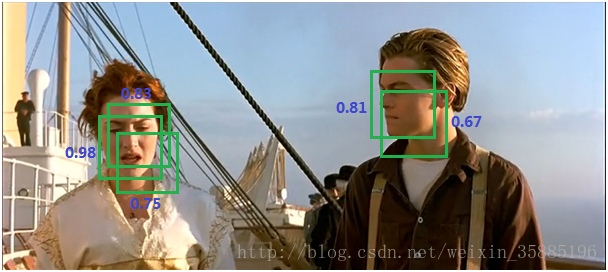
取概率最大值后
具体可参考:http://blog.csdn.net/shuzfan/article/details/52711706
或者直接使用以下的代码:并最终调用nms_average(boxes_nums, 1, 0.2)
boxes_nums 是模型数据的结果,
class Point(object):
    def __init__(self, x, y):
        self.x = x
        self.y = y
def calculateDistance(x1,y1,x2,y2):
    dist = math.sqrt((x2 - x1)**2 + (y2 - y1)**2)
    return dist

def range_overlap(a_min, a_max, b_min, b_max):

    return (a_min <= b_max) and (b_min <= a_max)

def rect_overlaps(r1,r2):
    return range_overlap(r1.left, r1.right, r2.left, r2.right) and range_overlap(r1.bottom, r1.top, r2.bottom, r2.top)

def rect_merge(r1,r2, mergeThresh):

    if rect_overlaps(r1,r2):
        # dist = calculateDistance((r1.left + r1.right)/2, (r1.top + r1.bottom)/2, (r2.left + r2.right)/2, (r2.top + r2.bottom)/2)
        SI= abs(min(r1.right, r2.right) - max(r1.left, r2.left)) * abs(max(r1.bottom, r2.bottom) - min(r1.top, r2.top))
        SA = abs(r1.right - r1.left)*abs(r1.bottom - r1.top)
        SB = abs(r2.right - r2.left)*abs(r2.bottom - r2.top)
        S=SA+SB-SI
        ratio = float(SI) / float(S)
        if ratio > mergeThresh :
            return 1
    return 0
class Rect(object):
    def __init__(self, p1, p2):
        '''Store the top, bottom, left and right values for points
               p1 and p2 are the (corners) in either order
        '''
        self.left   = min(p1.x, p2.x)
        self.right  = max(p1.x, p2.x)
        self.bottom = min(p1.y, p2.y)
        self.top    = max(p1.y, p2.y)

    def __str__(self):
        return "Rect[%d, %d, %d, %d]" % ( self.left, self.top, self.right, self.bottom )
def nms_average(boxes, groupThresh=2, overlapThresh=0.2):
    rects = []
    temp_boxes = []
    weightslist = []
    new_rects = []
    for i in range(len(boxes)):
        if boxes[i][4] > 0.2:
            rects.append([boxes[i,0], boxes[i,1], boxes[i,2]-boxes[i,0], boxes[i,3]-boxes[i,1]])


    rects, weights = cv2.groupRectangles(rects, groupThresh, overlapThresh)

    rectangles = []
    for i in range(len(rects)):

        testRect = Rect( Point(rects[i,0], rects[i,1]), Point(rects[i,0]+rects[i,2], rects[i,1]+rects[i,3]))
        rectangles.append(testRect)
    clusters = []
    for rect in rectangles:
        matched = 0
        for cluster in clusters:
            if (rect_merge( rect, cluster , 0.2) ):
                matched=1
                cluster.left   =  (cluster.left + rect.left   )/2
                cluster.right  = ( cluster.right+  rect.right  )/2
                cluster.top    = ( cluster.top+    rect.top    )/2
                cluster.bottom = ( cluster.bottom+ rect.bottom )/2

        if ( not matched ):
            clusters.append( rect )
    result_boxes = []
    for i in range(len(clusters)):

        result_boxes.append([clusters[i].left, clusters[i].bottom, clusters[i].right, clusters[i].top, 1])

    return result_boxes
- 1
- 2
- 3
- 4
- 5
- 6
- 7
- 8
- 9
- 10
- 11
- 12
- 13
- 14
- 15
- 16
- 17
- 18
- 19
- 20
- 21
- 22
- 23
- 24
- 25
- 26
- 27
- 28
- 29
- 30
- 31
- 32
- 33
- 34
- 35
- 36
- 37
- 38
- 39
- 40
- 41
- 42
- 43
- 44
- 45
- 46
- 47
- 48
- 49
- 50
- 51
- 52
- 53
- 54
- 55
- 56
- 57
- 58
- 59
- 60
- 61
- 62
- 63
- 64
- 65
- 66
- 67
- 68
- 69
- 70
- 71
- 72
- 73
- 74
- 75
人脸坐标映射
由于最终结果是一个概率点,我们需要根据网络模型结构把它映射回原图
def GenrateBoundingBox(featureMap, scale):
    boundingBox = []
    stride = 32 # 可以把网络结构进行了32倍卷积
    cellSize = 227 #滑动窗口的大小
    for (x, y), prob in np.ndenumerate(featureMap):
        if prob>0.95:
            boundingBox.append([float(stride*y)/scale, float(stride*x)/scale,
                               float(stride * y+ cellSize - 1) / scale, float(stride*x+ cellSize - 1)/scale,
                               prob])

    return boundingBox
- 1
- 2
- 3
- 4
- 5
- 6
- 7
- 8
- 9
- 10
- 11
完整的代码
- 注意:这里的”/home/tas/code/”是我本机的路径,根据你自己的路径进行修改
# -*- coding: utf-8 -*-

import sys
import os
from math import pow
from PIL import Image, ImageDraw,ImageFont
import cv2
import math
import random
import numpy as np

caffe_root = '/home/tas/code/caffe/'
sys.path.insert(0, caffe_root+'python')
# 设置log等级
os.environ['GLOG_minloglevel'] = '2'
import caffe
caffe.set_mode_gpu()


temp_path =  '/home/tas/code/learn/temp_img/'

def face_detection(imgFile):
# 这里调用的是第二步生成的模型和第三步修改后的神经网络
    net_full_conv = caffe.Net('/home/tas/code/learn/deploy_full_conv.prototxt',
                              '/home/tas/code/learn/alexnet_iter_50000_full_conv.caffemodel',
                              caffe.TEST)
    scales = [] # 刻度
    factor = 0.79 # 变换的倍数
    img = cv2.imread(imgFile)
    # 最大倍数
    largest = min(2, 4000/max(img.shape[0:2]))
    # 最小的边的长度
    minD = largest*min(img.shape[0:2])
    scale = largest
    # 从最大到最小227,获取变换的倍数
    while minD >= 227:
        scales.append(scale)
        scale *= factor
        minD *= factor
    # 存储人脸图
    total_box = []

    # 变换图片
    for scale in scales:
        fileName = "img_"+str(scale)+'.jpg'
        scale_img = cv2.resize(img, (int((img.shape[0]*scale)), int(img.shape[1]*scale)))
        cv2.imwrite(temp_path+fileName, scale_img)
        im = caffe.io.load_image(temp_path+fileName)
        # 动态修改数据层的大小?这里为什么时1,0 而不是0,1
        net_full_conv.blobs['data'].reshape(1, 3, scale_img.shape[1], scale_img.shape[0])
        transformer = caffe.io.Transformer({'data':net_full_conv.blobs['data'].data.shape})
        # 减均值,归一化
        transformer.set_mean('data', np.load(caffe_root+'python/caffe/imagenet/ilsvrc_2012_mean.npy'))
        # 维度变换 ,cafee默认的时BGR格式,要把RGB(0,1,2)改为BGR(2,0,1)
        transformer.set_transpose('data', (2, 0, 1))
        # 像素
        transformer.set_raw_scale('data', 255)
        transformer.set_channel_swap('data', (2, 1, 0))

        # 人脸坐标映射
        # 前先传播,映射到原始图像的位置
        out = net_full_conv.forward_all(data=np.asarray(transformer.preprocess('data', im)))
        #out['prob'][0, 1] 0表示类别,1表示概率
        boxes = GenrateBoundingBox(out['prob'][0, 1], scale)
        if(boxes):
            total_box.extend(boxes)
    boxes_nums = np.array(total_box)
    #nms 处理
    true_boxes = nms_average(boxes_nums, 1, 0.2)
    if not true_boxes == []:
        x1,y1,x2,y2 = true_boxes[0][:-1]
        cv2.rectangle(img,(int(x1), int(y1)), (int(x2), int(y2)), (0, 0, 255), thickness=5)
        cv2.imwrite('/home/tas/code/learn/result_img/result.jpg', img)
        # cv2.imshow('test', img)

def GenrateBoundingBox(featureMap, scale):
    boundingBox = []
    stride = 32
    cellSize = 227 #滑动窗口的大小
    for (x, y), prob in np.ndenumerate(featureMap):
        if prob>0.95:
            boundingBox.append([float(stride*y)/scale, float(stride*x)/scale,
                               float(stride * y+ cellSize - 1) / scale, float(stride*x+ cellSize - 1)/scale,
                               prob])

    return boundingBox


class Point(object):
    def __init__(self, x, y):
        self.x = x
        self.y = y
def calculateDistance(x1,y1,x2,y2):
    dist = math.sqrt((x2 - x1)**2 + (y2 - y1)**2)
    return dist

def range_overlap(a_min, a_max, b_min, b_max):

    return (a_min <= b_max) and (b_min <= a_max)

def rect_overlaps(r1,r2):
    return range_overlap(r1.left, r1.right, r2.left, r2.right) and range_overlap(r1.bottom, r1.top, r2.bottom, r2.top)

def rect_merge(r1,r2, mergeThresh):

    if rect_overlaps(r1,r2):
        # dist = calculateDistance((r1.left + r1.right)/2, (r1.top + r1.bottom)/2, (r2.left + r2.right)/2, (r2.top + r2.bottom)/2)
        SI= abs(min(r1.right, r2.right) - max(r1.left, r2.left)) * abs(max(r1.bottom, r2.bottom) - min(r1.top, r2.top))
        SA = abs(r1.right - r1.left)*abs(r1.bottom - r1.top)
        SB = abs(r2.right - r2.left)*abs(r2.bottom - r2.top)
        S=SA+SB-SI
        ratio = float(SI) / float(S)
        if ratio > mergeThresh :
            return 1
    return 0
class Rect(object):
    def __init__(self, p1, p2):
        '''Store the top, bottom, left and right values for points
               p1 and p2 are the (corners) in either order
        '''
        self.left   = min(p1.x, p2.x)
        self.right  = max(p1.x, p2.x)
        self.bottom = min(p1.y, p2.y)
        self.top    = max(p1.y, p2.y)

    def __str__(self):
        return "Rect[%d, %d, %d, %d]" % ( self.left, self.top, self.right, self.bottom )
def nms_average(boxes, groupThresh=2, overlapThresh=0.2):
    rects = []
    temp_boxes = []
    weightslist = []
    new_rects = []
    for i in range(len(boxes)):
        if boxes[i][4] > 0.2:
            rects.append([boxes[i,0], boxes[i,1], boxes[i,2]-boxes[i,0], boxes[i,3]-boxes[i,1]])


    rects, weights = cv2.groupRectangles(rects, groupThresh, overlapThresh)

    rectangles = []
    for i in range(len(rects)):

        testRect = Rect( Point(rects[i,0], rects[i,1]), Point(rects[i,0]+rects[i,2], rects[i,1]+rects[i,3]))
        rectangles.append(testRect)
    clusters = []
    for rect in rectangles:
        matched = 0
        for cluster in clusters:
            if (rect_merge( rect, cluster , 0.2) ):
                matched=1
                cluster.left   =  (cluster.left + rect.left   )/2
                cluster.right  = ( cluster.right+  rect.right  )/2
                cluster.top    = ( cluster.top+    rect.top    )/2
                cluster.bottom = ( cluster.bottom+ rect.bottom )/2

        if ( not matched ):
            clusters.append( rect )
    result_boxes = []
    for i in range(len(clusters)):

        result_boxes.append([clusters[i].left, clusters[i].bottom, clusters[i].right, clusters[i].top, 1])

    return result_boxes

face_detection('/home/tas/code/learn/result_img/timg.jpeg')
- 1
- 2
- 3
- 4
- 5
- 6
- 7
- 8
- 9
- 10
- 11
- 12
- 13
- 14
- 15
- 16
- 17
- 18
- 19
- 20
- 21
- 22
- 23
- 24
- 25
- 26
- 27
- 28
- 29
- 30
- 31
- 32
- 33
- 34
- 35
- 36
- 37
- 38
- 39
- 40
- 41
- 42
- 43
- 44
- 45
- 46
- 47
- 48
- 49
- 50
- 51
- 52
- 53
- 54
- 55
- 56
- 57
- 58
- 59
- 60
- 61
- 62
- 63
- 64
- 65
- 66
- 67
- 68
- 69
- 70
- 71
- 72
- 73
- 74
- 75
- 76
- 77
- 78
- 79
- 80
- 81
- 82
- 83
- 84
- 85
- 86
- 87
- 88
- 89
- 90
- 91
- 92
- 93
- 94
- 95
- 96
- 97
- 98
- 99
- 100
- 101
- 102
- 103
- 104
- 105
- 106
- 107
- 108
- 109
- 110
- 111
- 112
- 113
- 114
- 115
- 116
- 117
- 118
- 119
- 120
- 121
- 122
- 123
- 124
- 125
- 126
- 127
- 128
- 129
- 130
- 131
- 132
- 133
- 134
- 135
- 136
- 137
- 138
- 139
- 140
- 141
- 142
- 143
- 144
- 145
- 146
- 147
- 148
- 149
- 150
- 151
- 152
- 153
- 154
- 155
- 156
- 157
- 158
- 159
- 160
- 161
- 162
- 163
- 164
- 165
- 166
测试
最后,调用函数,就会生成一张倍圈中人脸的图片
face_detection('test.jpg')
- 1
问题
1.在哪里进行窗口滑动:将全链接层改为全卷积层
2.为什么要用全卷积层替换全链接层
参考:http://blog.csdn.net/nnnnnnnnnnnny/article/details/70194432
文章出自:https://blog.csdn.net/weixin_35885196/article/details/78877813