Nexus 是一个强大的maven仓库管理器,它极大地简化了本地内部仓库的维护和外部仓库的访问。,还可以用来创建yum、pypi、npm、docker、nuget、rubygems 等各种私有仓库。
安装
安装 JDK 环境
# tar -xzf jdk-8u211-linux-x64.tar.gz -C /usr/local/
# vim /etc/profile
export JAVA_HOME=/usr/local/jdk1.8.0_211/
export JRE_HOME=/usr/loca/jdk1.8.0_211/jre
export CLASSPATH=$JAVA_HOME/lib/tools.jar:$JAVA_HOME/lib/dt.jar
export PATH=$JAVA_HOME/bin:$JRE_HOME/bin:$PATH
# source /etc/profile
下载 nexus 安装包
# wget https://download.sonatype.com/nexus/3/latest-unix.tar.gz
# mkdir /opt/nexus
# tar -xzf nexus-3.16.1-02-unix.tar.gz -C /opt/nexus
# useradd nexus #以nexus用户运行
# chown -R nexus.nexus /opt/nexus

nexus解压后的两个文件
nexus-xxx nexus运行需要的文件,如运行脚本、依赖jar包
sonatype-work 该目录包含nexus生成的配置文件、日志文件、仓库文件等

### 优化配置

1) 配置运行用户
# cd /nexus/nexus.x.x.x/bin/
# vim nexus.rc
run_as_user="nexus" ----取消注释

2)可以手动配置jdk的路径
如果不配置的话,会使用默认的JAVA_HOME的环境变量
# cd /nexus/nexus.x.x.x/bin/
# vim nexus
INSTALL4J_JAVA_HOME_OVERRIDE=/usr/local/jdk1.8.0_144 #第14行

3)修改端口
一般使用默认的端口
# cd /nexus/nexusx.x.x.x/bin
# vim nexus-default.properties

4)配置存储及日志位置
一般不做修改,使用默认
# cd /nexus/nexusx.x.x.x/bin/
# vim nexus.vmoptions
修改完配置文件、运行
# sudo su - nexus
# cd /opt/nexus/nexus.x.x.x/bin
# ./nexus run & #后台运行
# 使用web页面进行设置代理仓库
http://localhost:8081

bin目录下执行执行 ./nexux start 命令启动。
脚本涵盖:./nexus {

    console | start | stop | restart | status | dump}
(3.X启动 nohup ./bin/nexus run > logs/nexus.log 2>&1 &)

后http://ip:port访问成功即可。

若启动成功,访问失败大概率是防火墙拦截导致,详见配置项四。

默认账号和密码:admin/admin123(3.X密码在data/admin.password)
私服的使用
一些私服的专业词
hosted,本地仓库(也叫宿主仓库),通常我们会部署自己的构件到这一类型的仓库或者是第三方的包(如:oracel的)。
proxy,代理仓库,它们被用来代理远程的公共仓库,如maven中央仓库。
group,仓库组,用来合并多个hosted/proxy仓库,通常我们配置maven依赖仓库组
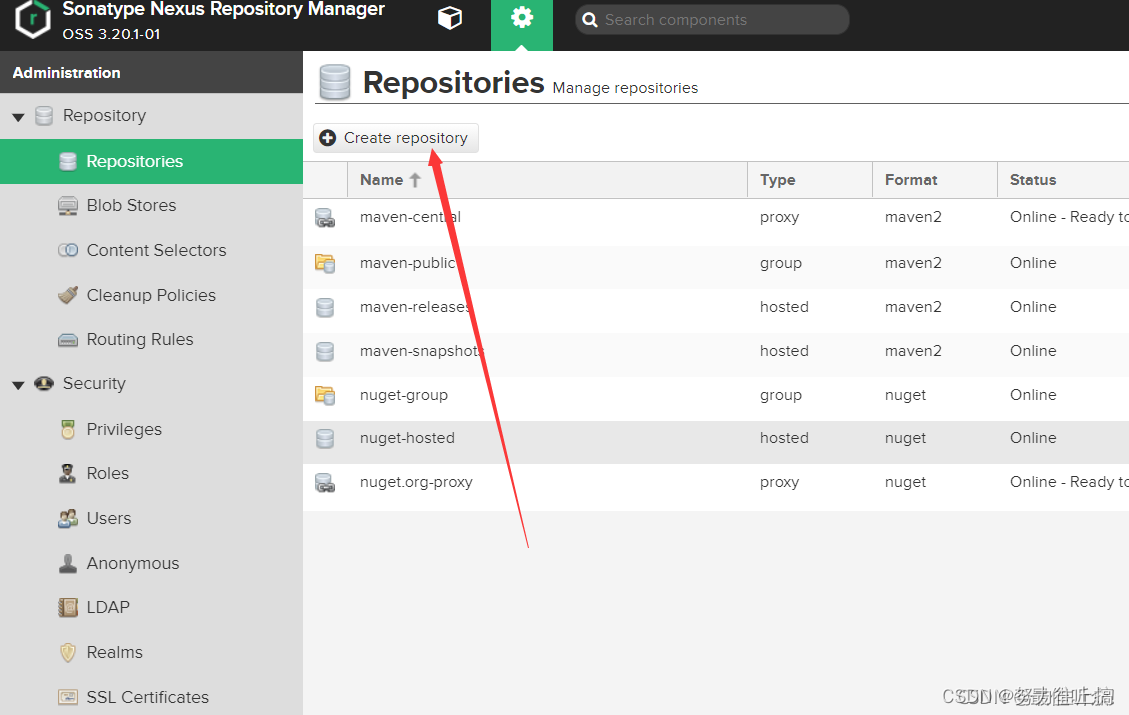
maven-central:maven中央库,默认从https://repo1.maven.org/maven2/拉取jar
maven-releases:私库发行版jar
maven-snapshots:私库快照(调试版本)jar
maven-public:仓库分组,把上面三个仓库组合在一起对外提供服务,在本地maven基础配置settings.xml中使用。
Hosted有三种方式:Releases、Snapshot、Mixed
Releases: 一般是已经发布的Jar包
Snapshot: 未发布的版本
Mixed:混合的
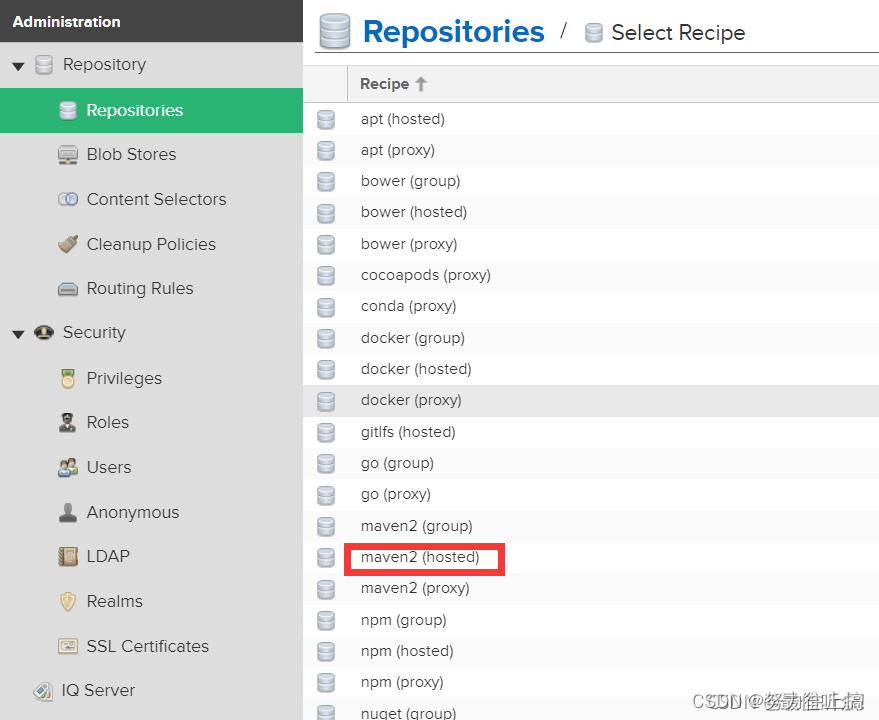
创建 Proxy Repository 代理仓库
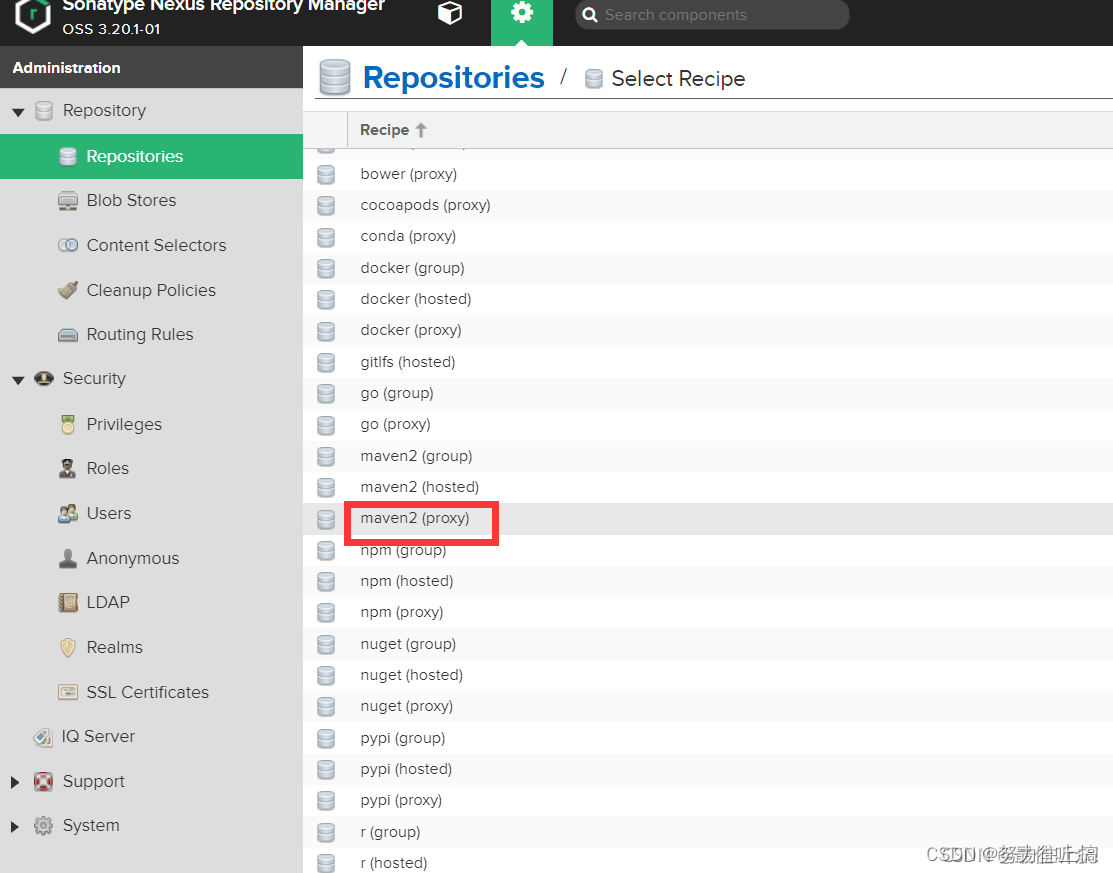
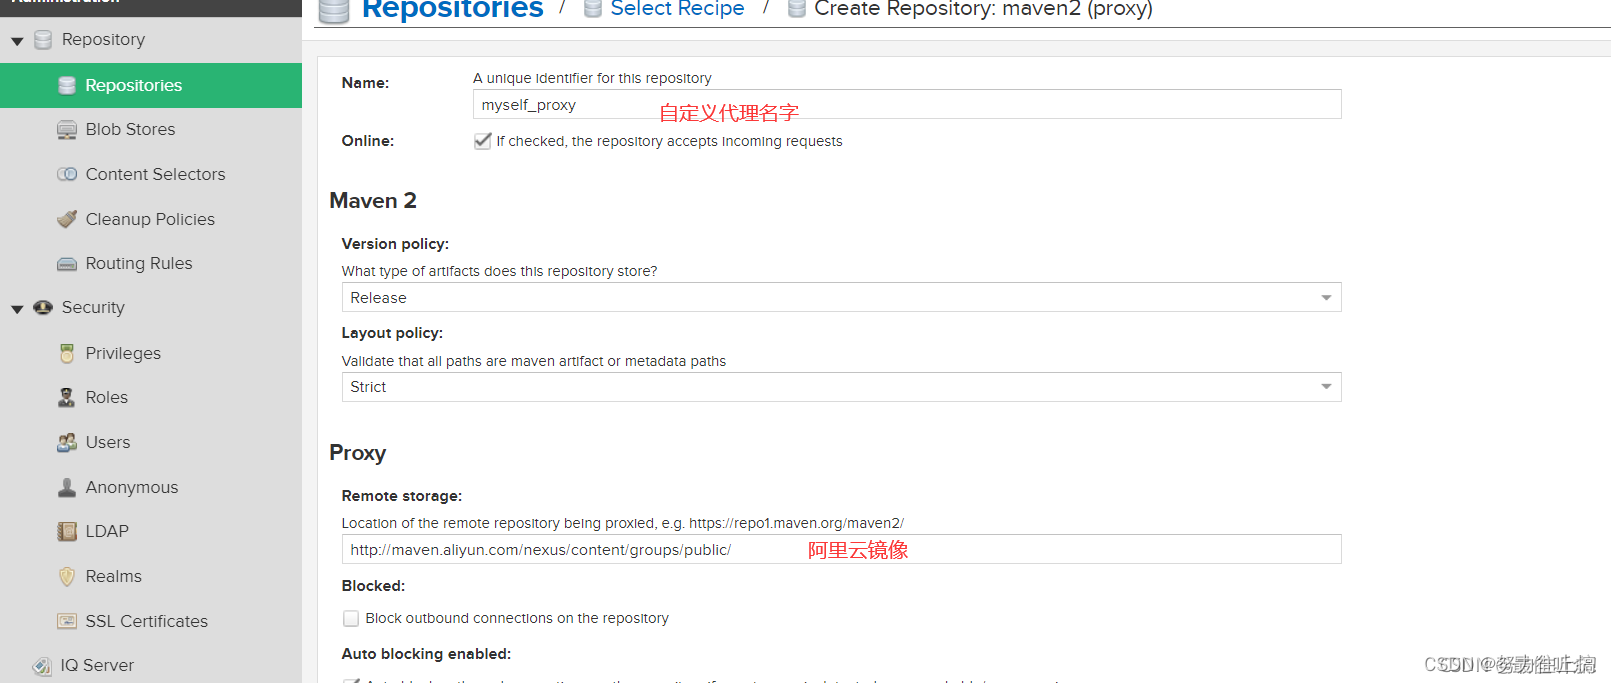
新建自定义的仓库
点击Create repository,然后选择类型为 maven2(hosted)

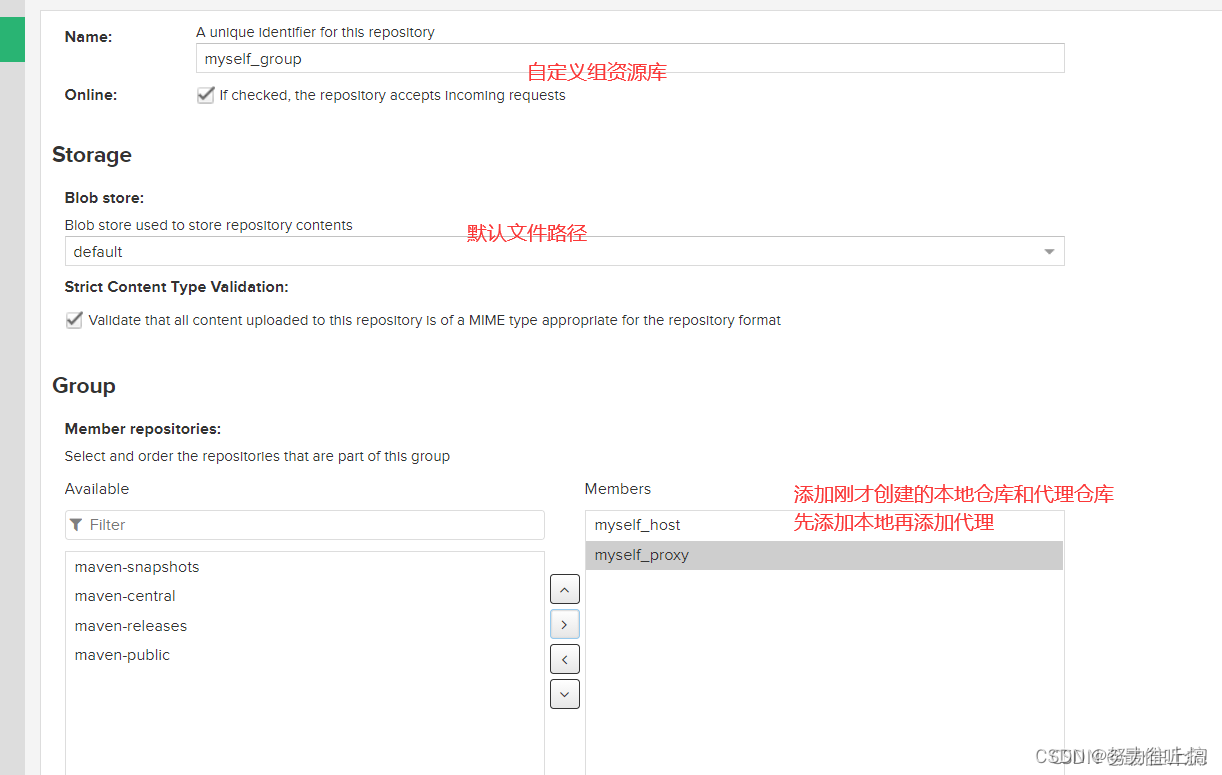
自定义组资源库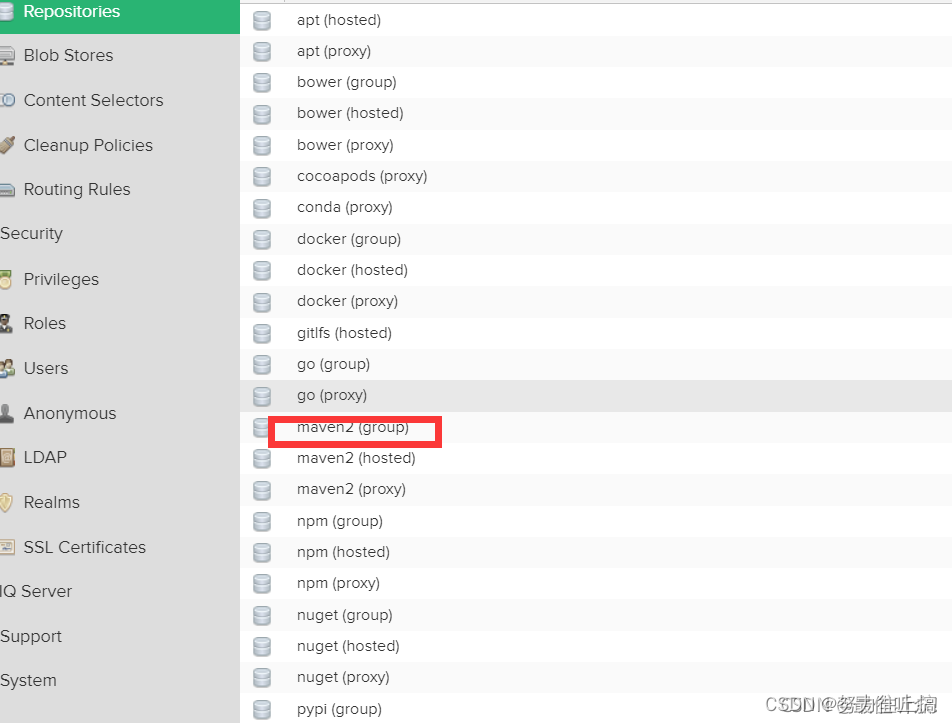
三 在Maven 项目使用 Nexus 私服
3.1创建角色
一个角色下有多个用户 ,有了角色才能分配给用户权限

3.2 创建用户
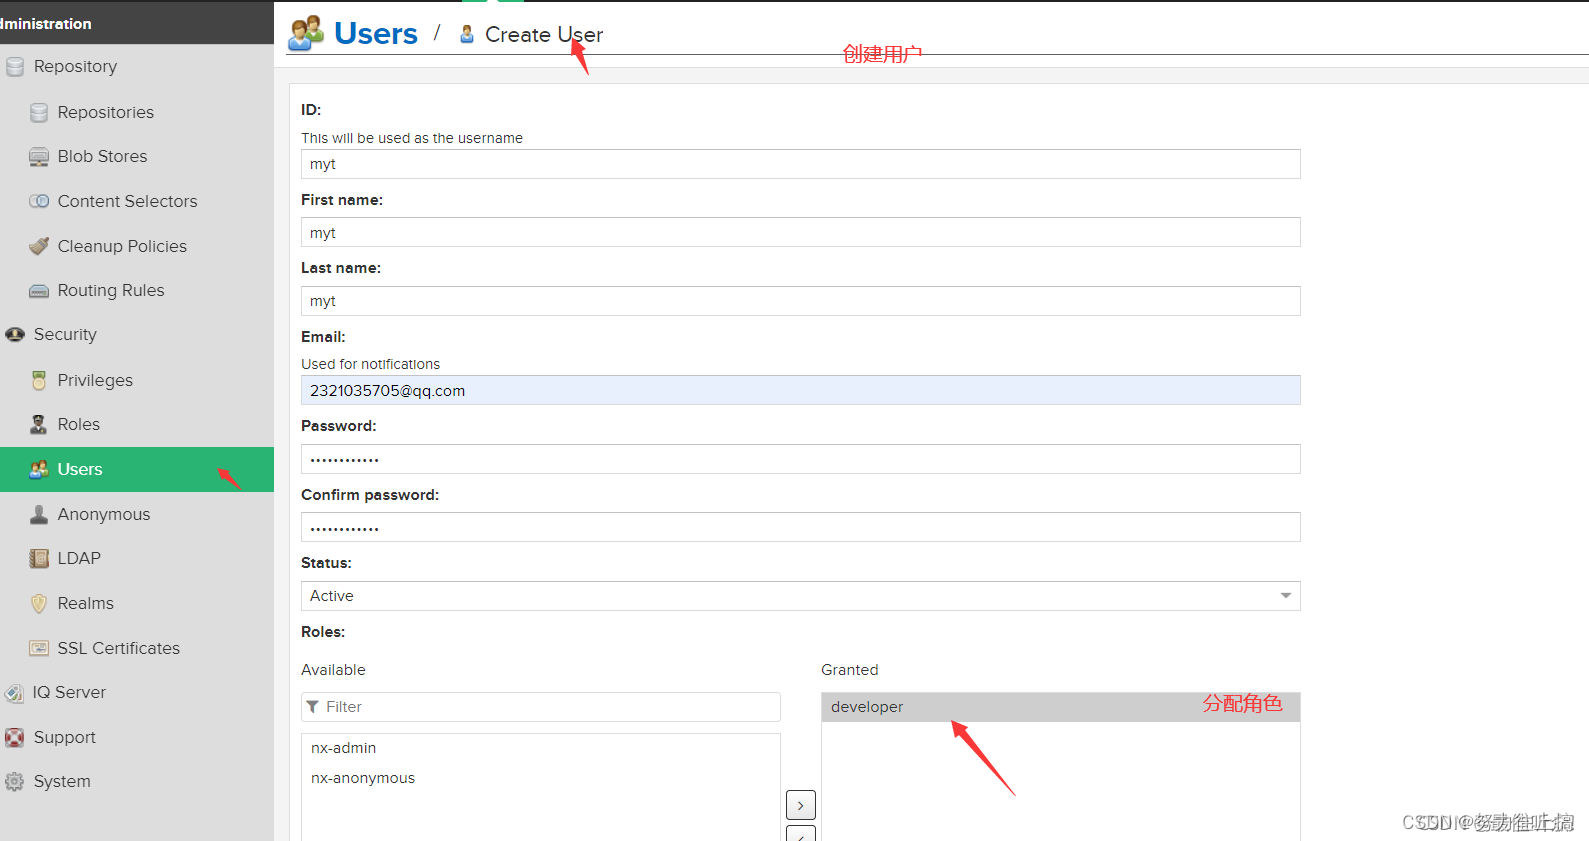
创建成功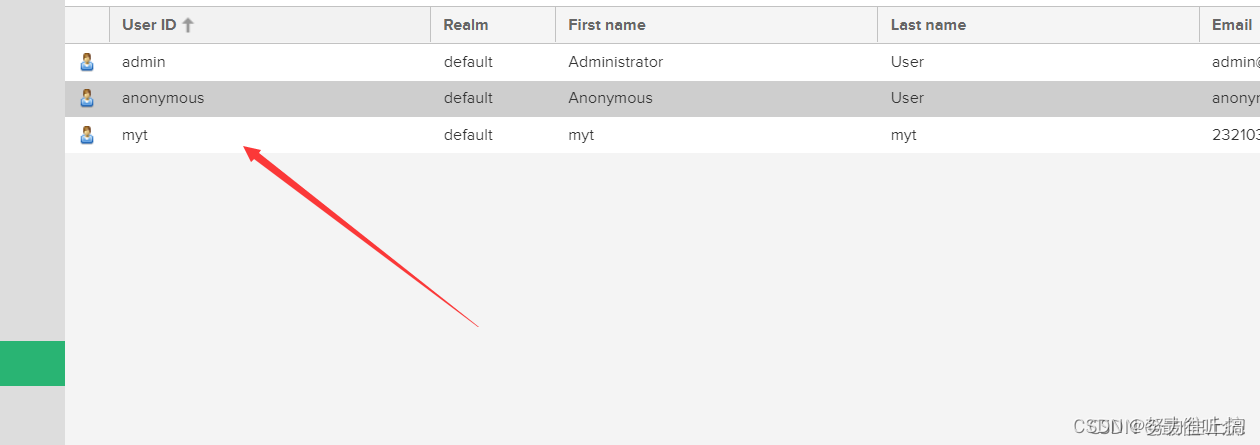
3.3 maven setting.xml文件配置
:定义jar包下载的Maven仓库、定义部署服务器。
但是某些配置例如username和password就保存在构建服务器中的settings.xml中。
id:server 的id,用于匹配distributionManagement库id,比较重要。
username, password:用于登陆此服务器的用户名和密码
privateKey, passphrase:设置private key,以及passphrase
filePermissions, directoryPermissions:当库文件或者目录创建后,需要使用权限进行访问。参照unix文件许可,如664和775
:表示镜像库,指定库的镜像,用于增加其他库。mirror相当于一个拦截器,它会拦截maven对remote repository的相关请求,把请求里的remote repository地址,重定向到mirror里配置的地址。
id,name:唯一的标志,用于区别镜像
url:镜像的url
mirrorOf:此镜像指向的服务id
在maven中配置私服,编辑setting.xml
Maven的中央仓库地址默认是:https://repo.maven.apache.org/maven2/,可以通过修改settings.xml文件来修改默认的中央仓库地址:
<?xml version="1.0" encoding="UTF-8"?>

<settings xmlns="http://maven.apache.org/SETTINGS/1.0.0"
          xmlns:xsi="http://www.w3.org/2001/XMLSchema-instance"
          xsi:schemaLocation="http://maven.apache.org/SETTINGS/1.0.0 http://maven.apache.org/xsd/settings-1.0.0.xsd">
    <!--本地仓库-->
  	<localRepository>D:/maven/repository</localRepository>
	<interactiveMode>true</interactiveMode>
    <offline>false</offline>
	<!--配置权限,使用默认用户-->
	<servers>
		<server>
		    <!--这是server的id(注意不是用户登陆的id),该id与repository元素的id相匹配。 -->
         <id>maven-releases</id>
         <username>admin</username>
         <password>2321035705Ma</password>
     </server>

     <server>
         <id>maven-snapshots</id>
         <username>admin</username>
         <password>2321035705Ma</password>
     </server>

     <server>
         <id>myself_group</id>
         <username>admin</username>
         <password>2321035705Ma</password>
     </server>
	</servers>

	<mirrors>
		<!--阿里云镜像-->
		<mirror>
	      <id>alimaven</id>
	      <name>aliyun maven</name>
	      <url>http://maven.aliyun.com/nexus/content/groups/public/</url>
	      <mirrorOf>central</mirrorOf>
	    </mirror>
    </mirrors>


	<profiles>
		<profile>
		   <id>nexus</id>
			    <activation>
			     <activeByDefault>true</activeByDefault>
				 <jdk>1.8</jdk>
			    </activation>
			    <repositories>
					<!-- 私有库地址-->
				    <repository>
						<id>nexus-group</id>
						<url>http://localhost:8081/repository/nexus-group/</url>
						<!-- <releases><enabled>true</enabled></releases>告诉Maven可以从这个仓库下载releases版本的构件-->
						<releases>
							<enabled>true</enabled>
						</releases>
						<snapshots>
							<enabled>true</enabled>
						</snapshots>
					</repository>


				</repositories>
				<pluginRepositories>
					<!--插件库地址-->
					<!-- 如果是配置了repositories,那么你会发现在mvn在下载依赖的时候,一部分从阿里云下载,一部分还是从默认的仓库(https://repo.maven.apache.org )下载-->
					<pluginRepository>
						<id>nexus-group</id>
						<url>http://localhost:8081/repository/nexus-group/</url>

						<releases>
							<enabled>true</enabled>
						</releases>
						<snapshots>
							<enabled>true</enabled>
					   </snapshots>
					</pluginRepository>
				</pluginRepositories>
			</profile>

			<profile>
		     <id>jdk-1.8</id>
			 <activation>
			     <activeByDefault>true</activeByDefault>
				 <jdk>1.8</jdk>
			 </activation>
			 <properties>
			     <maven.compiler.source>1.8</maven.compiler.source>
				 <maven.compiler.target>1.8</maven.compiler.target>
				 <maven.compiler.compilerVersion>1.8</maven.compiler.compilerVersion>
			 </properties>
		</profile>
	</profiles>

	<!--激活profile-->
	<activeProfiles>
	<!--将所有repositories以及pluginRepositories元素放到这个profile中,然后,使用<activeProfiles>元素自动激活该profile。这样,你就不用再为每个POM重复配置仓库-->
		<activeProfile>nexus</activeProfile>
		<activeProfile>jdk-1.8</activeProfile>
	</activeProfiles>
</settings>
3.4部署的仓库是用POM中distributionManagement元素来定义的。
准备发布的jar 运行:mvn deploy即可
  <distributionManagement>
    <repository>
        <id>maven-releases</id>
        <name>Nexus Release Repository</name>
        <url>http://localhost:8081/repository/maven-releases/</url>
    </repository>
    <snapshotRepository>
        <id>maven-snapshots</id>
        <name>Nexus Snapshot Repository</name>
        <url>http://localhost:8081/repository/maven-snapshots/</url>
    </snapshotRepository>
</distributionManagement>
3.5用来下载依赖是用POM中的repositories
<repositories>
  <repository>
    <id>nexus</id>
    <url>http://121.4.207.231:8081/repository/maven-public/</url>
    <releases>
      <enabled>true</enabled>
    </releases>
    <snapshots>
    <enabled>true</enabled>
    </snapshots>
  </repository>
</repositories>
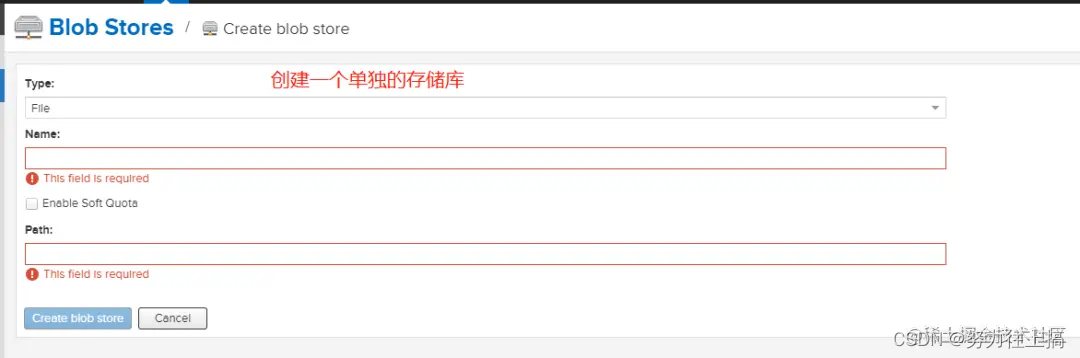
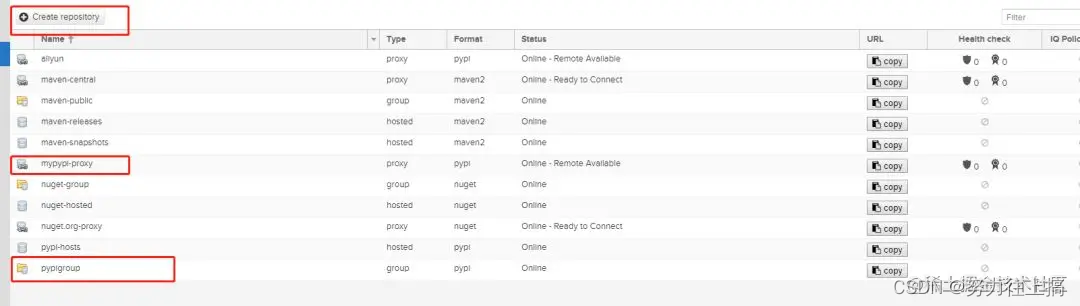
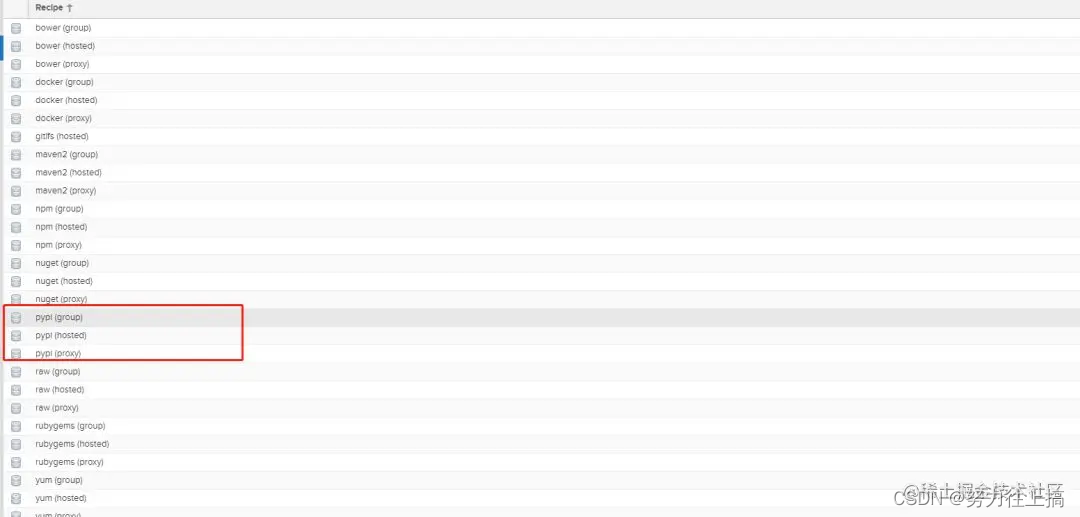
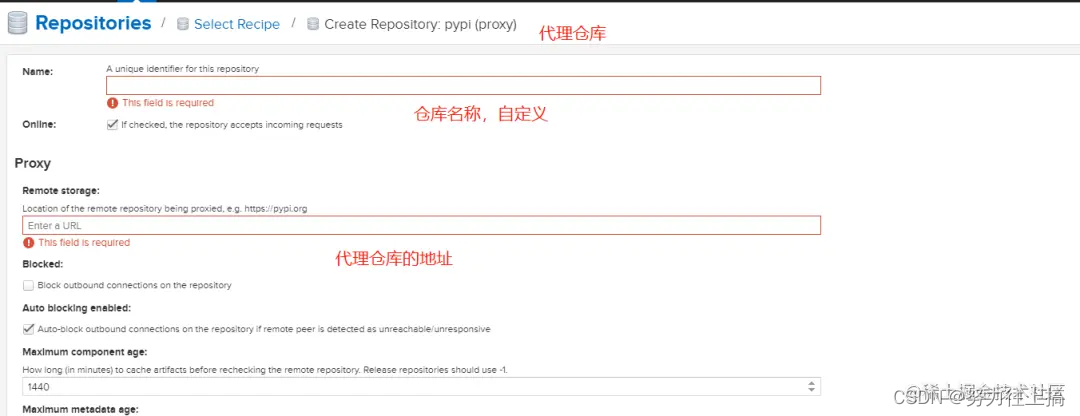
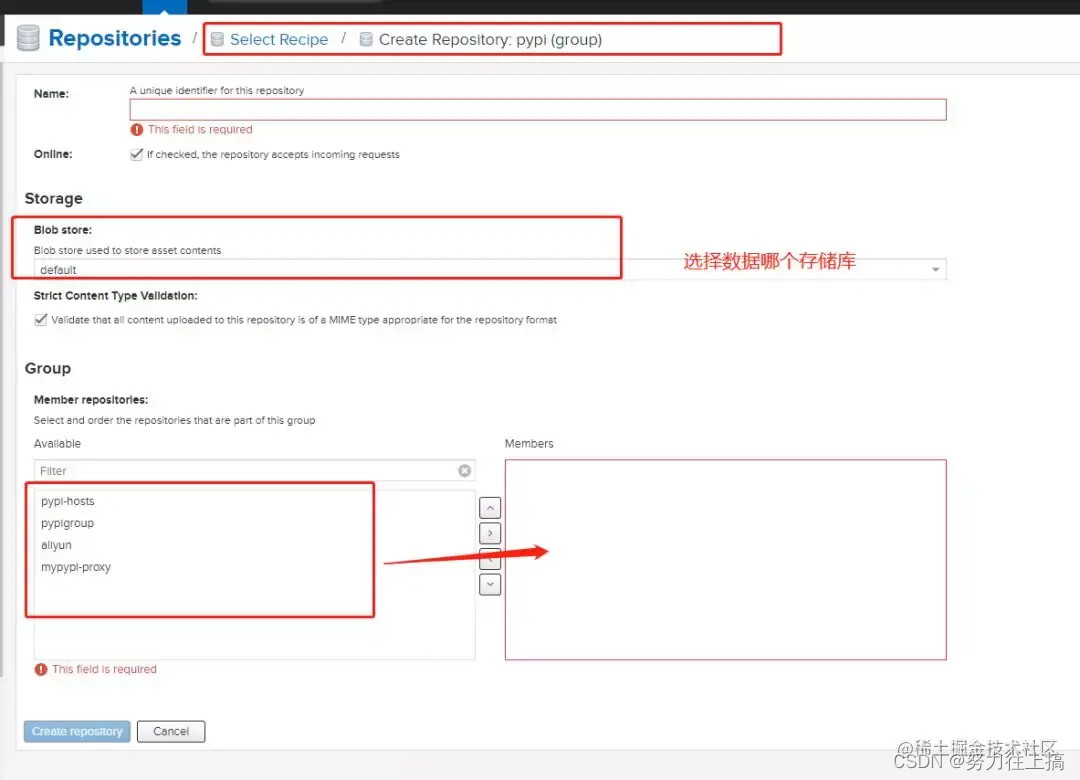
配置pypi仓库步骤:
1、建立官方代理仓库
2、填写远程索引地址时,地址:pypi.python.org/ ; mirrors.aliyun.com ; #配置多个国内的资源
3、建立hosted仓库,用于内部使用的myptpi-hosted
4、建立group仓库把官方代理配置添加进去
1、使用pip时,使用-i指定仓库地址,并同时使用–trusted-host参数指定信任主机
pip install -i http://localhost:8081/repository/pypigroup/simple/ --no-cache-dir -r requirements.txt --trusted-host
2、在配置文件中配置私服地址,配置文件地址~/.pip/pip.conf,如不存在则新增该文件。配置文件内容如下
[global]
index-url=nexus.menghuanhua.com:8081/repository/df-pipy-public/simple/
[install]
trusted-host=nexus.menghuanhua.com