注意:这种实现方法不是实现ListView的最优方法,只是希望通过练习了解ListView的实现原理
思维路线:
1.创建drawable文件夹将要使用的图片导入进去
2.写一个类,用于存放图片ID数据和内容文本。
3.写一个自定义布局,给ListView的每一个行的格式做范本。
4.创建一个类并且继承ArrayAdapter适配器,并且重写适配器自带的getView方法。
5.创建一个ListView的activity。
6.在ListView的activity里,创建list集合导入数据,将导入数据的list添加到ArrayAdapter适配器中,将适配好的内容放到ListView控件中。
1.创建drawable文件夹将要使用的图片导入进去:
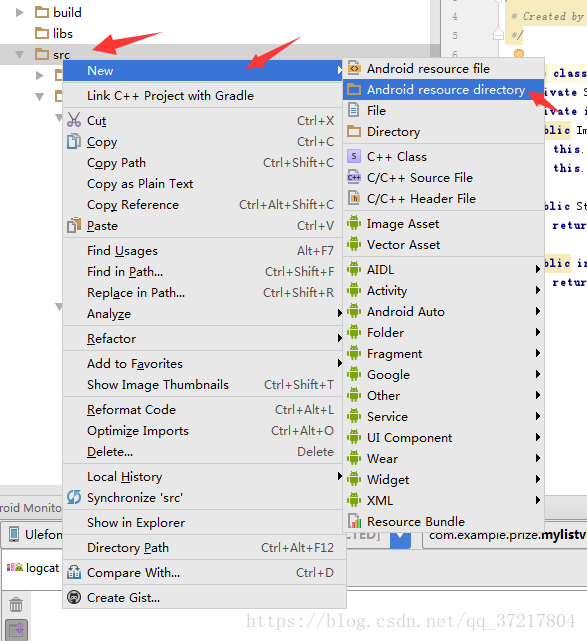
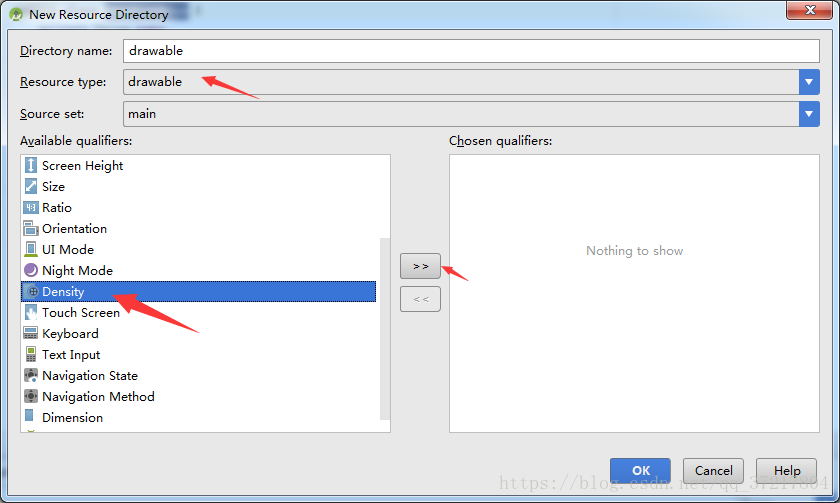
创建好文件夹后将图片复制到新的文件夹里。
2.写一个类,用于存放图片ID数据和内容文本:
package com.example.prize.mylistviewdemoapp;

/**
 * Created by prize on 2018/4/11.
 */

public class ImageListArray {
    private String name;
    private int imageId;
    public ImageListArray(String name, int imageId){
        this.name = name;
        this.imageId = imageId;
    }
    public String getName() {
        return name;
    }
    public int getImageId() {
        return imageId;
    }
}
3.写一个自定义布局,给ListView的每一个行的格式做范本:
<?xml version="1.0" encoding="utf-8"?>
<LinearLayout xmlns:android="http://schemas.android.com/apk/res/android"
    android:orientation="horizontal"
    android:layout_width="wrap_content"
    android:layout_height="wrap_content"
    android:padding="15dp">
    <ImageView
        android:id="@+id/IamgeView_List"
        android:layout_width="100dp"
        android:layout_height="100dp"
        android:background="#FFFFFF"/>
    <TextView
        android:id="@+id/TextView_List"
        android:layout_width="wrap_content"
        android:layout_height="wrap_content"
        android:text="内容"
        android:textSize="30sp"
        android:layout_marginLeft="15dp"
        android:layout_marginTop="30dp"/>

</LinearLayout>
4.创建一个类并且继承ArrayAdapter适配器,并且重写适配器自带的getView方法:
package com.example.prize.mylistviewdemoapp;

import android.content.Context;
import android.support.annotation.LayoutRes;
import android.support.annotation.NonNull;
import android.support.annotation.Nullable;
import android.view.LayoutInflater;
import android.view.View;
import android.view.ViewGroup;
import android.widget.ArrayAdapter;
import android.widget.ImageView;
import android.widget.TextView;

import java.util.List;

/**
 * Created by prize on 2018/4/11.
 */

public class ImageListAdapter extends ArrayAdapter<ImageListArray> {
    private int recourceId;
    /*
    ImageListAdapter( Context context,  int resource,  List<ImageListArray> objects)解析
    Context context :当前类或者当前类的Context上下文
    int resource  :ListView的一行布局,它将会导入到适配器中与数据自动适配
    List<ImageListArray> objects :数据的List集合
     */
    public ImageListAdapter( Context context,  int resource,  List<ImageListArray> objects) {
        super(context, resource, objects);
        recourceId = resource;

    }

    @NonNull
    @Override
    /*
    为什么要重写getView?因为适配器中其实自带一个返回布局的方法,
    这个方法可以是自定义适配一行的布局显示,因为我们需要更复杂的布局内容,
    所以我们直接重写它,,不需要在导入一个简单的TextView或者ImageView布局让适配器在写入布局数据。
    所以在recourceId自定义布局id直接导入到getView里面,getView方法不在convertView中获取布局了。
    最后只要返回一个view布局就可以。

     */
    public View getView(int position, @Nullable View convertView, @NonNull ViewGroup parent) {
        ImageListArray imageListArray = getItem(position); //得到集合中指定位置的一组数据,并且实例化
        View view = LayoutInflater.from(getContext()).inflate(recourceId,parent,false); //用布局裁剪器(又叫布局膨胀器),将导入的布局裁剪并且放入到当前布局中
        ImageView imageView = (ImageView)view.findViewById(R.id.IamgeView_List);//从裁剪好的布局里获取ImageView布局ID
        TextView textView = (TextView)view.findViewById(R.id.TextView_List); //从裁剪好的布局里获取TextView布局Id
        imageView.setImageResource(imageListArray.getImageId());//将当前一组imageListArray类中的图片iamgeId导入到ImageView布局中
        textView.setText(imageListArray.getName());//将当前一组imageListArray类中的TextView内容导入到TextView布局中
        return view;
    }
}
5.创建一个ListView的activity,并且添加数据类,适配器,导入ListView 最终实现 列表视图
ListView活动的布局:
<?xml version="1.0" encoding="utf-8"?>
<LinearLayout xmlns:android="http://schemas.android.com/apk/res/android"
    xmlns:app="http://schemas.android.com/apk/res-auto"
    xmlns:tools="http://schemas.android.com/tools"
    android:layout_width="match_parent"
    android:layout_height="match_parent"
    tools:context="com.example.prize.mylistviewdemoapp.ImageListActivity">
    <ListView
        android:id="@+id/ImageListView"
        android:layout_width="match_parent"
        android:layout_height="match_parent"></ListView>

</LinearLayout>
在ListView的activity里,创建list集合导入数据,将导入数据的list添加到ArrayAdapter适配器中,将适配好的内容放到ListView控件中。
package com.example.prize.mylistviewdemoapp;

import android.support.v7.app.AppCompatActivity;
import android.os.Bundle;
import android.widget.ListView;

import java.util.ArrayList;
import java.util.List;

public class ImageListActivity extends AppCompatActivity {
    private List<ImageListArray> onePieceList = new ArrayList<>();

    @Override
    protected void onCreate(Bundle savedInstanceState) {
        super.onCreate(savedInstanceState);
        setContentView(R.layout.activity_image_list);
        addingData(); //初始化数据
        //创建适配器,在适配器中导入数据 1.当前类 2.list_view一行的布局 3.数据集合
        ImageListAdapter imageListAdapter = new ImageListAdapter(ImageListActivity.this,R.layout.image_list_view,onePieceList);
        ListView listView = (ListView)findViewById(R.id.ImageListView); //将适配器导入Listview
        listView.setAdapter(imageListAdapter);
    }
    /*
    导入数据
     */
    public void addingData(){
        ImageListArray ace =new ImageListArray("ace",R.drawable.ace);
        onePieceList.add(ace);
        ImageListArray arlong =new ImageListArray("arlong",R.drawable.arlong);
        onePieceList.add(arlong);
        ImageListArray barbe_blanche =new ImageListArray("barbe_blanche",R.drawable.barbe_blanche);
        onePieceList.add(barbe_blanche);
        ImageListArray baroque_works =new ImageListArray("baroque_works",R.drawable.baroque_works);
        onePieceList.add(baroque_works);
        ImageListArray brook =new ImageListArray("brook",R.drawable.brook);
        onePieceList.add(brook);
        ImageListArray buggy =new ImageListArray("buggy",R.drawable.buggy);
        onePieceList.add(buggy);
        ImageListArray chopper =new ImageListArray("chopper",R.drawable.chopper);
        onePieceList.add(chopper);
        ImageListArray franck =new ImageListArray("franck",R.drawable.franck);
        onePieceList.add(franck);
        ImageListArray hommes_poissons =new ImageListArray("hommes_poissons",R.drawable.hommes_poissons);
        onePieceList.add(hommes_poissons);
        ImageListArray luffys_flag =new ImageListArray("luffys_flag",R.drawable.luffys_flag);
        onePieceList.add(luffys_flag);
        ImageListArray luffys_flag_2 =new ImageListArray("luffys_flag_2",R.drawable.luffys_flag_2);
        onePieceList.add(luffys_flag_2);
        ImageListArray nami =new ImageListArray("nami",R.drawable.nami);
        onePieceList.add(nami);
        ImageListArray nico =new ImageListArray("nico",R.drawable.nico);
        onePieceList.add(nico);
        ImageListArray sanji =new ImageListArray("sanji",R.drawable.sanji);
        onePieceList.add(sanji);
        ImageListArray shanks =new ImageListArray("shanks",R.drawable.shanks);
        onePieceList.add(shanks);
        ImageListArray ussop =new ImageListArray("ussop",R.drawable.ussop);
        onePieceList.add(ussop);
        ImageListArray vente_esclaves =new ImageListArray("vente_esclaves",R.drawable.vente_esclaves);
        onePieceList.add(vente_esclaves);
        ImageListArray vivi =new ImageListArray("vivi",R.drawable.vivi);
        onePieceList.add(vivi);
        ImageListArray zoro =new ImageListArray("zoro",R.drawable.zoro);
        onePieceList.add(zoro);

    }

}
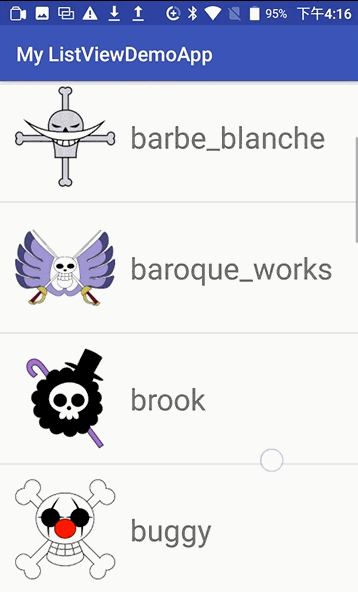
最终效果: