最新版vue自学教程(drf+vue前后端分离开发必备)
[学习笔记]drf+vue前后端分离开发必备
1.vue.js初体验
<!DOCTYPE html>
<html lang="en">
<head>
    <meta charset="UTF-8">
    <title>Title</title>
    <!-- 1.引入vue.js文件 -->
    <script src="https://cdn.jsdelivr.net/npm/vue@2/dist/vue.js"></script>
</head>
<body>

<div id="app">
    <h1>欢迎学习Vue.js</h1>
    <div>我叫{

   {name}}, 微信{

   {wechat}}</div>
    <input type="button" value="点我" v-on:click="clickMe">
</div>

<script>
    // 3.创建Vue对象,并关联指定HTML区域。
    var app = new Vue({


        el: "#app",
        data: {


            name: "张三",
            wechat: "zhangsan888"
        },
        methods: {


            clickMe: function () {


                this.name = "alex";
                this.wechat = "alex888"
            }
        }
    })
</script>

</body>
</html>
2. vue常见指令
2.1 插值表达式
<!DOCTYPE html>
<html lang="en">
<head>
    <meta charset="UTF-8">
    <title>Title</title>
    <!-- 1.引入vue.js文件 -->
    <script src="https://cdn.jsdelivr.net/npm/vue@2/dist/vue.js"></script>
</head>
<body>

<div id="app">
    <div>我叫{

   {name}}, {

   {hobby}}, {

   {dataInfo.email}}</div>
    <ul>
        <li>{

   {"李杰"}}</li>
        <li>{

   {"李杰" + "土鳖"}}</li>
        <li>{

   {base + 1 + 1}}</li>
        <li>{

   {1 === 1 ? "李杰" : "alex"}}</li>
    </ul>
    <ul>
        <li>{

   {condition ? "李杰" : "alex"}}</li>
    </ul>
    <input type="button" value="点我" v-on:click="clickMe">
</div>
<script>
    // 3.创建Vue对象,并关联指定HTML区域。
    var app = new Vue({


        el: "#app",
        data: {


            name: "张三",
            hobby: "篮球",
            dataInfo: {


                id: 1,
                email: "xxx.com"
            },
            condition: false,
            base: 1
        },
        methods: {


            clickMe: function () {


                this.name = "袁仲天";
                this.condition = true;
                this.dataInfo.email = "xxx1.com"
                this.base += 100
            }
        }
    })
</script>

</body>
</html>
2.2 v-bind指令
一般用于对标签中的属性进行操作。
<!DOCTYPE html>
<html lang="en">
<head>
    <meta charset="UTF-8">
    <title>Title</title>
    <!-- 1.引入vue.js文件 -->
    <script src="https://cdn.jsdelivr.net/npm/vue@2/dist/vue.js"></script>
    <style>
        .ig {


            border: 2px solid red;
        }
        .info {


            color: red;
        }
        .danger{


            font-size: 10px;
        }
    </style>
</head>
<body>

<div id="app">
    <img src="home.png" class="c1" alt="">

    <img src="" v-bind:src="imageUrl" v-bind:class="cls" alt="">

    <h1 v-bind:class="{info:v1, danger:v2}">你好呀</h1>
</div>

<script>
    var app = new Vue({


        el: "#app",
        data: {


            imageUrl: "https://img.php.cn/upload/article/202006/24/2020062414575442938.jpg",
            cls: "ig",
            v1: true,
            v2: false
        }
    })
</script>

</body>
</html>
- v-bind赋多个值
<h1 v-bind:class="{info:v1, danger:v2}">你好呀</h1>
<h1 v-bind:class="clsDict">你好呀</h1>
<h1 v-bind:class="[a1, a2]">你好呀</h1>
<h3 v-bind:style="{color: clr, fontSize: size}">333</h3>

<script>
    var app = new Vue({


        el: "#app",
        data: {


            imageUrl: "https://img.php.cn/upload/article/202006/24/2020062414575442938.jpg",
            cls: "ig",
            v1: true,
            v2: false,
            clsDict: {


                info: true,
                danger: false
            },
            a1: "info",
            a2: "danger",
            clr: "red",
            size: "19px"
        }
    })
</script>
不带引号是变量,带引号是样式
v-bind:class中的键值对,值用来做判断,表示键是否启用
v-biin:style中的键值对都是赋上去的
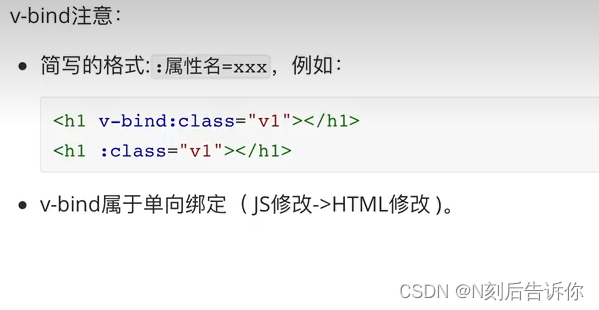
2.2.1 v-bind指令简写和单向绑定
<!DOCTYPE html>
<html lang="en">
<head>
    <meta charset="UTF-8">
    <title>Title</title>
    <script src="https://cdn.jsdelivr.net/npm/vue@2/dist/vue.js"></script>
</head>
<body>

<div id="app">
    <h1>{

   {txt}}</h1>
    <input type="text" v-bind:value="txt">  <!-- 单向绑定 -->
    <input type="text" v-model="txt">       <!-- 单向绑定 -->
</div>


<script>
    var app = new Vue({


        el: "#app",
        data: {


            txt: "张三"
        }
    })
</script>

</body>
</html>
2.3 v-model指令
一般用于在交互的表中使用,例如:input、select、textarea等。[双向绑定]
<!DOCTYPE html>
<html lang="en">
<head>
    <meta charset="UTF-8">
    <title>Title</title>
    <script src="vue.js"></script>
</head>
<body>
<div id="app">
    <div>
        用户名: <input type="text" v-model="user">
    </div>
    <div>
        密码: <input type="password" v-model="pwd">
    </div>
    <input type="button" value="登录" v-on:click="clickMe">
    <input type="button" value="重置" v-on:click="resetForm">
</div>

<script>
    var app = new Vue({


        el: "#app",
        data: {


            user: "",
            pwd: "",
        },
        methods: {


            clickMe: function () {


                console.log(this.user, this.pwd)
            },
            resetForm: function () {


                this.user = "";
                this.pwd = "";
            }
        }
    })
</script>

</body>
</html>
2.3.1 更多相关标签示例
<!DOCTYPE html>
<html lang="en">
<head>
    <meta charset="UTF-8">
    <title>Title</title>
    <script src="vue.js"></script>
</head>
<body>
<div id='app'>
    <div>
        user: <input type="text" v-model="user">
    </div>
    <div>
        password: <input type="password" v-model="pwd">
    </div>
    <div>
        sex:
        user: <input type="radio" v-model="sex" value="1">男
        user: <input type="radio" v-model="sex" value="2">女
    </div>
    <div>
        hobby:
        <input type="checkbox" v-model="hobby" value="11">篮球
        <input type="checkbox" v-model="hobby" value="22">足球
        <input type="checkbox" v-model="hobby" value="33">乒乓球
    </div>
    <div>
        city:
        <select v-model='city' name="">
            <option value="sh">上海</option>
            <option value="bj">北京</option>
            <option value="sz">深圳</option>
        </select>
    </div>
    <div>
        skilled field:
        <select v-model="company" multiple name="">
            <option value="11">技术</option>
            <option value="22">销售</option>
            <option value="33">运营</option>
        </select>
    </div>
    <div>
        others: <textarea v-model="more" name="" cols="30" rows="10"></textarea>
    </div>
    <input type="button" value="注册" v-on:click="clickMe">
</div>


<script>
    var app = new Vue({


        el: "#app",
        data: {


            user: '',
            pwd: '',
            sex: "2",
            hobby: ["22"],
            city: "sz",
            company: ["22", "33"],
            more: "..."
        },
        methods: {


            clickMe: function () {


                console.log(this.user, this.pwd, this.sex, this.hobby, this.city, this.company, this.more);
            },
        }
    })
</script>

</body>
</html>
如果状态量是在data.info里面,如data.info.user,那么绑定的值也需要是info.user。这样的话最后只需要console.log(this.info)
2.4 v-for指令
用户数据进行循环并展示。
- 示例1:循环列表(无索引)
<!DOCTYPE html>
<html lang="en">
<head>
    <meta charset="UTF-8">
    <title>Title</title>
    <script src="vue.js"></script>
</head>
<body>

<div id="app">
    <ul>
        <li v-for="item in dataList">{

   { item }}</li>
    </ul>
</div>

<script>
    var app = new Vue({


        el: "#app",
        data: {


            dataList: ["郭德纲", "于谦", "三哥"]
        }
    })
</script>
</body>
</html>
- 示例2:循环列表(含索引)
<!DOCTYPE html>
<html lang="en">
<head>
    <meta charset="UTF-8">
    <title>Title</title>
    <script src="vue.js"></script>
</head>
<body>

<div id="app">
    <ul>
        <li v-for="(item, idx) in dataList">{

   {idx}} - {

   { item }}</li>
    </ul>
</div>

<script>
    var app = new Vue({


        el: "#app",
        data: {


            dataList: ["郭德纲", "于谦", "三哥"],
        }
    })
</script>
</body>
</html>
- 示例3:循环字典(含索引)
<!DOCTYPE html>
<html lang="en">
<head>
    <meta charset="UTF-8">
    <title>Title</title>
    <script src="vue.js"></script>
</head>
<body>

<div id="app">
    <ul>
        <li v-for="(value, key) in dataDict">{

   {key}} - {

   { value }}</li>
    </ul>
</div>

<script>
    var app = new Vue({


        el: "#app",
        data: {


            dataDict: {


                id: 1,
                age: 19,
                name: "xxx"
            }
        }
    })
</script>
</body>
</html>
- 示例4:循环字典列表(含索引)
<!DOCTYPE html>
<html lang="en">
<head>
    <meta charset="UTF-8">
    <title>Title</title>
    <script src="vue.js"></script>
</head>
<body>

<div id="app">
    <ul>
        <li v-for="(item, idx) in cityList">{

   {item.id}} - {

   { item.text }}</li>
    </ul>
</div>

<script>
    var app = new Vue({


        el: "#app",
        data: {


            cityList: [
                {

      id: 11, text: "上海"},
                {

      id: 12, text: "北京"},
                {

      id: 13, text: "深圳"},
            ]
        }
    })
</script>
</body>
</html>
2.5 v-on指令
事件相关的指令,例如:
v-on:click
v-on:dbclick
v-on:mouseover
v-on:mouseout
v-on:change
v-on:focus
...
<!DOCTYPE html>
<html lang="en">
<head>
    <meta charset="UTF-8">
    <title>Title</title>
    <script src="vue.js"></script>
</head>
<body>
<div id="app">
    <ul>
        <li v-on:click="clickMe">点击</li>
        <li v-on:dblclick="doSomething('双击')">双击</li>
        <li v-on:mouseover="doSomething('进入')" v-on:mouseout="doSomething('离开')">进入&离开</li>

    </ul>
</div>

<script>
    var app = new Vue({


        el: "#app",
        data: {

      },
        methods: {


            clickMe: function () {


                alert("点击了")
            },
            doSomething: function (msg) {


                console.log(msg);
            }
        }
    })
</script>


</body>
</html>
v-on可以简写为@
案例:数据管理
数据的管理包括对数据:展示、动态添加、删除、修改。
- 数据列表
<!DOCTYPE html>
<html lang="en">
<head>
    <meta charset="UTF-8">
    <title>Title</title>
    <script src="vue.js"></script>
    <style>
        .penal {


            border: 1px solid #dddddd;
            margin: 20px 0 0 0;
            padding: 10px;
            border-bottom: 0;
            background-color: #d9d9d9;
        }
        .table {


            width: 100%;
            border-collapse: collapse;
            border-spacing: 0;
        }

        .table > tbody > tr > td, .table > tbody > tr > th, .table > tfoot > tr > td, .table > tfoot > tr > th, .table > thead > tr > td {


            padding: 8px;
            vertical-align: top;
            border: 1px solid #ddd;
            text-align: left;
        }
    </style>
</head>
<body>
<div id="app">
    <h3 class="penal">数据列表</h3>
    <table class="table">
        <thead>
        <tr>
            <td>姓名</td>
            <td>年龄</td>
        </tr>
        </thead>
        <tbody>
        <tr v-for="item in dataList">
            <td>{

   {item.name}}</td>
            <td>{

   {item.age}}</td>
        </tr>
        </tbody>
    </table>
</div>

<script>
    var app = new Vue({


        el: "#app",
        data: {


            dataList: [
                {

      "name": "zhangsan", "age": 19},
                {

      "name": "alex", "age": 89},
            ]
        }
    })
</script>
</body>
</html>
- 数据添加
<!DOCTYPE html>
<html lang="en">
<head>
    <meta charset="UTF-8">
    <title>Title</title>
    <script src="vue.js"></script>
    <style>
        .penal {


            border: 1px solid #dddddd;
            margin: 20px 0 0 0;
            padding: 10px;
            border-bottom: 0;
            background-color: #d9d9d9;
        }

        .table {


            width: 100%;
            border-collapse: collapse;
            border-spacing: 0;
        }

        .table > tbody > tr > td, .table > tbody > tr > th, .table > tfoot > tr > td, .table > tfoot > tr > th, .table > thead > tr > td {


            padding: 8px;
            vertical-align: top;
            border: 1px solid #ddd;
            text-align: left;
        }
    </style>
</head>
<body>
<div id="app">
    <h3 class="penal">表单区域</h3>
    <div>
        <div>
            <label for="">姓名</label>
            <input type="text" v-model="user">
        </div>
        <div>
            <label for="">年龄</label>
            <input type="text" v-model="age">
            <input type="button" value="新建" @click="addUser">
        </div>
    </div>

    <h3 class="penal">数据列表</h3>
    <table class="table">
        <thead>
        <tr>
            <td>姓名</td>
            <td>年龄</td>
        </tr>
        </thead>
        <tbody>
        <tr v-for="item in dataList">
            <td>{

   {item.name}}</td>
            <td>{

   {item.age}}</td>
        </tr>
        </tbody>
    </table>
</div>

<script>
    var app = new Vue({


        el: "#app",
        data: {


            user: "",
            age: "",
            dataList: [
                {

      name: "zhangsan", age: 19},
                {

      name: "alex", age: 89},
            ]
        },
        methods: {


            addUser: function(){


                let row = {

      name: this.user, age: this.age};
                this.dataList.push(row);
                this.user = "";
                this.age = "";
            }
        }
    })
</script>
</body>
</html>
- 数据删除
<!DOCTYPE html>
<html lang="en">
<head>
    <meta charset="UTF-8">
    <title>Title</title>
    <script src="vue.js"></script>
    <style>
        .penal {


            border: 1px solid #dddddd;
            margin: 20px 0 0 0;
            padding: 10px;
            border-bottom: 0;
            background-color: #d9d9d9;
        }

        .table {


            width: 100%;
            border-collapse: collapse;
            border-spacing: 0;
        }

        .table > tbody > tr > td, .table > tbody > tr > th, .table > tfoot > tr > td, .table > tfoot > tr > th, .table > thead > tr > td {


            padding: 8px;
            vertical-align: top;
            border: 1px solid #ddd;
            text-align: left;
        }
    </style>
</head>
<body>
<div id="app">
    <h3 class="penal">表单区域</h3>
    <div>
        <div>
            <label for="">姓名</label>
            <input type="text" v-model="user">
        </div>
        <div>
            <label for="">年龄</label>
            <input type="text" v-model="age">
            <input type="button" value="新建" @click="addUser">
        </div>
    </div>

    <h3 class="penal">数据列表</h3>
    <table class="table">
        <thead>
        <tr>
            <td>姓名</td>
            <td>年龄</td>
            <td>操作</td>
        </tr>
        </thead>
        <tbody>
        <tr v-for="(item, idx) in dataList">
            <td>{

   {item.name}}</td>
            <td>{

   {item.age}}</td>
            <td>
                <input type="button" value="删除" @click="deleteRow" :data-idx="idx">
            </td>
        </tr>
        </tbody>
    </table>
</div>

<script>
    var app = new Vue({


        el: "#app",
        data: {


            user: "",
            age: "",
            dataList: [
                {

      name: "zhangsan", age: 19},
                {

      name: "alex", age: 89},
            ]
        },
        methods: {


            addUser: function () {


                let row = {

      name: this.user, age: this.age};
                this.dataList.push(row);
                this.user = "";
                this.age = "";
            },
            deleteRow(event) {


                // console.log(idx)
                // 根据索引删除dataList中的值
                this.dataList.splice(event.target.dataset.idx, 1);
            }
        }
    })
</script>
</body>
</html>
触发的事件默认会传递event(除非括号里面没有指定参数),此时如果在html标签中携带data-
idx=“”,就可以通过event.target.dataset.idx拿到
- 编辑
<!DOCTYPE html>
<html lang="en">
<head>
    <meta charset="UTF-8">
    <title>Title</title>
    <script src="vue.js"></script>
    <style>
        .penal {


            border: 1px solid #dddddd;
            margin: 20px 0 0 0;
            padding: 10px;
            border-bottom: 0;
            background-color: #d9d9d9;
        }

        .table {


            width: 100%;
            border-collapse: collapse;
            border-spacing: 0;
        }

        .table > tbody > tr > td, .table > tbody > tr > th, .table > tfoot > tr > td, .table > tfoot > tr > th, .table > thead > tr > td {


            padding: 8px;
            vertical-align: top;
            border: 1px solid #ddd;
            text-align: left;
        }
    </style>
</head>
<body>
<div id="app">
    <h3 class="penal">表单区域</h3>
    <div>
        <div>
            <label for="">姓名</label>
            <input type="text" v-model="user">
        </div>
        <div>
            <label for="">年龄</label>
            <input type="text" v-model="age">
            <input type="button" :value="title" @click="addUser">
        </div>
    </div>

    <h3 class="penal">数据列表</h3>
    <table class="table">
        <thead>
        <tr>
            <td>姓名</td>
            <td>年龄</td>
            <td>操作</td>
        </tr>
        </thead>
        <tbody>
        <tr v-for="(item, idx) in dataList">
            <td>{

   {item.name}}</td>
            <td>{

   {item.age}}</td>
            <td>
                <input type="button" value="删除" @click="deleteRow" :data-idx="idx">
                <input type="button" value="编辑" @click="editRow" :data-idx="idx">
            </td>
        </tr>
        </tbody>
    </table>
</div>

<script>
    var app = new Vue({


        el: "#app",
        data: {


            editIndex: undefined,
            title: "新建",
            user: "",
            age: "",
            dataList: [
                {

      name: "zhangsan", age: 19},
                {

      name: "alex", age: 89},
            ]
        },
        methods: {


            addUser: function () {


                if(this.editIndex){


                    // 修改
                    this.dataList[this.editIndex].name = this.user
                    this.dataList[this.editIndex].age = this.age
                }else{


                    // 新增
                    let row = {

      name: this.user, age: this.age};
                    this.dataList.push(row);
                }
                this.user = "";
                this.age = "";
                this.editIndex = undefined;
                this.title = "新建";
            },
            deleteRow(event) {


                // 根据索引删除dataList中的值
                let idx = event.target.dataset.idx;
                this.dataList.splice(idx, 1);
            },
            editRow: function (event) {


                let idx = event.target.dataset.idx;
                let {

      name, age} = this.dataList[idx];
                this.user = name;
                this.age = age;
                this.title = "编辑";
                this.editIndex = idx;
            }
        }
    })
</script>
</body>
</html>
2.6 v-if指令
条件判断
<!DOCTYPE html>
<html lang="en">
<head>
    <meta charset="UTF-8">
    <title>Title</title>
    <script src="vue.js"></script>
</head>
<body>
<div id = "app">
    <h1 v-if="v1">阿里无人区</h1>

    <h1 v-if="v2">去西藏</h1>
    <h1 v-else>去新疆</h1>

    <div v-if="v3 === '北京'">
        <h1>天安门</h1>
    </div>
    <div v-else-if="v3 === '新疆'">
        <h1>乌鲁木齐</h1>
    </div>
    <div v-else-if="v3 === '西藏'">
        <h1>拉萨</h1>
    </div>
    <div v-else>
        <h1>大理</h1>
    </div>

</div>


<script>
    var app = new Vue({


        el: "#app",
        data: {


            v1: true,
            v2: true,
            v3: "新疆"
        }
    })
</script>

</body>
</html>
2.7 v-show指令
根据条件显示或隐藏(标签都会渲染到页面)
<!DOCTYPE html>
<html lang="en">
<head>
    <meta charset="UTF-8">
    <title>Title</title>
    <script src="vue.js"></script>
</head>
<body>
<div id="app">
  <h1 v-show="v1">可可西里</h1>
  <h1 v-show="!v1">罗布泊</h1>
</div>


<script>
  var app = new Vue({


    el: "#app",
    data: {


      v1: false
    }
  })
</script>

</body>
</html>
可以通过直接在点击上进行状态量的赋值操作:
<input type="button" value="密码登录" @click="isSms=false"/>
案例:用户登录
在编写案例之前,现在来学下axios,他是一个HTTP库,可以发送Http请求。
<!DOCTYPE html>
<html lang="en">
<head>
    <meta charset="UTF-8">
    <title>Title</title>
    <script src="axios.min.js"></script>
</head>
<body>


<script>
    axios({


        method: "post",
        url: "",
        params: {


            v1: 123,
            v2: 456
        },
        data: {


            name: "zhangsan",
            pwd: "123"
        },
        headers: {


            "Content-Type": "application/json"
        }
    }).then(function(res){


        console.log(res.data);
    }).catch(function(error){


        console.log(error);
    })
</script>

</body>
</html>
<!DOCTYPE html>
<html lang="en">
<head>
    <meta charset="UTF-8">
    <title>Title</title>
    <script src="vue.js"></script>
    <script src="axios.min.js"></script>

    <style>
        label {


            width: 60px;
            display: inline-block;
            text-align: right;
            margin-right: 8px;
        }
    </style>
</head>
<body>
<div id="app">

    <input type="button" value="密码登录" @click="isSms=false"/>
    <input type="button" value="短信登录" @click="isSms=true"/>

    <div v-show="isSms">
        <p>
            <label for="">手机号</label>
            <input type="text" placeholder="手机号" v-model="sms.mobile">
        </p>
        <p>
            <label for="">验证码</label>
            <input type="text" placeholder="验证码" v-model="sms.code">
        </p>
    </div>
    <div v-show="!isSms">
        <p>
            <label for="">用户名</label>
            <input type="text" placeholder="用户名" v-model="info.username">
        </p>
        <p>
            <label for="">密码</label>
            <input type="password" placeholder="密码" v-model="info.password">
        </p>
    </div>

    <input type="button" value="登 录" @click="loginForm">
</div>


<script>
    var app = new Vue({


        el: "#app",
        data: {


            isSms: false,
            info: {


                username: "",
                password: "",
            },
            sms: {


                mobile: "",
                code: "",
            }
        },
        methods: {


            loginForm: function () {


                // 1.获取用户输入的值
                let dataDict = this.isSms ? this.sms : this.info;

                let url;
                if(this.isSms){


                    url = "https://api.luffycity.com/api/v1/auth/mobile/login/?loginWay=mobile";
                }else{


                    url = "https://api.luffycity.com/api/v1/auth/password/login/?loginWay=password";
                }

                // 2.向某个地址发送网络请求,基于axios
                // https://api.luffycity.com/api/v1/auth/password/login/?loginWay=password
                // {"username":"13","password":"1234"}
                // https://api.luffycity.com/api/v1/auth/mobile/login/?loginWay=mobile
                // {"mobile":"17862713875","code":"123456"}
                axios({


                    method: "post",
                    url: url,
                    data: dataDict,
                    headers: {


                        "Content-Type": "application/json"
                    }
                }).then(function (res) {


                    // console.log(res.data);
                    if(res.data.code === -1){


                        alert(res.data.msg);
                        return;
                    }
                    // 登录成功之后跳转
                    window.location.href = "https://www.luffycity.com"
                }).catch(function (error) {


                    alert("请求异常,请重新操作。")
                })
            }
        }
    })
</script>

</body>
</html>
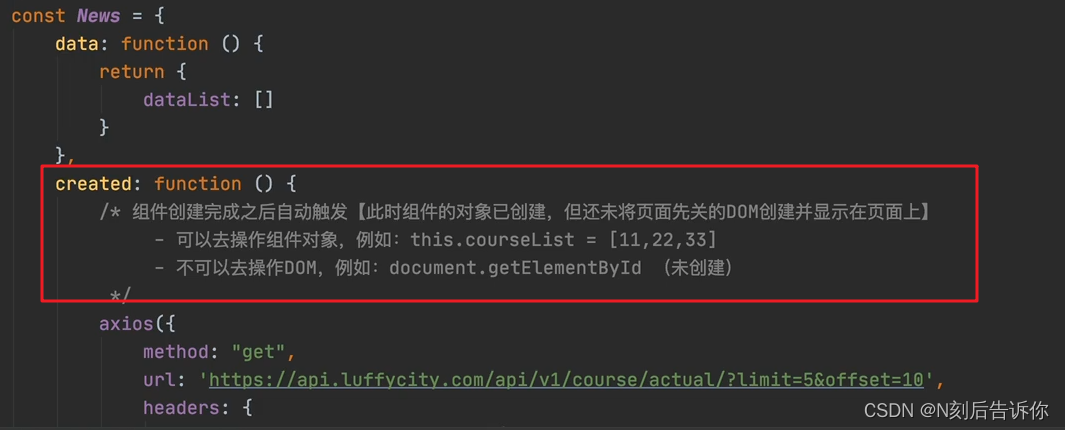
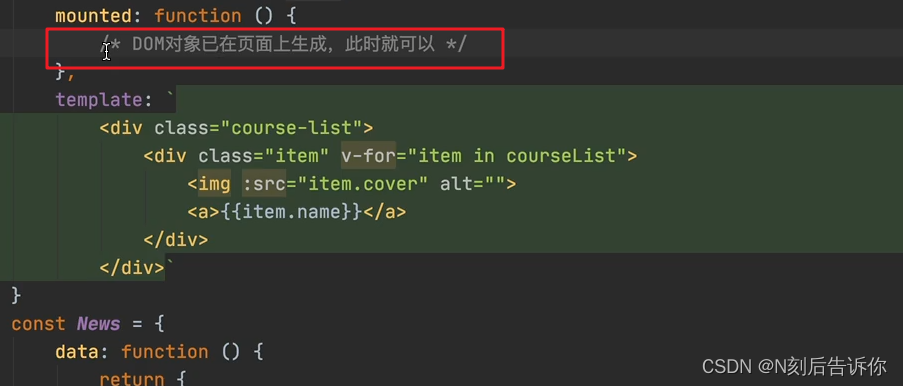
3.组件化开发
在开发过程中,我们可以将页面中某一部分功能编写成一个组件,然后在页面上进行引用。
- 有利于划分功能模块的开发(HTML、CSS、JavaScript等相关带啊吗都集成到组件中)。
- 有利于重用
3.1 局部组件
3.2 全局组件
4.vue-router组件
vue+vue-router组件可以实现SPA(single Page Application),即:单页面应用。
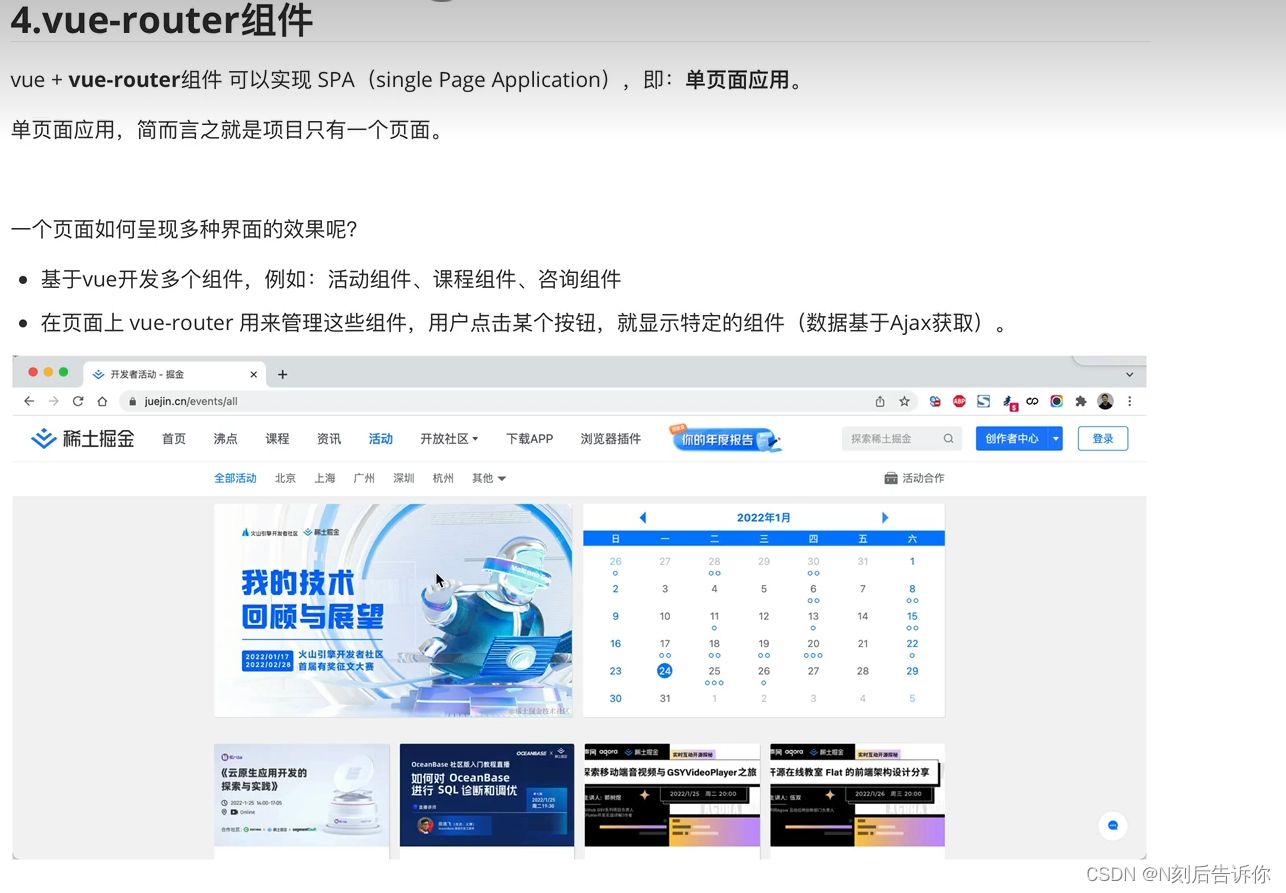
4.1 下载和引用
下载地址:https://unpkg.com/vue-router@4
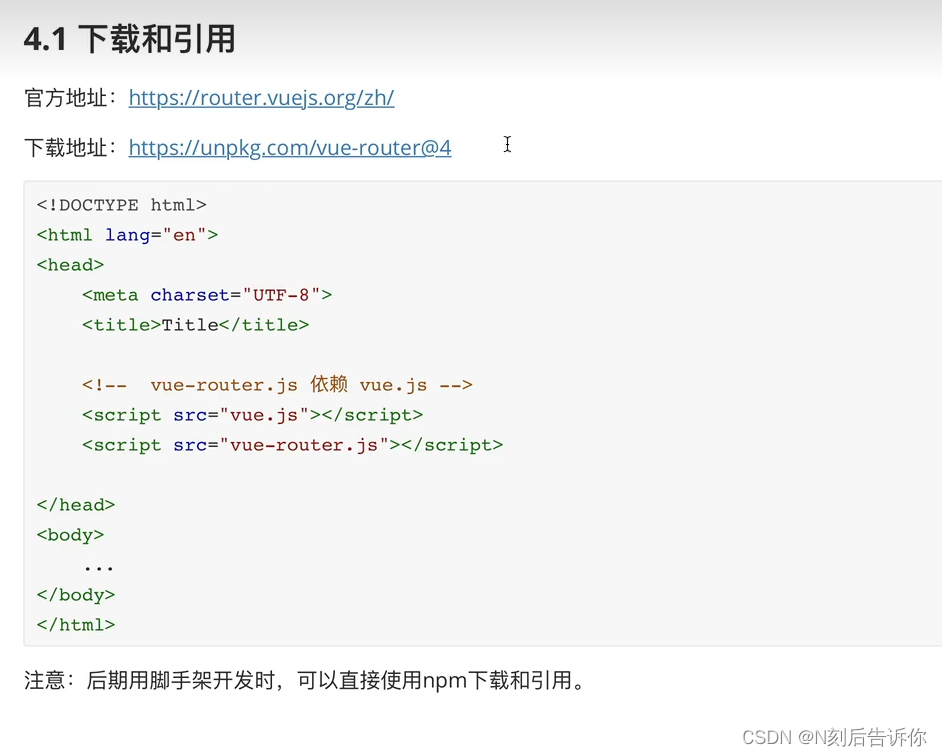
注意:后期用脚手架开发时,可以直接使用npm下载和引用。
4.2 快速上手
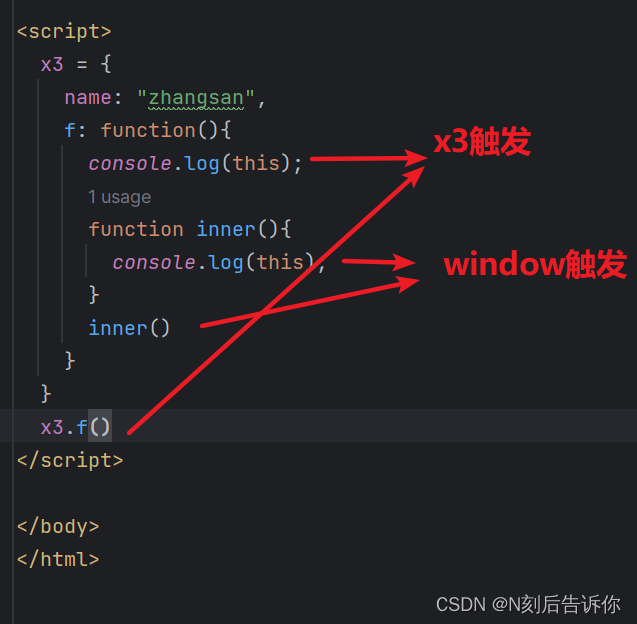
function函数与箭头函数的区别
1.箭头函数与function定义函数的写法不同
2.this的指向不同:使用function定义的函数,this的指向随着调用环境的变化而变化的,而箭头函数中的this指向是固定不变的,一直指向的是定义函数的环境。
3.普通函数可以使用arguments参数和args参数,箭头函数不能使用arguments参数,可以使用args参数
4.普通函数可以作为构造函数,箭头函数不可以作为构造函数,不能new
5.普通函数可以先调用后声明,因为有变量提升,但是箭头函数必须先声明后调用