Kubernetes 基于 helm 部署高可用 harbor
先决条件
- 高可用入口控制器(Harbor 不管理外部端点) – nodeport方式
- 高可用PostgreSQL 9.6+(Harbor不处理数据库HA的部署) --PostreSQL operator 14
- 高可用Redis(Harbor不处理Redis的HA部署) – redis sentinel
- 可以跨节点或外部对象存储共享的 PVC – minio
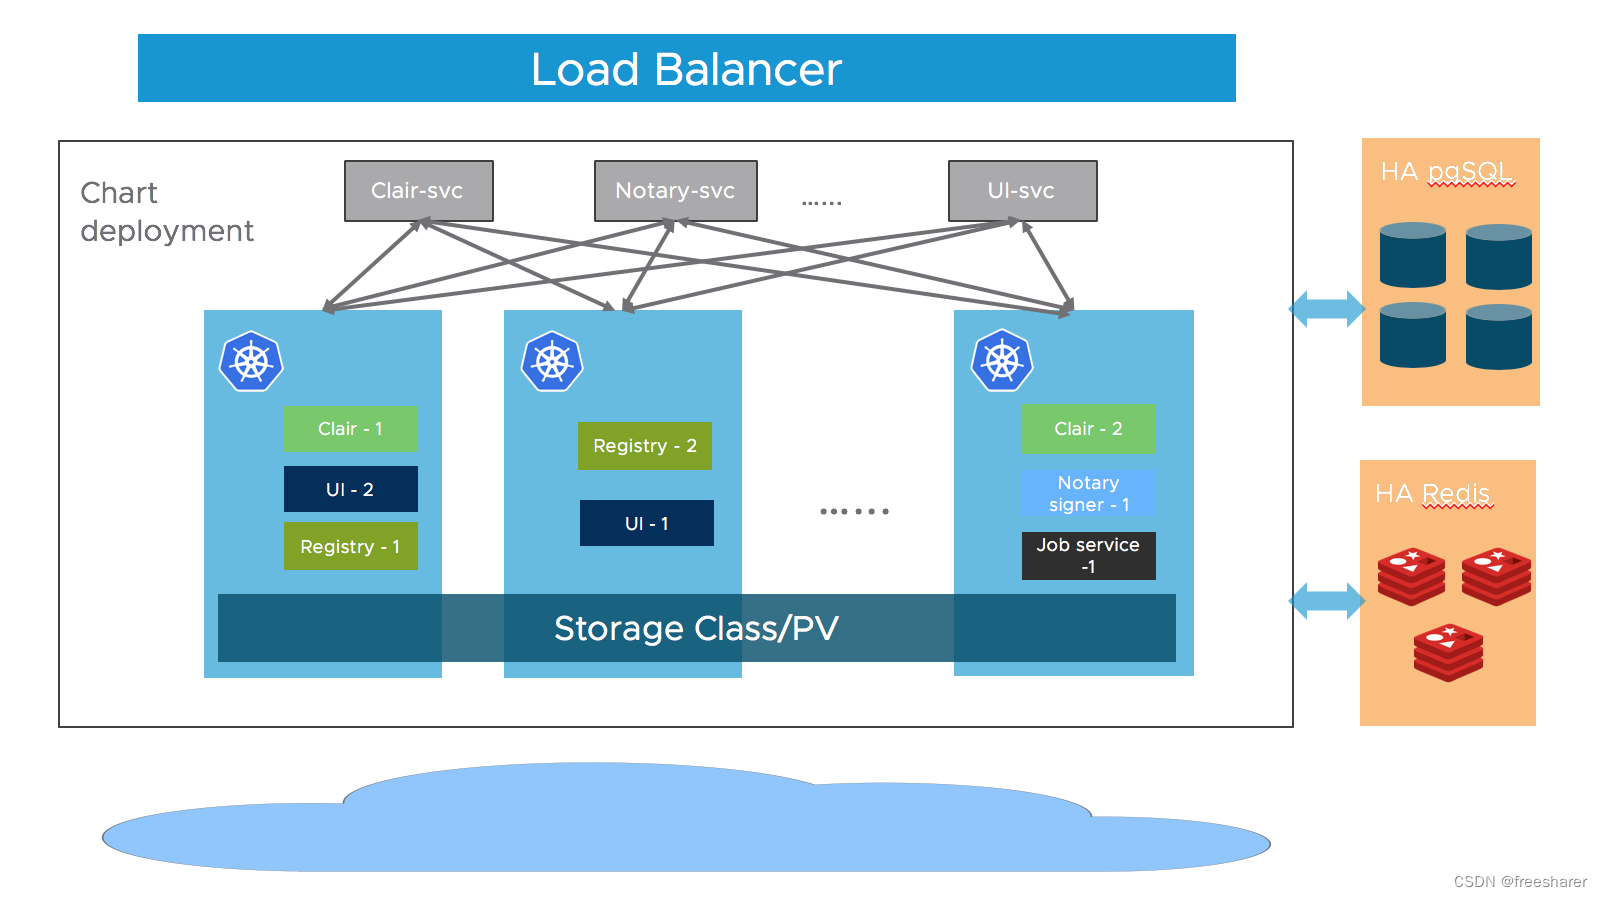
存储层方面,需要提供高可用的 PostgreSQL、Redis 集群用于应用数据和 PVC 或对象存储用于存储镜像和helm图表。
1、准备 kubernetes 集群
推荐使用 sealos 快速部署kubernetes集群,准备4个可调度的节点。
root@node01:~# kubectl get nodes -o wide
NAME     STATUS   ROLES           AGE     VERSION   INTERNAL-IP     EXTERNAL-IP   OS-IMAGE           KERNEL-VERSION      CONTAINER-RUNTIME
node01   Ready    control-plane   5d12h   v1.24.3   192.168.72.50   <none>        Ubuntu 22.04 LTS   5.15.0-27-generic   containerd://1.6.2
node02   Ready    <none>          5d12h   v1.24.3   192.168.72.51   <none>        Ubuntu 22.04 LTS   5.15.0-27-generic   containerd://1.6.2
node03   Ready    <none>          5d12h   v1.24.3   192.168.72.52   <none>        Ubuntu 22.04 LTS   5.15.0-27-generic   containerd://1.6.2
node04   Ready    <none>          5d12h   v1.24.3   192.168.72.53   <none>        Ubuntu 22.04 LTS   5.15.0-27-generic   containerd://1.6.2
2、部署持久化存储
依赖持久化存储的组件:
- redis
- postgresql
- minio
- harbor trivy组件
这里作为测试,使用openebs local-hostpath作为后端存储,实际环境可选择rook、longhorn、nfs或对接外部ceph方式。
helm repo add openebs https://openebs.github.io/charts
helm install openebs openebs/openebs -n openebs --create-namespace
查看存储状态
root@node01:~# kubectl -n openebs get pods
NAME                                            READY   STATUS    RESTARTS       AGE
openebs-localpv-provisioner-7b7b4c7b7d-87r2n    1/1     Running   4 (146m ago)   5d13h
openebs-ndm-cluster-exporter-54cf95c4f7-kzmd5   1/1     Running   0              5d13h
openebs-ndm-node-exporter-7zg5r                 1/1     Running   0              5d13h
openebs-ndm-node-exporter-cqr8f                 1/1     Running   0              5d13h
openebs-ndm-node-exporter-npt8z                 1/1     Running   0              5d13h
openebs-ndm-node-exporter-st8vs                 1/1     Running   0              5d13h
openebs-ndm-operator-6566d67cf6-8l2q8           1/1     Running   0              5d13h
确认存在默认存储类,后续操作依赖该存储类
root@node01:~# kubectl get sc
NAME                       PROVISIONER        RECLAIMPOLICY   VOLUMEBINDINGMODE      ALLOWVOLUMEEXPANSION   AGE
local-hostpath (default)   openebs.io/local   Delete          WaitForFirstConsumer   false                  5d13h
3、部署 Redis Sentinel 集群
部署redis operator
helm repo add redis-operator https://spotahome.github.io/redis-operator

helm install redis-operator redis-operator/redis-operator -n redis --create-namespace \
  --set service.type=NodePort
部署redis sentinel 集群
kubectl create -f https://raw.githubusercontent.com/spotahome/redis-operator/master/example/redisfailover/basic.yaml
验证集群状态
root@node01:~# kubectl -n redis get pods
NAME                                 READY   STATUS    RESTARTS   AGE
redis-operator-5cb98dbf66-gnfr6      1/1     Running   0          3d23h
rfr-redisfailover-0                  1/1     Running   0          3d23h
rfr-redisfailover-1                  1/1     Running   0          3d23h
rfr-redisfailover-2                  1/1     Running   0          3d23h
rfs-redisfailover-69c5c99854-4zr2l   1/1     Running   0          3d23h
rfs-redisfailover-69c5c99854-ll8tr   1/1     Running   0          3d23h
rfs-redisfailover-69c5c99854-m2h9r   1/1     Running   0          3d23h
获取redis集群内部service地址
root@node01:~# kubectl -n redis get svc
NAME                TYPE        CLUSTER-IP    EXTERNAL-IP   PORT(S)          AGE
redis-operator      NodePort    10.96.3.149   <none>        9710:30787/TCP   3d23h
rfs-redisfailover   ClusterIP   10.96.1.46    <none>        26379/TCP        3d23h
4、部署 PostgreSQL集群
部署postgreSQL operator
helm repo add postgres-operator-charts https://opensource.zalando.com/postgres-operator/charts/postgres-operator

helm upgrade -i postgres-operator postgres-operator-charts/postgres-operator -n postgres --create-namespace
部署 postgresql ui
helm upgrade -i postgres-operator-ui postgres-operator-ui-charts/postgres-operator-ui \
  -n postgres --create-namespace --set service.type=NodePort
下载 postgresql 集群部署文件
wget https://raw.githubusercontent.com/zalando/postgres-operator/v1.8.2/manifests/minimal-postgres-manifest.yaml
修改 postgresql 集群部署文件,创建 harbor用户,并为 harbor 创建需要的3个数据库:registry、notary_server、notary_signer:
$ cat minimal-postgres-manifest.yaml
apiVersion: "acid.zalan.do/v1"
kind: postgresql
metadata:
  name: acid-minimal-cluster
  namespace: postgres
spec:
  teamId: "acid"
  volume:
    size: 1Gi
  numberOfInstances: 2
  users:
    harbor:
    - superuser
    - createdb
  databases:
    registry: harbor
    notary_server: harbor
    notary_signer: harbor
  preparedDatabases:
    registry: {

    }
    notary_server: {

    }
    notary_signer: {

    }
  postgresql:
    version: "14"
部署 postgresql 集群
kubectl apply -f minimal-postgres-manifest.yaml
确认集群运行状态
root@node01:~# kubectl -n postgres get pods
NAME                                    READY   STATUS    RESTARTS   AGE
acid-minimal-cluster-0                  1/1     Running   0          5d8h
acid-minimal-cluster-1                  1/1     Running   0          5d3h
postgres-operator-f5c55b6f9-w2f4k       1/1     Running   0          5d4h
postgres-operator-ui-5cfff55c65-6c4mk   1/1     Running   0          5d12h
获取service连接信息
root@node01:~# kubectl -n postgres get svc
NAME                          TYPE        CLUSTER-IP    EXTERNAL-IP   PORT(S)        AGE
acid-minimal-cluster          ClusterIP   10.96.3.85    <none>        5432/TCP       5d8h
acid-minimal-cluster-config   ClusterIP   None          <none>        <none>         5d8h
acid-minimal-cluster-repl     ClusterIP   10.96.1.103   <none>        5432/TCP       5d8h
postgres-operator             ClusterIP   10.96.3.114   <none>        8080/TCP       5d12h
postgres-operator-ui          NodePort    10.96.2.128   <none>        80:31617/TCP   5d12h
获取数据库连接密码
kubectl -n postgres get secret postgres.acid-minimal-cluster.credentials.postgresql.acid.zalan.do -o 'jsonpath={.data.password}' | base64 -d
5、部署 Minio 对象存储集群
hellm 方式部署minio 对象存储集群,至少需要4个节点,并创建一个名为 harbor 的 bucket
helm repo add minio https://helm.min.io/

helm upgrade --install minio minio/minio --namespace minio --create-namespace
  --set replicas=4 \
  --set rootUser=minio \
  --set rootPassword=minio123 \
  --set service.type=NodePort \
  --set consoleService.type=NodePort \
  --set resources.requests.memory=1Gi \
  --set buckets[0].name=harbor \
  --set buckets[0].policy=upload \
  --set buckets[0].purge=false
查看minio集群状态
root@node01:~# kubectl -n minio get pods
NAME      READY   STATUS    RESTARTS   AGE
minio-0   1/1     Running   0          5d6h
minio-1   1/1     Running   0          5d3h
minio-2   1/1     Running   0          5d6h
minio-3   1/1     Running   0          5d6h
获取minio service连接信息
root@node01:~# kubectl -n minio get svc
NAME            TYPE        CLUSTER-IP    EXTERNAL-IP   PORT(S)          AGE
minio           NodePort    10.96.3.193   <none>        9000:32000/TCP   5d6h
minio-console   NodePort    10.96.3.4     <none>        9001:32001/TCP   5d6h
minio-svc       ClusterIP   None          <none>        9000/TCP         5d6h
6、部署 harbor 镜像仓库
添加helm repo
helm repo add harbor https://helm.goharbor.io
自定义values.yaml配置参数,其中192.168.72.50 为节点IP地址。
$ cat my-harbor-values.yaml
expose:
  type: nodePort
  tls:
    auto:
      commonName: "192.168.72.50"
externalURL: https://192.168.72.50:30003

nginx:
  replicas: 2
portal:
  replicas: 2
core:
  replicas: 2
jobservice:
  replicas: 2
registry:
  replicas: 2
chartmuseum:
  replicas: 2
trivy:
  replicas: 2
notary:
  server:
    replicas: 2
  signer:
    replicas: 2


persistence:
  imageChartStorage:
    disableredirect: true
    type: s3
    s3:
      region: us-west-1
      bucket: harbor
      accesskey: minio
      secretkey: minio123
      regionendpoint: http://minio.minio:9000
      secure: false
      v4auth: true

jobservice:
  jobLoggers:
    - database

database:
  type: external
  external:
    host: "acid-minimal-cluster.postgres"
    port: "5432"
    username: "harbor"
    password: "H9AZVgIoXWUPgoYpQJq0Z3NoVNzxKPAZjZCApg3sUafl9lI0ixFtNGKlkeP2ieY8"
    coreDatabase: "registry"
    notaryServerDatabase: "notary_server"
    notarySignerDatabase: "notary_signer"
    sslmode: "require"

redis:
  type: external
  external:
    addr: "rfs-redisfailover.redis:26379"
    sentinelMasterSet: "mymaster"
    coreDatabaseIndex: "0"
    jobserviceDatabaseIndex: "1"
    registryDatabaseIndex: "2"
    chartmuseumDatabaseIndex: "3"
    trivyAdapterIndex: "5"
    password: ""
部署harbor仓库
helm upgrade -i harbor harbor/harbor -n harbor --create-namespace -f my-harbor-values.yaml
查看harbor状态
root@node01:~# kubectl -n harbor get pods
NAME                                    READY   STATUS    RESTARTS   AGE
harbor-chartmuseum-5d97bc8b8c-4ccl8     1/1     Running   0          8m54s
harbor-chartmuseum-5d97bc8b8c-rw9n9     1/1     Running   0          8m54s
harbor-core-6df5b674dc-2lgx4            1/1     Running   0          8m54s
harbor-core-6df5b674dc-ws892            1/1     Running   0          8m54s
harbor-jobservice-9b6d5fb5c-s96tp       1/1     Running   0          8m54s
harbor-nginx-6d9cf558c5-gpxfw           1/1     Running   0          8m54s
harbor-nginx-6d9cf558c5-wlq86           1/1     Running   0          8m54s
harbor-notary-server-75cdb75f7d-44fkj   1/1     Running   0          8m54s
harbor-notary-server-75cdb75f7d-bfh2w   1/1     Running   0          8m54s
harbor-notary-signer-594587fb66-8c7sq   1/1     Running   0          8m54s
harbor-notary-signer-594587fb66-zrl97   1/1     Running   0          8m54s
harbor-portal-685498cc69-fc9js          1/1     Running   0          8m54s
harbor-portal-685498cc69-nhzqj          1/1     Running   0          8m54s
harbor-registry-6cc5d9d5b6-cxj6v        2/2     Running   0          8m54s
harbor-registry-6cc5d9d5b6-dzzx2        2/2     Running   0          8m54s
harbor-trivy-0                          1/1     Running   0          8m54s
harbor-trivy-1                          1/1     Running   0          8m42s
查看service
root@node01:~# kubectl -n harbor get svc
NAME                   TYPE        CLUSTER-IP    EXTERNAL-IP   PORT(S)                                     AGE
harbor                 NodePort    10.96.2.38    <none>        80:30002/TCP,443:30003/TCP,4443:30004/TCP   10m
harbor-chartmuseum     ClusterIP   10.96.1.174   <none>        80/TCP                                      10m
harbor-core            ClusterIP   10.96.2.160   <none>        80/TCP                                      10m
harbor-jobservice      ClusterIP   10.96.3.245   <none>        80/TCP                                      10m
harbor-notary-server   ClusterIP   10.96.3.157   <none>        4443/TCP                                    10m
harbor-notary-signer   ClusterIP   10.96.1.47    <none>        7899/TCP                                    10m
harbor-portal          ClusterIP   10.96.1.203   <none>        80/TCP                                      10m
harbor-registry        ClusterIP   10.96.3.197   <none>        5000/TCP,8080/TCP                           10m
harbor-trivy           ClusterIP   10.96.3.229   <none>        8080/TCP                                    10m
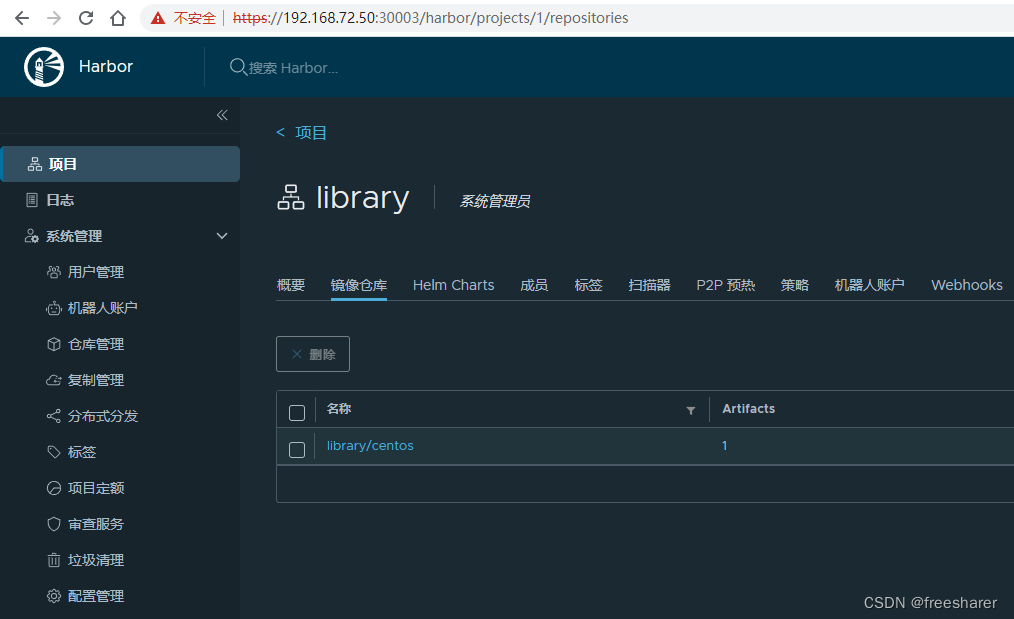
登录harbor仓库,本地上传镜像测试
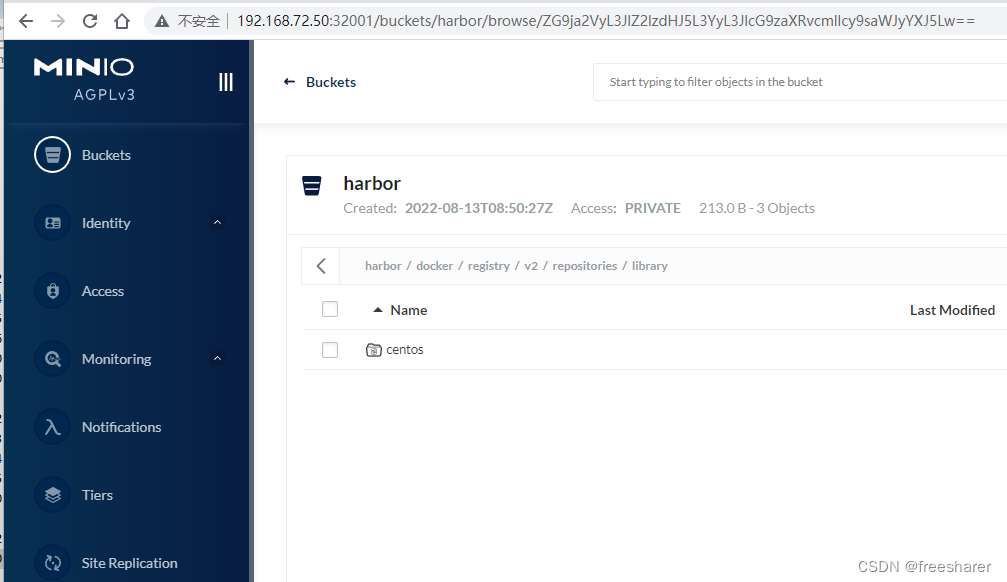
登录minio对象存储console控制台查看存储在bucket中的镜像