原文转自:Harbor高可用集群设计及部署(基于离线安装方式)
架构至美 2022-09-05 09:28 发表于北京
编者荐语:
纯干货、实用,推荐系数5颗星。
以下文章来源于Harbor进阶实战 ,作者键客·李大白

本公众号主要分享云原生领域Harbor私有镜像仓库在实际业务场景中的一些知识。harbor企业级高可用设计、备份还原、升级、监控、镜像迁移、故障排查、性能优化、cicd集成…

【摘要】 基于Harbor离线安装方式的高可用方案设计及部署。
一、环境说明
1.1 架构图
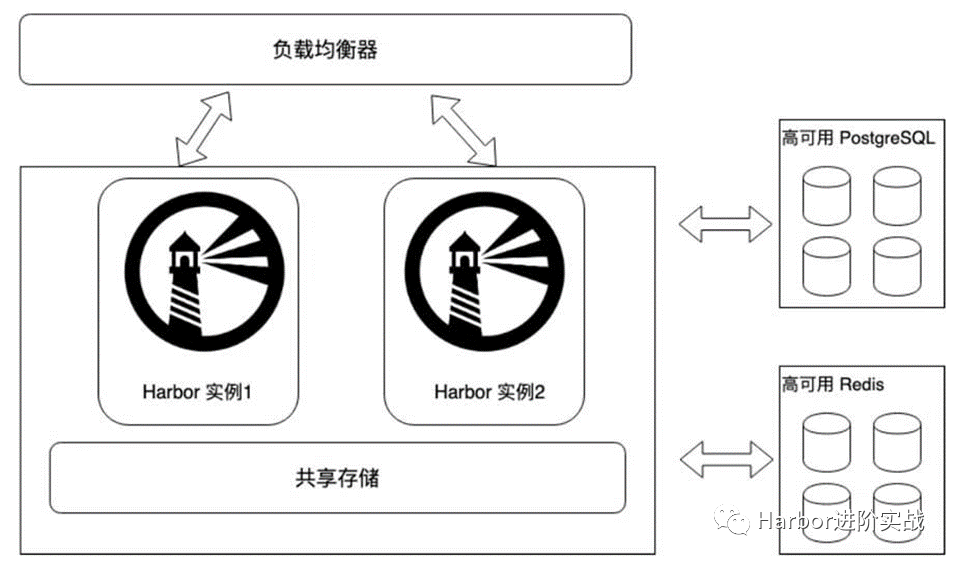
Harbor高可用架构图
【架构解析】:将Harbor的redis缓存组件、PostgreSQL数据库组件迁移到系统外部做高可用,使用外部共享存储实现多个Harbor实例的数据共享,Harbor实例可横向扩展。
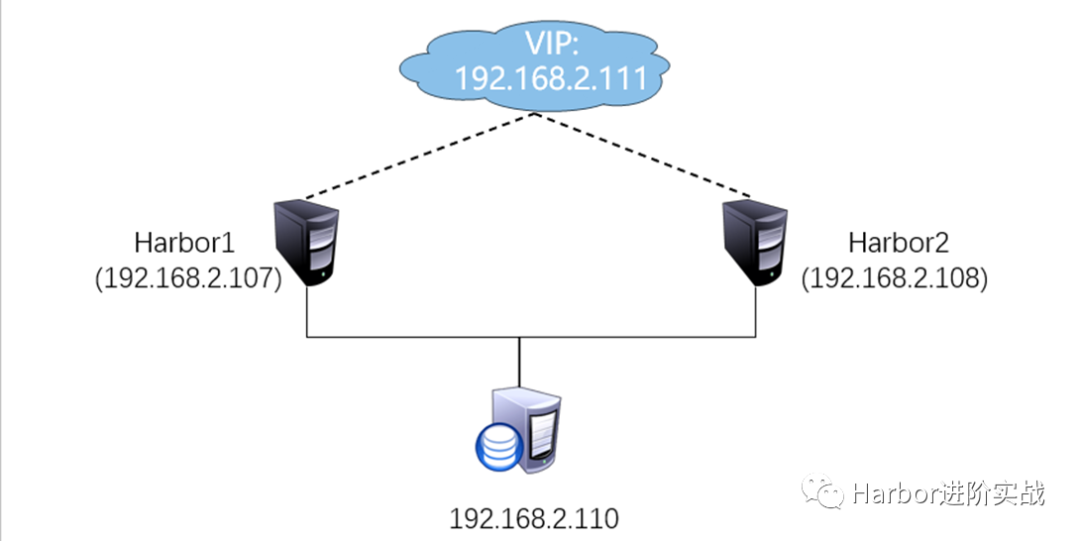
1.2 主机清单
| IP地址 | 主机名 | 描述 |
|---|---|---|
| 192.168.2.107 | harbor1 | Harbor实例1,8021端口 |
| 192.168.2.108 | harbor2 | Harbor实例2,8021端口 |
| 192.168.2.110 | harbor-data | 部署Harbor实例的共享存储、外部数据库、外部缓存服务 |
| 192.168.2.111 | / | 负载均衡VIP,8121端口 |
1.3 服务版本
| 服务 | 版本要求 | 安装版本 |
|---|---|---|
| Harbor | / | 2.3.5 |
| Docker | 17.06.0+ | 19.03.8 |
| Docker-compose | 1.18.0+ | v2.2.3 |
| Redis | 6.0.16 | 6.2.7 |
| PostgreSQL | v13.2 | 13.5 |
二、主机初始化
Harbor实例进行初始化
-
安装docker
-
安装docker-compose
-
配置内核参数
2.1 安装docker
$ wget -O /etc/yum.repos.d/docker-ce.repo https://mirrors.aliyun.com/docker-ce/linux/centos/docker-ce.repo
$ yum install -y docker-ce
$ systemctl enable  --now docker
$ systemctl status docker
$ cat <<EOF > /etc/docker/daemon.json
{
   "registry-mirrors": ["https://xcg41ct3.mirror.aliyuncs.com"],
   "exec-opts": ["native.cgroupdriver=systemd"],
   "registry-mirrors": ["https://3hjcmqfe.mirror.aliyuncs.com"],
   "log-driver": "json-file",
   "log-opts": {
           "max-size": "500m",
           "max-file": "2"
        }
}
EOF
$ systemctl daemon-reload
$ systemctl restart docker
exec-opts": ["native.cgroupdriver=systemd"], #驱动器 registry-mirrors: 镜像加速地址,可多个 max-file: log最多保留数量 live-restore: 重启docker不重启容器,多用于k8s上
2.2 安装docker-compose
安装docker-compose 1.18.0以上的版本,本处安装v2.2.3版本。
$ wget https://github.com/docker/compose/releases/download/v2.2.3/docker-compose-linux-x86_64
$ mv  docker-compose-linux-x86_64 /usr/local/bin/docker-compose
$ chmod +x /usr/local/bin/docker-compose
$ docker-compose version
Docker Compose version v2.2.3
2.3 配置内核参数
$ modprobe br_netfilter
$ cat >> /etc/sysctl.conf << EOF
net.bridge.bridge-nf-call-ip6tables = 1
net.bridge.bridge-nf-call-iptables = 1
net.ipv4.ip_forward = 1      #路由转发
EOF
$ sysctl -p
三、使用NFS提供外部共享存储
在192.168.2.110部署NFS服务提供共享存储给Harbor1实例、Harbor2实例使用。192.168.2.110作为NFS服务端,harbor实例为客户端。
3.1 部署NFS服务端
1)安装并启动nfs
$ yum  install -y  nfs-utils
$ systemctl start nfs && systemctl enable nfs  && systemctl status nfs
$ chkconfig nfs on              #设置为开机自启
2)创建共享目录
客户端的数据将远程存入到共享目录下。
$ mkdir -p /data/harbor_data
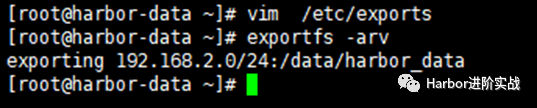
3)修改配置
$ cat /etc/exports
/data/harbor_data  192.168.2.0/24(rw,no_root_squash)  #允许哪个网段的客户端使用指定共享目录
$ exportfs -arv            #使配置文件生效
exporting 192.168.2.0/24:/data/harbor_data
4)重启nfs服务
$ systemctl restart nfs
5)检查共享目录信息
$ showmount  -e localhost
export list for localhost:
/data/harbor_data
3.2 部署客户端
在harbor1和harbor2上操作
$ yum -y install nfs-utils
$ systemctl start nfs-utils &&  systemctl enable nfs-utils && systemctl status  nfs-utils
3.3 客户端挂载NFS共享存储
在harbor1和harbor2节点操作,创建实例的存储目录,然后挂载到NFS。
$ mkdir -p /data/harbor_data
$ cat <<EOF >> /etc/fstab
192.168.2.110:/data/harbor_data /data/harbor_data nfs  defaults  0 0
EOF
$ mount -a
挂载格式:NFSIP:共享目录 本地目录 nfs defaults 0 0
-
测试是否可以正常使用:
[root@harbor2 ~]# touch  /data/harbor_data/test.txt
[root@harbor1 ~]# ls /data/harbor_data/
test.txt
四、部署Redis缓存服务(源码)

本处为演示环境,实际
生产环境请对Redis服务做高可用及数据备份。
在192.168.2.110部署Redis缓存服务,为harbor1和harbor2实例提供外部redis缓存服务。
4.1 下载安装包
$ wget https://download.redis.io/releases/redis-6.2.7.tar.gz
4.2 安装依赖包
$ yum install -y gcc gcc-c++
4.3 源码编译
$ mkdir -p /app/
$ tar zxvf  redis-6.2.7.tar.gz  -C /app
$ cd /app/redis-6.2.7/
$ make   #编译
$ make  install   #安装
4.4 修改配置文件
redis默认只支持本地使用,本处需要修改几个参数:
-
外部可连接;
-
redis启动方式;
-
redis远程连接密码;
$ vim  /app/redis-6.2.7/redis.conf
#bind 127.0.0.1 -::1  #75行,注释掉bind的行,允许任何主机连接;
daemonize yes       #259行,将no修改为yes,使redis可以使用守护进程方式启动;
requirepass lidabai666   #903行,设置redis连接的auth密码(lidabai666)
4.5 启动Redis服务
前面配置了使用守护进程方式启动,所以直接使用systemctl则可以启动redis服务。
$ pwd
/app/redis-6.2.7
$ redis-server redis.conf
4.6 服务验证
1)查看Redis服务版本
$ redis-cli -v
redis-cli 6.2.7
2)查看端口
redis默认监听6379端口
$ ps aux | grep  6379
root  6200  0.1  0.2 162416 10020 ?  Ssl 17:59  0:00 redis-server *:6379
root  6231  0.0  0.0 112720  984 pts/0  R+  18:01  0:00 grep --color=auto 6379
3)客户端连接Redis
harbor1和harbor2作为redis客户端
$ which redis-cli      #查看redis-cli工具位置
/usr/local/bin/redis-cli
[root@harbor-data redis-6.2.7]# scp /usr/local/bin/redis-cli  192.168.2.107:/usr/local/bin/
[root@harbor-data redis-6.2.7]# scp /usr/local/bin/redis-cli  192.168.2.108:/usr/local/bin/
客户端使用redis-cli工具连接Redis服务器
[root@harbor1 ~]# redis-cli -h 192.168.2.110 -p 6379 -a lidabai666
-a 参数指定redis连接密码
五、部署PostgreSQL外部存储服务(源码)
在192.168.2.110主机以源码的方式安装PostgreSQL数据库服务,为harbor1和harbor2实例提供共享存储。
5.1 新建postgres用户
默认超级用户(root)不能启动postgresql,需要手动建用户postgres。
$ useradd postgres
$ id postgres
uid=1000(postgres) gid=1000(postgres) 组=1000(postgres)
5.2 安装依赖包
$ yum -y install readline-devel zlib-devel gcc zlib
5.3 下载解压源码包
$ wget https://ftp.postgresql.org/pub/source/v13.5/postgresql-13.5.tar.gz --no-check-certificate
$ tar zxvf postgresql-13.5.tar.gz   -C  /app/
5.4 编译安装
$ cd /app/postgresql-13.5/
$ ./configure  --prefix=/usr/local/postgresql
$ make && make install
5.5 创建数据目录
$ mkdir -p /data/postgresql/data
$ chown -R postgres:postgres /usr/local/postgresql/
$ chown -R postgres:postgres /data/postgresql/data/
5.6 设置postgres环境变量
[root@harbor-data postgresql-13.5]# su  - postgres
[postgres@harbor-data ~]$ vim + .bash_profile
PGHOME=/usr/local/postgresql   #psql安装目录
export PGHOME
PGDATA=/data/postgresql/data    #数据库目录
export PGDATA
PATH=$PATH:$HOME/bin:$HOME/.local/bin:$PGHOME/bin
export PATH
[postgres@harbor-data ~]$ source ./.bash_profile
[postgres@harbor-data ~]$ which psql
/usr/local/postgresql/bin/psql
查看版本 [postgres@harbor-data ~]$ psql -V psql (PostgreSQL) 13.5
5.7 初始化数据库
由于 Red Hat 系列发行版的政策,PostgreSQL 安装不会启用自动启动或自动初始化数据库。要完成数据库安装,您需要根据您的发行版执行以下步骤:
[postgres@ceph3 ~]$ initdb
......
You can change this by editing pg_hba.conf or using the option -A, or
--auth-local and --auth-host, the next time you run initdb.
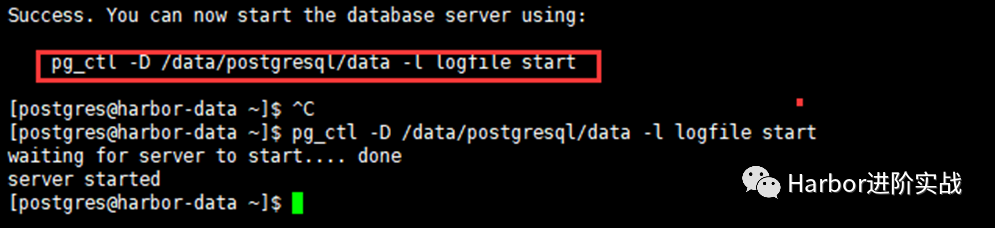
Success. You can now start the database server using: #表示初始化成功
pg_ctl -D /data/postgresql/data -l logfile start

5.8 启动PostgreSQL
根据刚才初始化成功后的提示执行启动命令!
[postgres@harbor-data ~]$ pg_ctl -D /data/postgresql/data -l logfile start
waiting for server to start.... done
server started
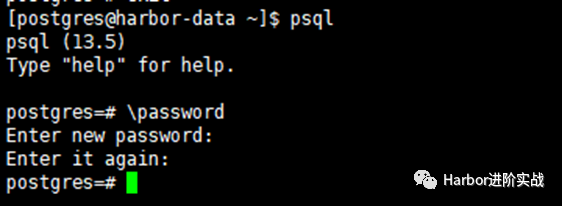
5.9 设置(修改)Postgresql密码
默认psql本地登录是不需要密码的,即使我们设置了密码,也不需要密码就能登录。应为配置文件pg_hba.conf中的local设置为trust , 为了安全我们修改为 password,就是使用密码才能登陆,(当我们忘记密码的时间,也可以使用这用方式,先设置为trust之后,修改密码,然后在设置为password。)
[postgres@harbor-data ~]$ psql
psql (13.5)
Type "help" for help.

postgres=# \password
Enter new password:     #输入设置的密码 Lidabai666
Enter it again:      #确认密码(再次输入)
postgres=# \q    #退出
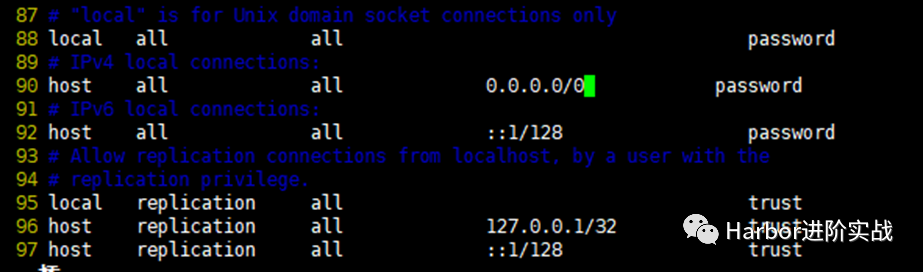
5.10 设置可远程登录PostgreSQL
[postgres@harbor-data ~]$ vim /data/postgresql/data/postgresql.conf
listen_addresses = '*'    #60行,监听所有地址
[postgres@harbor-data ~]$ vim + /data/postgresql/data/pg_hba.conf
local   all             all                                 password
host    all             all             0.0.0.0/0            password
host    all             all             ::1/128             password
5.10 重启PostgreSQL
$ pg_ctl -D /data/postgresql/data -l /data/postgresql/data/postgres.log restartwaiting for server to shut down.... done
server stopped
waiting for server to start.... done
server started

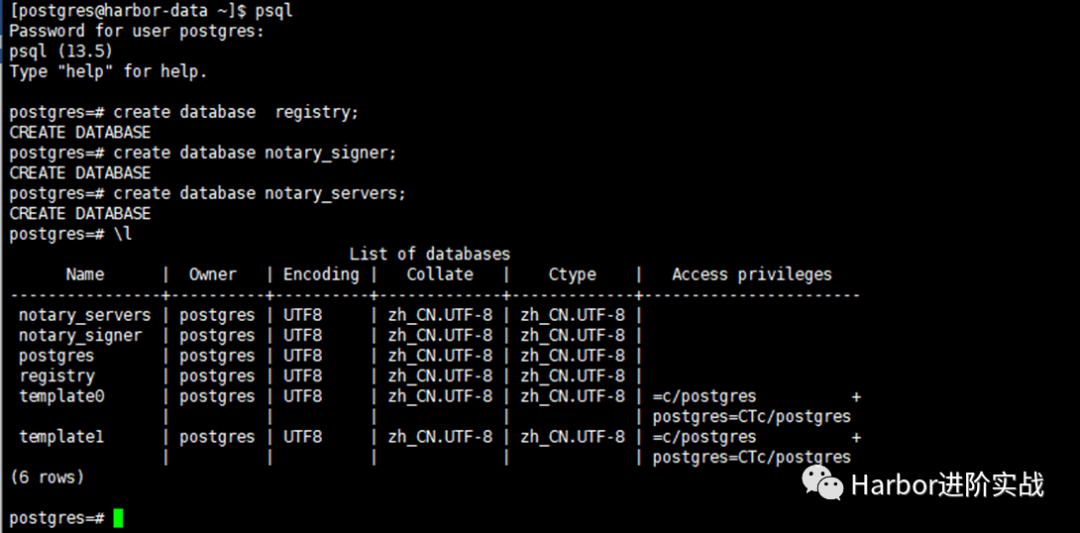
5.11 创建数据库
Harbor 2.3.5需要创建的数据库:
-
notaryserver
-
notarysigner
-
registry
目前Harbor仅支持PostgraSQL数据库,需要手动在外部的PostgreSQL上创建registry、notary_signer、notary_servers三个数据库,Harbor启动时会自动在对应数据库下生成表。
因为本处主要是演示环境,PostgreSQL数据库的用户就以超级管理员
postgres为例,如果是生产环境,建议新建用户,并授予harbor、notary_signer、notary_servers三个数据库相对应的权限。
[postgres@harbor-data ~]$ psql
Password for user postgres:     #输入密码

postgres=# create database  registry;
CREATE DATABASE
postgres=# create database notary_signer;
CREATE DATABASE
postgres=# create database notary_servers;
CREATE DATABASE
postgres=# \l
5.12 创建用户
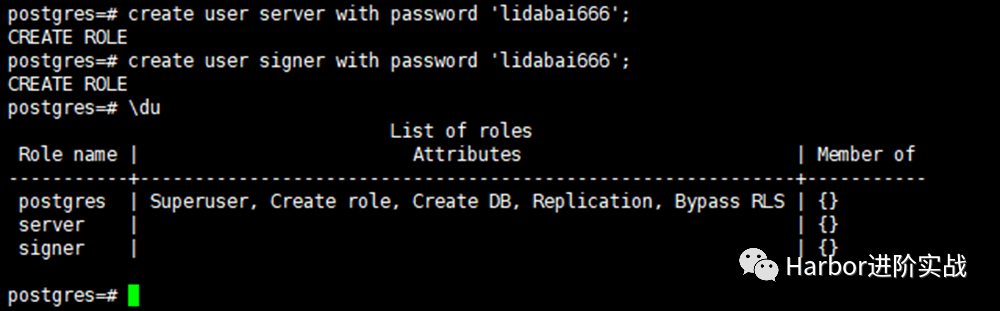
postgres=# create user server with password 'lidabai666';
CREATE ROLE
postgres=# create user signer with password 'lidabai666';
CREATE ROLE
postgres=# \du
六、负载均衡设置(Nginx + Keepalived)
使用keepalived和Nginx实现harbor的高可用。在
harbor1和harbor2节点上安装keepalived服务来提供VIP实现负载均衡。Nginx服务则实现将来到VIP的请求转发到后端服务器组harbor
6.1 安装nginx和keepalived
在harbor1和harbor2操作
$ wget -O /etc/yum.repos.d/epel.repo http://mirrors.aliyun.com/repo/epel-7.repo
$ yum install -y nginx keepalived
$ yum -y install nginx-all-modules.noarch     #安装nginx的stream模块
nginx从1.9.0开始新增了steam模块,用来实现四层协议的转发、代理、负载均衡等。二进制安装的nginx则在./configure时添加--with-stream参数来安装stream模块。
6.2 修改nginx配置文件
在harbor1和harbor2的Nginx服务配置文件一样。$ vim /etc/nginx/nginx.conf
user nginx;
worker_processes auto; #自动设置nginx的工作进程数量
error_log /var/log/nginx/error.log;
pid /run/nginx.pid;
include /usr/share/nginx/modules/*.conf;
events {
worker_connections 1024; #工作进程的连接数
}
# 四层负载均衡,为两台harbor提供负载均衡
stream {
log_format main '$remote_addr $upstream_addr - [$time_local] $status $upstream_bytes_sent';
access_log /var/log/nginx/harbor-access.log main;
upstream harbor{
server 192.168.2.107:8021; # harbor1
server 192.168.2.108:8021; # harbor2
}
server {
listen 8121; #由于nginx与harbor节点复用,这个监听端口不能是8021,否则会冲突
proxy_pass harbor;
}
}
http {
log_format main '$remote_addr - $remote_user [$time_local] "$request" '
'$status $body_bytes_sent "$http_referer" '
'"$http_user_agent" "$http_x_forwarded_for"';
access_log /var/log/nginx/access.log main;
sendfile on;
tcp_nopush on;
tcp_nodelay on;
keepalive_timeout 65;
types_hash_max_size 2048;
include /etc/nginx/mime.types;
default_type application/octet-stream;
server {
listen 80 default_server;
server_name _;
location / {
}
}
}
检测nginx配置文件语法
$ nginx -t
nginx: the configuration file /etc/nginx/nginx.conf syntax is ok
nginx: configuration file /etc/nginx/nginx.conf test is successful
6.3 修改keepalived配置
本处以harbor1为keepalived服务的主节点,harbor2为keepalived的备节点。主备节点的keepalived配置文件不一样。1)主节点(harbor1)
[root@harbor1 ~]# cat  /etc/keepalived/keepalived.conf
! Configuration File for keepalived

global_defs {
   notification_email {
     [email protected]
   }
   router_id master1
}

vrrp_instance lidabai {
    state MASTER
    interface ens33
    mcast_src_ip:192.168.2.107
    virtual_router_id 107
    priority 100
    advert_int 1
    nopreempt
    authentication {
        auth_type PASS
        auth_pass 1111
    }
    virtual_ipaddress {
        192.168.2.111/24  #虚拟VIP地址
    }
    track_script {
        chk_nginx
    }
}
##### 健康检查
vrrp_script chk_nginx {
    script "/etc/keepalived/check_nginx.sh"
    interval 2
    weight -20
}
2)备节点(harbor2)
[root@harbor2 ~]# cat  /etc/keepalived/keepalived.conf
! Configuration File for keepalived

global_defs {
   notification_email {
     [email protected]
   }
   router_id master2
}

vrrp_instance lidabai {
    state BACKUP
    interface ens33
    mcast_src_ip:192.168.2.108
    virtual_router_id 107
    priority 80    #权重
    advert_int 1
    nopreempt
    authentication {
        auth_type PASS
        auth_pass 1111
    }
    virtual_ipaddress {
        192.168.2.111/24
    }
    track_script {
    chk_nginx
    }
}
vrrp_script chk_nginx {
  script "/etc/keepalived/check_nginx.sh"
  interval 2
  weight -20
}
6.4 编写健康检查脚本
在主备节点(harbor1和harbor2)同样操作。$ vim /etc/keepalived/check_nginx.sh
#!/bin/bash
#1、判断Nginx是否存活
counter=`ps -C nginx --no-header | wc -l`
if [ $counter -eq 0 ]; then
#2、如果不存活则尝试启动Nginx
service nginx start
sleep 2
#3、等待2秒后再次获取一次Nginx状态
counter=`ps -C nginx --no-header | wc -l`
#4、再次进行判断,如Nginx还不存活则停止Keepalived,让地址进行漂移
if [ $counter -eq 0 ]; then
service keepalived stop
fi
fi
$ chmod +x /etc/keepalived/check_nginx.sh
6.5 启动服务
先启动master1和master2节点上的nginx服务,再启动keepalived服务
1)启动nginx服务
[root@harbor1 ~]# systemctl enable --now nginx   #启动nginx服务并设置开机自启
[root@harbor2 ~]# systemctl enable --now nginx
[root@harbor1 ~]# systemctl status nginx.service
[root@harbor2 ~]# systemctl status nginx.service
2)启动keepalived服务
[root@harbor1 ~]# systemctl enable --now keepalived
[root@harbor2 ~]# systemctl enable --now keepalived
[root@harbor1 ~]# systemctl status keepalived.service
[root@harbor2 ~]# systemctl status keepalived.service
6.6 查看VIP
在harbor1节点查看VIP是否成功绑定。[root@harbor1 ~]# ip addr
......
2: ens33: <BROADCAST,MULTICAST,UP,LOWER_UP> mtu 1500 qdisc pfifo_fast state UP group default qlen 1000
link/ether 00:0c:29:f1:a3:65 brd ff:ff:ff:ff:ff:ff
inet 192.168.2.107/24 brd 192.168.2.255 scope global noprefixroute ens33
valid_lft forever preferred_lft forever
inet 192.168.2.111/24 scope global secondary ens33 #VIP地址
valid_lft forever preferred_lft forever
inet6 fe80::80b0:1d7f:b5d4:19e8/64 scope link tentative dadfailed
......
通过ifconfig是无法查看到VIP的,通过
hostname -I命令也可以查看到VIP。
七、部署Harbor实例1
在harbor1 192.168.2.107主机上部署harbor服务
7.1 下载解压离线安装包
$ mkdir /app   #创建安装目录
$ wget https://github.com/goharbor/harbor/releases/download/v2.3.5/harbor-offline-installer-v2.3.5.tgz
$ tar zxvf harbor-offline-installer-v2.3.5.tgz  -C  /app/
7.2 修改配置文件
将配置文件模板复制为配置文件,然后修改对应参数。
[root@harbor1 ~]# cd /app/harbor/
[root@harbor1 harbor]# cp harbor.yml.tmpl harbor.yml
[root@harbor1 harbor]# vim harbor.yml
hostname: 192.168.2.107
http:
port: 8021
#取消https安全加密访问方式:
#https:
# port: 443
# certificate: /your/certificate/path
# private_key: /your/private/key/path
## 启用外部代理,启用后hostname将不再使用
external_url: http:192.168.2.111:8121
## 配置共享存储,即挂载的NFS目录
data_volume: /data/harbor_data
_version: 2.3.0
## 配置外部数据库
external_database:
harbor:
host: 192.168.2.110 # 数据库主机地址
port: 5432 # 数据库端口
db_name: registry # 数据库名称
username: postgres # 连接该数据库的用户名
password: Lidabai666 # 连接数据库的密码
ssl_mode: disable
max_idle_conns: 2
max_open_conns: 0
notary_signer:
host: 192.168.2.110
port: 5432
db_name: notary_signer
username: postgres
password: Lidabai666
ssl_mode: disable
notary_server:
host: 192.168.2.110
port: 5432
db_name: notary_server
username: postgres
password: Lidabai666
ssl_mode: disable
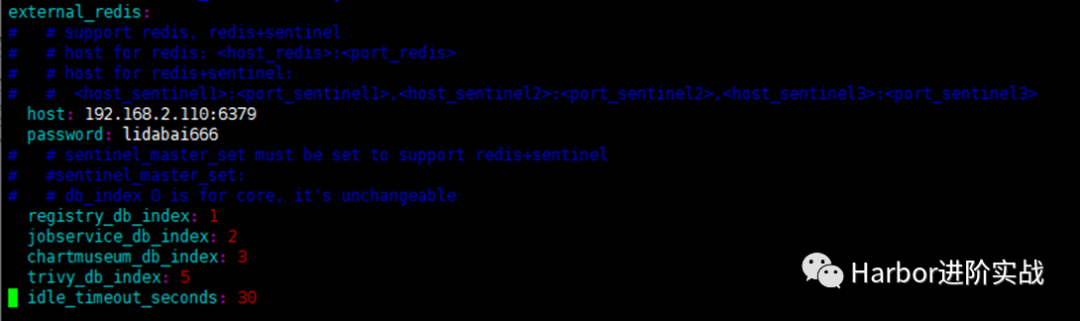
##配置外部Redis实例:
external_redis:
host: 192.168.2.110:6379 #redis服务IP地址和端口号。如果redis是哨兵模式,这里应该是host_sentinel1:port_sentinel1,host_sentinel2:port_sentinel2
password: lidabai666 #连接外部redis服务的密码
# sentinel_master_set: #仅在使用 Sentinel模式(哨兵模式)时使用
registry_db_index: 1
jobservice_db_index: 2 #job服务的数据库索引
chartmuseum_db_index: 3 #chartmuseum插件的Redis索引
trivy_db_index: 5 #Trivy扫描器的数据索引
idle_timeout_seconds: 30 #超时时间
#启用metrics数据采集插件:
metric:
enabled: true
port: 9090
path: /metrics

7.3 将配置文件注入到组件中
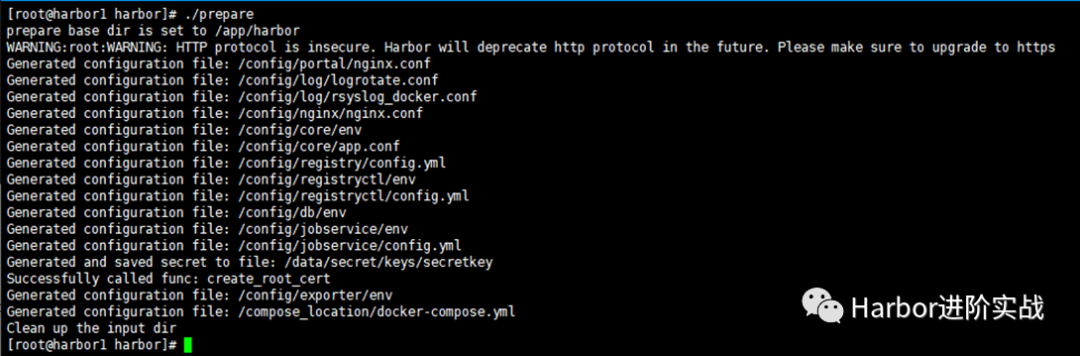
将harbor.yml配置文件的内容注入到各组件的配置文件中。
[root@harbor1 harbor]# ./prepare
7.4 安装Harbor
安装期间会自动导入镜像,执行完成会自动启动Harbor服务。
[root@harbor1 harbor]# ./install.sh --with-trivy --with-chartmuseum
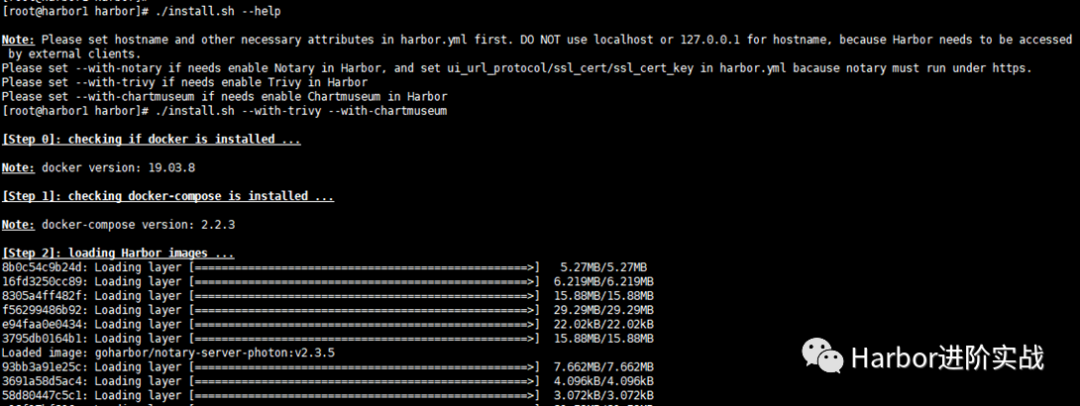

-Harbor has been installed and started successfully.- 表示安装成功!
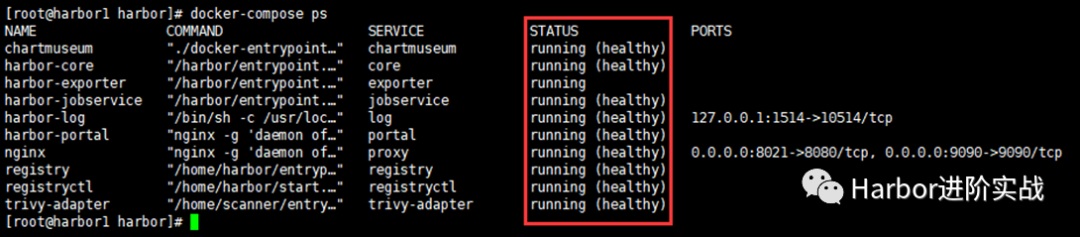
7.5 查看服务状态
[root@harbor1 harbor]# docker-compose ps
7.6 浏览器登录Harbor UI
使用实例主机IP+端口在浏览器访问harbor UI Http://192.168.2.107:8021

用户名:admin
密码:Harbor12345
八、部署Harbor实例2
操作步骤跟部署Harbor实例1一致,仅将harbor.yml文件中hostname的值修改为当前主机的IP地址即可。
$ mkdir /app
$ wget https://github.com/goharbor/harbor/releases/download/v2.3.5/harbor-offline-installer-v2.3.5.tgz
$ tar zxvf harbor-offline-installer-v2.3.5.tgz  -C  /app/
$ scp  192.168.2.107:/app/harbor/harbor.yml /app/harbor/
$ vim /app/harbor/harbor.yml’
hostname: 192.168.2.108
九、服务验证
9.1 浏览器访问VIP和端口
http://192.168.2.111:8121
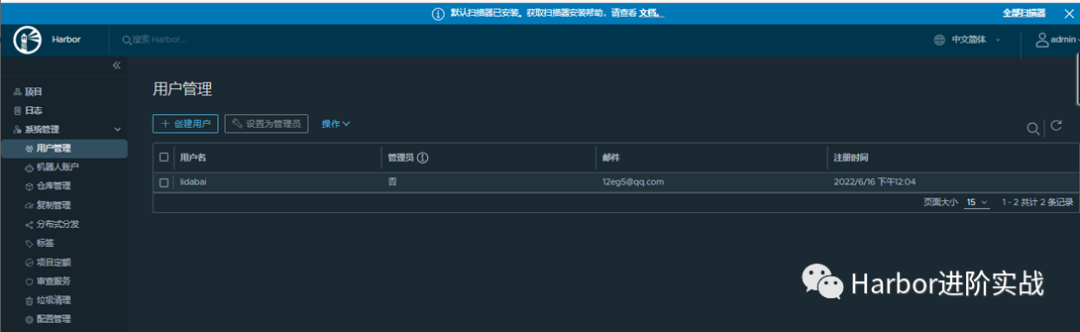
在Harbor UI界面测试镜像推送、拉取、创建用户、创建项目等是否正常
9.2 命令行登录Harbor
$ docker login http://192.168.2.111:8121 -u admin -p Harbor12345
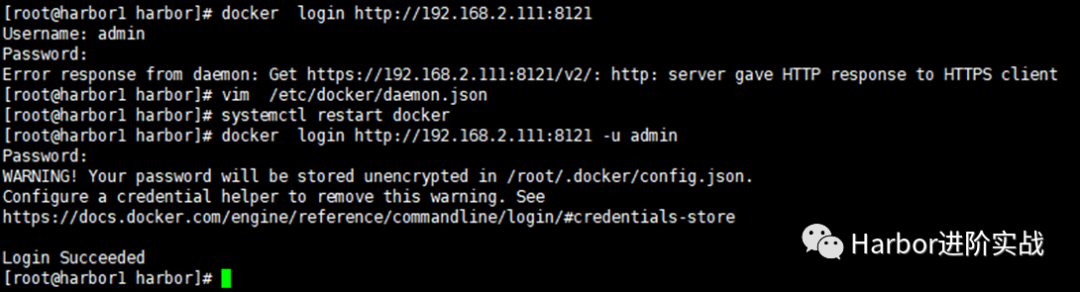
出现报错:
Error response from daemon: Get https://192.168.2.111:8121/v2/: http: server gave HTTP response to HTTPS client 在docker配置文件中添加参数:
[root@harbor1 harbor]# vim  /etc/docker/daemon.json
{
   "registry-mirrors": ["https://xcg41ct3.mirror.aliyuncs.com"],
   "exec-opts": ["native.cgroupdriver=systemd"],
   "registry-mirrors": ["https://3hjcmqfe.mirror.aliyuncs.com"],
   "insecure-registries": ["192.168.2.111:8121"],
   "log-driver": "json-file",
   "log-opts": {
           "max-size": "500m",
           "max-file": "2"
        }
}
[root@harbor1 harbor]# systemctl restart docker   #然后重启docker
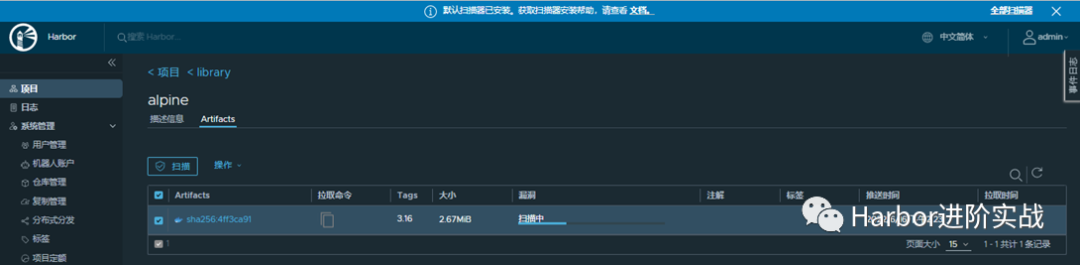
9.3 向Harbor推送镜像
[root@harbor1 harbor]# docker pull alpine:3.16
[root@harbor1 harbor]# docker tag alpine:3.16 192.168.2.111:8121/library/alpine:3.16
[root@harbor1 harbor]# docker  push 192.168.2.111:8121/library/alpine:3.16
然后可以在Harbor UI界面查看到镜像已经推送成功!