1、VisDrone2019数据集介绍
配备摄像头的无人机(或通用无人机)已被快速部署到广泛的应用领域,包括农业、航空摄影、快速交付和监视。因此,从这些平台上收集的视觉数据的自动理解要求越来越高,这使得计算机视觉与无人机的关系越来越密切。我们很高兴为各种重要的计算机视觉任务展示一个大型基准,并仔细注释了地面真相,命名为VisDrone,使视觉与无人机相遇。VisDrone2019数据集由天津大学机器学习和数据挖掘实验室AISKYEYE团队收集。基准数据集包括288个视频片段,由261908帧和10209幅静态图像组成,由各种无人机摄像头捕获,覆盖范围广泛,包括位置(来自中国相隔数千公里的14个不同城市)、环境(城市和农村)、物体(行人、车辆、自行车、等)和密度(稀疏和拥挤的场景)。请注意,数据集是在不同的场景、不同的天气和光照条件下使用不同的无人机平台(即不同型号的无人机)收集的。这些框架用超过260万个经常感兴趣的目标框手工标注,比如行人、汽车、自行车和三轮车。一些重要的属性,包括场景可见性,对象类和遮挡,也提供了更好的数据利用。
挑战主要集中在四个任务上:
(1)任务1:图像中的目标检测挑战。该任务旨在从无人机拍摄的单个图像中检测预定义类别的物体(如汽车和行人)。
(2)任务2:视频中的物体检测挑战。该任务与task 1类似,不同之处在于需要从视频中检测物体。
(3)task 3:单物体跟踪挑战。
(4)任务4:多目标跟踪挑战(multiobject tracking challenge)。
(5)任务5:人群计数挑战。该任务的目的是统计每个视频帧中的人数。
1、目标检测数据介绍
我们很高兴宣布VisDrone2021图像对象检测挑战(任务1)。该比赛旨在推动与无人机平台的对象检测的最先进技术。要求团队预测10个预定义类别(即行人、人、汽车、面包车、巴士、卡车、摩托车、自行车、遮阳篷-三轮车和三轮车
pedestrian, person, car, van, bus, truck, motor, bicycle, awning-tricycle, and tricycle)的物体边界盒,并给出实值置信度。一些很少发生的特种车辆(如机械车间卡车、叉车、油罐车)在评估中被忽略。
据DeepBlueAI团队介绍,虽然该比赛已举办多届,仍然存在以下几个难点:
- 大量的检测物体
- 部分目标过小
- 不同的数据分布
- 目标遮挡严重
2、数据下载
3、任务一,目标检测数据集
我们很高兴地宣布VisDrone2021图像对象检测挑战(任务1)。该比赛旨在推动与无人机平台的最先进的目标检测。要求团队预测10个预定义类别(pedestrian, person, car, van, bus, truck, motor, bicycle, awning-tricycle, and tricycle)的物体边界盒,并给出实值置信度。一些很少发生的特种车辆(如machineshop truck, forklift truck, and tanker)在评估中被忽略。
该挑战包含10209张静态图像(6471张用于训练,548张用于验证,3190张用于测试),由无人机平台在不同地点和不同高度捕获,可在下载页面上下载。我们手动注释每个图像中不同类别对象的边界框。此外,我们还提供了两种有用的注释,遮挡比和截断比。具体地说,我们使用被遮挡物体的比例来定义遮挡比。截断比用来表示物体部分出现在框架外的程度。如果一个物体在一帧内没有被完全捕获,我们在帧边界上标注边界框,并根据图像外部区域估计截断比。值得一提的是,如果目标的截断比大于50%,则在评估过程中跳过该目标。关于培训和验证集的注释是公开可用的。
对于DET比赛,有三组数据和标签:训练数据、验证数据和测试挑战数据。这三组之间没有重叠。
Number of images
Dataset Training Validation Test-Challenge
Object detection in images 6,471 images 548 images 1,580 images
1、标签类别
标签从0到11分别为’ignored regions’,‘pedestrian’,‘people’,‘bicycle’,‘car’,‘van’,
‘truck’,‘tricycle’,‘awning-tricycle’,‘bus’,‘motor’,‘others’
2、注释标签

<bbox_left>,<bbox_top>,<bbox_width>,<bbox_height>,,<object_category>,,
<bbox_left>,<bbox_top>,<bbox_width>,<bbox_height>,,<object_category>,,
Name Description
<bbox_left> The x coordinate of the top-left corner of the predicted bounding box
<bbox_top> The y coordinate of the top-left corner of the predicted object bounding box
<bbox_width> The width in pixels of the predicted object bounding box
<bbox_height> The height in pixels of the predicted object bounding box
The score in the DETECTION file indicates the confidence of the predicted bounding box enclosing
an object instance.
The score in GROUNDTRUTH file is set to 1 or 0. 1 indicates the bounding box is considered in evaluation,
while 0 indicates the bounding box will be ignored.
<object_category> The object category indicates the type of annotated object, (i.e., ignored regions(0), pedestrian(1),
people(2), bicycle(3), car(4), van(5), truck(6), tricycle(7), awning-tricycle(8), bus(9), motor(10),
others(11))
The score in the DETECTION result file should be set to the constant -1.
The score in the GROUNDTRUTH file indicates the degree of object parts appears outside a frame
(i.e., no truncation = 0 (truncation ratio 0%), and partial truncation = 1 (truncation ratio 1% ~ 50%)).
The score in the DETECTION file should be set to the constant -1.
The score in the GROUNDTRUTH file indicates the fraction of objects being occluded (i.e., no occlusion = 0
(occlusion ratio 0%), partial occlusion = 1 (occlusion ratio 1% ~ 50%), and heavy occlusion = 2
(occlusion ratio 50% ~ 100%)).
其中:两种有用的注释:truncation截断率,occlusion遮挡率。
被遮挡的对象比例来定义遮挡率。
截断率用于指示对象部分出现在框架外部的程度。
如果目标的截断率大于50%,则会在评估过程中将其跳过。
3、数据评估
我们要求每个评估的算法以预定义的格式输出检测到的带有每个测试图像置信度得分的边界框列表。请参阅结果格式了解更多细节。与MS COCO[1]的评估协议类似,我们使用 AP, APIOU=0.50, APIOU=0.75, ARmax=1, ARmax=10, ARmax=100, and ARmax=500 metrics to evaluate the results of detection algorithms。除非另有规定,AP和AR指标是在联合(loU)值的多个交集上平均的。具体来说,我们使用十个loU阈值[0.50:0.05:0.95]。所有指标的计算允许最多500个最高得分检测每个图像(跨所有类别)。这些标准会惩罚对象检测缺失和重复检测(同一个对象实例有两个检测结果)。AP指标被用作算法排序的主要指标。下表描述了这些指标。
Measure Perfect Description
AP 100% The average precision over all 10 IoU thresholds (i.e., [0.5:0.05:0.95]) of all object categories
所有对象类别的10个IoU阈值(即[0.5:0.05:0.95])的平均精度
APIOU=0.50 100% The average precision over all object categories when the IoU overlap with ground truth is larger than 0.50
当IoU与地面真实值重叠时,所有对象类别的大于0.50的平均精度
APIOU=0.75 100% The average precision over all object categories when the IoU overlap with ground truth is larger than 0.75
ARmax=1 100% The maximum recall given 1 detection per image,给定每幅图像一次检测的最大召回率
ARmax=10 100% The maximum recall given 10 detections per image,给定每幅图像10次检测的最大召回率
ARmax=100 100% The maximum recall given 100 detections per image
ARmax=500 100% The maximum recall given 500 detections per image
以上指标是根据10个感兴趣的对象类别计算的。综合评估,我们将报告每个对象类别的性能。图像中对象检测的评估代码可以在VisDrone github上获得。
evalDET.m is the main function used to evaluate your detector -please modify the dataset path and result path -use “isImgDisplay” to display the groundtruth and detections
4、VisDrone2019目标检测数据集格式转换
4.1 转换为YOLO(TXT)格式
YOLO数据集文件夹共有两个子文件夹,一个是 images ,一个是 labels ,分别存放图片与标签txt文件,并且 images与labels的目录结构需要对应,因为yolo是先读取images图片路径,随后直接将images替换为labels来查找标签文件 。如下所示:
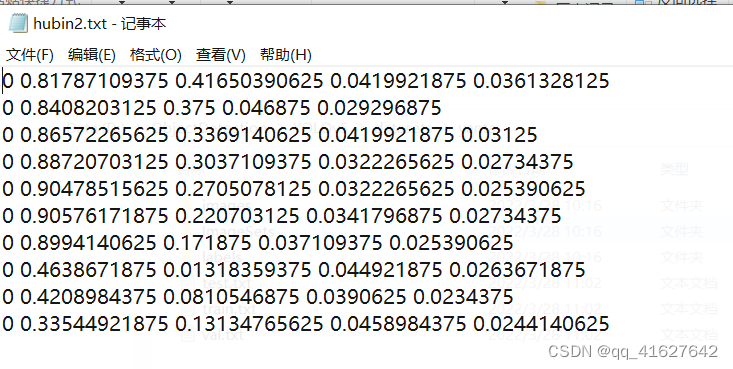
每张图片对应的txt文件中,数据格式是:cls_id x y w h 其中坐标(x,y)是中心点坐标,并且是相对于图片宽高的比例值 ,并非绝对坐标。
新版本的yolov5中已经集成了训练visdrone数据集的配置文件,其中附带了数据集的处理方式,主要是labels的生成,可以新建一个visDrone2019_txt2txt_yolo.py文件。
'''
Author: 刘鸿燕 13752614153@163.com
Date: 2022-05-09 14:05:05
LastEditors: 刘鸿燕 13752614153@163.com
LastEditTime: 2022-05-09 15:38:09
FilePath: \VisDrone2019\data_process\visDrone2019_txt2txt_yolo.py
Description: 这是默认设置,请设置`customMade`, 打开koroFileHeader查看配置 进行设置: https://github.com/OBKoro1/koro1FileHeader/wiki/%E9%85%8D%E7%BD%AE
'''
import os
from pathlib import Path
from PIL import Image
from tqdm import tqdm

def visdrone2yolo(dir):
    def convert_box(size, box):
        #Convert VisDrone box to YOLO CxCywh box,坐标进行了归一化
        dw = 1. / size[0]
        dh = 1. / size[1]
        return (box[0] + box[2] / 2) * dw, (box[1] + box[3] / 2) * dh, box[2] * dw, box[3] * dh

    # (dir / 'labels').mkdir(parents=True, exist_ok=True)  # make labels directory
    (dir / 'Annotations_YOLO').mkdir(parents=True, exist_ok=True)  # make labels directory
    pbar = tqdm((dir / 'annotations').glob('*.txt'), desc=f'Converting {dir}')
    for f in pbar:
        img_size = Image.open((dir / 'images' / f.name).with_suffix('.jpg')).size
        lines = []
        with open(f, 'r') as file:  # read annotation.txt
            for row in [x.split(',') for x in file.read().strip().splitlines()]:
                if row[4] == '0':  # VisDrone 'ignored regions' class 0
                    continue
                cls = int(row[5]) - 1
                box = convert_box(img_size, tuple(map(int, row[:4])))
                lines.append(f"{cls} {' '.join(f'{x:.6f}' for x in box)}\n")
                with open(str(f).replace(os.sep + 'annotations' + os.sep, os.sep + 'Annotations_YOLO' + os.sep), 'w') as fl:
                    fl.writelines(lines)  # write label.txt


dir = Path(r'E:\DPL\DeepLearnData\目标检测\航空目标检测数据VisDrone\VisDrone2019')  # dataset文件夹下Visdrone2019文件夹路径
# Convert
for d in 'VisDrone2019-DET-train', 'VisDrone2019-DET-val', 'VisDrone2019-DET-test-dev':
    visdrone2yolo(dir / d)  # convert VisDrone annotations to YOLO labels
正确执行代码后,会在’VisDrone2019-DET-train’, ‘VisDrone2019-DET-val’, 'VisDrone2019-DET-test-dev三个文件夹内新生成Annotations_YOLO文件夹,用以存放将VisDrone数据集处理成YoloV5格式后的数据标签。
标签为yolo格式数据集划分训练集和验证集
from xml.dom.minidom import Document
import os
import cv2

# def makexml(txtPath, xmlPath, picPath):  # txt所在文件夹路径,xml文件保存路径,图片所在文件夹路径
def makexml(picPath, txtPath, xmlPath):  # txt所在文件夹路径,xml文件保存路径,图片所在文件夹路径
    """此函数用于将yolo格式txt标注文件转换为voc格式xml标注文件
    在自己的标注图片文件夹下建三个子文件夹,分别命名为picture、txt、xml
    """
    dic = {

    '0': "hat",  # 创建字典用来对类型进行转换
           '1': "person",  # 此处的字典要与自己的classes.txt文件中的类对应,且顺序要一致
           }
    files = os.listdir(txtPath)
    for i, name in enumerate(files):
        xmlBuilder = Document()
        annotation = xmlBuilder.createElement("annotation")  # 创建annotation标签
        xmlBuilder.appendChild(annotation)
        txtFile = open(txtPath + name)
        txtList = txtFile.readlines()
        img = cv2.imread(picPath + name[0:-4] + ".jpg")
        Pheight, Pwidth, Pdepth = img.shape

        folder = xmlBuilder.createElement("folder")  # folder标签
        foldercontent = xmlBuilder.createTextNode("driving_annotation_dataset")
        folder.appendChild(foldercontent)
        annotation.appendChild(folder)  # folder标签结束

        filename = xmlBuilder.createElement("filename")  # filename标签
        filenamecontent = xmlBuilder.createTextNode(name[0:-4] + ".jpg")
        filename.appendChild(filenamecontent)
        annotation.appendChild(filename)  # filename标签结束

        size = xmlBuilder.createElement("size")  # size标签
        width = xmlBuilder.createElement("width")  # size子标签width
        widthcontent = xmlBuilder.createTextNode(str(Pwidth))
        width.appendChild(widthcontent)
        size.appendChild(width)  # size子标签width结束

        height = xmlBuilder.createElement("height")  # size子标签height
        heightcontent = xmlBuilder.createTextNode(str(Pheight))
        height.appendChild(heightcontent)
        size.appendChild(height)  # size子标签height结束

        depth = xmlBuilder.createElement("depth")  # size子标签depth
        depthcontent = xmlBuilder.createTextNode(str(Pdepth))
        depth.appendChild(depthcontent)
        size.appendChild(depth)  # size子标签depth结束

        annotation.appendChild(size)  # size标签结束

        for j in txtList:
            oneline = j.strip().split(" ")
            object = xmlBuilder.createElement("object")  # object 标签
            picname = xmlBuilder.createElement("name")  # name标签
            namecontent = xmlBuilder.createTextNode(dic[oneline[0]])
            picname.appendChild(namecontent)
            object.appendChild(picname)  # name标签结束

            pose = xmlBuilder.createElement("pose")  # pose标签
            posecontent = xmlBuilder.createTextNode("Unspecified")
            pose.appendChild(posecontent)
            object.appendChild(pose)  # pose标签结束

            truncated = xmlBuilder.createElement("truncated")  # truncated标签
            truncatedContent = xmlBuilder.createTextNode("0")
            truncated.appendChild(truncatedContent)
            object.appendChild(truncated)  # truncated标签结束

            difficult = xmlBuilder.createElement("difficult")  # difficult标签
            difficultcontent = xmlBuilder.createTextNode("0")
            difficult.appendChild(difficultcontent)
            object.appendChild(difficult)  # difficult标签结束

            bndbox = xmlBuilder.createElement("bndbox")  # bndbox标签
            xmin = xmlBuilder.createElement("xmin")  # xmin标签
            mathData = int(((float(oneline[1])) * Pwidth + 1) - (float(oneline[3])) * 0.5 * Pwidth)
            xminContent = xmlBuilder.createTextNode(str(mathData))
            xmin.appendChild(xminContent)
            bndbox.appendChild(xmin)  # xmin标签结束

            ymin = xmlBuilder.createElement("ymin")  # ymin标签
            mathData = int(((float(oneline[2])) * Pheight + 1) - (float(oneline[4])) * 0.5 * Pheight)
            yminContent = xmlBuilder.createTextNode(str(mathData))
            ymin.appendChild(yminContent)
            bndbox.appendChild(ymin)  # ymin标签结束

            xmax = xmlBuilder.createElement("xmax")  # xmax标签
            mathData = int(((float(oneline[1])) * Pwidth + 1) + (float(oneline[3])) * 0.5 * Pwidth)
            xmaxContent = xmlBuilder.createTextNode(str(mathData))
            xmax.appendChild(xmaxContent)
            bndbox.appendChild(xmax)  # xmax标签结束

            ymax = xmlBuilder.createElement("ymax")  # ymax标签
            mathData = int(((float(oneline[2])) * Pheight + 1) + (float(oneline[4])) * 0.5 * Pheight)
            ymaxContent = xmlBuilder.createTextNode(str(mathData))
            ymax.appendChild(ymaxContent)
            bndbox.appendChild(ymax)  # ymax标签结束

            object.appendChild(bndbox)  # bndbox标签结束

            annotation.appendChild(object)  # object标签结束

        f = open(xmlPath + name[0:-4] + ".xml", 'w')
        xmlBuilder.writexml(f, indent='\t', newl='\n', addindent='\t', encoding='utf-8')
        f.close()

if __name__ == "__main__":
    picPath = "VOCdevkit/VOC2007/JPEGImages/"  # 图片所在文件夹路径,后面的/一定要带上
    txtPath = "VOCdevkit/VOC2007/YOLO/"  # txt所在文件夹路径,后面的/一定要带上
    xmlPath = "VOCdevkit/VOC2007/Annotations/"  # xml文件保存路径,后面的/一定要带上
    makexml(picPath, txtPath, xmlPath)
4.2 转换为VOC(XML)格式
VOCdevkit
–VOC2007
----Annotations
----ImageSets
------Main
----JEPGImages
Annotations 目录存放.xml文件,JEPGImages 存放训练图片,划分数据集使用以下代码,
VOC Annotations文件夹,该文件下存放的是xml格式的标签文件,每个xml文件都对应于JPEGImages文件夹的一张图片, 其中对xml的解析如下:
<annotation>
    <folder>VOC2007</folder>
    <filename>2007_000392.jpg</filename>                               //文件名
    <source>                                                           //图像来源(不重要)
        <database>The VOC2007 Database</database>
        <annotation>PASCAL VOC2007</annotation>
        <image>flickr</image>
    </source>
    <size>                                               //图像尺寸(长宽以及通道数)
        <width>500</width>
        <height>332</height>
        <depth>3</depth>
    </size>
    <segmented>1</segmented>                                   //是否用于分割(在图像物体识别中01无所谓)
    <object>                                                           //检测到的物体
        <name>horse</name>                                         //物体类别
        <pose>Right</pose>                                         //拍摄角度
        <truncated>0</truncated>                                   //是否被截断(0表示完整)
        <difficult>0</difficult>                                   //目标是否难以识别(0表示容易识别)
        <bndbox>                                                   //bounding-box(包含左下角和右上角xy坐标)
            <xmin>100</xmin>
            <ymin>96</ymin>
            <xmax>355</xmax>
            <ymax>324</ymax>
        </bndbox>
    </object>
    <object>                                                           //检测到多个物体
        <name>person</name>
        <pose>Unspecified</pose>
        <truncated>0</truncated>
        <difficult>0</difficult>
        <bndbox>
            <xmin>198</xmin>
            <ymin>58</ymin>
            <xmax>286</xmax>
            <ymax>197</ymax>
        </bndbox>
    </object>
</annotation>
下面是visDrone2019的txt注释文件转换为voc xml的代码,visDrone2019_txt2xml_voc.py
需要改的地方有注释,就是几个路径改一下即可。
'''
Author: 刘鸿燕 13752614153@163.com
Date: 2022-05-09 10:17:40
LastEditors: 刘鸿燕 13752614153@163.com
LastEditTime: 2022-05-09 11:17:20
FilePath: \VisDrone2019\data_process\visDrone2019_txt2xml.py
Description: 这是默认设置,请设置`customMade`, 打开koroFileHeader查看配置 进行设置: https://github.com/OBKoro1/koro1FileHeader/wiki/%E9%85%8D%E7%BD%AE
'''
import os
import datetime
from PIL import Image
from pathlib import Path
FILE = Path(__file__).resolve()
# print("FILE",FILE)
ROOT = FILE.parent.parents[0] # root directory
print("ROOT",ROOT)

def check_dir(path):
    if os.path.isdir(path):
        print("{}文件路径存在!".format(path))
        pass
    else:
        os.makedirs(path)
        print("{}文件路径创建成功!".format(path))

#把下面的root_dir路径改成你自己的路径即可
root_dir = ROOT / 'VisDrone2019-DET-train'
annotations_dir = root_dir / "annotations/"
image_dir = root_dir / "images/"
xml_dir = root_dir / "Annotations_XML/"   #在工作目录下创建Annotations_XML文件夹保存xml文件
check_dir(xml_dir)
# print("annotation_dir",annotations_dir)
# print("image_dir",image_dir)
# print("xml_dir",xml_dir)

# root_dir = r"D:\object_detection_data\datacovert\VisDrone2019-DET-val/"
# annotations_dir = root_dir+"annotations/"
# image_dir = root_dir + "images/"
# xml_dir = root_dir+"Annotations_XML/"   #在工作目录下创建Annotations_XML文件夹保存xml文件

# 下面的类别也换成你自己数据类别,也可适用于其他的数据集转换
class_name = ['ignored regions','pedestrian','people','bicycle','car','van',
    'truck','tricycle','awning-tricycle','bus','motor','others']

for filename in os.listdir(annotations_dir):
    fin = open(annotations_dir/ filename, 'r')
    image_name = filename.split('.')[0]
    image_path=Path(image_dir).joinpath(image_name+".jpg")# 若图像数据是“png”转换成“.png”即可
    img = Image.open(image_path) # 若图像数据是“png”转换成“.png”即可
    xml_name = Path(xml_dir).joinpath(image_name+'.xml')
    with open(xml_name, 'w') as fout:
        #写入的xml基本信息
        fout.write('<annotation>'+'\n')
        fout.write('\t'+'<folder>VOC2007</folder>'+'\n')
        fout.write('\t'+'<filename>'+image_name+'.jpg'+'</filename>'+'\n')

        fout.write('\t'+'<source>'+'\n')
        fout.write('\t\t'+'<database>'+'VisDrone2019-DET'+'</database>'+'\n')
        fout.write('\t\t'+'<annotation>'+'VisDrone2019-DET'+'</annotation>'+'\n')
        fout.write('\t\t'+'<image>'+'flickr'+'</image>'+'\n')
        fout.write('\t\t'+'<flickrid>'+'Unspecified'+'</flickrid>'+'\n')
        fout.write('\t'+'</source>'+'\n')

        fout.write('\t'+'<owner>'+'\n')
        fout.write('\t\t'+'<flickrid>'+'LJ'+'</flickrid>'+'\n')
        fout.write('\t\t'+'<name>'+'LJ'+'</name>'+'\n')
        fout.write('\t'+'</owner>'+'\n')

        fout.write('\t'+'<size>'+'\n')
        fout.write('\t\t'+'<width>'+str(img.size[0])+'</width>'+'\n')
        fout.write('\t\t'+'<height>'+str(img.size[1])+'</height>'+'\n')
        fout.write('\t\t'+'<depth>'+'3'+'</depth>'+'\n')
        fout.write('\t'+'</size>'+'\n')

        fout.write('\t'+'<segmented>'+'0'+'</segmented>'+'\n')

        for line in fin.readlines():
            line = line.split(',')
            fout.write('\t'+'<object>'+'\n')
            fout.write('\t\t'+'<name>'+class_name[int(line[5])]+'</name>'+'\n')
            fout.write('\t\t'+'<pose>'+'Unspecified'+'</pose>'+'\n')
            fout.write('\t\t'+'<truncated>'+line[6]+'</truncated>'+'\n')
            fout.write('\t\t'+'<difficult>'+str(int(line[7]))+'</difficult>'+'\n')
            fout.write('\t\t'+'<bndbox>'+'\n')
            fout.write('\t\t\t'+'<xmin>'+line[0]+'</xmin>'+'\n')
            fout.write('\t\t\t'+'<ymin>'+line[1]+'</ymin>'+'\n')
            # pay attention to this point!(0-based)
            fout.write('\t\t\t'+'<xmax>'+str(int(line[0])+int(line[2])-1)+'</xmax>'+'\n')
            fout.write('\t\t\t'+'<ymax>'+str(int(line[1])+int(line[3])-1)+'</ymax>'+'\n')
            fout.write('\t\t'+'</bndbox>'+'\n')
            fout.write('\t'+'</object>'+'\n')

        fin.close()
        fout.write('</annotation>')
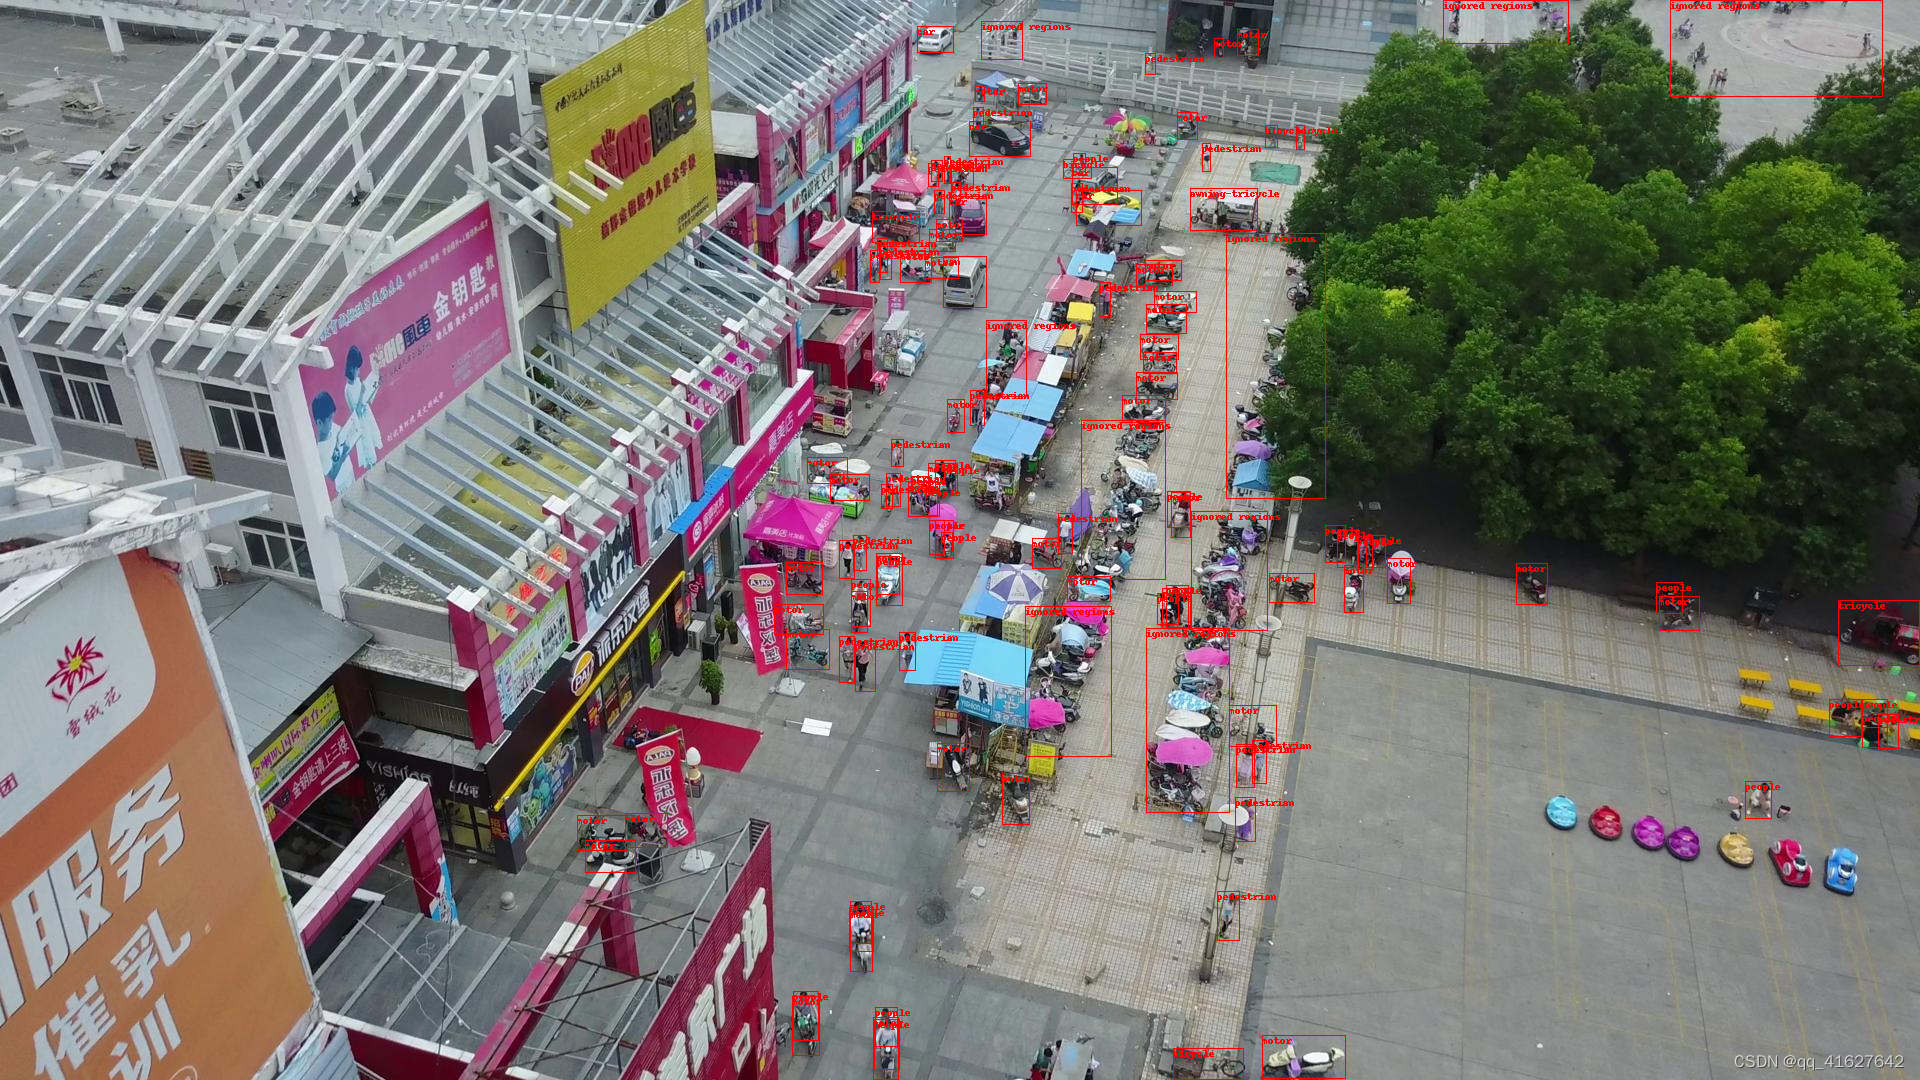
1、 转化为voc格式数据集的数据标签可视化
'''
为了方便实验对比结果,先将visdrone的验证集可视化出来。
代码是根据xml标签可视化的,需要将visdrone的txt标签转成xml
'''
import os
import os.path
import numpy as np
import xml.etree.ElementTree as xmlET
from PIL import Image, ImageDraw

#'1': 'people', '2': 'people','3': 'bicycle', '4': 'car', '5': 'car',
# 6':'others','7':'others','8':'others','9':'others','10': 'motor','11':'others'

classes = ('__background__', # always index 0
           'ignored regions','pedestrian', 'people','bicycle','car','van','truck','tricycle','awning-tricycle',
           'bus','motor','others')

#把下面的路径改为自己的路径即可
file_path_img = r'E:\DPL\DeepLearnData\目标检测\航空目标检测数据VisDrone\VisDrone2019\VisDrone2019-DET-val\images'
file_path_xml = r'E:\DPL\DeepLearnData\目标检测\航空目标检测数据VisDrone\VisDrone2019\VisDrone2019-DET-val\Annotations_XML'
save_file_path = r'E:\DPL\DeepLearnData\目标检测\航空目标检测数据VisDrone\VisDrone2019\VisDrone2019-DET-val\Annotations_XML_show'

pathDir = os.listdir(file_path_xml)
for idx in range(len(pathDir)):
    filename = pathDir[idx]#xml文件名
    tree = xmlET.parse(os.path.join(file_path_xml, filename))#解析xml
    objs = tree.findall('object')
    num_objs = len(objs)
    boxes = np.zeros((num_objs, 5), dtype=np.uint16)

    for ix, obj in enumerate(objs):
        bbox = obj.find('bndbox')
        # Make pixel indexes 0-based
        x1 = float(bbox.find('xmin').text)
        y1 = float(bbox.find('ymin').text)
        x2 = float(bbox.find('xmax').text)
        y2 = float(bbox.find('ymax').text)

        cla = obj.find('name').text
        label = classes.index(cla)

        boxes[ix, 0:4] = [x1, y1, x2, y2]
        boxes[ix, 4] = label

    image_name = os.path.splitext(filename)[0]
    img = Image.open(os.path.join(file_path_img, image_name + '.jpg'))

    draw = ImageDraw.Draw(img)
    for ix in range(len(boxes)):
        xmin = int(boxes[ix, 0])
        ymin = int(boxes[ix, 1])
        xmax = int(boxes[ix, 2])
        ymax = int(boxes[ix, 3])
        draw.rectangle([xmin, ymin, xmax, ymax], outline=(255, 0, 0))
        draw.text([xmin, ymin], classes[boxes[ix, 4]], (255, 0, 0))

    img.save(os.path.join(save_file_path, image_name + '.png'))
2、标签为voc格式数据集划分训练集和验证集
import os
import random

trainval_percent = 0.8
train_percent = 0.8
xmlfilepath = 'Annotations'
txtsavepath = 'ImageSets\Main'
total_xml = os.listdir(xmlfilepath)

num = len(total_xml)
list = range(num)
tv = int(num * trainval_percent)
tr = int(tv * train_percent)
trainval = random.sample(list, tv)
train = random.sample(trainval, tr)

ftrainval = open('ImageSets/Main/trainval.txt', 'w')
ftest = open('ImageSets/Main/test.txt', 'w')
ftrain = open('ImageSets/Main/train.txt', 'w')
fval = open('ImageSets/Main/val.txt', 'w')

for i in list:
    name = total_xml[i][:-4] + '\n'
    if i in trainval:
        ftrainval.write(name)
        if i in train:
            ftrain.write(name)
        else:
            fval.write(name)
    else:
        ftest.write(name)

ftrainval.close()
ftrain.close()
fval.close()
ftest.close()
上述代码分割数据集,训练集占80%,测试集占20% 运行代码后可在/VOCdevkit/VOC2007/ImageSets/Main看见三个.txt文件
三个.txt文件里面分别是训练测试图片名称的索引,数据集准备到这就完成了
4.3 转换为VOC(XML)TO COCO(JSON)数据格式
参考博客:
将visdrone数据集转化为coco格式并在mmdetection上训练,附上转好的json文件
1、coco目标检测的json整体格式
对于目标检测,json文件的格式主要如下:
是的,你打开这两个文件,虽然内容很多,但从文件开始到结尾按照顺序就是这5段。其中,info、licenses、images在不同的JSON文件中这三个类型是一样的,定义是共享的。
不共享的是annotation和category这两种结构体,他们在不同类型的JSON文件中是不一样的。
PS,images数组、annotations数组、categories数组的元素数量是相等的,等于图片的数量。
每个对象实例注释包含一系列字段,包括对象的类别id和分段掩码。分割格式取决于实例是否代表单个对象(iscrowd=0,在使用多边形的情况下)或对象集合(iscrowd=1,在使用RLE的情况下)。请注意,单个对象(iscrowd=0)可能需要多个多边形,例如遮挡。人群注释(iscrowd=1)用于标记大型对象组(例如一群人)。此外,为每个对象提供了一个封闭的边界框(框的坐标是从图像左上角开始测量的,并且是o索引的)。
最后,注释结构的categories字段存储类别id到类别和超类别名称的映射。
2、coco共享的数据基本结构
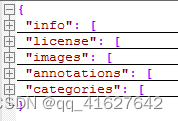
这3种类型共享下面所列的基本类型,包括info、image、license。
{


"info" : info,
"images" : [image],
"annotations" : [annotation],
"licenses" : [license],
}

info{


"year" : int,
"version" : str,
"description" : str,
"contributor" : str,
"url" : str,
"date_created" : datetime,
}

image{


"id" : int,
"width" : int,
"height" : int,
"file_name" : str,
"license" : int,
"flickr_url" : str,
"coco_url" : str,
"date_captured" : datetime,
}

license{


"id" : int,
"name" : str,
"url" : str,
}
info
info: {


    "year": int,# 年份
    "version": str,# 版本
    "description": str, # 数据集描述
    "contributor": str,# 提供者
    "url": str,# 下载地址
    "date_created": datetime
}
info类型,比如一个info类型的实例:
"info":{


	"description":"This is stable 1.0 version of the 2014 MS COCO dataset.",
	"url":"http:\/\/mscoco.org",
	"version":"1.0","year":2014,
	"contributor":"Microsoft COCO group",
	"date_created":"2015-01-27 09:11:52.357475"
}
license
license{


    "id": int,
    "name": str,
    "url": str,
}
{


	"url":"http:\/\/creativecommons.org\/licenses\/by-nc-sa\/2.0\/",
	"id":1,
	"name":"Attribution-NonCommercial-ShareAlike License"
}
image
image{


    "id": int,# 图片的ID编号(每张图片ID是唯一的)
    "width": int,#宽
    "height": int,#高
    "file_name": str,# 图片名
    "license": int,
    "flickr_url": str,# flickr网路地址
    "coco_url": str,# 网路地址路径
    "date_captured": datetime # 数据获取日期
}
Images是包含多个image实例的数组,对于一个image类型的实例:
{


	"license":3,
	"file_name":"COCO_val2014_000000391895.jpg",
	"coco_url":"http:\/\/mscoco.org\/images\/391895",
	"height":360,"width":640,"date_captured":"2013-11-14 11:18:45",
	"flickr_url":"http:\/\/farm9.staticflickr.com\/8186\/8119368305_4e622c8349_z.jpg",
	"id":391895
}
每一个image的实例是一个dict。其中有一个id字段,代表的是图片的id,每一张图片具有唯一的一个独特的id。
3、coco不共享的数据基本结构
annotations字段
annotations字段是包含多个annotation实例的一个列表,annotation类型本身又包含了一系列的字段,如这个目标的category id和segmentation mask。segmentation格式取决于这个实例是一个单个的对象(即iscrowd=0,将使用polygons格式)还是一组对象(即iscrowd=1,将使用RLE格式)。如下所示:
annotation{


    "id": int,
    "image_id": int,
    "category_id": int,
    "segmentation": RLE or [polygon],
    "area": float,
    "bbox": [x,y,width,height],
    "iscrowd": 0 or 1,
}

annotation{


    "id": int, # 对象ID,因为每一个图像有不止一个对象,所以要对每一个对象编号(每个对象的ID是唯一的)
    "image_id": int,# 对应的图片ID(与images中的ID对应)
    "category_id": int,# 类别ID(与categories中的ID对应)
    "segmentation": RLE or [polygon],# 对象的边界点(边界多边形,此时iscrowd=0)。
    #segmentation格式取决于这个实例是一个单个的对象(即iscrowd=0,将使用polygons格式)还是一组对象(即iscrowd=1,将使用RLE格式)
    "area": float,# 区域面积
    "bbox": [x,y,width,height], # 定位边框 [x,y,w,h]
    "iscrowd": 0 or 1 #见下
}
注意,单个的对象(iscrowd=0)可能需要多个polygon来表示,比如这个对象在图像中被挡住了。而iscrowd=1时(将标注一组对象,比如一群人)的segmentation使用的就是RLE格式。
另外,每个对象(不管是iscrowd=0还是iscrowd=1)都会有一个矩形框bbox ,矩形框左上角的坐标和矩形框的长宽会以数组的形式提供,数组第一个元素就是左上角的横坐标值。
其中,area是框的面积(area of encoded masks)。
一个annotation为segmentation是polygon格式的实例:
{


	"segmentation": [[510.66,423.01,511.72,420.03,510.45......]],
	"area": 702.1057499999998,
	"iscrowd": 0,
	"image_id": 289343,
	"bbox": [473.07,395.93,38.65,28.67],
	"category_id": 18,
	"id": 1768
}
categories字段
categories是一个包含多个category实例的列表,而一个category结构体描述如下:
{


	"supercategory": str,# 主类别
    "id": int,# 类对应的id (0 默认为背景)
    "name": str # 子类别
}
categories类型实例:
{


	"supercategory": "person",
	"id": 1,
	"name": "person"
},
{


	"supercategory": "vehicle",
	"id": 2,
	"name": "bicycle"
}
4、代码转换
# coco数据标注的基本格式
'''
{


    "info" : info,
    "images" : [image],
    "annotations" : [annotation],
    "licenses" : [license],
}

info {


    "year" : int,
    "version" : str,
    "description" : str,
    "contributor" : str,
    "url" : str,
    "date_created" : datetime,
}


license{


    "id" : int,
    "name" : str,
    "url" : str,
}

image{


    "id" : int, # 图片id
    "width" : int, # 图片宽
    "height" : int, # 图片高
    "file_name" : str, # 图片名

    "license" : int,
    "flickr_url" : str,
    "coco_url" : str, # 图片链接
    "date_captured" : datetime, # 图片标注时间
}


annotation{


    "id" : int,
    "image_id" : int,
    "category_id" : int,
    "segmentation" : RLE or [polygon],
    "area" : float,
    "bbox" : [x,y,width,height],
    "iscrowd" : 0 or 1,
}

categories[{


    "id" : int,
    "name" : str,
    "supercategory" : str,
}]'''


import sys, os, json, glob
import xml.etree.ElementTree as ET
from pathlib import Path
from xml.dom import minidom

#检测框的ID起始值
INITIAL_BBOXIds = 0
# #类别列表无必要预先创建,程序中会根据所有图像中包含的ID来创建并更新
# PREDEF_CLASSE = {}
PREDEF_CLASSE = {

     'ignored regions':0,'pedestrian': 1, 'people': 2,'bicycle': 3, 'car': 4, 'van': 5, 'truck': 6, 'tricycle': 7,'awning-tricycle': 8, 'bus': 9, 'motor': 10,'others':11}
'''
#我这里只想检测这十个类, 0和11没有加入转化。
PREDEF_CLASSE = {

     'pedestrian': 1, 'people': 2,'bicycle': 3, 'car': 4, 'van': 5, 'truck': 6, 'tricycle': 7,'awning-tricycle': 8, 'bus': 9, 'motor': 10}
#class_name = ['ignored regions','pedestrian','people','bicycle','car','van','truck','tricycle','awning-tricycle','bus','motor','others']
'''
def check_dir(path):
    if os.path.isdir(path):
        print("{}文件路径存在!".format(path))
        pass
    else:
        os.makedirs(path)
        print("{}文件路径创建成功!".format(path))

def get(root, name):
    return root.findall(name)

def get_and_check(root, name, length):
    vars = root.findall(name)
    if len(vars) == 0:
        raise NotImplementedError('Can not find %s in %s.'%(name, root.tag))
    if length > 0 and len(vars) != length:
        raise NotImplementedError('The size of %s is supposed to be %d, but is %d.'%(name, length, len(vars)))
    if length == 1:
        vars = vars[0]
    return vars

def convert(xml_paths, out_json):
    #json的基本标注格式
    json_dict = {

    'images': [], 'type':"instances",'annotations': [],'categories': []}

    categories = PREDEF_CLASSE
    bbox_id = INITIAL_BBOXIds

    for image_id, xml_f in enumerate(xml_paths):
        # 进度输出
        sys.stdout.write('\r>> Converting image %d/%d' % (image_id + 1, len(xml_paths)))
        sys.stdout.flush()

        tree = ET.parse(xml_f)
        root = tree.getroot()
        path=get(root,'path')

        if len(path)==1:
            filename = os.path.basename(path[0].text)
        elif len(path) == 0:
            filename = get_and_check(root, 'filename', 1).text
        else:
            raise NotImplementedError('%d paths found in %s'%(len(path), xml_f))

        #images属性
        size = get_and_check(root, 'size', 1)
        #图片的基本信息
        width = int(get_and_check(size, 'width', 1).text)
        height = int(get_and_check(size, 'height', 1).text)
        image = {


            'id': image_id + 1,
            'height': height,
            'width': width,
            'file_name': filename
            }
        json_dict['images'].append(image)

        for obj in get(root, 'object'):
            category = get_and_check(obj, 'name', 1).text
            #更新类别ID字典
            if category not in categories:
                new_id = len(categories)
                categories[category] = new_id
            category_id = categories[category]

            bbox = get_and_check(obj, 'bndbox', 1)
            xmin = int(get_and_check(bbox, 'xmin', 1).text) - 1
            ymin = int(get_and_check(bbox, 'ymin', 1).text) - 1
            xmax = int(get_and_check(bbox, 'xmax', 1).text)
            ymax = int(get_and_check(bbox, 'ymax', 1).text)
            if xmax <= xmin or ymax <= ymin:
                continue
            o_width = abs(xmax - xmin)
            o_height = abs(ymax - ymin)
            # ann = {'area': o_width * o_height, 'iscrowd': 0, 'image_id': image_id + 1,
            #     'bbox': [xmin, ymin, o_width, o_height], 'category_id': category_id,
            #     'id': bbox_id, 'ignore': 0, 'segmentation': [xmin,ymin,xmin,ymax,xmax,ymax,xmax,ymin]}
            ann={


                'id':bbox_id,
                'image_id': image_id,
                'category_id': category_id,
                # 'segmentation': [xmin,ymin,xmin,ymax,xmax,ymax,xmax,ymin],
                'area': o_width * o_height,
                'bbox': [xmin, ymin, o_width, o_height],
                'iscrowd': 0
            }
            json_dict['annotations'].append(ann)
            bbox_id = bbox_id + 1


    # 写入类别ID字典
    for cate, cid in categories.items():
        cat = {

    'supercategory': 'none', 'id': cid, 'name': cate}
        json_dict['categories'].append(cat)

    # json_file = open(out_json, 'w')
    # json_str = json.dumps(json_dict)
    # json_file.write(json_str)
    # json_file.close() # 快

    json.dump(json_dict, open(out_json, 'w'), indent=4)  # indent=4 更加美观显示 慢
    print("json file write done...")

if __name__ == '__main__':
    dir = Path(r'E:\DPL\DeepLearnData\目标检测\航空目标检测数据VisDrone\VisDrone2019')  # dataset文件夹下Visdrone2019文件夹路径
    # for d in 'VisDrone2019-DET-train', 'VisDrone2019-DET-val', 'VisDrone2019-DET-test-dev':
    for d in 'VisDrone2019-DET-train','VisDrone2019-DET-val':
        xml_dir=dir / d / 'Annotations_XML'
        coco_dir=dir / d/ 'Annotations_COCO'
        check_dir( coco_dir)
        xml_file = glob.glob(os.path.join(xml_dir, '*.xml'))
        json_file=coco_dir / 'instances_{}2017.json'.format(d.split('-')[2])
        # convrt Annotations_COCO
        convert(xml_file, json_file)  #这里是生成的json保存位置,改一下
4.4 直接由txtT转换为 COCO(JSON)数据格式
import os
import cv2
from PIL import Image
from tqdm import tqdm
import json

def convert_to_cocodetection(dir, output_dir):

    #数据目录
    train_dir = os.path.join(dir, "VisDrone2019-DET-train")
    val_dir = os.path.join(dir, "VisDrone2019-DET-val")
    #数据标注目录
    train_annotations = os.path.join(train_dir, "annotations")
    val_annotations = os.path.join(val_dir, "annotations")
    #数据影像目录
    train_images = os.path.join(train_dir, "images")
    val_images = os.path.join(val_dir, "images")

    id_num = 0

    categories = [
        {

    "id": 0, "name": "ignored regions"},
        {

    "id": 1, "name": "pedestrian"},
        {

    "id": 2, "name": "people"},
        {

    "id": 3, "name": "bicycle"},
        {

    "id": 4, "name": "car"},
        {

    "id": 5, "name": "van"},
        {

    "id": 6, "name": "truck"},
        {

    "id": 7, "name": "tricycle"},
        {

    "id": 8, "name": "awning-tricycle"},
        {

    "id": 9, "name": "bus"},
        {

    "id": 10, "name": "motor"},
        {

    "id": 11, "name": "others"}
    ]

    for mode in ["train", "val"]:
        images = []
        annotations = []

        print(f"start loading {mode} data...")
        if mode == "train":
            set = os.listdir(train_annotations)
            annotations_path = train_annotations
            images_path = train_images
        else:
            set = os.listdir(val_annotations)
            annotations_path = val_annotations
            images_path = val_images

        for i in tqdm(set):
            f = open(annotations_path + "/" + i, "r")
            name = i.replace(".txt", "")

            #images属性
            image = {

    }
            image_file_path=images_path + os.sep + name + ".jpg"
            print(image_file_path)

            img_size = Image.open((images_path + os.sep + name+ ".jpg")).size
            width,height=img_size
            # height, width = cv2.imread(images_path + os.sep + name + ".jpg").shape[:2]
            file_name = name + ".jpg"
            image["id"] = name
            image["height"] = height
            image["width"] = width
            image["file_name"] = file_name
            images.append(image)

            for line in f.readlines():
                #annotation属性
                annotation = {

    }
                line = line.replace("\n", "")
                if line.endswith(","):  # filter data
                    line = line.rstrip(",")
                line_list = [int(i) for i in line.split(",")]
                bbox_xywh = [line_list[0], line_list[1], line_list[2], line_list[3]]
                annotation["id"] = id_num
                annotation["image_id"] = name
                annotation["category_id"] = int(line_list[5])
                # annotation["segmentation"] = []
                annotation["area"] = bbox_xywh[2] * bbox_xywh[3]
                # annotation["score"] = line_list[4]
                annotation["bbox"] = bbox_xywh
                annotation["iscrowd"] = 0
                id_num += 1
                annotations.append(annotation)

        dataset_dict = {

    }
        dataset_dict["images"] = images
        dataset_dict["annotations"] = annotations
        dataset_dict["categories"] = categories
        json_str = json.dumps(dataset_dict)
        with open(f'{output_dir}/VisDrone2019-DET_{mode}_coco.json', 'w') as json_file:
            json_file.write(json_str)
    print("json file write done...")


def get_test_namelist(dir, out_dir):
    full_path = out_dir + "/" + "test.txt"
    file = open(full_path, 'w')
    for name in tqdm(os.listdir(dir)):
        name = name.replace(".txt", "")
        file.write(name + "\n")
    file.close()
    return None


def centerxywh_to_xyxy(boxes):
    """
    args:
        boxes:list of center_x,center_y,width,height,
    return:
        boxes:list of x,y,x,y,cooresponding to top left and bottom right
    """
    x_top_left = boxes[0] - boxes[2] / 2
    y_top_left = boxes[1] - boxes[3] / 2
    x_bottom_right = boxes[0] + boxes[2] / 2
    y_bottom_right = boxes[1] + boxes[3] / 2
    return [x_top_left, y_top_left, x_bottom_right, y_bottom_right]


def centerxywh_to_topleftxywh(boxes):
    """
    args:
        boxes:list of center_x,center_y,width,height,
    return:
        boxes:list of x,y,x,y,cooresponding to top left and bottom right
    """
    x_top_left = boxes[0] - boxes[2] / 2
    y_top_left = boxes[1] - boxes[3] / 2
    width = boxes[2]
    height = boxes[3]
    return [x_top_left, y_top_left, width, height]


def clamp(coord, width, height):
    if coord[0] < 0:
        coord[0] = 0
    if coord[1] < 0:
        coord[1] = 0
    if coord[2] > width:
        coord[2] = width
    if coord[3] > height:
        coord[3] = height
    return coord


if __name__ == '__main__':
    # 第一个参数输入上面目录的路径,第二个参数是要输出的路径
    # 只添加了检测训练必要的数据,COCO格式多余的数据都设为空
    convert_to_cocodetection(r"E:\DPL\DeepLearnData\目标检测\航空目标检测数据VisDrone\VisDrone2019",r"E:\DPL\DeepLearnData\目标检测\航空目标检测数据VisDrone\VisDrone2019\VisDrone2019-DET-COCO\annotations")
5、VisDrone2019目标检测数据集coco格式目录整理
VisDrone2019的目标检测的COCO形式的数据集目录如下图所示
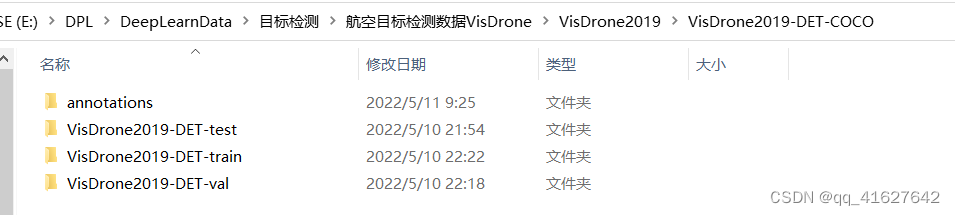 annotations数据集目录内容如下图所示

6、 VisDrone2019目标检测数据集coco格式数据浏览browse_dataset
给你一个新的目标检测项目,转化为coco格式,设置好cfg后,难道不需要看下label和bbox是否正确?不需要看下数据增强策略是否合适?我想作为一个有经验的工程师必然少不了这个步骤。
故browse_dataset可以对datasets吐出的数据进行可视化检查,看下是否有错误。这个工具我是直接从mmdetection里面copy过来的,并修复了在voc那种数据的配置上面出错的bug。
用法非常简单,只需要传入cfg文件即可,以coco数据为例,如下所示:
Tools /misc/browse_data .py帮助用户可视化地浏览检测数据集(包括图像和边界框注释),或者将图像保存到指定目录
python tools/misc/browse_dataset.py ${CONFIG} [-h] [--skip-type ${SKIP_TYPE[SKIP_TYPE...]}] [--output-dir ${OUTPUT_DIR}] [--not-show] [--show-interval ${SHOW_INTERVAL}]
可视化数据集标签 – browse_dataset.py
一般训练前放好数据集和设置好相应的配置文件之后,需要先看看自己数据集标签这块对着没。可运行如下命令以faster_rcnn为例
示例:
python tools/misc/browse_dataset.py configs/faster_rcnn/faster_rcnn_r50_fpn_1x_coco.py