在 iOS 移动应用程序上使用选择器查找元素定位是我们在移动端 UI 自动化测试的先决条件。
但是,由于应用程序内容在原生 iOS 应用程序中的呈现方式,我们可以用来定位应用程序元素的选择器与 Web 浏览器元素有很大不同。
在本文中,我们将了解 3 种常用方法来确定元素选择器,以便在 iOS 应用程序中查找元素定位,进而用于进行自动化移动 UI 测试。
XCTest 框架和 Appium XCUITest 驱动程序
对于原生 iOS 应用,应用内容通过 WKWebView(iOS 8.0 或更高版本)呈现。Apple 开发的官方 XCTest 框架提供了一种方法,可以根据每个元素的渲染内容,根据其元素类型和 WKWebView 上下文中的元素属性来定位元素。但是,XCTest 框架仅支持 Swift 和 Objective-C,因此当 iOS 应用程序是用 React Native 而不是 Swift 编写时,它就不适用于移动端 UI 自动化测试了。
如果已经对于移动端 UI 自动化测试有所了解或应用的话,可能会对这样一种替代方案有所耳闻: Appium XCUITest Driver(以前称为 UIAutomation Driver for iOS)。 Appium XCUITest 驱动程序利用 Apple 的 XCTest 框架及其底层库来提升 iOS 应用程序的自动化,并支持多种语言,包括 Java、Python、javascript、Ruby、C# 和 PHP。接下来将以 Appium XCUITest 驱动程序为例来看看我们如何检查 iOS 应用程序并找到元素定位的。
查找 iOS 移动应用的元素选择器
XCTest 框架或 Appium XCUITest 驱动程序提供了一种通过编程方式与 app 元素交互的方法,但我们仍然需要手动识别元素选择器并将选择器提供给我们的元素进行 UI 自动化测试。由于我们必须使用 iOS 模拟器或真实的 iOS 设备来打开应用程序,而设备上并没有内置的检查器来为我们提供这些信息,反观在各种浏览器中,就有各种开发者工具可以用来提供这些信息。
以下是 3 种经常使用来检查原生 iOS 应用程序内容并确定选择器以定位元素的方法。
顺便说一下,我们将用于演示的示例 iOS 应用程序如下。它使用 React Native 编写并在 iOS 模拟器上运行。
(在 iOS 模拟器上运行的示例 react-native 应用程序的屏幕截图)
1. driver.getPageSource()
Appium XCUITest 驱动程序提供了一种方法: getPageSource(),它可以在终端控制台中直接打印出当前呈现的应用页面的页面源代码。这是一种可以快速查看应用页面中所有元素的全貌,并确定可用于获取元素定位的元素类型和属性的快速方法。
只需要在 UI 自动化测试中插入以下代码(如下Java代码):
System.out.println(driver.getPageSource());
下面是示例应用程序的页面源代码片段。
<XCUIElementTypeOther type="XCUIElementTypeOther" name="Welcome to Example App" label="Welcome to Example App" enabled="true" visible="true" x="0" y="76" width="375" height="77">
<XCUIElementTypeStaticText type="XCUIElementTypeStaticText" value="Welcome to Example App" name="Welcome to Example App" label="Welcome to Example App" enabled="true" visible="true" x="24" y="100" width="327" height="29"/>
</XCUIElementTypeOther>
<XCUIElementTypeOther type="XCUIElementTypeOther" name="Section One This is the description for Section One." label="Section One This is the description for Section One." enabled="true" visible="true" x="0" y="184" width="375" height="55">
<XCUIElementTypeStaticText type="XCUIElementTypeStaticText" value="Section One" name="Section One" label="Section One" enabled="true" visible="true" x="24" y="184" width="327" height="25"/>
<XCUIElementTypeStaticText type="XCUIElementTypeStaticText" value="This is the description for Section One." name="This is the description for Section One." label="This is the description for Section One." enabled="true" visible="true" x="24" y="216" width="327" height="23"/>
</XCUIElementTypeOther>
<XCUIElementTypeOther type="XCUIElementTypeOther" name="Section Two This is the description for Section Two." label="Section Two This is the description for Section Two." enabled="true" visible="true" x="0" y="270" width="375" height="54">
<XCUIElementTypeStaticText type="XCUIElementTypeStaticText" value="Section Two" name="Section Two" label="Section Two" enabled="true" visible="true" x="24" y="270" width="327" height="25"/>
<XCUIElementTypeStaticText type="XCUIElementTypeStaticText" value="This is the description for Section Two." name="This is the description for Section Two." label="This is the description for Section Two." enabled="true" visible="true" x="24" y="302" width="327" height="23"/>
</XCUIElementTypeOther>
<XCUIElementTypeOther type="XCUIElementTypeOther" name="Section Three This is the description for Section Three. Example Button" label="Section Three This is the description for Section Three. Example Button" enabled="true" visible="true" x="0" y="356" width="375" height="113">
<XCUIElementTypeStaticText type="XCUIElementTypeStaticText" value="Section Three" name="Section Three" label="Section Three" enabled="true" visible="true" x="24" y="356" width="327" height="25"/>
<XCUIElementTypeStaticText type="XCUIElementTypeStaticText" value="This is the description for Section Three." name="This is the description for Section Three." label="This is the description for Section Three." enabled="true" visible="true" x="24" y="388" width="327" height="44"/>
<XCUIElementTypeButton type="XCUIElementTypeButton" name="Example Button" label="Example Button" enabled="true" visible="true" x="24" y="431" width="327" height="38"/>
</XCUIElementTypeOther>
可以看到,打印出来的页面源代码提供了每个元素的丰富信息,包括元素的类型和属性等,我们可以使用这些信息来确定每个元素定位。
例如,对于 Example Button 按钮元素,其页面源代码为:
<XCUIElementTypeButton type="XCUIElementTypeButton" name="Example Button" label="Example Button" enabled="true" visible="true" x="24" y="431" width="327" height="38"/> </XCUIElementTypeOther>
我们可以很容易地确定它的元素定位为:
driver.findElement(By.xpath("//XCUIElementTypeButton[@name='Example Button']"))
2. Accessibility Inspector
Accessibility Inspector是 Apple 开发的一个鲜为人知但非常有用的工具,可帮助开发人员提高 iOS 应用程序的可访问性。该工具是与 Xcode 捆绑在一起的,因此需要在 Mac 电脑上安装Xcode。Accessibility Inspector 通过解析和识别 iOS 应用程序上的每个元素并检查元素的类型和可访问性标签来明确 iOS 应用程序的可访问性功能及问题。由于它提供了有关应用程序上每个元素的详细信息,因此它也可以很容易地用于在自动化 UI 测试中识别每个元素的选择器。
下面是 Accessibility Inspector 为 Example Button 按钮元素提供的信息:

(示例应用程序和辅助功能检查器的屏幕截图)
可以看到,Accessibility Inspector 显示 Example Button 按钮元素具有 Button 类型和 Example Button标签,因此我们就可以使用它们来确定该元素定位:
driver.findElement(By.xpath("//XCUIElementTypeButton[@name='Example Button']"))
在确定确切的元素选择器方面,Accessibility Inspector 一开始并不总是很容易使用,但是一旦熟悉了 Accessibility Inspector 如何呈现有关应用程序元素的信息,它将是一种快速且轻量级的工具,可以轻松完成工作。
实操示例:
1)Accessibility Inspector 在Xcode的入口:Xcode —— Open Developer Tool —— Accessibility Inspector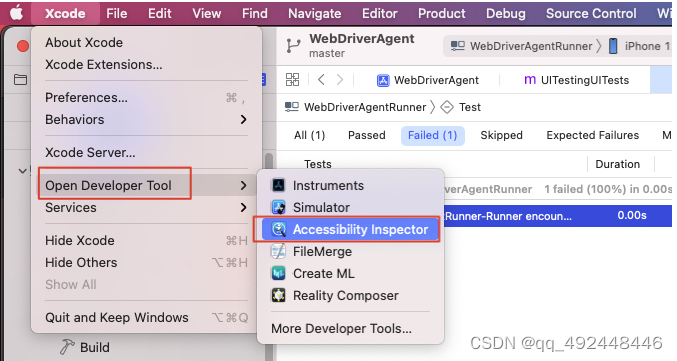
2)连接好设备后点击开始按钮即可开始使用。
3. Appium Desktop
Appium Desktop 是 Appium 团队为 Mac、Windows 和 Linux 开发的桌面应用程序。它是许多 Appium 开发人员在移动端UI自动化测试中检查 iOS 和 Android 应用程序元素的流行工具。
下面是 Appium Desktop 显示的关于 Example Button 按钮元素的内容: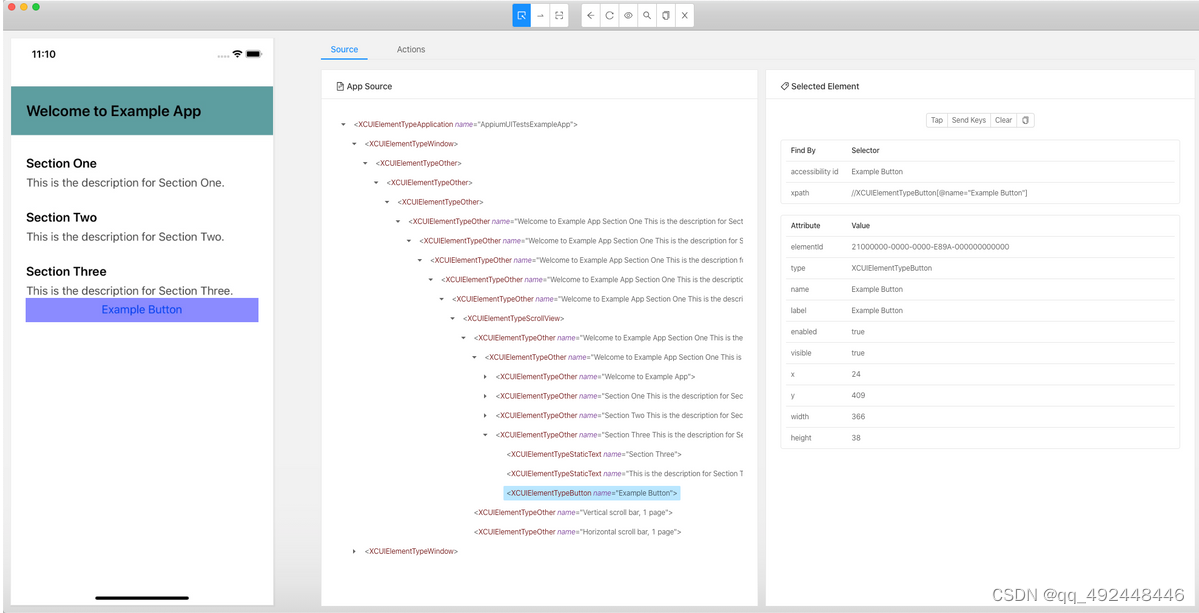
(示例应用和 Appium 桌面的屏幕截图)
可以看到,中间部分的 App Source 显示了当前应用页面的完整层次结构,右侧部分的 Selected Element 显示了详细的信息和属性列表 。更有用的是它还提供了用于定位当前元素的最佳选择器,即 accessibility id 或者 xpath,这二者非常方便使用。
Appium Desktop 还提供了其他不错的功能,例如直接单击/点击所选元素,以及在应用页面更改后刷新页面源。可以参考官方的Appium Desktop代码仓库了解更多信息。
最后的话
总之,Appium Desktop 是一种用于检查 iOS 应用程序上的元素获取元素定位的流行且推荐的工具。如果你是刚开始编写 UI 自动化测试,那么利用它来全面了解应用程序和页面元素也很有用。一旦你相当熟悉了应用程序和页面结构,直接在代码中使用driver.getPageSource() 或使用 Accessibility Inspector 是快速找到元素定位的好选择。
Reference
1、3 Ways to Find Element Selector for iOS App with Appium:https://stephenweixu.com/blog/3-ways-to-find-element-selector-for-ios-app-with-appium
2、iOS 测试 WebDriverAgent 简介:https://testerhome.com/topics/4904 (WebDriverAgent Inspector 的使用)
3、Appium1.6 定位iOS元素和操作元素 :https://www.cnblogs.com/meitian/p/7373460.html
4、Appium+Python3+iOS定位元素:https://wangxiaoxi.cn/posts/appium-ios-2/ (元素定位慢的问题)
5、uiautomator2 使用Python测试 Android应用:https://www.cnblogs.com/fnng/p/8486863.html (也有提到 这种方法可以获取元素定位 )