1.新建Android项目
1.1修改Android项目中gradle版本
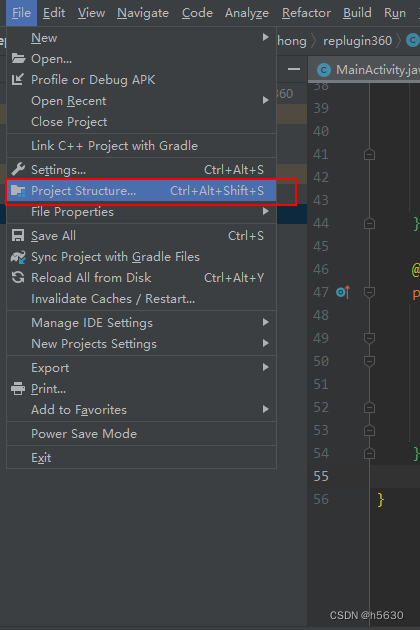
点击Android studio左上角的File菜单,选中Project structure,如下图所示:
将Android Gradle Plugin Version的版本修改为3.5.4,并且将Gradle Version的版本修改为6.5,如下图所示:

1.2修改Android项目中gradle版本(项目下的)
在项目下的build.gradle中添加Replugin的仓库地址,代码如下所示:
// Top-level build file where you can add configuration options common to all sub-projects/modules.
buildscript {
    //添加kotlin的支持
    ext.kotlin_version = "1.6.10"
    repositories {
        google()
        mavenCentral()
        //replugin地址
        maven {url "http://maven.geelib.360.cn/nexus/repository/replugin/"}
    }
    dependencies {
        classpath 'com.android.tools.build:gradle:3.5.4'
        classpath "org.jetbrains.kotlin:kotlin-gradle-plugin:$kotlin_version"
        //replugin插件插件
        classpath 'com.qihoo360.replugin:replugin-plugin-gradle:3.0.0'
        //replugin宿主插件
        classpath "com.qihoo360.replugin:replugin-host-gradle:3.0.0"
        // NOTE: Do not place your application dependencies here; they belong
        // in the individual module build.gradle files
    }
}

allprojects {
    repositories {
        google()
        mavenCentral()
        jcenter() // Warning: this repository is going to shut down soon
        //replugin的地址
        maven {url "http://maven.geelib.360.cn/nexus/repository/replugin/"}
    }
}

task clean(type: Delete) {
    delete rootProject.buildDir
}
Android studio中右上角会提示sync,点击更新一下。
1.3修改App下的gradle版本
在Android闭包下添加:
apply plugin: 'replugin-host-gradle'在dependencies闭包中添加replugin的依赖
implementation "com.qihoo360.replugin:replugin-host-lib:3.0.0"所有代码如下所示:
plugins {
    id 'com.android.application'
    id 'kotlin-android-extensions'
    id 'kotlin-android'
}

android {
    compileSdkVersion 28
    buildToolsVersion "28.0.0"

    defaultConfig {

        applicationId "com.hong.replugin360"
        minSdkVersion 16
        targetSdkVersion 28
        versionName "1.0"
        testInstrumentationRunner "androidx.test.runner.AndroidJUnitRunner"
    }

    buildTypes {
        release {
            minifyEnabled false
            proguardFiles getDefaultProguardFile('proguard-android-optimize.txt'), 'proguard-rules.pro'
        }
    }
    compileOptions {
        sourceCompatibility JavaVersion.VERSION_1_8
        targetCompatibility JavaVersion.VERSION_1_8
    }
}
//必须在Android的闭包下
apply plugin: 'replugin-host-gradle'

dependencies {

    implementation 'androidx.appcompat:appcompat:1.0.0'
    implementation 'com.google.android.material:material:1.0.0'
    implementation 'androidx.constraintlayout:constraintlayout:2.1.4'
    implementation "org.jetbrains.kotlin:kotlin-stdlib:$kotlin_version"
    testImplementation 'junit:junit:4.+'
    androidTestImplementation 'androidx.test.ext:junit:1.1.3'
    androidTestImplementation 'androidx.test.espresso:espresso-core:3.4.0'
    //添加replugin插件依赖
    implementation "com.qihoo360.replugin:replugin-host-lib:3.0.0"

}需要注意的是,我们前面把项目下的build.gradle下的dependencies闭包里面的gradle是3.5.4即 com.android.tools.build:gradle:3.5.4,所以我们App下dependencies下的appcompat和material以及constraintlayout的版本不能太高,否则不兼容。记得sync一下。
继续修改vaules中的themes.xml中的主题(以防找不到主题,这里我们还是修改一下),修改主题如下所示:
<resources xmlns:tools="http://schemas.android.com/tools">
    <!-- Base application theme. -->
    <style name="Theme.Replugin360" parent="Theme.Design.Light.NoActionBar">
        <!-- Primary brand color. -->
        <item name="colorPrimary">@color/purple_500</item>
        <!-- Secondary brand color. -->
        <item name="colorSecondary">@color/teal_200</item>
        <!-- Status bar color. -->
        <!-- Customize your theme here. -->
    </style>
</resources>这里主题我们修改为Theme.Design.Light.NoActionBar,把其他不存在的颜色删除,就可以了
好了,这样我们就把Replugin插件接入到我们的项目中了,记得同步一下。接下来,我们写一个demo,实践一下
2.Replugin实战
1.编写App类
在App模块下新建App类集成RePluginApplication类,代码如下所示:
import com.qihoo360.replugin.RePluginApplication;

public class App extends RePluginApplication {

}
在AndroidManifest.xml中配置App类,如下所示:
<?xml version="1.0" encoding="utf-8"?>
<manifest xmlns:android="http://schemas.android.com/apk/res/android"
    package="com.hong.replugin360">

    <!--申请读写权限-->
    <uses-permission android:name="android.permission.WRITE_EXTERNAL_STORAGE" />
    <uses-permission android:name="android.permission.READ_EXTERNAL_STORAGE" />

    <!--将App类添加到配置文件中-->
    <application
        android:name=".App"
        android:allowBackup="true"
        android:icon="@mipmap/ic_launcher"
        android:label="@string/app_name"
        android:roundIcon="@mipmap/ic_launcher_round"
        android:supportsRtl="true"
        android:theme="@style/Theme.Replugin360">
        <activity android:name=".MainActivity">
            <intent-filter>
                <action android:name="android.intent.action.MAIN" />
                <category android:name="android.intent.category.LAUNCHER" />
            </intent-filter>
        </activity>
    </application>
</manifest>
修改MainActivity中的布局文件,如下所示:
<?xml version="1.0" encoding="utf-8"?>
<androidx.constraintlayout.widget.ConstraintLayout xmlns:android="http://schemas.android.com/apk/res/android"
    xmlns:app="http://schemas.android.com/apk/res-auto"
    xmlns:tools="http://schemas.android.com/tools"
    android:layout_width="match_parent"
    android:layout_height="match_parent"
    tools:context=".MainActivity">

    <TextView
        android:layout_width="wrap_content"
        android:layout_height="wrap_content"
        android:text="Hello World!"
        app:layout_constraintBottom_toBottomOf="parent"
        app:layout_constraintLeft_toLeftOf="parent"
        app:layout_constraintRight_toRightOf="parent"
        app:layout_constraintTop_toTopOf="parent" />

    <Button
        android:id="@+id/button"
        android:layout_width="0dp"
        android:layout_height="wrap_content"
        android:text="跳转至插件"
        app:layout_constraintBottom_toBottomOf="parent"
        app:layout_constraintEnd_toEndOf="parent"
        app:layout_constraintStart_toStartOf="parent" />

    <Button
        android:id="@+id/button2"
        android:layout_width="0dp"
        android:layout_height="wrap_content"
        android:text="跳转至第二界面"
        app:layout_constraintBottom_toTopOf="@+id/button"
        app:layout_constraintEnd_toEndOf="parent"
        app:layout_constraintStart_toStartOf="parent" />

</androidx.constraintlayout.widget.ConstraintLayout>
MainActivity.java的代码如下所示:
import androidx.annotation.NonNull;
import androidx.appcompat.app.AppCompatActivity;
import androidx.core.app.ActivityCompat;

import android.Manifest;
import android.content.Intent;
import android.content.pm.PackageManager;
import android.os.Build;
import android.os.Bundle;
import android.util.Log;
import android.widget.Button;

import com.qihoo360.replugin.RePlugin;

public class MainActivity extends AppCompatActivity {
    private Button btn;
    private Button secondBtn;
    private static String[] PERMISSIONS_STORAGE = {
            Manifest.permission.READ_EXTERNAL_STORAGE,
            Manifest.permission.WRITE_EXTERNAL_STORAGE};
    private int REQUEST_PERMISSION_CODE = 1000;

    @Override
    protected void onCreate(Bundle savedInstanceState) {
        super.onCreate(savedInstanceState);
        setContentView(R.layout.activity_main);
        btn = this.findViewById(R.id.button);
        secondBtn = this.findViewById(R.id.button2);
        //申请文件读写权限
        if (Build.VERSION.SDK_INT > Build.VERSION_CODES.LOLLIPOP) {
            if (ActivityCompat.checkSelfPermission(this, Manifest.permission.WRITE_EXTERNAL_STORAGE) != PackageManager.PERMISSION_GRANTED) {
                ActivityCompat.requestPermissions(this, PERMISSIONS_STORAGE, REQUEST_PERMISSION_CODE);
            }
        }
    }

    //文件读写权限回传
    @Override
    public void onRequestPermissionsResult(int requestCode, @NonNull String[] permissions, @NonNull int[] grantResults) {
        super.onRequestPermissionsResult(requestCode, permissions, grantResults);
        if (requestCode == REQUEST_PERMISSION_CODE) {
            for (int i = 0; i < permissions.length; i++) {
                Log.i("MainActivity", "申请的权限为:" + permissions[i] + ",申请结果:" + grantResults[i]);
            }
        }
    }

}
这样宿主代码编写完成,接下来我们编写插件apk的代码。
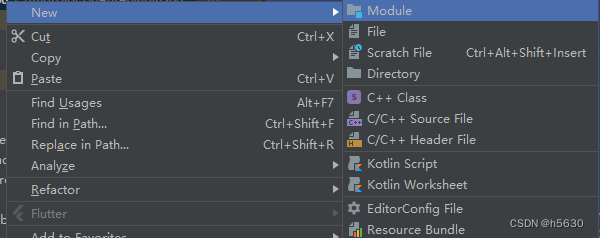
在根项目下创建module模块,如下图所示:
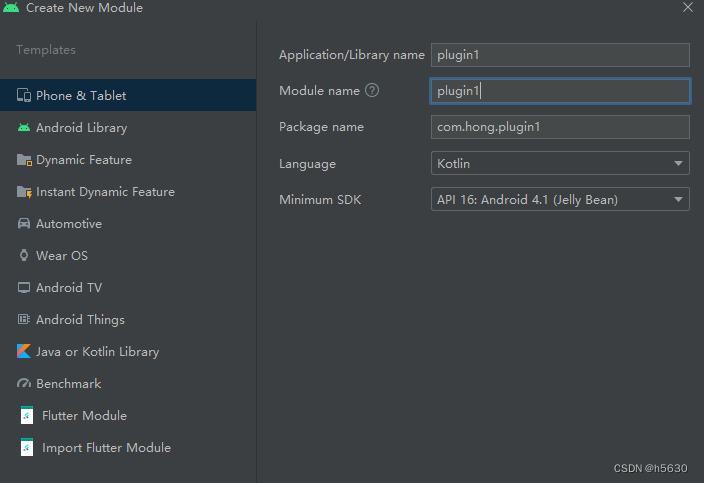
选择Phone&Table模块,如下所示:
在plugin1模块的build.gradle下添加插件依赖,如下所示:
apply plugin: 'replugin-plugin-gradle'
repluginPluginConfig {
    pluginName = "plugin1"
    hostApplicationId = "com.hong.replugin360"
    hostAppLauncherActivity = "com.hong.replugin360.MainActivity"
}
需要注意,上面这段代码需要在Android闭包下,
全部代码如下所示:
plugins {
    id 'com.android.application'
}

android {
    compileSdkVersion 28
    buildToolsVersion "28.0.0"

    defaultConfig {
        applicationId "com.hong.plugin1"
        minSdkVersion 16
        targetSdkVersion 28
        versionCode 1
        versionName "1.0"

        testInstrumentationRunner "androidx.test.runner.AndroidJUnitRunner"
    }

    buildTypes {
        release {
            minifyEnabled false
            proguardFiles getDefaultProguardFile('proguard-android-optimize.txt'), 'proguard-rules.pro'
        }
    }
    compileOptions {
        sourceCompatibility JavaVersion.VERSION_1_8
        targetCompatibility JavaVersion.VERSION_1_8
    }
}
apply plugin: 'replugin-plugin-gradle'
repluginPluginConfig {
    pluginName = "plugin1"
    hostApplicationId = "com.hong.replugin360"
    hostAppLauncherActivity = "com.hong.replugin360.MainActivity"
}
dependencies {

    implementation 'androidx.appcompat:appcompat:1.0.0'
    implementation 'com.google.android.material:material:1.0.0'
    implementation 'androidx.constraintlayout:constraintlayout:2.1.4'
    testImplementation 'junit:junit:4.+'
    androidTestImplementation 'androidx.test.ext:junit:1.1.3'
    androidTestImplementation 'androidx.test.espresso:espresso-core:3.4.0'
    implementation 'com.qihoo360.replugin:replugin-plugin-lib:3.0.0'
}
修改plugin1模块在MainActivity的布局,如下所示:
<?xml version="1.0" encoding="utf-8"?>
<androidx.constraintlayout.widget.ConstraintLayout xmlns:android="http://schemas.android.com/apk/res/android"
    xmlns:app="http://schemas.android.com/apk/res-auto"
    xmlns:tools="http://schemas.android.com/tools"
    android:layout_width="match_parent"
    android:layout_height="match_parent"
    tools:context=".MainActivity">

    <TextView
        android:layout_width="wrap_content"
        android:layout_height="wrap_content"
        android:text="Hello Plugin!"
        app:layout_constraintBottom_toBottomOf="parent"
        app:layout_constraintLeft_toLeftOf="parent"
        app:layout_constraintRight_toRightOf="parent"
        app:layout_constraintTop_toTopOf="parent" />

</androidx.constraintlayout.widget.ConstraintLayout>同样的需要把主题给themes.xml文件里面的主题给切换了,和上面一样,这里就不详细描述了。
将plugin1模块打包成APK,需要注意要打包成release版本,debug的不行。
选中plugin1模块,点击Android studio最上栏的build菜单,选择Generate Signed Bundle /Apk 选项
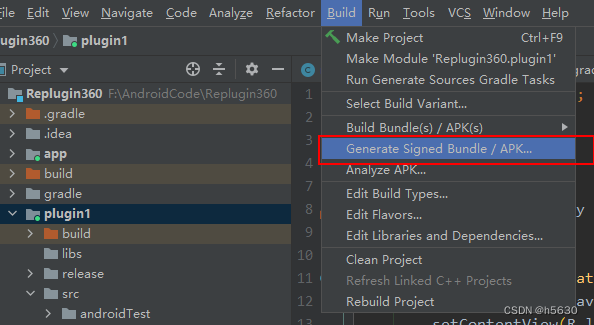
选择Release版本即可
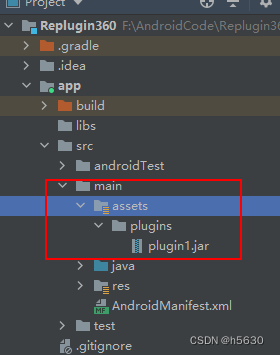
在app模块下创建assets目录,在assets目录下创建plugins目录,修改我们之前打包好的插件apk后缀,改为.jar,如下下图所示:
修改app模块的MainActivity.java,如下所示:
import androidx.annotation.NonNull;
import androidx.appcompat.app.AppCompatActivity;
import androidx.core.app.ActivityCompat;

import android.Manifest;
import android.content.Intent;
import android.content.pm.PackageManager;
import android.os.Build;
import android.os.Bundle;
import android.util.Log;
import android.widget.Button;

import com.qihoo360.replugin.RePlugin;

public class MainActivity extends AppCompatActivity {
    private Button btn;
    private Button secondBtn;
    private static String[] PERMISSIONS_STORAGE = {
            Manifest.permission.READ_EXTERNAL_STORAGE,
            Manifest.permission.WRITE_EXTERNAL_STORAGE};
    private int REQUEST_PERMISSION_CODE = 1000;

    @Override
    protected void onCreate(Bundle savedInstanceState) {
        super.onCreate(savedInstanceState);
        setContentView(R.layout.activity_main);
        btn = this.findViewById(R.id.button);
        secondBtn = this.findViewById(R.id.button2);
        if (Build.VERSION.SDK_INT > Build.VERSION_CODES.LOLLIPOP) {
            if (ActivityCompat.checkSelfPermission(this, Manifest.permission.WRITE_EXTERNAL_STORAGE) != PackageManager.PERMISSION_GRANTED) {
                ActivityCompat.requestPermissions(this, PERMISSIONS_STORAGE, REQUEST_PERMISSION_CODE);
            }
        }

        btn.setOnClickListener(v -> {
            Intent intent = RePlugin.createIntent("com.hong.plugin1", "com.hong.plugin1.MainActivity");
            intent.addFlags(Intent.FLAG_ACTIVITY_NEW_TASK);
            RePlugin.startActivity(this, intent);
        });

        secondBtn.setOnClickListener(v -> startActivity(new Intent(this, SecondActivity.class)));
    }

    @Override
    public void onRequestPermissionsResult(int requestCode, @NonNull String[] permissions, @NonNull int[] grantResults) {
        super.onRequestPermissionsResult(requestCode, permissions, grantResults);
        if (requestCode == REQUEST_PERMISSION_CODE) {
            for (int i = 0; i < permissions.length; i++) {
                Log.i("MainActivity", "申请的权限为:" + permissions[i] + ",申请结果:" + grantResults[i]);
            }
        }
    }

}
点击运行,效果如下:
这样就完成了Replugin框架的接入