【AI实战】开源中文 llama2 来了,30 分钟搭建 130 亿参数大模型 Llama2-Chinese-13b-Chat
简介
-
Llama2
2023年7月19日:Meta 发布开源可商用模型 Llama2。Llama2 是一个预训练和微调的生成文本模型的集合,其规模从70亿到700亿个参数不等。
LLaMA2 的详细介绍可以参考这篇文章:【大模型】更强的 LLaMA2 来了,开源可商用、与 ChatGPT 齐平
-
Llama2-Chinese
Llama2中文社区
Llama2 中文 Hugging Face仓库 FlagAlpha: https://huggingface.co/FlagAlpha
Llama2在线体验链接 llama.family
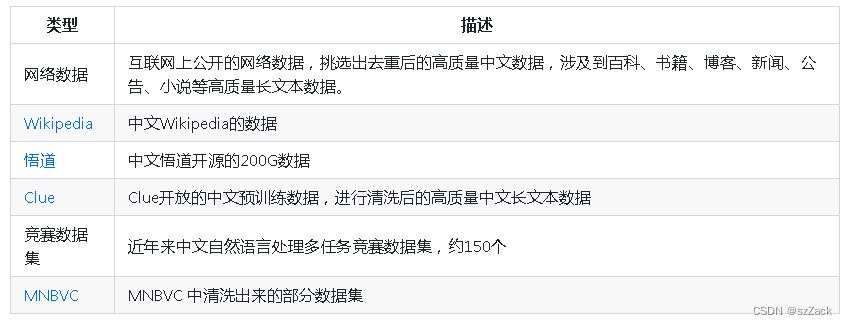
模型数据:
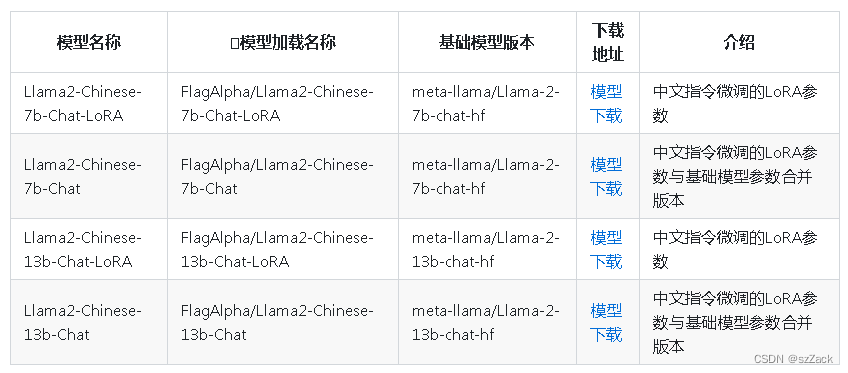
中文微调参数:
环境配置
环境搭建
-
系统环境
- Ubuntu 20.04LTS
- CUDA 11.8
- Docker 18.09.5
-
创建docker容器
拉取docker镜像
docker pull nvcr.io/nvidia/pytorch:21.08-py3
创建docker
nvidia-docker run -it -d \
    --name llama2_chinese \
    -p 15550:15550 \
    -p 15551:15551 \
    -v /xx/xx/llm:/notebooks \
    -e TZ='Asia/Shanghai' \
    --shm-size 16G \
    nvcr.io/nvidia/pytorch:21.08-py3

# docker exec -it llama2_chinese env LANG=C.UTF-8 /bin/bash
修改 /xx/xx/llm 为自己的路径
进入容器内:
docker exec -it llama2_chinese env LANG=C.UTF-8 /bin/bash
- 安装conda
下载:
cd /notebooks
wget https://repo.anaconda.com/miniconda/Miniconda3-latest-Linux-x86_64.sh
安装:
bash Miniconda3-latest-Linux-x86_64.sh
安装提升安装即可
将miniconda加入PATH路径:
export PATH="/root/miniconda3/bin:$PATH"
创建 conda 环境:
conda create -n llama2 python=3.10.9
- 安装依赖库
conda activate llama2
conda init
exit退出docker,重新进入docker
docker exec -it llama2_chinese  env LANG=C.UTF-8 /bin/bash
cd /notebooks
conda activate llama2
依赖安装
安装依赖库:
pip install -r requirements-2.txt -i https://pypi.tuna.tsinghua.edu.cn/simple
代码及模型权重拉取
拉取 Llama2-Chinese
git clone https://github.com/FlagAlpha/Llama2-Chinese.git
github网站偶尔会抽风,需要耐心等待,如果失败了,执行 rm -rf Llama2-Chinese,再重新拉取
拉取 Llama2-Chinese-13b-Chat 模型权重及代码
cd Llama2-Chinese
git clone git clone https://huggingface.co/FlagAlpha/Llama2-Chinese-13b-Chat
由于权重文件特别大,如果失败了,执行 rm -rf Llama2-Chinese-13b-Chat,再重新拉取。
建议中午时间拉取,速度比较快,大概 1 小时(和你的网络带宽有很大关系!)。
文件大小查看:
du -sh Llama2-Chinese-13b-Chat
输出:
25G Llama2-Chinese-13b-Chat
如果文件大小不一致,或者太小,说明权重文件下载识别,
请执行: rm -rf Llama2-Chinese-13b-Chat, 再重新拉取
或者 按照后面的方法去下载权重文件
查看文件列表:
ls -l Llama2-Chinese-13b-Chat/
输出:
# ls -l Llama2-Chinese-13b-Chat/
total 25421840
-rw-r--r-- 1 root root       1514 Jul 27 06:33 README.md
-rw-r--r-- 1 root root        683 Jul 27 06:33 config.json
-rw-r--r-- 1 root root        327 Jul 27 07:12 down.sh
-rw-r--r-- 1 root root        175 Jul 27 06:33 generation_config.json
-rw-r--r-- 1 root root 9948728430 Jul 24 23:12 pytorch_model-00001-of-00003.bin
-rw-r--r-- 1 root root 9904165024 Jul 24 12:44 pytorch_model-00002-of-00003.bin
-rw-r--r-- 1 root root 6178983625 Jul 24 12:14 pytorch_model-00003-of-00003.bin
-rw-r--r-- 1 root root      33444 Jul 27 06:33 pytorch_model.bin.index.json
-rw-r--r-- 1 root root        414 Jul 27 06:33 special_tokens_map.json
-rw-r--r-- 1 root root        131 Jul 27 06:33 tokenizer.model
-rw-r--r-- 1 root root        749 Jul 27 06:33 tokenizer_config.json
【】如果大文件下载识别,按照下面的方法下载模型文件;
wget https://huggingface.co/FlagAlpha/Llama2-Chinese-13b-Chat/resolve/main/pytorch_model-00001-of-00003.bin
wget https://huggingface.co/FlagAlpha/Llama2-Chinese-13b-Chat/resolve/main/pytorch_model-00002-of-00003.bin
wget https://huggingface.co/FlagAlpha/Llama2-Chinese-13b-Chat/resolve/main/pytorch_model-00003-of-00003.bin
如果还是没法下载,参考下面的“国内 Llama2 最新下载地址” 进行下载
终端测试
进入python环境:
python3
输入代码:
import torch
from transformers import AutoTokenizer, AutoModelForCausalLM
model = AutoModelForCausalLM.from_pretrained('Llama2-Chinese-13b-Chat',device_map='auto',torch_dtype=torch.float16,load_in_8bit=True)
model =model.eval()
tokenizer = AutoTokenizer.from_pretrained('Llama2-Chinese-13b-Chat',use_fast=False)
tokenizer.pad_token = tokenizer.eos_token
input_ids = tokenizer(['<s>Human: 介绍一下深圳\n</s><s>Assistant: '], return_tensors="pt",add_special_tokens=False).input_ids.to('cuda')
generate_input = {
    "input_ids":input_ids,
    "max_new_tokens":512,
    "do_sample":True,
    "top_k":50,
    "top_p":0.95,
    "temperature":0.3,
    "repetition_penalty":1.3,
    "eos_token_id":tokenizer.eos_token_id,
    "bos_token_id":tokenizer.bos_token_id,
    "pad_token_id":tokenizer.pad_token_id
}
generate_ids  = model.generate(**generate_input)
text = tokenizer.decode(generate_ids[0])
print(text)
页面测试
使用 gradio 搭建页面
安装 gradio
pip install gradio -i https://pypi.tuna.tsinghua.edu.cn/simple
加载模型并启动服务
修改端口;
vi /notebooks/Llama2-Chinese/examples/chat_gradio.py
到94行:
demo.queue().launch(share=False, debug=True, server_name="0.0.0.0")
修改为:
demo.queue().launch(share=False, debug=True, server_name="0.0.0.0", server_port=15550)
启动脚本:
python examples/chat_gradio.py --model_name_or_path Llama2-Chinese-13b-Chat
如果出现下面的错误:
  File "/notebooks/Llama2-Chinese/examples/chat_gradio.py", line 94
    demo.queue().launch(share=False, debug=True, server_name="0.0.0.0")
                                               ^
SyntaxError: invalid character ',' (U+FF0C)
则按照下面的步骤修改代码:
vi /notebooks/Llama2-Chinese/examples/chat_gradio.py
:94
修改中文逗号,为英文逗号,

94    demo.queue().launch(share=False, debug=True, server_name="0.0.0.0")
=>
94    demo.queue().launch(share=False, debug=True, server_name="0.0.0.0")
-
测试
浏览器打开地址:http://10.192.x.x:15550/
国内 Llama2 最新下载地址
Llama2-7B官网版本:https://pan.xunlei.com/s/VN_kR2fwuJdG1F3CoF33rwpIA1?pwd=z9kf

Llama2-7B-Chat官网版本:https://pan.xunlei.com/s/VN_kQa1_HBvV-X9QVI6jV2kOA1?pwd=xmra

Llama2-13B官网版本:https://pan.xunlei.com/s/VN_izibaMDoptluWodzJw4cRA1?pwd=2qqb

Llama2-13B-Chat官网版本:https://pan.xunlei.com/s/VN_iyyponyapjIDLXJCNfqy7A1?pwd=t3xw

Llama2-7B Hugging Face版本:https://pan.xunlei.com/s/VN_t0dUikZqOwt-5DZWHuMvqA1?pwd=66ep

Llama2-7B-Chat Hugging Face版本:https://pan.xunlei.com/s/VN_oaV4BpKFgKLto4KgOhBcaA1?pwd=ufir

Llama2-13B Hugging Face版本:https://pan.xunlei.com/s/VN_yT_9G8xNOz0SDWQ7Mb_GZA1?pwd=yvgf

Llama2-13B-Chat Hugging Face版本:https://pan.xunlei.com/s/VN_yA-9G34NGL9B79b3OQZZGA1?pwd=xqrg
参考
1.https://github.com/FlagAlpha/Llama2-Chinese
2.https://huggingface.co/FlagAlpha/Llama2-Chinese-13b-Chat/tree/main
3.https://github.com/facebookresearch/llama
4.https://huggingface.co/meta-llama