一、简介
现在项目一般都是使用分布式集群部署,对后台业务数据的某些操作需要考虑加锁的问题,而jdk的synchronize加锁机制已经不适合做集群部署的操作,因为synchronize关键字只是针对于单体部署的单台虚拟机有用。考虑到现在系统使用redis做缓存比较高效,此处推荐使用redis下的分布式锁redisson进行加锁操作。官网参考:https://github.com/redisson/redisson/wiki/%E7%9B%AE%E5%BD%95。
二、工程引入配置
1.工程中需要引入redis、redisson依赖,pom.xml中引入:
<!--redis依赖-->
<dependency>
    <groupId>org.springframework.boot</groupId>
    <artifactId>spring-boot-starter-data-redis</artifactId>
    <version>2.3.2.RELEASE</version>
</dependency>
<!--redisson依赖-->
<dependency>
    <groupId>org.redisson</groupId>
    <artifactId>redisson</artifactId>
    <version>3.16.4</version>
</dependency>
<!--使用redis时需要此jar包-->
<dependency>
    <groupId>org.apache.commons</groupId>
    <artifactId>commons-pool2</artifactId>
</dependency>
2.配置文件yml中添加redis连接信息。
spring:
  redis:
    database: 0
    host: xx.xx.xx.xx
    port: 1316
    password: xxxx
    timeout: 3000
    lettuce:
      pool:
        max-active: 20
        max-idle: 10
        max-wait: -1
        min-idle: 0
3.操作redis的客户端选择RedisTemplate,需要配置下存储在redis的序列化值,使用@Bean注解,当程序启动时加载到spring容器中供后期使用,redis的相关操作,不在此处进行,有需求的可以参考笔者的这篇博文:https://blog.csdn.net/ZHANGLIZENG/article/details/121740884。
@Configuration
public class RedisConfig {


    Logger logger = LoggerFactory.getLogger(RedisConfig.class);

    @Bean
    public RedisTemplate<String,Object> redisTemplate(RedisConnectionFactory factory) {


        logger.debug("redisTemplate实例化 {}");
        RedisTemplate<String,Object> redisTemplate = new RedisTemplate<>();
        redisTemplate.setConnectionFactory(factory);
        FastJsonRedisSerializer fastJsonRedisSerializer = new FastJsonRedisSerializer<Object>(Object.class);
        // key的序列化采用StringRedisSerializer
        redisTemplate.setKeySerializer(new StringRedisSerializer());
        // value值的序列化采用fastJsonRedisSerializer
        redisTemplate.setValueSerializer(fastJsonRedisSerializer);
        // hash的key也采用String的序列化方式
        redisTemplate.setHashKeySerializer(new StringRedisSerializer());
        // hash的value序列化方式采用fastJsonRedisSerializer
        redisTemplate.setHashValueSerializer(fastJsonRedisSerializer);
        redisTemplate.afterPropertiesSet();
        return redisTemplate;
    }
}
4.配置RedissonClient客户端,用于加锁操作,使用@Bean注解,当程序启动时加载到spring容器中供后期使用,配置客户端需要根据redis服务的模式配置,有集群、主从、哨兵等模式,具体配置参考官网:https://github.com/redisson/redisson/wiki/2.-%E9%85%8D%E7%BD%AE%E6%96%B9%E6%B3%95;此处使用的单节点模式配置。
@Configuration
public class RedissonConfig {


    //redis相关配置
    @Value("${spring.redis.host}")
    private String redisHost;

    @Value("${spring.redis.port}")
    private String redisPort;

    @Value("${spring.redis.database}")
    private int database;

    @Value("${spring.redis.password}")
    private String password;

    @Value("${spring.redis.timeout}")
    private int timeout;

    //创建redisson客户端,此时默认使用单节点
    @Bean
    public RedissonClient redissonClient(){


        Config config = new Config();
        config.useSingleServer().setAddress("redis://"+redisHost+":"+redisPort);
        config.useSingleServer().setDatabase(database);
        config.useSingleServer().setPassword(password);
        config.useSingleServer().setTimeout(timeout);
        RedissonClient redisson = Redisson.create(config);
        return redisson;
    }
}
三、加锁操作
操作特别简单,通过RedissonClient获取锁,然后调用lock即可加锁,解锁使用unlock即可。
//在需要使用分布式锁的类里面注入RedissonClient客户端
@Autowired
RedissonClient redissonClient;

//根据锁名称获取锁
RLock lock = redissonClient.getLock("anyLock");

//加锁
// 最常见的使用方法
lock.lock();
// 加锁以后10秒钟自动解锁
lock.lock(10, TimeUnit.SECONDS);

// 尝试加锁,最多等待100秒,上锁以后10秒自动解锁
boolean res = lock.tryLock(100, 10, TimeUnit.SECONDS);
if (res) {


   try {


     ...
   } finally {


       //解锁
       lock.unlock();
   }
}
四、原理分析
1.程序启动创建RedissonClient时做了啥?
//创建客户端
RedissonClient redisson = Redisson.create(config)
根据配置的config信息创建RedissonClient客户端,创建连接redis的管理器、执行redis命令的执行器,并生成一个uuid值作为此客户端的id,此id将会贯穿程序的一生,后面加锁时需要使用此客户端id+进程号作为锁hash值的key。此处创建的执行器,会在后面创建锁时复用。
protected Redisson(Config config) {


        this.config = config;
        //复制一份配置信息
        Config configCopy = new Config(config);
        //根据配置信息连接redis的方式创建连接管理器,分为单节点、集群、哨兵模式等
        //此处会出创建UUID id = UUID.randomUUID()作为客户端的唯一id
        this.connectionManager = ConfigSupport.createConnectionManager(configCopy);
        RedissonObjectBuilder objectBuilder = null;
        if (config.isReferenceEnabled()) {


            objectBuilder = new RedissonObjectBuilder(this);
        }
        //创建操作redis的执行器
        this.commandExecutor = new CommandSyncService(this.connectionManager, objectBuilder);
        this.evictionScheduler = new EvictionScheduler(this.commandExecutor);
        this.writeBehindService = new WriteBehindService(this.commandExecutor);
    }
2.创建锁的时候做了啥?
//创建锁
RLock lock = redissonClient.getLock("mylock");
根据一个key值,进行锁的创建,最终的创建会在Redisson类中实现,因为Redisson实现了RedissonClient接口。
    public RLock getLock(String name) {


        //this.commandExecutor执行器为程序启动时,创建RedissonClient客户端时已经生成
        return new RedissonLock(this.commandExecutor, name);
    }
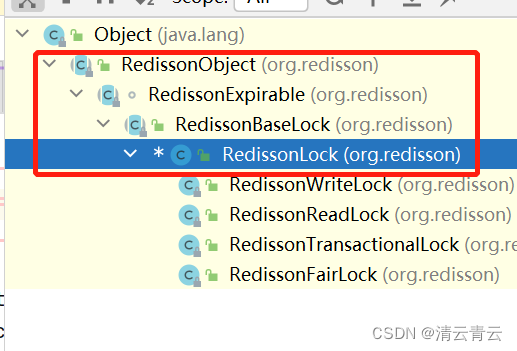
创建RedissonLock的时候,会连带创建它的父类RedissonBaseLock、RedissonExpirable、RedissonObject,并把执行器和锁key一并传递过去,供后面程序调用使用。
    public RedissonLock(CommandAsyncExecutor commandExecutor, String name) {


        //创建父类RedissonBaseLock
        super(commandExecutor, name);
        //程序启动时创建的执行器复制一份给此类变量
        this.commandExecutor = commandExecutor;
        //WatchDog 锁续期的时间,默认是30秒
        this.internalLockLeaseTime = commandExecutor.getConnectionManager().getCfg().getLockWatchdogTimeout();
        this.pubSub = commandExecutor.getConnectionManager().getSubscribeService().getLockPubSub();
    }
RedissonLock类的父级关系:
3.尝试获取锁都做了啥?
//尝试获取锁
boolean b = lock.tryLock(30, TimeUnit.SECONDS)
首先会调用到jdk包java.util.concurrent.locks下的尝试获取锁方法:
boolean tryLock(long time, TimeUnit unit) throws InterruptedException;
由于继承和实现接口,最终调用到RedissonLock的tryLock方法:
public boolean tryLock(long waitTime, TimeUnit unit) throws InterruptedException {


    //waitTime为获取锁等待的时间,超过此时间获取不到锁则获取锁失败,-1L表示没有设置加锁时间,默认的加锁30秒,为后续判断是否加延期watch dog做标识,unit为时间单位
    return this.tryLock(waitTime, -1L, unit);
}
具体看下获取锁的方法:
 public boolean tryLock(long waitTime, long leaseTime, TimeUnit unit) throws InterruptedException {


        //获取锁等待时间
        long time = unit.toMillis(waitTime);
        //当前时间,用于后面计算使用
        long current = System.currentTimeMillis();
        //当前线程的id,用于后面加锁、订阅信息等使用
        long threadId = Thread.currentThread().getId();
        //尝试获取锁,若是此key已经加锁,且不是当前线程加的锁,则返回此锁还有多久过期,若是返回的是null则标识加锁成功
        Long ttl = this.tryAcquire(waitTime, leaseTime, unit, threadId);
        if (ttl == null) {


            //加锁成功,直接返回获取锁成功
            return true;
        } else {


            //计算锁等待时间
            time -= System.currentTimeMillis() - current;
            if (time <= 0L) {

      //锁等待时间小于0,则加锁失败,直接返回false
                this.acquireFailed(waitTime, unit, threadId);
                return false;
            } else {


                //再次获取当前时间
                current = System.currentTimeMillis();
                //根据线程id,订阅锁释放事件,添加监听,当锁释放了,通知等待的线程争抢锁资源
                RFuture<RedissonLockEntry> subscribeFuture = this.subscribe(threadId);
                //当await返回的为false,表示等待时间已经超出获取锁最大等待时间,取消订阅并返回获取锁失败
                if (!subscribeFuture.await(time, TimeUnit.MILLISECONDS)) {


                    if (!subscribeFuture.cancel(false)) {


                        subscribeFuture.onComplete((res, e) -> {


                            if (e == null) {


                                this.unsubscribe(subscribeFuture, threadId);
                            }

                        });
                    }

                    this.acquireFailed(waitTime, unit, threadId);
                    return false;
                } else {


                    try {


                        //重新计算剩余等待时间
                        time -= System.currentTimeMillis() - current;
                        //等待时间为负数,直接返回false
                        if (time <= 0L) {


                            this.acquireFailed(waitTime, unit, threadId);
                            boolean var20 = false;
                            return var20;
                        } else {


                            boolean var16;
                            do {


                                long currentTime = System.currentTimeMillis();
                                //再次尝试获取锁
                                ttl = this.tryAcquire(waitTime, leaseTime, unit, threadId);
                                //获取锁成功直接返回
                                if (ttl == null) {


                                    var16 = true;
                                    return var16;
                                }
                                //计算剩余等待时间
                                time -= System.currentTimeMillis() - currentTime;
                                if (time <= 0L) {

     //获取锁失败
                                    this.acquireFailed(waitTime, unit, threadId);
                                    var16 = false;
                                    return var16;
                                }

                                currentTime = System.currentTimeMillis();
                                //当锁释放的时间ttl小于等待获取锁的时间time,则让线程挂起ttl的时间再进行锁的获取,避免了无效的锁申请浪费资源,使用LockSupport类的UNSAFE.park让线程挂起一段时间
                                if (ttl >= 0L && ttl < time) {


                                    ((RedissonLockEntry)subscribeFuture.getNow()).getLatch().tryAcquire(ttl, TimeUnit.MILLISECONDS);
                                } else {


                                //当等待获取锁的时间time小于锁释放的时间ttl,则让线程挂起time的时间,再去获取锁,避免了无效的锁申请浪费资源,使用LockSupport类的UNSAFE.park让线程挂起一段时间,此时肯定是获取锁失败,因为锁还没到释放的时间
                                    ((RedissonLockEntry)subscribeFuture.getNow()).getLatch().tryAcquire(time, TimeUnit.MILLISECONDS);
                                }
                                //经过时间的消耗,重新计算锁的等待时间
                                time -= System.currentTimeMillis() - currentTime;
                            } while(time > 0L);   //执行循环获取锁的条件是:获取锁的剩余时间还大于0,否则跳出循环,执行后面的获取锁失败程序

                            this.acquireFailed(waitTime, unit, threadId);
                            var16 = false;
                            return var16;
                        }
                    } finally {


                        //不管是否获取到锁,都需要取消订阅锁释放事件
                        this.unsubscribe(subscribeFuture, threadId);
                    }
                }
            }
        }
    }
首先根据进程id获取锁,若是ttl返回的为null则表示获取锁成功,直接返回true;若是获取到的ttl是一个时间值,则表示此锁被其他线程占用,此值表示锁过期的时间,则进行后续的锁释放订阅事件,通过redis的channel信道,异步信号量来监听锁释放机制,当锁释放,继续尝试获取锁;每一步操作花费一定的时候后,都需要根据当前时间减去进行操作前的时间,结果值与获取锁等待的剩余时间做计算,若是等待时间小于0,则直接返回获取锁失败。为了减少do while里面重复无效获取锁浪费资源,使用了LockSupport类的UNSAFE.park让线程挂起一段时间,直到获取锁等待时间小于0则退出while循环。
尝试获取锁的方法this.tryAcquire执行的redis语句是一个lua脚本,之所以使用lua脚本是为了保证执行的原子性,如下:
if (redis.call('exists', KEYS[1]) == 0) then
    redis.call('hincrby', KEYS[1], ARGV[2], 1);
    redis.call('pexpire', KEYS[1], ARGV[1]);
    return nil;
end;
if (redis.call('hexists', KEYS[1], ARGV[2]) == 1) then
    redis.call('hincrby', KEYS[1], ARGV[2], 1);
    redis.call('pexpire', KEYS[1], ARGV[1]);
    return nil;
end;
return redis.call('pttl', KEYS[1]);
KEYS[1]代表加锁的key上面的"mylock",ARGV[1]代表锁的生存时间,默认是30秒,ARGV[2]代表加锁的hash值的key,由客户端id+当前线程id组成,客户端id是程序启动创建RedissonClient客户端是生成的uuid。
上面redis含义为:
redis.call('exists', KEYS[1]) == 0:当前key的锁不存在

redis.call('hincrby', KEYS[1], ARGV[2], 1):则进行加锁,加锁次数加1,类似于redis执行HINCRBY myLock we65768xs-6752-4c23-278a-67ee2f1986jhf:43 1

redis.call('pexpire', KEYS[1], ARGV[1]):设置锁过期时间,类似于pexpire myLock 30000

redis.call('hexists', KEYS[1], ARGV[2]) == 1:key已经被当前客户端当前线程加锁了

redis.call('hincrby', KEYS[1], ARGV[2], 1):重新加锁,加锁次数加1

redis.call('pexpire', KEYS[1], ARGV[1]):设置加锁时间,类似于pexpire myLock 30000

return redis.call('pttl', KEYS[1]):上面两个if条件都不满足,表示此key已经加锁了,且不是此线程加的锁,返回此锁还有多久过期
语句连贯解释:(1)当此key锁不存在,则进行加锁,存储类型为hash,hash值的key为客户端id+线程id,value为1,设置锁的过期时间,默认是30秒,语句结束返回(2)1不满足,判断是否为此客户端的此线程加的锁,若是,则加锁次数value值加1,重新赋值锁的过期时间,语句结束返回(3)前面两个都不满足,说明此key的锁已经被其他客户端或者相同客户端不同线程加上了,此时查询此锁的过期时间返回。
加锁key的结构说明:
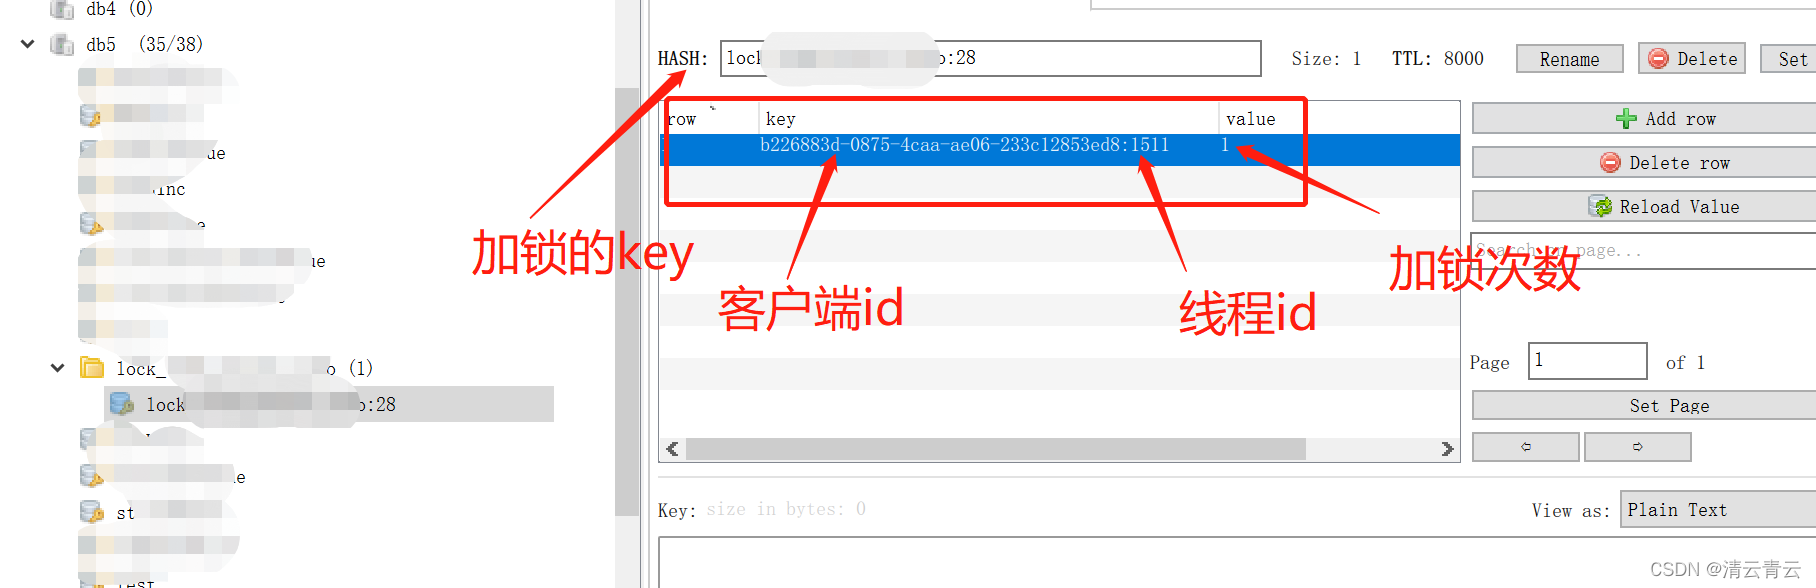
同一客户端+同一线程多次去获取锁,获取到的话值value加1,redisson是可重入锁,下面这样重复加锁的方式是允许的,几次加锁,需要使用几个unlock解锁。
//加锁
lock.lock();
//加锁
lock.lock();
//释放锁
lock.unlock();
lock.unlock();
测试重复加锁可以使用debug得到当前客户端id+进程号作为锁hash值key,value给1,手动向redis中添加一行记录,再执行尝试获取锁,此时redis中hash值value会加1变为2。

4.获取不到锁,订阅锁释放机制是如何实现的?
当获取不到锁,返回的ttl为锁的过期时间时,往下继续执行获取锁的实现,此时会执行redis的订阅锁机制。
RFuture<RedissonLockEntry> subscribeFuture = this.subscribe(threadId);
具体订阅机制实现:
//参数entryName为创建锁时创建RedissonLock的时候,连带创建它的父类RedissonBaseLock,值为客户端id加key值:this.entryName = this.id + ":" + name;
//参数channelName信道名称为创建锁时创建RedissonLock的时候,连带创建它的父类RedissonObject,值为固定字符加锁key:redisson_lock__channel+":{" + name + "}"
public RFuture<E> subscribe(String entryName, String channelName) {


       //根据信道名称创建信道,再获取异步信号量
        AsyncSemaphore semaphore = this.service.getSemaphore(new ChannelName(channelName));
       //创建redisson信号量
        RPromise<E> newPromise = new RedissonPromise();
       //semaphore.acquire:Lambda表达式,把当前创建的信号量添加到listeners线程集合中进行监听
        semaphore.acquire(() -> {


            //redisson信号量取消
            if (!newPromise.setUncancellable()) {


                //释放信号量
                semaphore.release();
            } else {


                //从private final ConcurrentMap<String, E> entries = new ConcurrentHashMap();中获取是否有此entry的信号量,此处使用ConcurrentHashMap是为了线程安全,并且提高效率,因为ConcurrentHashMap是线程安全的分段锁
                E entry = (PubSubEntry)this.entries.get(entryName);
                //存在此信号量,则释放信号量
                if (entry != null) {


                    entry.acquire();
                    semaphore.release();
                    entry.getPromise().onComplete(new TransferListener(newPromise));
                } else {


                    //不存在此entry,则创建
                    E value = this.createEntry(newPromise);
                    value.acquire();
                    //此处使用ConcurrentHashMap的putIfAbsent校验是否已经存在此entry,存在则不添加
                    E oldValue = (PubSubEntry)this.entries.putIfAbsent(entryName, value);
                    if (oldValue != null) {

     //存在则不添加,释放信号量
                        oldValue.acquire();
                        semaphore.release();
                        oldValue.getPromise().onComplete(new TransferListener(newPromise));
                    } else {

      //不存在此entry的信号量
                        //创建一个信道的监听
                        RedisPubSubListener<Object> listener = this.createListener(channelName, value);
                        //订阅信道的监听事件,当锁释放时,信号量的release会被调用
                        this.service.subscribe(LongCodec.INSTANCE, channelName, semaphore, new RedisPubSubListener[]{

    listener});
                    }
                }
            }
        });
        return newPromise;
    }
通过redis的channel信道订阅锁释放的事件,创建异步信号量AsyncSemaphore监听锁释放的机制,当锁释放时调用信号量的release释放方法,此时被信号量阻塞的线程就可以继续尝试获取锁,释放锁的方法如下:
//定义一个AtomicInteger类型的counter变量,记录线程数,AtomicInteger能保证在多线程下的安全性,其特性是加和减的时候先用当前需要变化后的值和旧的值进行比较,例如当前需要加1,则用加后的结果值减去1,再和旧的值比较,一致了才进行覆盖的操作,保证多线程下的安全性
private final AtomicInteger counter;

//尝试执行线程
private void tryRun() {


        if (this.counter.decrementAndGet() >= 0) {


            Runnable listener = (Runnable)this.listeners.poll();
            if (listener == null) {


                this.counter.incrementAndGet();
                return;
            }

            listener.run();
        } else if (this.counter.incrementAndGet() > 0) {


            this.tryRun();
        }

    }

    //释放信号量的方法
    public void release() {


        //信号量加1
        this.counter.incrementAndGet();
        //启动监听
        this.tryRun();
    }
5.避免无效申请锁浪费资源是怎么实现的?
  //当锁释放的时间ttl小于等待获取锁的时间time,则让线程挂起ttl的时间再进行锁的获取,避免了无效的锁申请浪费资源,使用LockSupport类的UNSAFE.park让线程挂起一段时间
                                if (ttl >= 0L && ttl < time) {


                                    ((RedissonLockEntry)subscribeFuture.getNow()).getLatch().tryAcquire(ttl, TimeUnit.MILLISECONDS);
                                } else {


                                //当等待获取锁的时间time小于锁释放的时间ttl,则让线程挂起time的时间,再去获取锁,避免了无效的锁申请浪费资源,,使用LockSupport类的UNSAFE.park让线程挂起一段时间,此时肯定是获取锁失败,因为锁还没到释放的时间
                                    ((RedissonLockEntry)subscribeFuture.getNow()).getLatch().tryAcquire(time, TimeUnit.MILLISECONDS);
                                }
ttl是锁释放的时间,time是获取锁剩余的等待时间,此方法是放在do while里面的,为了不让程序无效申请锁浪费资源,在此处做的优化。让线程挂起一定的时间后再执行获取锁,挂起的时间根据ttl和time的大小来定,若是满足if条件,代表获取锁等待的时间比锁释放的时间要长,则让程序挂起ttl的时间,这样锁已经释放了,再去获取;若是不满足if条件,代表释放锁的时间比锁等待的时间要长,则让程序挂起time的时间,此时锁还没有释放,但是获取锁的等待时间已经到达,继续执行while循环,此时会跳出while,表示获取锁失败。
LockSupport类挂起线程的方法:
 public static void parkNanos(Object blocker, long nanos) {


     //挂起时间大于0
     if (nanos > 0) {


         //获取当前线程
         Thread t = Thread.currentThread();
         //设置挂起的线程
         setBlocker(t, blocker);
         //public native void park(boolean isAbsolute, long time);第一个参数是是否是绝对时间,第二个参数是等待时间值
         UNSAFE.park(false, nanos);
         //移除挂起的线程
         setBlocker(t, null);
     }
 }

//设置挂起的线程
private static void setBlocker(Thread t, Object arg) {


    UNSAFE.putObject(t, parkBlockerOffset, arg);
}
6.当加锁时间内处理不完业务,锁续时是怎么处理的?
当在加锁时间范围内,处理不完业务,需要更新此锁的过期时间,此处就需要redisson的一个watch dog机制进行处理。注意watch dog机制只适用于锁过期时间为默认30秒的方式,自己配置的过期时间,尽管是配的30秒过期也不会启用watch dog机制。
 //尝试获取锁,等待获取时间30秒,此种方式会启用watch dog
 boolean b = lock.tryLock(30, TimeUnit.SECONDS);

 //尝试获取锁,等待获取时间20秒,锁的过期时间是30秒或者配置为其他任意值,都不会启用watch dog
 boolean b = lock.tryLock(20, 30,TimeUnit.SECONDS);
源码中当没有配置过期时间,默认传递一个-1L,此-1L作为后面判断是否要创建定时任务启动watch dog的标识:
    public boolean tryLock(long waitTime, TimeUnit unit) throws InterruptedException {
        return this.tryLock(waitTime, -1L, unit);
    }
若是配置了锁的过期时间,尽管是配的30秒,也不会启动watch dog,源码中是直接把过期时间传递过去的,没有做30秒转成-1L的操作:
boolean tryLock(long var1, long var3, TimeUnit var5) throws InterruptedException;
源码中获取锁,判断是否启用定时器的逻辑代码:
//waitTime:获取锁等待的时间
//leaseTime:加锁时间,没有配置的情况传递的是-1L,有配置过期时间则直接传递的是过期时间
//unit:时间单位
//threadId:当前线程号
private <T> RFuture<Long> tryAcquireAsync(long waitTime, long leaseTime, TimeUnit unit, long threadId) {


        RFuture ttlRemainingFuture;
        if (leaseTime != -1L) {

     //不等于-1L表示用户自己配置了过期时间,加锁时传递用户配置的过期时间
            ttlRemainingFuture = this.tryLockInnerAsync(waitTime, leaseTime, unit, threadId, RedisCommands.EVAL_LONG);
        } else {

      //没有配置锁的过期时间,使用默认的时间;internalLockLeaseTime为程序启动时创建RedissonClient客户端时设置的默认值30秒,在创建锁时,创建RedissonLock时已经给此值赋上值
            ttlRemainingFuture = this.tryLockInnerAsync(waitTime, this.internalLockLeaseTime, TimeUnit.MILLISECONDS, threadId, RedisCommands.EVAL_LONG);
        }

        ttlRemainingFuture.onComplete((ttlRemaining, e) -> {


            //e==null表示获取到锁,获取不到锁会有锁过期的时间
            if (e == null) {


                //ttlRemaining == null表示获取到锁
                if (ttlRemaining == null) {


                    if (leaseTime != -1L) {

     //当用户配置了过期时间,则把过期时间赋值给internalLockLeaseTime变量,记录锁的过期时间
                        this.internalLockLeaseTime = unit.toMillis(leaseTime);
                    } else {

       //使用默认的30秒过期时间,则创建定时器启动watch dog续时
                        this.scheduleExpirationRenewal(threadId);
                    }
                }

            }
        });
        return ttlRemainingFuture;
    }
当用户配置了过期时间(leaseTime != -1L)时,获取到锁,在redis中存放的过期时间为用户配置的时间;当使用默认的过期时间30秒,则在redis中存放的过期时间为程序启动时默认配置的30秒。当获取锁的结果为null即成功时,进行判断是否要启动watch dog 续时机制,若是用户自己配置的过期时间,则给类中记录此锁过期的变量赋值上用户设置的数据,若是默认30秒过期时间,则添加定时器启动watch dog。
看下设置定时器的源码:
//根据进程id设置定时器启动watch dog
protected void scheduleExpirationRenewal(long threadId) {


        //创建一个entry对象
        RedissonBaseLock.ExpirationEntry entry = new RedissonBaseLock.ExpirationEntry();
        //从ConcurrentHashMap类型的EXPIRATION_RENEWAL_MAP变量中判断此entry是否已经存在
        RedissonBaseLock.ExpirationEntry oldEntry = (RedissonBaseLock.ExpirationEntry)EXPIRATION_RENEWAL_MAP.putIfAbsent(this.getEntryName(), entry);
        if (oldEntry != null) {

     //已经存在,更新进程号
            oldEntry.addThreadId(threadId);
        } else {

      //不存在则添加,值引用直接添加进程号
            entry.addThreadId(threadId);

            try {


                //检查表达式
                this.renewExpiration();
            } finally {


                if (Thread.currentThread().isInterrupted()) {


                    //进程中断了,EXPIRATION_RENEWAL_MAP中移除entry,停止定时器
                    this.cancelExpirationRenewal(threadId);
                }

            }
        }

    }
根据进程号,从全局变量EXPIRATION_RENEWAL_MAP中看是否有此进程的entry存在,存在则更新进程号,不存在则添加进去;当线程终止了,需要从EXPIRATION_RENEWAL_MAP中移除entry,停止定时器。添加完成后开始检验锁的过期时间,源码为:
 //检查表达式
private void renewExpiration() {


        //从全局变量中查询线程的entry对象
        RedissonBaseLock.ExpirationEntry ee = (RedissonBaseLock.ExpirationEntry)EXPIRATION_RENEWAL_MAP.get(this.getEntryName());
        if (ee != null) {

     //entry对象存在
            //创建一个定时器,定时器执行的时间this.internalLockLeaseTime / 3L,10秒钟执行一次
            Timeout task = this.commandExecutor.getConnectionManager().newTimeout(new TimerTask() {


                public void run(Timeout timeout) throws Exception {


                      //从全局变量中查询线程的entry对象
                    RedissonBaseLock.ExpirationEntry ent = (RedissonBaseLock.ExpirationEntry)RedissonBaseLock.EXPIRATION_RENEWAL_MAP.get(RedissonBaseLock.this.getEntryName());
                    if (ent != null) {

    //entry对象存在
                        //获取线程号
                        Long threadId = ent.getFirstThreadId();
                        if (threadId != null) {


                            //异步执行判断是否还持有锁,持有锁的话,再把锁的过期时间更新为30秒,也是一个lua执行脚本
                            RFuture<Boolean> future = RedissonBaseLock.this.renewExpirationAsync(threadId);
                            future.onComplete((res, e) -> {


                                if (e != null) {

      //执行更新锁过期时间失败
                                    RedissonBaseLock.log.error("Can't update lock " + RedissonBaseLock.this.getRawName() + " expiration", e);
                                 //从全局变量中移除entry   RedissonBaseLock.EXPIRATION_RENEWAL_MAP.remove(RedissonBaseLock.this.getEntryName());
                                } else {


                                    if (res) {

       //更新锁为30秒过期成功,则重新调用renewExpiration方法,再次添加定时器检查
                                        RedissonBaseLock.this.renewExpiration();
                                    } else {

    //已经不存在此锁,任务已经完成,则EXPIRATION_RENEWAL_MAP中移除entry,停止定时器
                                        RedissonBaseLock.this.cancelExpirationRenewal((Long)null);
                                    }

                                }
                            });
                        }
                    }
                }
                //设置task的定时时间,指定时间单位
            }, this.internalLockLeaseTime / 3L, TimeUnit.MILLISECONDS);
            //添加到定时器中
            ee.setTimeout(task);
        }
    }
从全局变量EXPIRATION_RENEWAL_MAP中获取线程的entry,当entry存在,则执行一段检查锁是否存在,存在则更新过期时间为30秒的lua脚本,当lua脚本的执行结果返回成功,则重新调用renewExpiration方法,重新添加定时器任务;当lua脚本执行失败,则从EXPIRATION_RENEWAL_MAP中移除entry,停止定时器。
检查锁key是否存在,并更新锁过期时间的方法renewExpirationAsync中lua脚本:
if (redis.call('hexists', KEYS[1], ARGV[2]) == 1) then
   redis.call('pexpire', KEYS[1], ARGV[1]);
   return 1;
end;
return 0;
redis脚本含义:
redis.call('hexists', KEYS[1], ARGV[2]) == 1:存在此key的锁,并且是当前客户端下当前线程所拥有
redis.call('pexpire', KEYS[1], ARGV[1]):重新给此key设置过期时间,更新为30秒
每次执行这段lua脚本满足if条件,并且执行成功,则此key的过期时间被重置为30秒,业务一直没有处理完的话,会每隔十秒过期时间被重置为30秒。
五、方案优缺点
1.优点
(1)通过watch dog机制实现了锁的续期问题。
(2)结合着redis一块使用,系统性能更高。
(3)操作redis使用lua脚本,保证执行的原子性。
(4)支持可重入锁。
(5)使用了LockSupport的Unsafe.park使线程挂起,避免了重复无效获取锁浪费资源。
2.缺点
(1)在redis主从模式或者集群模式下,当客户端1在master节点加锁成功,但是master节点还没有异步复制数据给其他slave节点时,master节点宕机了,此时客户端2来申请加锁,会在新的master节点上加锁成功,此时会存在多个客户端加锁成功的情况,可能会产生不必要的脏数据。
(2)watch dog 机制10秒触发一次会消耗一定的服务器资源。