文章目录

Pre
Redis进阶-细说分布式锁中我们梳理了使用Redis实现分布式锁的演进过程,并提出了目前最完善的解决方案:Redisson 实现分布式锁 。
这里我们来分析下Redisson分布式锁实现原理及源码解析
用法
使用redisson实现分布式锁的操作步骤,三部曲
- 第一步: 获取锁 RLock redissonLock = redisson.getLock(lockKey);
- 第二步: 加锁,实现锁续命功能 redissonLock.lock();
- 第三步:释放锁 redissonLock.unlock();
Redisson分布式锁实现原理
熟悉了基本用法以后,我们来看下Redission实现分布式锁的原理,再理解了原理之后,后续梳理源码实现就更加得心应手了。
Redisson分布式锁源码分析
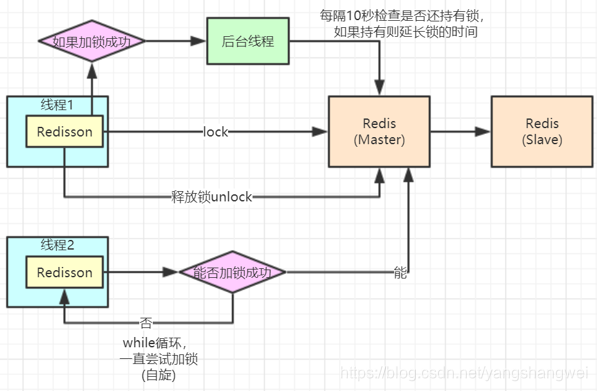
流程图如下
重点主要是依赖lua脚本的原子性,实现加锁和释放锁的功能

redisson.getLock(lockKey) 的逻辑
    @Override
    public RLock getLock(String name) {
        return new RedissonLock(connectionManager.getCommandExecutor(), name);
    }
实例化RedissonLock,我们看下RedissonLock的构造函数
    public RedissonLock(CommandAsyncExecutor commandExecutor, String name) {
        super(commandExecutor, name);
        this.commandExecutor = commandExecutor;
        this.id = commandExecutor.getConnectionManager().getId();
        this.internalLockLeaseTime = commandExecutor.getConnectionManager().getCfg().getLockWatchdogTimeout();
    }
-
super(commandExecutor, name); 父类name赋值,后续通过getName()获取
-
commandExecutor: 执行lua脚本的executor
-
id 是个UUID, 后面被用来当做 和threadId组成 value值,用作判断加锁和释放锁是否是同一个线程的校验。
-
internalLockLeaseTime : 取自 Config#lockWatchdogTimeout,默认30秒,这个参数还有另外一个作用,锁续命的执行周期 internalLockLeaseTime/3 = 10秒
redissonLock.lock()的逻辑
主要是实现加锁和锁的续命
redissonLock.lock();
看看都干了啥
  @Override
    public void lock() {
        try {
            lockInterruptibly();
        } catch (InterruptedException e) {
            Thread.currentThread().interrupt();
        }
    }
继续看 lockInterruptibly
 @Override
    public void lockInterruptibly() throws InterruptedException {
        lockInterruptibly(-1, null);
    }
继续看 lockInterruptibly(-1, null);
@Override
    public void lockInterruptibly(long leaseTime, TimeUnit unit) throws InterruptedException {

	    // 获取当前线程ID
        long threadId = Thread.currentThread().getId();

        // 尝试获取锁的剩余时间
        Long ttl = tryAcquire(leaseTime, unit, threadId);
        // lock acquired  ttl为空,说明没有线程持有该锁,直接返回 让当前线程加锁成功
        if (ttl == null) {
            return;
        }

        RFuture<RedissonLockEntry> future = subscribe(threadId);
        commandExecutor.syncSubscription(future);


        // 死循环
        try {
            while (true) {

                // 再此尝试获取锁的剩余时间 ,如果为null, 跳出循环
                ttl = tryAcquire(leaseTime, unit, threadId);
                // lock acquired
                if (ttl == null) {
                    break;
                }

                // waiting for message   如果ttl >=0 说明 有其他线程持有该锁
                if (ttl >= 0) {

                     // 获取信号量,尝试加锁,设置最大等待市场为ttl
                    getEntry(threadId).getLatch().tryAcquire(ttl, TimeUnit.MILLISECONDS);
                } else {

                     // 如果ttl小于0 (-1 ,-2 ) 说明已经过期,直接获取
                    getEntry(threadId).getLatch().acquire();
                }
            }
        } finally {
            unsubscribe(future, threadId);
        }
//        get(lockAsync(leaseTime, unit));
    }
大流程已经梳理完了,我们看下 Long ttl = tryAcquire(leaseTime, unit, threadId);
 private Long tryAcquire(long leaseTime, TimeUnit unit, long threadId) {
        return get(tryAcquireAsync(leaseTime, unit, threadId));
    }
继续看下
tryAcquireAsync(leaseTime, unit, threadId)
 private <T> RFuture<Long> tryAcquireAsync(long leaseTime, TimeUnit unit, final long threadId) {


        if (leaseTime != -1) {
            return tryLockInnerAsync(leaseTime, unit, threadId, RedisCommands.EVAL_LONG);
        }

        // 刚开始  leaseTime 传入的是 -1 ,所以走这个分支

        // 1)尝试加锁  待会细看 先把主要的逻辑梳理完
        RFuture<Long> ttlRemainingFuture = tryLockInnerAsync(commandExecutor.getConnectionManager().getCfg().getLockWatchdogTimeout(), TimeUnit.MILLISECONDS, threadId, RedisCommands.EVAL_LONG);

       // 2) 注册监听事件
        ttlRemainingFuture.addListener(new FutureListener<Long>() {
            @Override
            public void operationComplete(Future<Long> future) throws Exception {
                if (!future.isSuccess()) {
                    return;
                }

                Long ttlRemaining = future.getNow();
                // lock acquired
                if (ttlRemaining == null) {

	                // 3)获取锁成功的话,给锁延长过期时间
                    scheduleExpirationRenewal(threadId);
                }
            }
        });
        return ttlRemainingFuture;
    }
继续看
 // 1)尝试加锁  待会细看 先把主要的逻辑梳理完
        RFuture<Long> ttlRemainingFuture = tryLockInnerAsync(commandExecutor.getConnectionManager().getCfg().getLockWatchdogTimeout(), TimeUnit.MILLISECONDS, threadId, RedisCommands.EVAL_LONG);
看实现
    <T> RFuture<T> tryLockInnerAsync(long leaseTime, TimeUnit unit, long threadId, RedisStrictCommand<T> command) {
        internalLockLeaseTime = unit.toMillis(leaseTime);

        return commandExecutor.evalWriteAsync(getName(), LongCodec.INSTANCE, command,
                  "if (redis.call('exists', KEYS[1]) == 0) then " +
                      "redis.call('hset', KEYS[1], ARGV[2], 1); " +
                      "redis.call('pexpire', KEYS[1], ARGV[1]); " +
                      "return nil; " +
                  "end; " +
                  "if (redis.call('hexists', KEYS[1], ARGV[2]) == 1) then " +
                      "redis.call('hincrby', KEYS[1], ARGV[2], 1); " +
                      "redis.call('pexpire', KEYS[1], ARGV[1]); " +
                      "return nil; " +
                  "end; " +
                  "return redis.call('pttl', KEYS[1]);",
                    Collections.<Object>singletonList(getName()), internalLockLeaseTime, getLockName(threadId));
    }
lua 脚本
KEYS[1] ---------> getName()
ARGV[1] ---------> internalLockLeaseTime
ARGV[2] ---------> getLockName(threadId) 实现如下
  String getLockName(long threadId) {
        return id + ":" + threadId;
    }
这个id就是自开始实例化RedissonLock的id ,是个UUID
我们来解释下这段lua脚本
 // 如果 lockKey不存在 ,设置 使用hset设置 lockKey ,field为 uuid:threadId ,value为1 ,并设置过期时间

 //就是这个命令

 //127.0.0.1:6379> hset lockkey  uuid:threadId 1
 //(integer) 1
 //127.0.0.1:6379> PEXPIRE lockkey internalLockLeaseTime

  "if (redis.call('exists', KEYS[1]) == 0) then " +
    "redis.call('hset', KEYS[1], ARGV[2], 1); " +
           "redis.call('pexpire', KEYS[1], ARGV[1]); " +
           "return nil; " +
       "end; " +

 // 如果 lockKey 存在和 filed 和 当前线程的uuid:threadId相同  key 加1 ,执行多少次 就加多次  设置过期时间  其实就是如下命令
 //127.0.0.1:6379> HEXISTS lockkey uuid:threadId
 //(integer) 1
 //127.0.0.1:6379> PEXPIRE lockkey  internalLockLeaseTime

   "if (redis.call('hexists', KEYS[1], ARGV[2]) == 1) then " +
           "redis.call('hincrby', KEYS[1], ARGV[2], 1); " +
           "redis.call('pexpire', KEYS[1], ARGV[1]); " +
           "return nil; " +
       "end; " +

 // 最后返回 lockkey的 pttl

   "return redis.call('pttl', KEYS[1]);"
那继续监听时间中的 scheduleExpirationRenewal(threadId); 逻辑
 private void scheduleExpirationRenewal(final long threadId) {
        if (expirationRenewalMap.containsKey(getEntryName())) {
            return;
        }

        Timeout task = commandExecutor.getConnectionManager().newTimeout(new TimerTask() {

           // 重点是run方法
            @Override
            public void run(Timeout timeout) throws Exception {


               // 又是lua脚本  判断是否存在,存在就调用pexpire
                RFuture<Boolean> future = commandExecutor.evalWriteAsync(getName(), LongCodec.INSTANCE, RedisCommands.EVAL_BOOLEAN,
                        "if (redis.call('hexists', KEYS[1], ARGV[2]) == 1) then " +
                            "redis.call('pexpire', KEYS[1], ARGV[1]); " +
                            "return 1; " +
                        "end; " +
                        "return 0;",
                          Collections.<Object>singletonList(getName()), internalLockLeaseTime, getLockName(threadId));
                // 监听事件中又 调用了自己  scheduleExpirationRenewal
                future.addListener(new FutureListener<Boolean>() {
                    @Override
                    public void operationComplete(Future<Boolean> future) throws Exception {
                        expirationRenewalMap.remove(getEntryName());
                        if (!future.isSuccess()) {
                            log.error("Can't update lock " + getName() + " expiration", future.cause());
                            return;
                        }

                        if (future.getNow()) {
                            // reschedule itself
                            scheduleExpirationRenewal(threadId);
                        }
                    }
                });
            }
        }, internalLockLeaseTime / 3, TimeUnit.MILLISECONDS);

        if (expirationRenewalMap.putIfAbsent(getEntryName(), task) != null) {
            task.cancel();
        }
    }
redissonLock.unlock();逻辑
  @Override
    public void unlock() {
        Boolean opStatus = get(unlockInnerAsync(Thread.currentThread().getId()));
        if (opStatus == null) {
            throw new IllegalMonitorStateException("attempt to unlock lock, not locked by current thread by node id: "
                    + id + " thread-id: " + Thread.currentThread().getId());
        }
        if (opStatus) {
            cancelExpirationRenewal();
        }
    }
重点看 unlockInnerAsync(Thread.currentThread().getId())
 protected RFuture<Boolean> unlockInnerAsync(long threadId) {
        return commandExecutor.evalWriteAsync(getName(), LongCodec.INSTANCE, RedisCommands.EVAL_BOOLEAN,
                "if (redis.call('exists', KEYS[1]) == 0) then " +
                    "redis.call('publish', KEYS[2], ARGV[1]); " +
                    "return 1; " +
                "end;" +
                "if (redis.call('hexists', KEYS[1], ARGV[3]) == 0) then " +
                    "return nil;" +
                "end; " +
                "local counter = redis.call('hincrby', KEYS[1], ARGV[3], -1); " +
                "if (counter > 0) then " +
                    "redis.call('pexpire', KEYS[1], ARGV[2]); " +
                    "return 0; " +
                "else " +
                    "redis.call('del', KEYS[1]); " +
                    "redis.call('publish', KEYS[2], ARGV[1]); " +
                    "return 1; "+
                "end; " +
                "return nil;",
                Arrays.<Object>asList(getName(), getChannelName()), LockPubSub.unlockMessage, internalLockLeaseTime, getLockName(threadId));

    }
又是lua脚本,核心就是 把value减到为0 ,删除key
KEYS[1] ---------> getName()
KEYS[2] ---------> getChannelName()
ARGV[1] ---------> LockPubSub.unlockMessage
ARGV[2] ---------> internalLockLeaseTime
ARGV[2] ---------> getLockName(threadId)
总结
至此,原理和源码我们粗略的梳理完了 ,梳理了主要的核心流程,主要是依靠lua脚本,代码写的还是非常优秀的,向开源学习!!!
