系列文章目录
第一章:Visual Studio 2019 动态链接库DLL建立
第二章:VS动态链接库DLL调试
第三章:VS2019 OpenCV环境配置
第四章:C++部署pytorch模型
前言
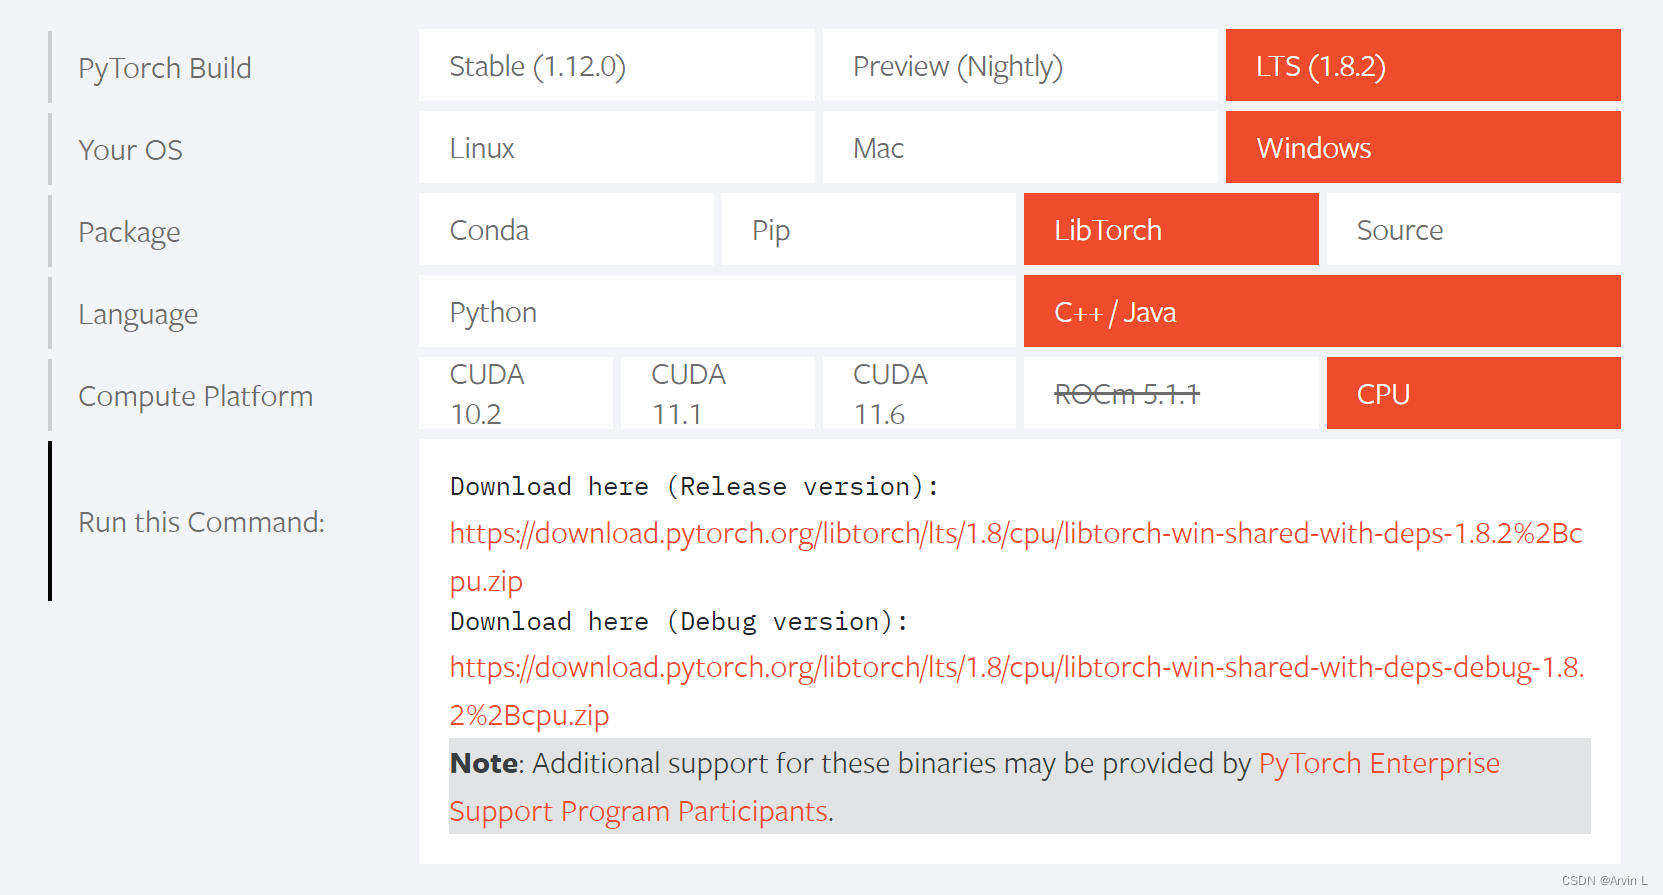
环境:visual studio 2019;OpenCV4.5.5;pytorch1.8;libtorch10.2;
一、C++部署pytorch?
pytorch模型在C++部署我知道的一般有两种方式,一种是讲pytorch模型转为onnx,使用opencv的DNN模块部署。一种是使用pytorch对应版本的Libtorch部署。onnx试验发现,转换模型过程之后,语义分割精度相差太大,最终选择Libtorch部署。
二、Libtorch配置
注意事项:1,Libtorch版本与pytorch版本要对应
2,Libtorch与pytorch的CPU/GPU要对应
1.下载Libtorch
Pytorch官网下载,有Release版本和Debug版本
2.VS2019配置Libtorch
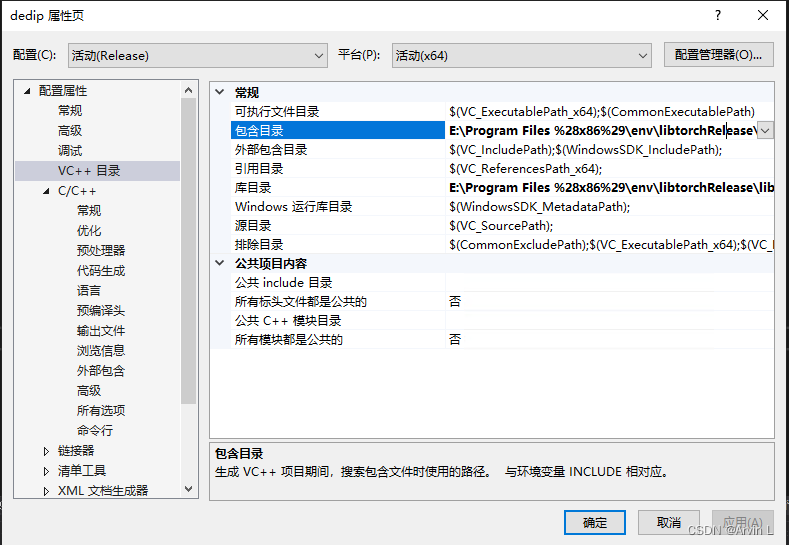
2.1配置VC++目录
首先配置包含目录和库目录,对应opencv一样的方法。
2.2配置链接器
依赖项添加所有lib,cmd中进入lib目录,使用dir /b *.lib>1.txt命令可生成目录,复制使用。

2.3Libtorch环境变量配置
可以在系统环境变量中添加,或直接把所有DLL复制进Release或者Debug目录就不用配置环境了。
三、pytorch模型转换为Libtorch使用的pt
# -*- coding:utf-8 -*-
import torch

model = torch.load("red_model.pth", map_location='cpu')
model.eval()

# 向模型中输入数据以得到模型参数
example = torch.rand(1, 3, 512, 512)  # N*C*H*W
traced_script_module = torch.jit.trace(model, example)

# 保存模型
traced_script_module.save("red_models_trace.pt")
四、C++中Libtorch的使用
/****************************************
@brief     :  分割
@input	   :  图像
@output    :  掩膜
*****************************************/
void SegmentAI(Mat& imgSrc, int width, int height)
{
	cv::Mat transImg;
	cv::resize(imgSrc, transImg, cv::Size(512, 512));
	//Deserialize the ScriptModule
	torch::jit::script::Module Module = torch::jit::load("models_trace.pt");
	//Module.to(at::kCUDA);//XXX-GPU版本添加
	//processing

	//cv::cvtColor(image_transfomed, image_transfomed, cv::COLOR_BGR2RGB); //转RGB
	//Mat to tensor
	torch::Tensor tensorImg = torch::from_blob(transImg.data, { transImg.rows, transImg.cols,3 }, torch::kByte);
	tensorImg = tensorImg.permute({ 2,0,1 });
	tensorImg = tensorImg.toType(torch::kFloat);
	tensorImg = tensorImg.div(255);
	tensorImg = tensorImg.unsqueeze(0);
	//excute the model
	torch::Tensor output = Module.forward({ tensorImg }).toTensor();
	//tensor to Mat
	torch::Tensor output_max = output.argmax(1);
	output_max = output_max.squeeze();
	output_max = output_max == 1;
	output_max = output_max.mul(255).to(torch::kU8);
	output_max = output_max.to(torch::kCPU);
	Mat conjMask(Size(512, 512), CV_8UC1);
	memcpy((void*)conjMask.data, output_max.data_ptr(), sizeof(torch::kU8) * output_max.numel());
	//最大连通域
	vector<vector<Point>> contours;
	vector<Vec4i> hierarchy;
	double largest_area = 0;
	int largest_contour_index = 0;
	findContours(conjMask, contours, hierarchy, RETR_EXTERNAL, CHAIN_APPROX_SIMPLE);
	for (size_t i = 0; i < contours.size(); i++) // iterate through each contour.
	{
		double area = contourArea(contours[i]);  //  Find the area of contour
		if (area > largest_area)
		{
			largest_area = area;
			largest_contour_index = i;
		}
	}
	Mat conjMaskMax = Mat(512, 512, CV_8UC1, cv::Scalar::all(0));
	if (contours.size() != 0)
	{
		fillPoly(conjMaskMax, contours[largest_contour_index], Scalar(255, 255, 255), 8, 0);
	}
	resize(conjMaskMax, conjMaskMax, cv::Size(width, height));
	conjMaskMax.convertTo(imgSrc, CV_8UC1, 255, 0);
}
参考文献
windows+VS2019+PyTorchLib配置使用攻略 - 简书 (jianshu.com)![]() https://www.jianshu.com/p/2371ee8b45f0
https://www.jianshu.com/p/2371ee8b45f0