利用PyTorch C++ API(LibTorch)加载预训练模型及预测
前言
LibTorch是基于PyTorch的包含头文件,库文件和CMake编译(配置)文件的C++ API。CMake编译配置文件并不是必须的,但官方推荐使用,且会持续维护。这个API主要包含五部分(官方文档):
- ATen: The foundational tensor and mathematical operation library on which all else is built;(基本的张量和数学操作)
- Autograd: Augments ATen with automatic differentiation;(自动求导机制)
- C++ Frontend: High level constructs for training and evaluation of machine learning models;(C++框架下PyTorch功能,机器学习模型训练与评估)
- TorchScript: An interface to the TorchScript JIT compiler and interpreter;(TorchScript是PyTorch模型的表示形式,是使用PyTorch API的Python的子集,有C ++接口)
- C++ Extensions: A means of extending the Python API with custom C++ and CUDA routines.(扩展PyTorch的常规Python用例)
本博文介绍第三部分 C++ Frontend 的第二个功能,evaluation,即 加载使用python语言训练好的pytorch模型,在C++语言中执行前向传播过程。LibTorch可应用于不同平台,如Linux,MacOS和Windows,它也支持GPU。请根据自己的需要,到官网下载对应的LibTorch编译版本。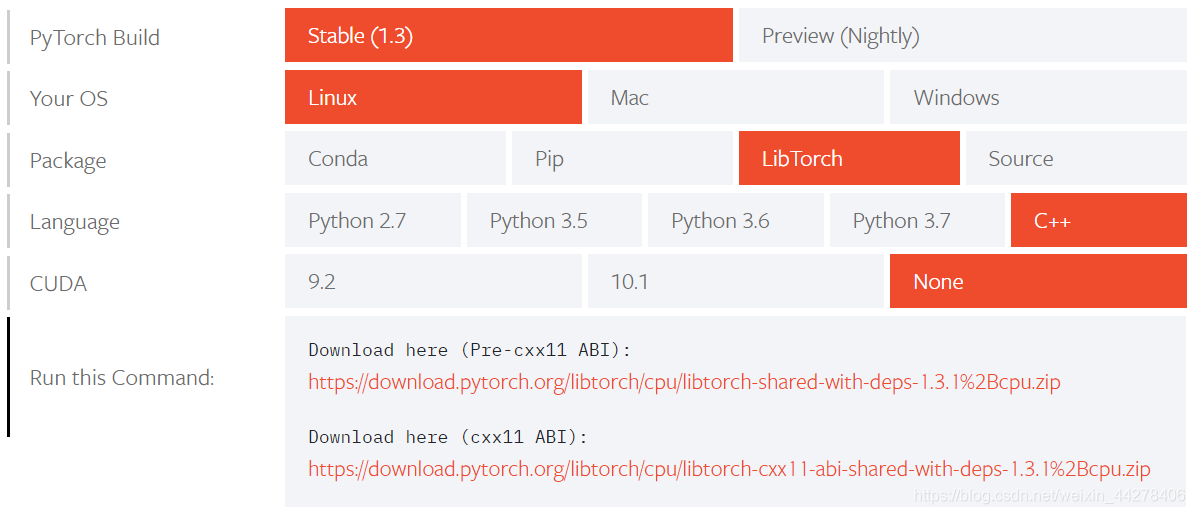 本文使用环境为,
- Ubuntu 18.04.3 LTS
- opencv 3.4.5 (读取图片)
- python 3.6.9(训练模型/保存预训练模型)
- cmake 3.10.2 & GNU Make 4.1(编译工具)
- pytorch 1.3.1+cpu,
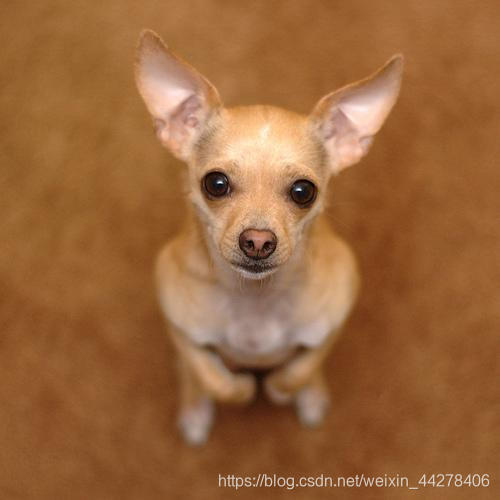
使用最简单的Ubuntu下的CPU版本做实例,加载预训练的ResNet101,识别图片吉娃娃,Chihuahua。
第一步,获取LibTorch
wget https://download.pytorch.org/libtorch/nightly/cpu/libtorch-shared-with-deps-latest.zip
unzip libtorch-shared-with-deps-latest.zip
解压得到的libtorch包——bin,include,lib,share,build-version,build-hash;libtorch包可放置在任何地方(记住绝对路径,使用 “pwd”)。
第二步,检验LibTorch(可省略)
- 编写CMakeLists.txt
cmake_minimum_required(VERSION 3.0 FATAL_ERROR)
project(example-app)

find_package(Torch REQUIRED)
set(CMAKE_CXX_FLAGS "${CMAKE_CXX_FLAGS} ${TORCH_CXX_FLAGS}")

add_executable(example-app example-app.cpp)
target_link_libraries(example-app "${TORCH_LIBRARIES}")
set_property(TARGET example-app PROPERTY CXX_STANDARD 14)
- 编写C++文件,example-app.cpp
#include <torch/torch.h>
#include <iosstream>
int main(){
    torch::Tensor tensor = torch::rand({2, 3});
    std::cout << tensor << std::endl;
}
- cmake和make
此时,我们有如下文件结构。
example-app/
  CMakeLists.txt
  example-app.cpp
新建一个build文件夹,方便编译。
mkdir build
cd build
cmake -DCMAKE_PREFIX_PATH=/path/to/libtorch .. # absolute path
cmake --build . --config Release
# make
执行结果如下,
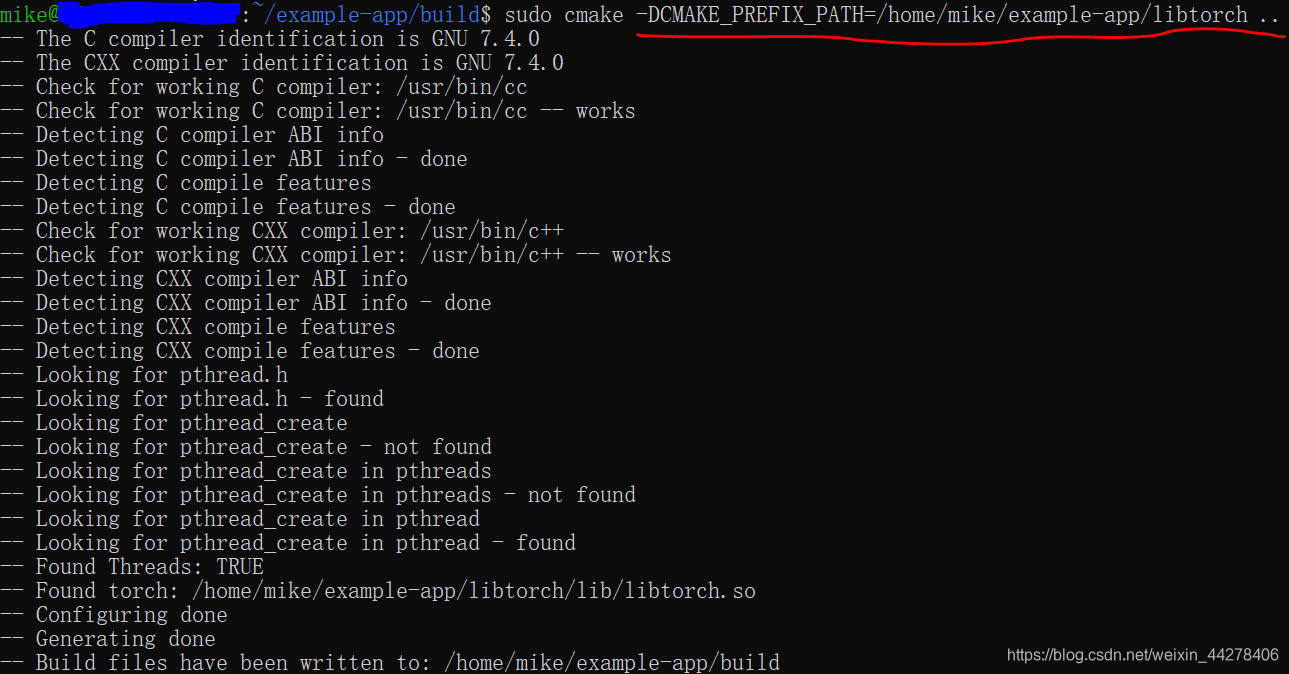
请留意,
- libtorch路径写第一步的绝对路径,如,/home/mike/example-app/libtorch/;
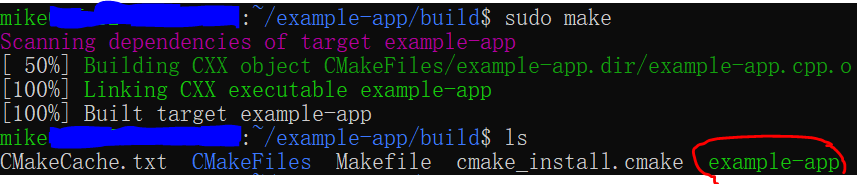
- “cmake --build . --config Release” 可直接使用“make”指令代替
- build文件夹下,example-app为可执行文件
- 运行可执行文件
./example-app
结果如下,
 0.8741  0.4835  0.7189
 0.5223  0.6797  0.1077
[ CPUFloatType{2,3} ]
第三步,保存预训练模型
将pytorch模型转换为C++可读的script模型,并保存为.pt文件。
import torch
import torchvision

# An instance of your model
#model = torchvision.models.resnet18(pretrained=True)
# model = torchvision.models.resnet50()
model = torchvision.models.resnet101(pretrained=True)

# An example input you would normally provide to
# your model's forward() method
example = torch.rand(1,3,224,224)

# Use torch.jit.trace to generate a torch.jit.ScriptModule via tracing
traced_script_module = torch.jit.trace(model, example)

# Output and Input
output = traced_script_module(torch.ones(1,3,224,224))
print(type(output), output[0,:10],output.shape)

# This will produce a traced_resnet_model.pt file
# in working dir
traced_script_module.save("traced_resnet_model.pt")
保存训练好的模型有两种方式一种为tracing,一种为annotation,详情参见官方文档。此处resnet101模型前向算法无control flow(if, else等),使用简单的"tracing"方式。代码中,要想将pytorch模型保存到torch script中供C++使用,需要有个输入,使其实例化。
第四步,C++中加载模型并使用
第四步与第二步框架其实是一样的,多出来的部分是opencv读入图片,加载torch script模型到C++,执行前向传播过程。opencv在Ubuntu下的编译与安装请参见此博文。
- 编写CMakeLists.txt
CMakeLists.txt中添加了对opencv的依赖——include_directories(${OpenCV_INCLUDE_DIRS}),“包含路径”;target_link_libraries(example-app ${OpenCV_LIBS}),“目标链接”。
cmake_minimum_required(VERSION 3.0 FATAL_ERROR)
project(example-app)


#set(CMAKE_PREFIX_PATH "/home/mike/loadTorchScript/libtorch")
set(CMAKE_CXX_FLAGS "${CMAKE_CXX_FLAGS} ${TORCH_CXX_FLAGS}")
find_package(Torch REQUIRED)
find_package(OpenCV REQUIRED)

message(STATUS "OpenCV library status:")
message(STATUS "  version: ${OpenCV_VERSION}")
message(STATUS "  libraries: ${OpenCV_LIBS}")
message(STATUS "  include path: ${OpenCV_INCLUDE_DIRS}")
message(STATUS "  torch lib: ${TORCH_LIBRARIES}")

include_directories(${OpenCV_INCLUDE_DIRS})

add_executable(example-app example-app.cpp)
target_link_libraries(example-app ${TORCH_LIBRARIES} ${OpenCV_LIBS})
set_property(TARGET example-app PROPERTY CXX_STANDARD 14)
- 编写C++文件,example-app.cpp
#include <torch/script.h> //one-stop header
#include <torch/torch.h>

#include <string>
#include <opencv2/opencv.hpp>
#include <opencv2/imgproc/imgproc.hpp>
#include <opencv2/highgui.hpp>

#include <iostream>
#include <memory>

int main(int argc, const char* argv[]){
    if (argc != 2){
        std::cerr << "usage: example-app <path-to-exported-script-module>\n";
	    return -1;
    }
    torch::jit::script::Module module;
    try{
        // Deserialize the scriptmodule from a file using torch::jit::load().
        module = torch::jit::load(argv[1]);
    }
    catch(const c10::Error& e){
        std::cerr << "error loading the model\n";
	return -1;
    }
    std::cout << "model load ok\n";
    // load image with opencv and transform.
    // 1. read image
    cv::Mat image;
    image = cv::imread("../dog2.JPEG", CV_LOAD_IMAGE_COLOR);
    // 2. convert color space, opencv read the image in BGR
    cv::cvtColor(image, image, CV_BGR2RGB);
    cv::Mat img_float;
    // convert to float format
    image.convertTo(img_float, CV_32F, 1.0/255);
    // 3. resize the image for resnet101 model
    cv::resize(img_float, img_float, cv::Size(224, 224),cv::INTER_AREA);
    // 4. transform to tensor
    auto img_tensor = torch::from_blob(img_float.data, 1,224,224,3},torch::kFloat32);
    // in pytorch, batch first, then channel
    img_tensor = img_tensor.permute({0,3,1,2});
    // 5. Removing mean values of the RGB channels
    // the values are from following link.
    // https://github.com/pytorch/examples/blob/master/imagenet/main.py#L202
    img_tensor[0][0] = img_tensor[0][0].sub_(0.485).div_(0.229);
    img_tensor[0][1] = img_tensor[0][1].sub_(0.456).div_(0.224);
    img_tensor[0][2] = img_tensor[0][2].sub_(0.406).div_(0.225);

    // Create vectors of inputs.
    std::vector<torch::jit::IValue> inputs1, inputs2;
    inputs1.push_back(torch::ones({1,3,224,224}));
    inputs2.push_back(img_tensor);

    // 6. Execute the model and turn its output into a tensor
    at::Tensor output = module.forward(inputs2).toTensor();
    std::cout << output.sizes() << std::endl;
    std::cout << output.slice(/*dim=*/1,/*start=*/0,/*end=*/3) << '\n';

    // 7. Load labels
    std::string label_file = "../synset_words.txt";
    std::ifstream rf(label_file.c_str());
    CHECK(rf) << "Unable to open labels file" << label_file;
    std::string line;
    std::vector<std::string> labels;
    while(std::getline(rf, line)){labels.push_back(line);}

    // 8. print predicted top-3 labels
    std::tuple<torch::Tensor, torch::Tensor> result = output.sort(-1, true);
    torch::Tensor top_scores = std::get<0>(result)[0];
    torch::Tensor top_idxs = std::get<1>(result)[0].toType(torch::kInt32);

    auto top_scores_a = top_scores.accessor<float, 1>();
    auto top_idxs_a = top_idxs.accessor<int, 1>();
    for(int i=0; i<3;i++){
        int idx = top_idxs_a[i];
	    std::cout << "top-" << i+1 << " label: ";
	    std::cout << labels[idx] << ",score: " << top_scores_a[i] << std::endl;
    }
    return 0;
}
请注意一下几点,
- 此处需要三个文件,一个是测试用的JPEG,一个是保存好的.pt文件,一个是IMAGENET的1000个类别的标签,整理好的标签文件。
- opencv读入的图像格式到torch模型能使用的数据格式转换
- cmake和make
新建一个build文件夹,方便编译。
mkdir build
cd build
cmake -DCMAKE_PREFIX_PATH=/path/to/libtorch .. # absolute path
cmake --build . --config Release
# make
- 运行可执行文件
./example-app traced_resnet_model.pt
结果
top-1 label: n02085620 Chihuahua,score: 2.04532
top-2 label: n04409515 tennis ball,score: 1.95568
top-3 label: n02909870 bucket, pail,score: 1.90941
Chihuahua就是吉娃娃…emmm,我还是忍不住笑。
Reference
- INSTALLING C++ DISTRIBUTIONS OF PYTORCH
- LOADING A TORCHSCRIPT MODEL IN C++
- 利用Pytorch的C++前端(libtorch)读取预训练权重并进行预测
- libtorch初体验
- Which labels correspond to pretrained model outputs?
注重工程化的小伙伴可详细阅读参考3和参考4
