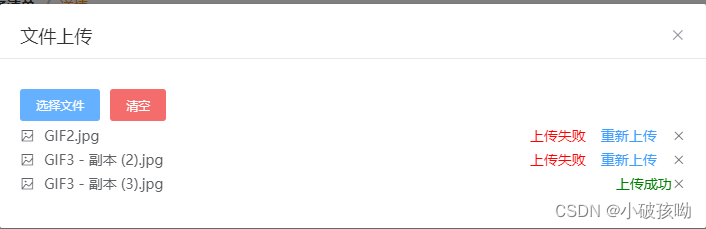
效果图:
不废话了,直接上代码!!!
HTML部分:
<template>
	<div class="container">
		<el-upload
			class="upload-demo"
			accept=".jpg,.JPG,.png,.PNG"
			action="#"
			:headers="{ 'Auth': token }"
			:multiple="true"
			:auto-upload="true"
			:http-request="uploadFile1"
			:on-progress="onProgress"
			:before-upload="beforefileListUpload"
			:show-file-list="false"
			:file-list="newFileList">
			<el-button slot="trigger" size="small" type="primary" style="margin-right: 10px">选择文件</el-button>
			<!-- <el-button class="handle-upload" size="small" type="primary" @click="uploadData()" :loading="loadingFile1">开始上传</el-button> -->
			<el-button size="small" type="danger" @click="removeAll()">清空</el-button>
		</el-upload>
		<!-- 进度条 -->
		<el-progress v-if="progressFlag" :percentage="loadProgress"></el-progress>
		<div v-for="(item,index) in newFileList" :key="item.uid" class="file-list">
			<div class="file-list-left">
				<i class="el-icon-picture-outline"></i>
				<span>{

   { item.name }}</span>
			</div>
			<div class="file-list-right">
				<span v-if="item.isSuccess" style="color: green;">上传成功</span>
				<span v-if="!item.isSuccess" style="color: red;">上传失败</span>
				<span v-if="!item.isSuccess" @click="uploadFile1(item)">重新上传</span>
				<i class="el-icon-close" @click="handleRemove1(index)"></i>
			</div>
		</div>
	</div>
</template>
before-upload 也可以这样写,进行自定义传参。
:before-upload="(file) => {return beforefileListUpload('UploadFile3',item,scope.row)}"
js部分:
export default {
	data() {
		return {
			loadingFile1: false,
			token: '',
			actionUrlapi: baseUrl + 'api/ops-resource/attach/upload-uploadAllFile-link',
			loadProgress: 0, // 动态显示进度条
   			progressFlag: false, // 关闭进度条
			newFileList: [], // 保存所有选择的图片  isSuccess是否上传成功,true:成功 false:失败
			showFileList: [], // 已上传文件列表
		}
	},
	created(){
		const token = JSON.parse(window.localStorage.getItem('token'));
		this.token = token.content;
	},
	props:{
		paramsData: {
			type: Object,
			default: {}
		}
	},
	methods: {
		// 上传之前
		beforefileListUpload(file){
			let obj = {
				id:new Date(),
				name: file.name,
				isSuccess: false,
				other1:'',
				other2:'',
				file:file
			}
			this.newFileList.push(obj)
		},
		// 文件上传时
		onProgress(event, file, fileList) {
			this.progressFlag = true; // 显示进度条
			this.loadProgress = parseInt(event.percent); // 动态获取文件上传进度
			if (this.loadProgress >= 100) {
				this.loadProgress = 100
				setTimeout( () => {this.progressFlag = false}, 1000) // 一秒后关闭进度条
			}
		},
		// 上传方法
		uploadFile1(item) {
			let formData = new FormData();
			formData.append("sourceSystem", 'MES2');
			formData.append("sourceType", this.paramsData.inspectionType);
			formData.append("sourceId", this.paramsData.id);
			formData.append("hierarchyCode", 'MES2');
			formData.append("files", item.file)
			api.queryUploadUploadAllFileLink(formData).then((res) => {
				this.$message.success('上传成功!')
				this.newFileList.forEach((option) => {
					if(option.name == item.file.name){
						option.isSuccess = true;
					}
				})
				// console.log(this.newFileList,'上传结果');
			}).catch(() => {
				this.$message.error('上传失败!')
				// console.log(this.newFileList,'上传失败结果');
			})
		},
		// 删除图片
		handleRemove1(index) {
			this.newFileList.splice(index,1);
		},
		// 清空
		removeAll(){
			this.newFileList = [];
		},
	},
}
css部分:
<style scoped lang="scss">
.handle-upload{
	margin-left: 10px;
}
.file-list{
	margin: 5px 0;
	display: flex;
	flex-direction: row;
	justify-content: space-between;
	a{
		color: #409EFF;
		margin: 0 10px;
	}
	.file-list-left{
		i{
			margin-right: 10px;
		}
	}
	.file-list-right{
		span:nth-child(2){
			color: #409EFF;
			margin: 0 15px;
			cursor: pointer;
		}
		i{
			cursor: pointer;
		}
	}
}
.file-list:hover{
	background-color: #eee;
}
</style>
至此完成!!!
测试有效!!!感谢支持!!!