1 Etcd介绍
Etcd是CoreOS基于Raft协议开发的分布式key-value存储,可用于服务发现、共享配置以及一致性保障(如数据库选主、分布式锁等)。
1.1 etcd特点
简单:curl可访问的用户的API(HTTP + JSON)
安全:可选的SSL客户端证书认证
快速:单实例每秒1000次写操作
可靠:使用Raft算法保证一致性
1.2 etcd功能
基本的key-value存储
监听机制
key的过期及续约机制, 用于监控和服务发现
原子Compare And Swap和Compare And Delete, 用于分布式锁和leader选举
1.3 etcd写流程

① 当客户端对etcd发起请求的时候,如果etcd不是leader的状态而是follower,follower则会将请求转发leader; 如果是leader后, 会对其进行预检查,检查(配额、限速、鉴权【判断请求是否合法】、包大小【需要小于1.5M,过大则会拒绝】)。
② 如果请求本身是合法的,会将请求转发给KVServer处理。
③ KVserver一致性模块进行数据处理,一致性模块是基于raft协议实现的,这时候的数据本身是处于unstable状态。
④ 当leader该数据处理unstable状态后,会通过rpc通知其他follower也来同步该数据,并且leader本身会在数据同步到日志模块【wal日志, wal日志通过fsync落盘到磁盘中】。而其他follow在同步该数据的时候,本身完成的是步骤3和数据同步到日志模块,follower一致性模块数据变成commited状态,当完成了这些后通过上次rpc返回响应体给leader。
⑤ leader在收到了超过半数集群本身确认后,更新MatchIndex, 一致性模块中数据本身由unstable变化成commited状态。这时候通过MVCC模块【treeIndex和BoltDB开源组件组成】进行状态机的写入,将数据同步到treeIndex【会更新modified版本[当前版本号], generations信息[创建的版本,当前版本数,过往的所有版本号]】。再通过BoltDB落盘到磁盘中。这时候一致性模块数据由commited变化为applied状态。【在这里如果没有要求数据强一致性,弱一致性的话,那么数据在commited状态就认为数据已经同步完成了】。
⑥ 再通过heatbeat将数据同步到follower中MVCC模块中。最终完成数据的一致性。如下图所示。 【如果follower比leader落后好几个版本,leader会通过headbeat带到follower进行同步】。

2 etcd安装部署
2.1 单机版
2.1.1 下载安装包
https://github.com/etcd-io/etcd/releases/tag/v3.5.4
2.1.2 解压并运行
tar -zxvf etcd-v3.5.4-linux-amd64.tar.gz
./etcd
2.1.3 验证
查看信息
./etcdctl member list --write-out=table

插入数据
./etcdctl --endpoints=localhost:2379 put chen perfect

查看插入的数据
./etcdctl --endpoints=localhost:2379 get chen

2.2 集群部署
2.2.1 环境准备
| 主机 | ip |
|---|---|
| linux1 | 192.168.159.200 |
| linux2 | 192.168.159.201 |
| linux3 | 192.168.159.202 |
2.2.2 编写配置文件
在/root/software/etcd-v3.5.4-linux-amd64目录下新增conf目录,并在conf目录下新增etcd-conf.yml配置文件
# 节点名字
name: linux1
# 数据存储目录
data-dir: /root/etcd/etcd-v3.5.4-linux-amd64/data
# 该节点与客户端通信时监听的地址列表
listen-client-urls: http://192.168.233.61:2379
# 广播给集群中其他成员自己的客户端地址列表
advertise-client-urls: http://192.168.233.61:2379
# 该节点与其他节点通信时所监听的地址列表,多个地址使用逗号隔开,其格式可以划分为scheme://IP:PORT,这里的scheme可以是http、https
listen-peer-urls: http://192.168.233.61:2380
# 该成员节点在整个集群中的通信地址列表,这个地址用来传输集群数据的地址。因此这个地址必须是可以连接集群中所有的成员的。
initial-advertise-peer-urls: http://192.168.233.61:2380
# 启动集群使, 使用静态连接方法, 定义每个 member 主机名 endpoint
initial-cluster: linux1=http://192.168.233.61:2380,linux2=http://192.168.233.62:2380,linux3=http://192.168.233.63:2380
# 用于标记集群唯一性的 token,每个节点要一样
initial-cluster-token: etcd-cluster-token
# 初始化集群状态,new表示新建
initial-cluster-state: new
linux1配置文件内容如下:
name: linux1
data-dir: /root/software/etcd-v3.5.4-linux-amd64/data
listen-client-urls: http://192.168.159.200:2379
advertise-client-urls: http://192.168.159.200:2379
listen-peer-urls: http://192.168.159.200:2380
initial-advertise-peer-urls: http://192.168.159.200:2380
initial-cluster: linux1=http://192.168.159.200:2380,linux2=http://192.168.159.201:2380,linux3=http://192.168.159.202:2380
initial-cluster-token: etcd-cluster-token
initial-cluster-state: new
linux2配置文件内容如下:
name: linux2
data-dir: /root/software/etcd-v3.5.4-linux-amd64/data
listen-client-urls: http://192.168.159.201:2379
advertise-client-urls: http://192.168.159.201:2379
listen-peer-urls: http://192.168.159.201:2380
initial-advertise-peer-urls: http://192.168.159.201:2380
initial-cluster: linux1=http://192.168.159.200:2380,linux2=http://192.168.159.201:2380,linux3=http://192.168.159.202:2380
initial-cluster-token: etcd-cluster-token
initial-cluster-state: new
linux3配置文件内容如下:
name: linux3
data-dir: /root/software/etcd-v3.5.4-linux-amd64/data
listen-client-urls: http://192.168.159.202:2379
advertise-client-urls: http://192.168.159.202:2379
listen-peer-urls: http://192.168.159.202:2380
initial-advertise-peer-urls: http://192.168.159.202:2380
initial-cluster: linux1=http://192.168.159.200:2380,linux2=http://192.168.159.201:2380,linux3=http://192.168.159.202:2380
initial-cluster-token: etcd-cluster-token
initial-cluster-state: new
2.2.3 启动etcd集群
在每个节点执行如下命令
./etcd --config-file /root/software/etcd-v3.5.4-linux-amd64/conf/etcd-conf.yml
2.2.4 查看集群成员信息
./etcdctl --endpoints=http://192.168.159.200:2379,http://192.168.159.201:2379,http://192.168.159.202:2379 member list --write-out=table

2.2.5 查看集群状态
./etcdctl --endpoints=http://192.168.159.200:2379,http://192.168.159.201:2379,http://192.168.159.202:2379 endpoint status --write-out=table

2.2.6 查看集群健康信息
./etcdctl --endpoints=http://192.168.159.200:2379,http://192.168.159.201:2379,http://192.168.159.202:2379 endpoint health --write-out=table

3 etcd集群减容与缩容
3.1 减容
3.1.1 插入数据
./etcdctl --endpoints=http://192.168.159.200:2379,http://192.168.159.201:2379,http://192.168.159.202:2379 put k1 v1
查看是否插入成功
./etcdctl --endpoints=http://192.168.159.200:2379,http://192.168.159.201:2379,http://192.168.159.202:2379 get k1

3.1.2 执行减容
# 查看减容节点的MEMBER_ID
./etcdctl --endpoints=http://192.168.159.200:2379,http://192.168.159.201:2379,http://192.168.159.202:2379 member list --write-out=table
# 删除MEMBER_ID
./etcdctl --endpoints=http://192.168.159.200:2379,http://192.168.159.201:2379,http://192.168.159.202:2379 member remove ${MEMBER_ID}
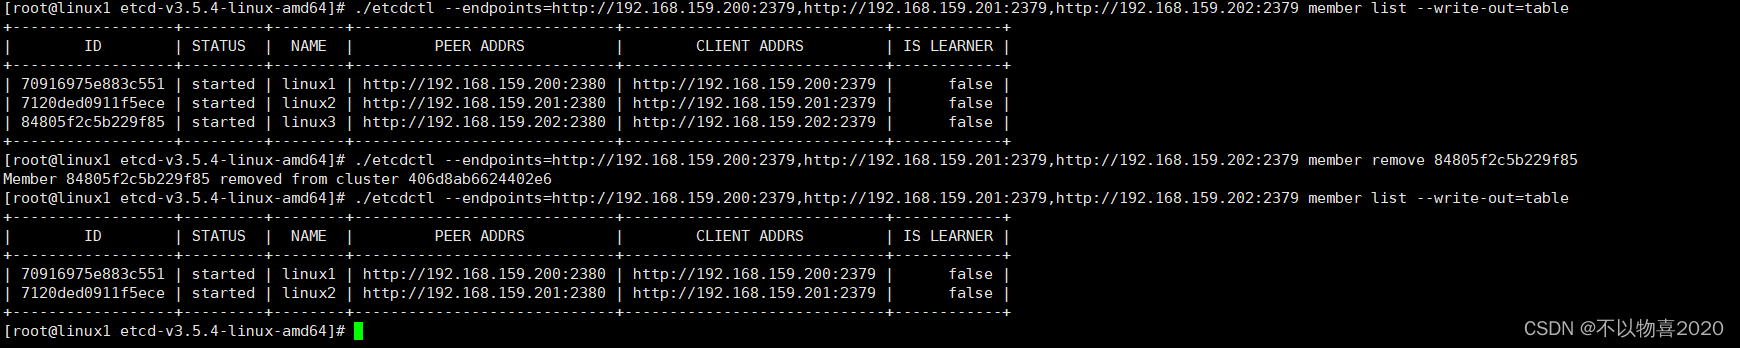
查看集群成员状态
./etcdctl --endpoints=http://192.168.159.200:2379,http://192.168.159.201:2379 endpoint status --write-out=table

查看集群健康状态
./etcdctl --endpoints=http://192.168.159.200:2379,http://192.168.159.201:2379 endpoint health --write-out=table

3.1.3 数据验证
./etcdctl --endpoints=http://192.168.159.200:2379,http://192.168.159.201:2379 get k1

3.2 集群扩容
3.2.1 扩容节点编写配置文件
注意:–initial-cluster-state existing
name: linux3
data-dir: /root/software/etcd-v3.5.4-linux-amd64/data
listen-client-urls: http://192.168.159.202:2379
advertise-client-urls: http://192.168.159.202:2379
listen-peer-urls: http://192.168.159.202:2380
initial-advertise-peer-urls: http://192.168.159.202:2380
initial-cluster: linux1=http://192.168.159.200:2380,linux2=http://192.168.159.201:2380,linux3=http://192.168.159.202:2380
initial-cluster-token: etcd-cluster-token
initial-cluster-state: existing
3.2.2 执行扩容操作
./etcdctl --endpoints=http://192.168.159.200:2379,http://192.168.159.201:2379 member add linux3 --peer-urls=http://192.168.159.202:2380

3.2.3 扩容节点启动etcd服务
./etcd --config-file /root/software/etcd-v3.5.4-linux-amd64/conf/etcd-conf.yml
3.2.4 查看集群成员信息
./etcdctl --endpoints=http://192.168.159.200:2379,http://192.168.159.201:2379,http://192.168.159.202:2379 member list --write-out=table
注意:减容后的202节点,重新扩容回集群,需要删除202节点上之前的节点存储目录。
3.2.5 查看集群集群状态和健康信息
./etcdctl --endpoints=http://192.168.159.200:2379,http://192.168.159.201:2379,http://192.168.159.202:2379 endpoint status --write-out=table

./etcdctl --endpoints=http://192.168.159.200:2379,http://192.168.159.201:2379,http://192.168.159.202:2379 endpoint health --write-out=table

3.2.6 数据验证
./etcdctl --endpoints=http://192.168.159.200:2379,http://192.168.159.201:2379,http:192.168.159.202:2379 get k1

4 数据备份和恢复
4.1 备份数据
4.1.1 插入数据
./etcdctl --endpoints=http://192.168.159.200:2379,http://192.168.159.201:2379,http://192.168.159.202:2379 put test1 value1
./etcdctl --endpoints=http://192.168.159.200:2379,http://192.168.159.201:2379,http://192.168.159.202:2379 put test2 value2
./etcdctl --endpoints=http://192.168.159.200:2379,http://192.168.159.201:2379,http://192.168.159.202:2379 put test3 value3

4.1.2 开始备份数据
./etcdctl --endpoints=http://192.168.159.200:2379 snapshot save /opt/bakup.db

4.1.3 数据量查看
./etcdctl --write-out=table --endpoints=http://192.168.159.200:2379,http://192.168.159.201:2379,http://192.168.159.202:2379 snapshot status /opt/bakup.db

4.2 数据恢复
4.2.1 删除数据
./etcdctl --endpoints=http://192.168.159.200:2379,http://192.168.159.201:2379,http://192.168.159.202:2379 del test1
./etcdctl --endpoints=http://192.168.159.200:2379,http://192.168.159.201:2379,http://192.168.159.202:2379 del test2
./etcdctl --endpoints=http://192.168.159.200:2379,http://192.168.159.201:2379,http://192.168.159.202:2379 del test3
4.2.2 查看数据是否删除
./etcdctl --endpoints=http://192.168.159.200:2379,http://192.168.159.201:2379,http:192.168.159.202:2379 get test1
./etcdctl --endpoints=http://192.168.159.200:2379,http://192.168.159.201:2379,http:192.168.159.202:2379 get test2
./etcdctl --endpoints=http://192.168.159.200:2379,http://192.168.159.201:2379,http:192.168.159.202:2379 get test3

4.2.3 数据导入
将备份文件bakup.db拷贝到集群所有节点,并在每个节点执行如下命令。
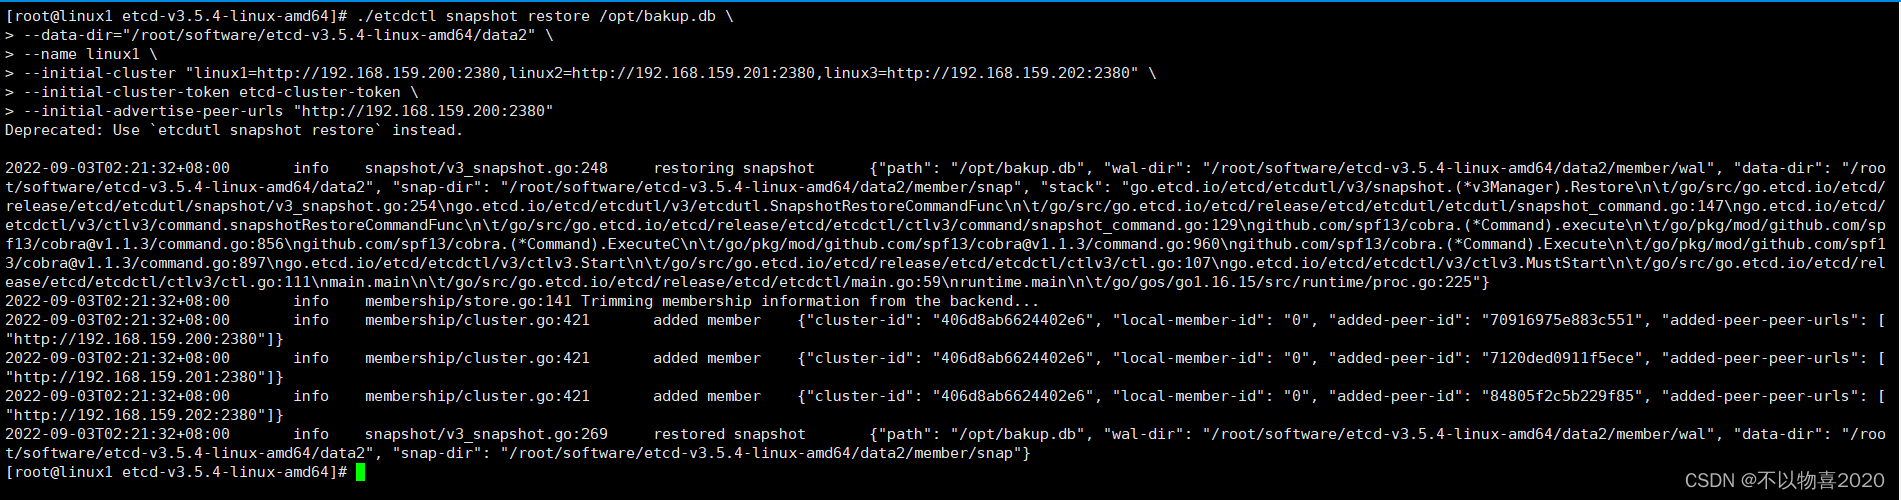
linux1
./etcdctl snapshot restore /opt/bakup.db \
--data-dir="/root/software/etcd-v3.5.4-linux-amd64/data2" \
--name linux1 \
--initial-cluster "linux1=http://192.168.159.200:2380,linux2=http://192.168.159.201:2380,linux3=http://192.168.159.202:2380" \
--initial-cluster-token etcd-cluster-token \
--initial-advertise-peer-urls "http://192.168.159.200:2380"
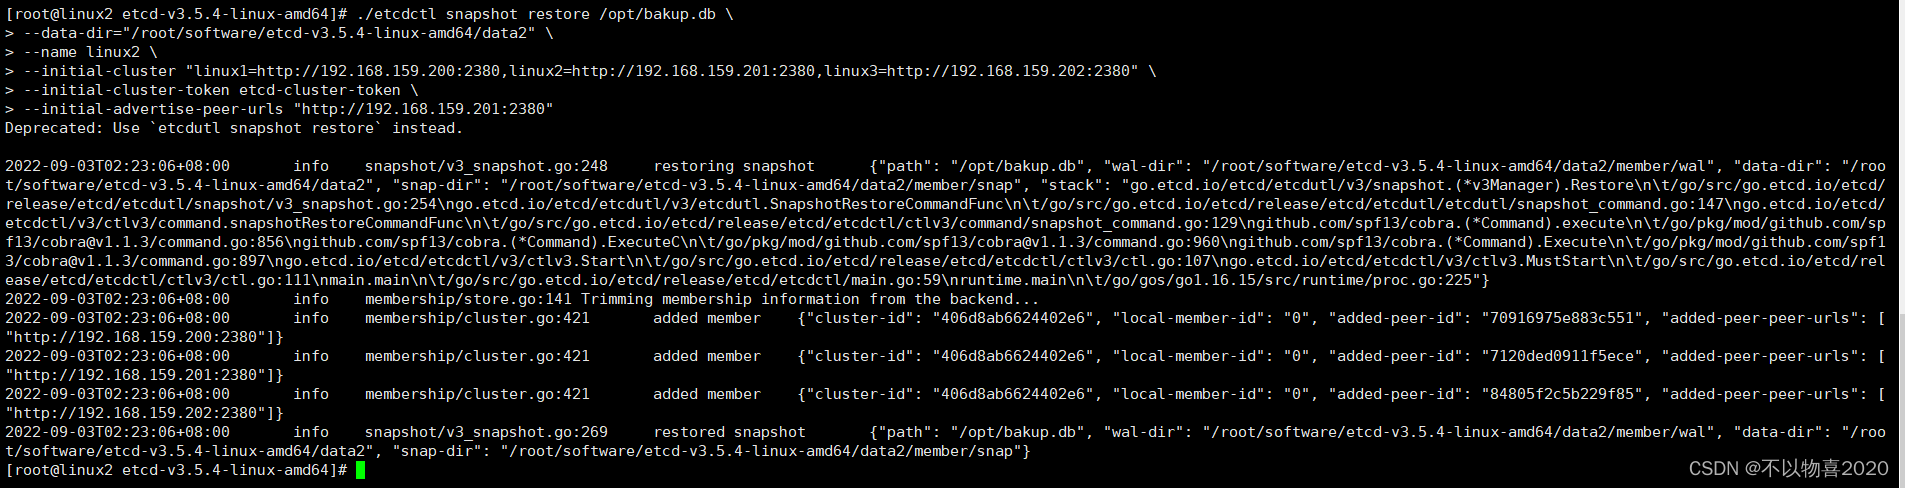
linux2
./etcdctl snapshot restore /opt/bakup.db \
--data-dir="/root/software/etcd-v3.5.4-linux-amd64/data2" \
--name linux2 \
--initial-cluster "linux1=http://192.168.159.200:2380,linux2=http://192.168.159.201:2380,linux3=http://192.168.159.202:2380" \
--initial-cluster-token etcd-cluster-token \
--initial-advertise-peer-urls "http://192.168.159.201:2380"
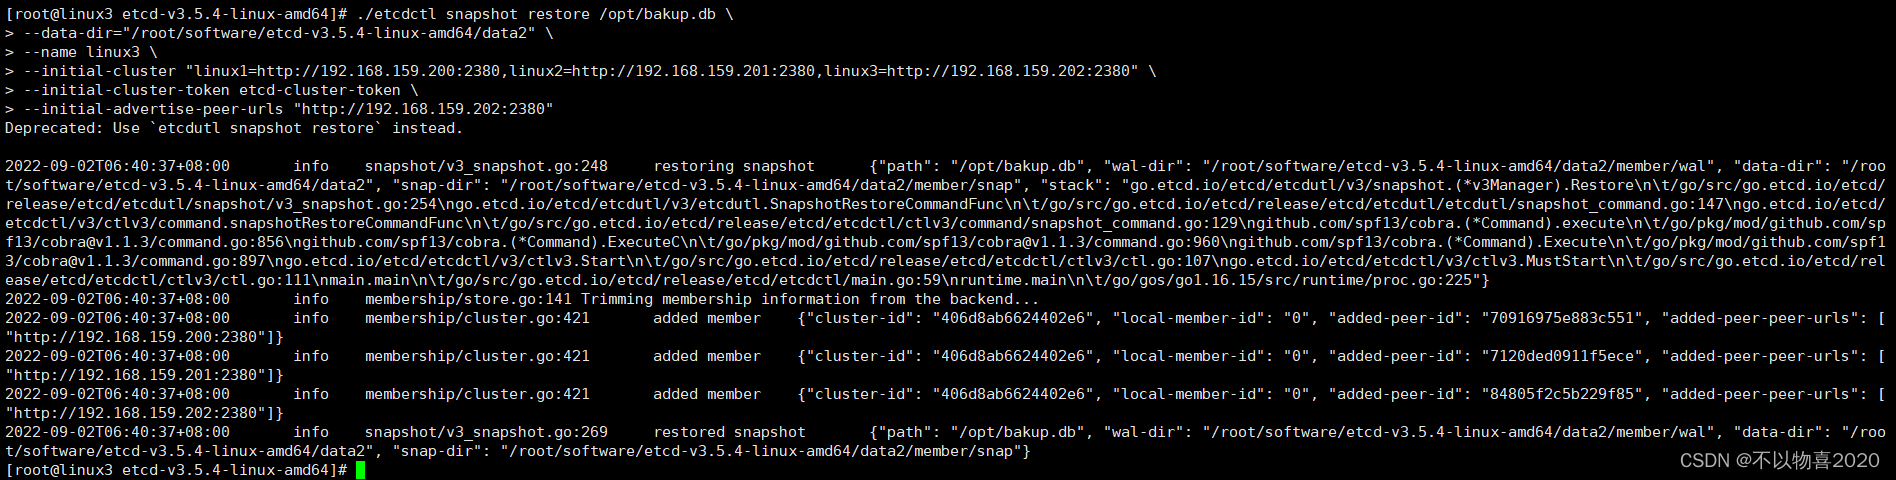
linux3
./etcdctl snapshot restore /opt/bakup.db \
--data-dir="/root/software/etcd-v3.5.4-linux-amd64/data2" \
--name linux3 \
--initial-cluster "linux1=http://192.168.159.200:2380,linux2=http://192.168.159.201:2380,linux3=http://192.168.159.202:2380" \
--initial-cluster-token etcd-cluster-token \
--initial-advertise-peer-urls "http://192.168.159.202:2380"
4.2.4 停止集群所有节点的etcd服务
4.2.5 启动新的目录启etcd服务
需修改配置文件etcd-conf.yml中的数据存储目录

4.2.6 数据验证
./etcdctl --endpoints=http://192.168.159.200:2379,http://192.168.159.201:2379,http:192.168.159.202:2379 get test1
./etcdctl --endpoints=http://192.168.159.200:2379,http://192.168.159.201:2379,http:192.168.159.202:2379 get test2
./etcdctl --endpoints=http://192.168.159.200:2379,http://192.168.159.201:2379,http:192.168.159.202:2379 get test3

5 常见操作
5.1 插入数据和获取数据
# 插入数据
etcdctl --endpoints=$ENDPOINTS put web1 value1
etcdctl --endpoints=$ENDPOINTS put web2 value2
etcdctl --endpoints=$ENDPOINTS put web3 value3

# 根据前缀获取数据
etcdctl --endpoints=$ENDPOINTS get web --prefix
例子:
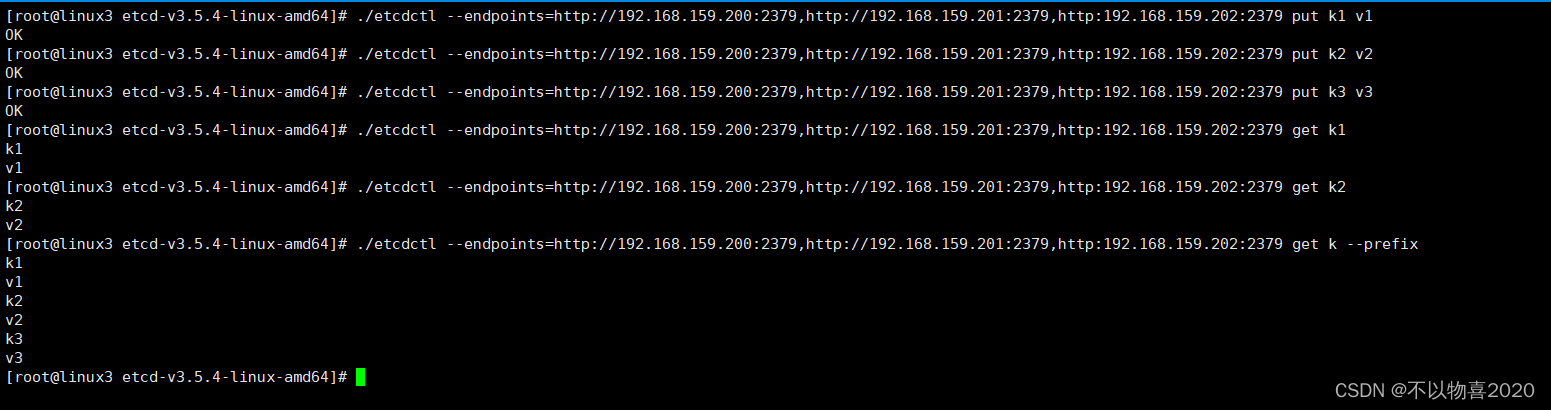
# 插入数据
./etcdctl --endpoints=http://192.168.159.200:2379,http://192.168.159.201:2379,http:192.168.159.202:2379 put k1 v1
./etcdctl --endpoints=http://192.168.159.200:2379,http://192.168.159.201:2379,http:192.168.159.202:2379 put k2 v2
./etcdctl --endpoints=http://192.168.159.200:2379,http://192.168.159.201:2379,http:192.168.159.202:2379 put k3 v3

# 获取单条数据
./etcdctl --endpoints=http://192.168.159.200:2379,http://192.168.159.201:2379,http:192.168.159.202:2379 get k1

# 根据前缀获取数据
./etcdctl --endpoints=http://192.168.159.200:2379,http://192.168.159.201:2379,http:192.168.159.202:2379 get k --prefix
5.2 删除数据
etcdctl --endpoints=$ENDPOINTS put key myvalue
etcdctl --endpoints=$ENDPOINTS del key

etcdctl --endpoints=$ENDPOINTS put k1 value1
etcdctl --endpoints=$ENDPOINTS put k2 value2
etcdctl --endpoints=$ENDPOINTS del k --prefix
例子:
# 插入数据
./etcdctl --endpoints=http://192.168.159.200:2379,http://192.168.159.201:2379,http:192.168.159.202:2379 put key myvalue
# 删除数据
./etcdctl --endpoints=http://192.168.159.200:2379,http://192.168.159.201:2379,http:192.168.159.202:2379 del key
# 获取数据
./etcdctl --endpoints=http://192.168.159.200:2379,http://192.168.159.201:2379,http:192.168.159.202:2379 get key

# 插入2条数据
./etcdctl --endpoints=http://192.168.159.200:2379,http://192.168.159.201:2379,http:192.168.159.202:2379 put k1 value1
./etcdctl --endpoints=http://192.168.159.200:2379,http://192.168.159.201:2379,http:192.168.159.202:2379 put k2 value2
# 根据前缀删除数据
./etcdctl --endpoints=http://192.168.159.200:2379,http://192.168.159.201:2379,http:192.168.159.202:2379 del k --prefix
# 获取数据
./etcdctl --endpoints=http://192.168.159.200:2379,http://192.168.159.201:2379,http:192.168.159.202:2379 get k1
./etcdctl --endpoints=http://192.168.159.200:2379,http://192.168.159.201:2379,http:192.168.159.202:2379 get k2

5.3 事务操作
etcdctl --endpoints=$ENDPOINTS put user1 bad
etcdctl --endpoints=$ENDPOINTS txn --interactive

compares:
value("user1") = "bad"

success requests (get, put, delete):
del user1

failure requests (get, put, delete):
put user1 good
例子:
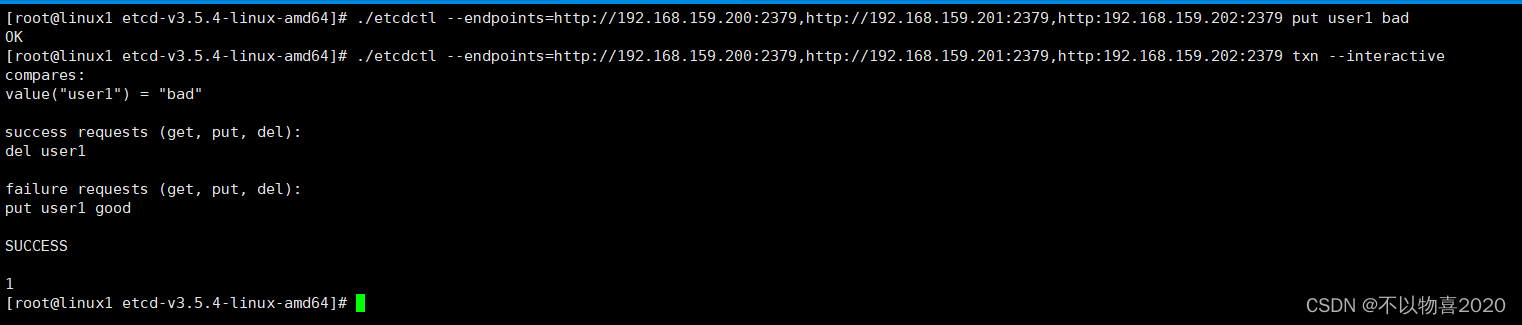
# 插入数据
./etcdctl --endpoints=http://192.168.159.200:2379,http://192.168.159.201:2379,http:192.168.159.202:2379 put user1 bad
# 开启事务
./etcdctl --endpoints=http://192.168.159.200:2379,http://192.168.159.201:2379,http:192.168.159.202:2379 txn --interactive
compares:
value("user1") = "bad"

success requests (get, put, del):
del user1

failure requests (get, put, del):
put user1 good

SUCCESS
5.4 监控某个值
etcdctl --endpoints=$ENDPOINTS watch stock1
etcdctl --endpoints=$ENDPOINTS put stock1 1000

etcdctl --endpoints=$ENDPOINTS watch stock --prefix
etcdctl --endpoints=$ENDPOINTS put stock1 10
etcdctl --endpoints=$ENDPOINTS put stock2 20
例子:
# 设置stock1的值,默认值为0
./etcdctl --endpoints=http://192.168.159.200:2379,http://192.168.159.201:2379,http:192.168.159.202:2379 put stock1 0
# 监控key为stock1的值
./etcdctl --endpoints=http://192.168.159.200:2379,http://192.168.159.201:2379,http:192.168.159.202:2379 watch stock1

# 修改stock1的值
./etcdctl --endpoints=http://192.168.159.200:2379,http://192.168.159.201:2379,http:192.168.159.202:2379 put stock1 1000

./etcdctl --endpoints=http://192.168.159.200:2379,http://192.168.159.201:2379,http:192.168.159.202:2379 put stock1 1001


前缀值监控:
# 前缀值监控
# 设置chen1的值,默认值为0
./etcdctl --endpoints=http://192.168.159.200:2379,http://192.168.159.201:2379,http:192.168.159.202:2379 put chen1 0
# 设置chen2的值,默认为1
./etcdctl --endpoints=http://192.168.159.200:2379,http://192.168.159.201:2379,http:192.168.159.202:2379 put chen2 1
# 监控前缀为chen的值
./etcdctl --endpoints=http://192.168.159.200:2379,http://192.168.159.201:2379,http:192.168.159.202:2379 watch chen --prefix

# 修改chen1和chen2的值
./etcdctl --endpoints=http://192.168.159.200:2379,http://192.168.159.201:2379,http:192.168.159.202:2379 put chen1 10
./etcdctl --endpoints=http://192.168.159.200:2379,http://192.168.159.201:2379,http:192.168.159.202:2379 put chen2 20


5.5创建租约
grant		Creates leases
keep-alive	Keeps leases alive (renew)
list		List all active leases
revoke		Revokes leases
timetolive	Get lease information

etcdctl --endpoints=$ENDPOINTS lease grant 300
# lease 2be7547fbc6a5afa granted with TTL(300s)

etcdctl --endpoints=$ENDPOINTS put sample value --lease=2be7547fbc6a5afa
etcdctl --endpoints=$ENDPOINTS get sample

etcdctl --endpoints=$ENDPOINTS lease keep-alive 2be7547fbc6a5afa
etcdctl --endpoints=$ENDPOINTS lease revoke 2be7547fbc6a5afa
# or after 300 seconds
etcdctl --endpoints=$ENDPOINTS get sample
例子:
# 创建租约
./etcdctl --endpoints=http://192.168.159.200:2379,http://192.168.159.201:2379,http:192.168.159.202:2379 lease grant 300
# lease 5ece82ff7769d712 granted with TTL(300s)
# 给某个值赋予租约
./etcdctl --endpoints=http://192.168.159.200:2379,http://192.168.159.201:2379,http:192.168.159.202:2379 put sample value --lease=5ece82ff7769d712

# 查看租约剩余时间
./etcdctl --endpoints=http://192.168.159.200:2379,http://192.168.159.201:2379,http:192.168.159.202:2379 lease timetolive 5ece82ff7769d712
# 租约时间到后无法查询其值

在租约有效期时间内可以正常查看其值

租约时间失效后,无法正常查看其值

如果在截止时间结束后再续约,则会报错,表示该租约以过期,不能继续续约

# 创建租约
./etcdctl --endpoints=http://192.168.159.200:2379,http://192.168.159.201:2379,http:192.168.159.202:2379 lease grant 100
# lease 455182ff7785601a granted with TTL(300s)
# 查看租约剩余时间
./etcdctl --endpoints=http://192.168.159.200:2379,http://192.168.159.201:2379,http:192.168.159.202:2379 lease timetolive 455182ff7785601a

# 续租约
./etcdctl --endpoints=http://192.168.159.200:2379,http://192.168.159.201:2379,http:192.168.159.202:2379 lease keep-alive 455182ff7785601a

# 查看租约剩余时间
./etcdctl --endpoints=http://192.168.159.200:2379,http://192.168.159.201:2379,http:192.168.159.202:2379 lease timetolive 455182ff7785601a

# 删除租约
./etcdctl --endpoints=http://192.168.159.200:2379,http://192.168.159.201:2379,http:192.168.159.202:2379 lease revoke 455182ff7785601a
# 获取值
./etcdctl --endpoints=http://192.168.159.200:2379,http://192.168.159.201:2379,http:192.168.159.202:2379 get sample

5.6 创建锁
tcdctl --endpoints=$ENDPOINTS lock mutex1

# another client with the same name blocks
etcdctl --endpoints=$ENDPOINTS lock mutex1
例子:
# 创建一个锁
./etcdctl --endpoints=http://192.168.159.200:2379,http://192.168.159.201:2379,http:192.168.159.202:2379 lock mutex1

# 其他节点也去访问这个锁住的节点没有返回
./etcdctl --endpoints=http://192.168.159.200:2379,http://192.168.159.201:2379,http:192.168.159.202:2379 lock mutex1


我们将节点1关闭,发现节点2获取锁

