目录
1. 读源码
读源码千万不能一行一行读啊,不然你就看晕在那里了,
我们先从核心框架开始抓取,比如说先找到 list 在哪:

然后老规矩,我们先找他的成员变量:
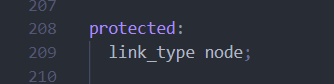
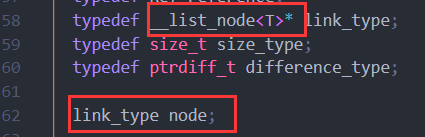
那我们就来找找这个 link_type 是什么:

link_type 是 list_node*,list_node 是一个类类型,那我就知道了,
成员变量 node 就是链表的一个节点指针。
那问题又来了,有单链表,双链表,带头的链表等等,库里实现的是什么链表呢?
我们需要确定他的结构,还是老样子,我们先从构造函数和插入(核心)接口开始看:

我们先看看这个无参的构造是怎么实现的:
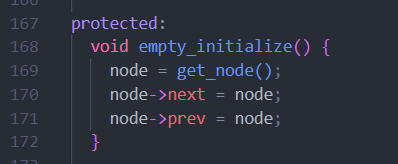
他先 get_node() 获取一个节点,然后再两个指针指向自己,
那我们基本就能确定这是一个带头双向循环的链表了。
那我们奖励自己再看一眼他的 get_node() 吧

我们就可以看到他是通过空间配置器的接口开空间了,
再往下看其实就是定位 new 的那一套操作了。
我们继续接着来看 push_back() 接口是怎么样的:

我们可以看到,他这里就是复用的 insert,在 end() 位置插入,
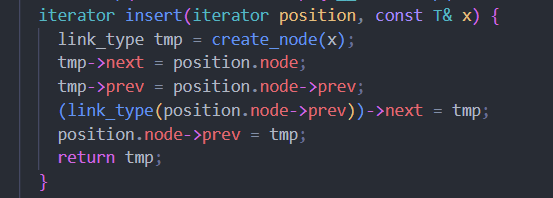
他这里调用的就是这个 insert 的重载,就是普通的插入操作。
最后我们再来瞅一眼 node 这个节点类库里是怎么定义的:

他这里用了 void* 作为他的类型,我比较菜,不太懂这样做有什么妙用,
我就不这么麻烦去用 void* 作为我的指针类型了,不然之后每次用都得强转,我用 T* 就好了。
那么源码看到这里就差不多了,框架看的差不多了,到时候有问题再来看细节。
2. 框架搭建
框架搭建主要就是把 list 的核心框架搭建出来,让代码快速跑起来:
#pragma once

#include <iostream>
#include <list>

#include <assert.h>

using namespace std;

namespace xl {
	template<class T>
	struct list_node {
		list_node<T>* _next;
		list_node<T>* _prev;
		T _val;

		list_node(const T& val = T())
			: _next(nullptr)
			, _prev(nullptr)
			, _val(val)
		{}
	};

	template<class T>
	class list {
	public:
		typedef list_node<T> Node;

	private:
		Node* _head;

	public:
		list()
		{
			_head = new Node;
			_head->_next = _head;
			_head->_prev = _head;
		}

	public:
		void push_back(const T& x) {
			Node* tail = _head->_prev;
			Node* newnode = new Node;

			tail->_next = newnode;
			newnode->_prev = tail;
			newnode->_next = _head;
			_head->_prev = newnode;
		}

	};
}
这里我们实现了 list 的节点,以及 list 的构造函数和尾插接口,
来看看测试:
#include "list.h"

void test1() {
	xl::list<int> lt1;
	lt1.push_back(1);
	lt1.push_back(2);
	lt1.push_back(3);
	lt1.push_back(4);

}

int main()
{
	test1();

	return 0;
}
通过调试来看结果:
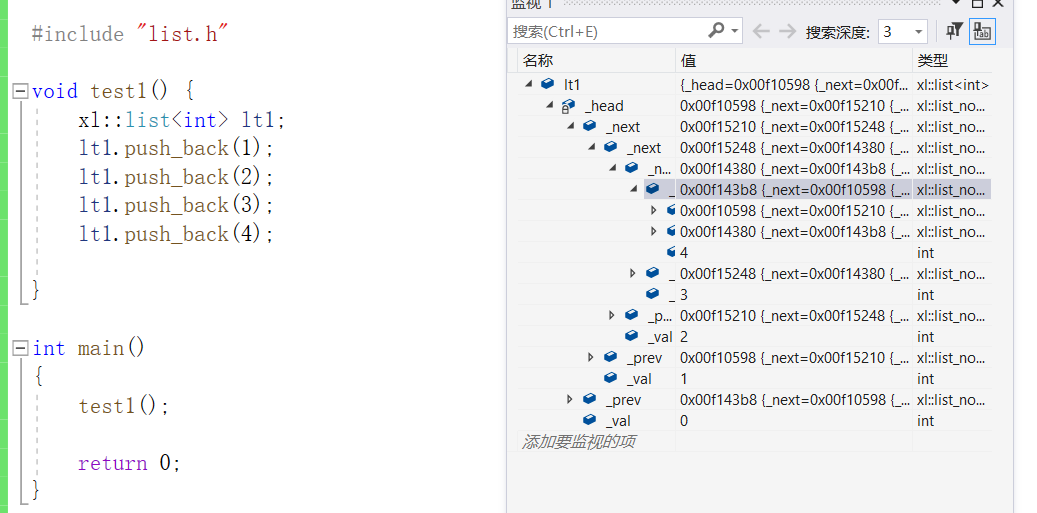
我们确实是插入了 4 个节点,
你有没有觉得少了点什么,之前我们搭框架的时候都会实现一个基本的迭代器,
但是这次没有,问题来了, list 的迭代器很明显是不能用原生指针实现的,
毕竟你有见过链表能用指针或者说下标直接访问吗,那肯定是没见过,
那 list 的迭代器该怎么实现呢?
3. list 的迭代器
当我们不明白一件事情的时候,就去看源码是怎么做的:

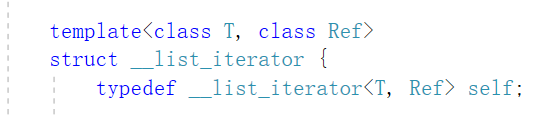
找到了,但是更迷惑了,怎会有三个模板参数啊,
先就此打住,我们一点一点慢慢看,他的类型是一个类模板,那我们先去找到这个类:

我们看到这里,发现他是用一个叫 __list_iterator 的类来封装他的迭代器,
而这个类的成员变量就是链表的节点:
那我们再来看看他的迭代器是怎么跑起来的(也就是++是怎么实现的)
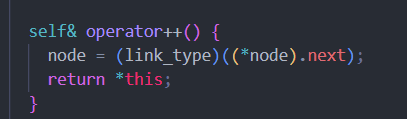
我们发现这不就是让 node = node->next 的操作吗。
再来看看解引用的操作:
![]()
不出所料确实就是返回该节点的值,
但是他这个返回值的类型 reference 是啥东东呢?

这个是他的一个模板参数,看来看去,这源码很复杂,又有许多意义不明的操作,
我们还是先根据大思路上手试一下,遇到问题了再来细看源码的实现。
在搭完基本的架子之后,我们遇到了第一个问题,
begin 和 end 该指向什么位置?我们来看看库:

库里的 begin 返回的是第一个节点,end 返回的是哨兵位的头结点,
所以我们就这样实现即可:
iterator begin() {
	return _head->_next;
}

iterator end() {
	return _head;
}
这个时候你可能又有疑问了,迭代器不是自定义类型吗?他怎么能返回节点的指针呢?
这就又用到我们前面学的知识了:单参数的构造函数支持隐式类型转换:
__list_iterator(Node* node)
	: _node(node)
{}
是的,我们在迭代器的类里实现了这样一个东西。
然后我们再把解引用实现了:
T& operator*() {
	return _node->_val;
}
最后还剩 ++ 和 != 需要实现:
iterator operator++() {
	_node = _node->_next;
	return *this;
}

bool operator!=(iterator& it) {
	return _node != it._node;
}
这样我们的迭代器就跑通了,来看看测试:
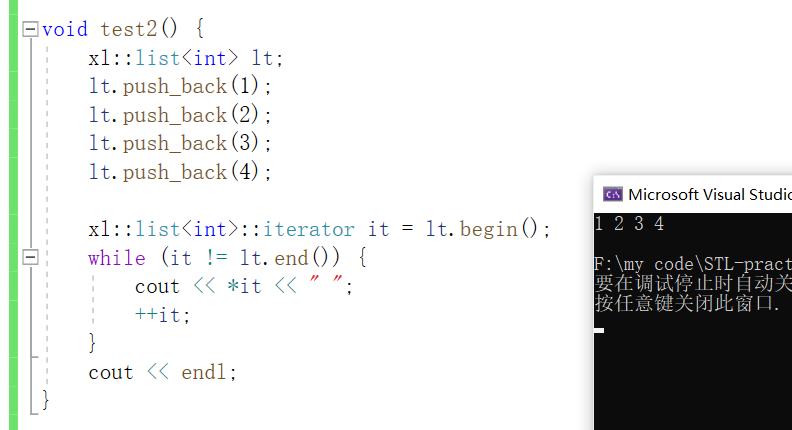
void test2() {
	xl::list<int> lt;
	lt.push_back(1);
	lt.push_back(2);
	lt.push_back(3);
	lt.push_back(4);

	xl::list<int>::iterator it = lt.begin();
	while (it != lt.end()) {
		cout << *it << " ";
		++it;
	}
	cout << endl;
}
输出:
这样我们的基本框架算是搭建完了:
#pragma once

#include <iostream>
#include <list>

#include <assert.h>

using namespace std;

namespace xl {
	template<class T>
	struct list_node {
		list_node<T>* _next;
		list_node<T>* _prev;
		T _val;

		list_node(const T& val = T())
			: _next(nullptr)
			, _prev(nullptr)
			, _val(val)
		{}
	};

	template<class T>
	struct __list_iterator {
		typedef __list_iterator<T> iterator;

		typedef list_node<T> Node;

		Node* _node;

		__list_iterator(Node* node)
			: _node(node)
		{}

		T& operator*() {
			return _node->_val;
		}

		iterator& operator++() {
			_node = _node->_next;
			return *this;
		}

		bool operator!=(const iterator& it) {
			return _node != it._node;
		}
	};

	template<class T>
	class list {
	public:
		typedef list_node<T> Node;

		typedef __list_iterator<T> iterator;

		iterator begin() {
			return _head->_next;
		}

		iterator end() {
			return _head;
		}

	private:
		Node* _head;

	public:
		list()
		{
			_head = new Node;
			_head->_next = _head;
			_head->_prev = _head;
		}

	public:
		void push_back(const T& x) {
			Node* tail = _head->_prev;
			Node* newnode = new Node(x);

			tail->_next = newnode;
			newnode->_prev = tail;
			newnode->_next = _head;
			_head->_prev = newnode;
		}

	};
}
所以这里我们可以得出一个小结论,
list 的迭代器是什么?他是通过对自定义类型的封装,改变了他的行为。
那我们继续,现在来设计实现一个 const 迭代器,
我们可以通过加 const 来完成这件事情:

如果我们想要重载一整份迭代器,那岂不是得重新写一份自定义的 const 迭代器?
那这样设计也太冗余了,凭空又多出一大坨代码,有没有什么更好的方法实现呢?
还记得我们一开始看库的时候,那两个意义不明的模板参数吗?

他们还是同一个类,但是传了不同的模板参数。
然后就增加了迭代器的模板参数:
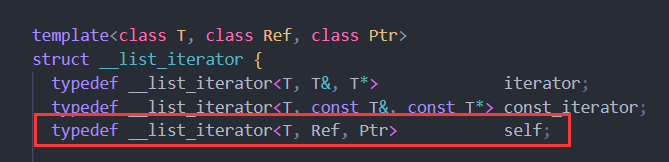
然后他这里就把迭代器重命名成了 self,我们就跟着库里的来:

首先是传模板参数这里,因为我们暂时只需要传 T* 给解引用的重载,
所以暂时先设置这两个模板参数:
实际上,这种做法和我们一开始否决的冗余写法没有本质上的区别,
因为模板的实例化就是再生成一段代码,只不过这个工作原本是由我们做,
使用模板之后变成让编译器帮我做了。
这里我把这个阶段的代码也放出来:
#pragma once

#include <iostream>
#include <list>

#include <assert.h>

using namespace std;

namespace xl {
	template<class T>
	struct list_node {
		list_node<T>* _next;
		list_node<T>* _prev;
		T _val;

		list_node(const T& val = T())
			: _next(nullptr)
			, _prev(nullptr)
			, _val(val)
		{}
	};

	template<class T, class Ref>
	struct __list_iterator {
		typedef __list_iterator<T, Ref> self;

		typedef list_node<T> Node;

		Node* _node;

		__list_iterator(Node* node)
			: _node(node)
		{}

		Ref operator*() {
			return _node->_val;
		}

		self& operator++() {
			_node = _node->_next;
			return *this;
		}

		self operator++(int) {
			self tmp(*this);
			_node = _node->_next;
			return tmp;
		}

		bool operator!=(const self& it) {
			return _node != it._node;
		}

		bool operator==(const self& it) {
			return _node != it._node;
		}
	};

	template<class T>
	class list {
	public:
		typedef list_node<T> Node;

		typedef __list_iterator<T, T&> iterator;
		typedef __list_iterator<T, const T&> const_iterator;

		iterator begin() {
			return _head->_next;
		}

		iterator end() {
			return _head;
		}

	private:
		Node* _head;

	public:
		list()
		{
			_head = new Node;
			_head->_next = _head;
			_head->_prev = _head;
		}

	public:
		void push_back(const T& x) {
			Node* tail = _head->_prev;
			Node* newnode = new Node(x);

			tail->_next = newnode;
			newnode->_prev = tail;
			newnode->_next = _head;
			_head->_prev = newnode;
		}

	};
}
这里新的问题又来了,为什么库里是有三个模板参数呢?
我们来看看:


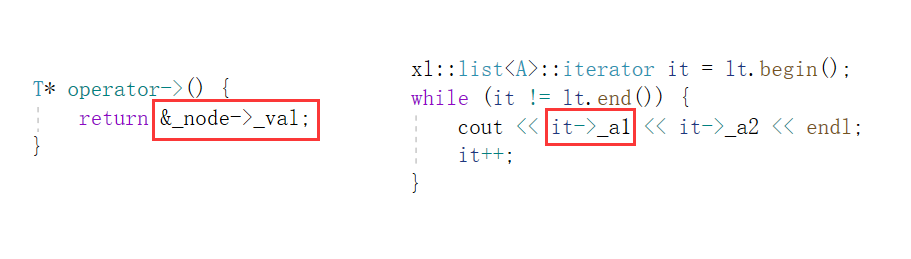
我们可以看到,还需要这个模板参数的是 -> 操作符的重载,
那事不宜迟,我们也来实现一下:
T* operator->() {
	return &_node->_val;
}
现在我们是正常的实现了这个操作符重载,
那这个操作符有什么应用场景吗?我们为什么要重载他?
来看这样一个场景:
struct A {
	A(int a1 = 0, int a2 = 0)
		: _a1(a1)
		, _a2(a2)
	{}

	int _a1;
	int _a2;
};

void test3() {
	xl::list<A> lt;
	lt.push_back({ 1, 1 });
	lt.push_back({ 2, 2 });
	lt.push_back({ 3, 3 });
	lt.push_back({ 4, 4 });

	xl::list<A>::iterator it = lt.begin();
	while (it != lt.end()) {
		cout << (*it)._a1 << (*it)._a2 << endl;
		it++;
	}
}
如果我们想取结构体内的成员,可以通过 (*it). 来取,
但是我们一般更喜欢使用 -> 直接取结构体成员:
struct A {
	A(int a1 = 0, int a2 = 0)
		: _a1(a1)
		, _a2(a2)
	{}

	int _a1;
	int _a2;
};

void test3() {
	xl::list<A> lt;
	lt.push_back({ 1, 1 });
	lt.push_back({ 2, 2 });
	lt.push_back({ 3, 3 });
	lt.push_back({ 4, 4 });

	xl::list<A>::iterator it = lt.begin();
	while (it != lt.end()) {
		cout << it->_a1 << it->_a2 << endl;
		it++;
	}
}
这个就是重载 -> 的意义。
但是,你有没有发现有一些不太对劲的地方?
这个函数返回的只是一个指针,而调用这个操作符重载需要一个 -> ,
然后,使用这个指针去调用结构体成员还需要一个 -> ,那为什么这里只有一个 -> 呢?
实际上是为了代码的可读性,编译器特殊处理让我们可以省略一个 -> 。
明白了这个之后,我们就再来添加一个模板参数给他用。
那这样我们的大框架总算是搭好了:
#pragma once

#include <iostream>
#include <list>

#include <assert.h>

using namespace std;

namespace xl {
	template<class T>
	struct list_node {
		list_node<T>* _next;
		list_node<T>* _prev;
		T _val;

		list_node(const T& val = T())
			: _next(nullptr)
			, _prev(nullptr)
			, _val(val)
		{}
	};

	template<class T, class Ref, class Ptr>
	struct __list_iterator {
		typedef __list_iterator<T, Ref, Ptr> self;

		typedef list_node<T> Node;

		Node* _node;

		__list_iterator(Node* node)
			: _node(node)
		{}

		Ref operator*() {
			return _node->_val;
		}

		Ptr operator->() {
			return &_node->_val;
		}

		self& operator++() {
			_node = _node->_next;
			return *this;
		}

		self operator++(int) {
			self tmp(*this);
			_node = _node->_next;
			return tmp;
		}

		bool operator!=(const self& it) {
			return _node != it._node;
		}

		bool operator==(const self& it) {
			return _node != it._node;
		}
	};

	template<class T>
	class list {
	public:
		typedef list_node<T> Node;

		typedef __list_iterator<T, T&, T*> iterator;
		typedef __list_iterator<T, const T&, const T*> const_iterator;

		iterator begin() {
			return _head->_next;
		}

		iterator end() {
			return _head;
		}

		const_iterator begin() const {
			return _head->_next;
		}

		const_iterator end() const {
			return _head;
		}

	private:
		Node* _head;

	public:
		list()
		{
			_head = new Node;
			_head->_next = _head;
			_head->_prev = _head;
		}

	public:
		void push_back(const T& x) {
			Node* tail = _head->_prev;
			Node* newnode = new Node(x);

			tail->_next = newnode;
			newnode->_prev = tail;
			newnode->_next = _head;
			_head->_prev = newnode;
		}

	};
}
4. list 的拷贝构造与赋值重载
拷贝构造
直接通过复用 push_back 来完成拷贝构造。
list(const list<T>& lt)
{
	_head = new Node;
	_head->_next = _head;
	_head->_prev = _head;

	for (auto& e : lt) {
		push_back(e);
	}
}
赋值重载
我们就直接用现代写法实现,还能顺便把 swap 函数提供了:
void swap(list<T>& lt) { ::swap(_head, lt._head); }
list<T>& opeartor = (list<T> lt)
{
swap(lt);
return *this;
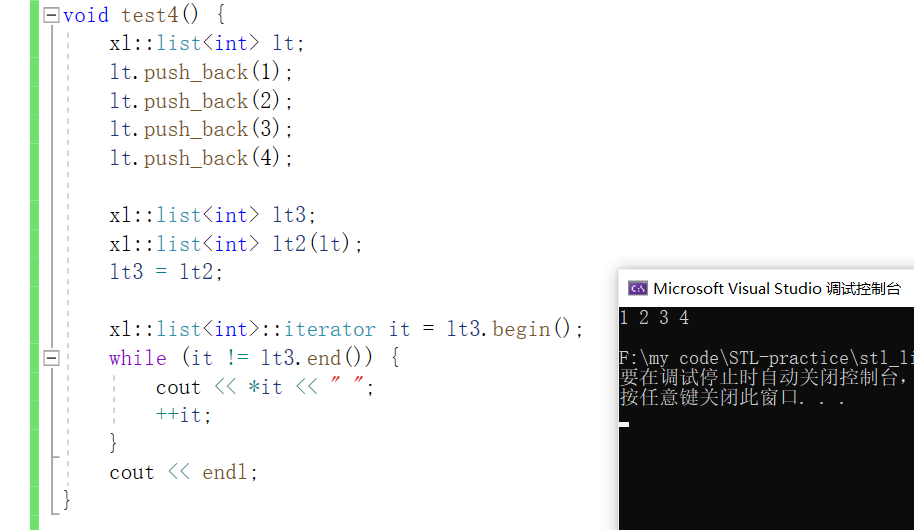
}我们可以来集中测试一下:
void test4() {
	xl::list<int> lt;
	lt.push_back(1);
	lt.push_back(2);
	lt.push_back(3);
	lt.push_back(4);

	xl::list<int> lt3;
	xl::list<int> lt2(lt);
	lt3 = lt2;

	xl::list<int>::iterator it = lt3.begin();
	while (it != lt3.end()) {
		cout << *it << " ";
		++it;
	}
	cout << endl;
}
输出:
5. list 的常见重要接口实现
operator--()
self& operator--() {
	_node = _node->_prev;
	return *this;
}

self operator--(int) {
	self tmp(*this);
	_node = _node->_prev;
	return tmp;
}
insert 接口
我们先实现 insert 和 erase 接口,之后直接复用就好了:
// pos 位置之前插入
iterator insert(iterator pos, const T& x) {
	Node* cur = pos._node;
	Node* prev = cur->_prev;
	Node* newnode = new Node(x);

	prev->_next = newnode;
	newnode->_next = cur;

	cur->_prev = newnode;
	newnode->_prev = cur;

	return newnode;
}
erase 接口
iterator erase(iterator pos) {
	assert(pos != end);

	Node* cur = pos._node;
	Node* prev = cur->_prev;
	Node* next = cur->_next;

	prev->_next = next;
	next->_prev = prev;

	delete cur;

	return next;
}
剩下的通通复用~
push_back 接口
void push_back(const T& x) {
	insert(end(), x);
}
push_front 接口
void push_front(const T& x) {
	insert(begin(), x);
}
pop_back 接口
void pop_back() {
	erase(--end());
}
pop_front 接口
void pop_front() {
	erase(begin());
}
不知道你爽了没,反正我爽了,现在就再来一些常见接口:
size 接口
我们直接用迭代器来计数:
size_t size() {
	size_t sz = 0;
	iterator it = begin();
	while (it != end()) {
		sz++;
		it++;
	}
	return sz;
}
clear 接口
清理所有的数据,直接复用 erase:
void clear() {
	iterator it = begin();
	while (it != end()) {
		it = erase(it);
	}
}
对了,差点忘了析构函数还没定义:
别忘了析构函数
直接复用 clear:
~list()
{
	clear();
	delete _head;
	_head = nullptr;
}
源码分享
Gitee链接:模拟实现简易STL: 模拟实现简易STL (gitee.com)
写在最后:
以上就是本篇文章的内容了,感谢你的阅读。
如果感到有所收获的话可以给博主点一个赞哦。
如果文章内容有遗漏或者错误的地方欢迎私信博主或者在评论区指出~