众所周知,vue 是一个没有强大后台支撑,纯靠用户使用起飞的框架。
现在 vue 是火的一批,在很多优秀的框架成熟的情况下,硬是撑起了前端的半片天。
那么,vue 更新日新月异,一个好的项目系统对开发和维护都如虎添翼,后期维护更是不要太爽,那么如何搭建一个健壮的 vue3 项目呢?
github地址:https://github.com/zhengyimeng/vue-model
↑ 希望大家直接看项目,看完再看内容,不会就评论,因为我文章写的不全
首先我们现在基本上都是采用 @vue/cli 搭建项目,执行 vue create my-app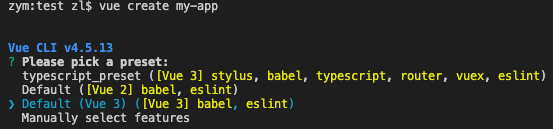
创建ok,需要考虑
1. css 样式编写 —— 一般来说 .css 写起来不舒服
2. router 路由器系统 —— 单页面应用必备系统
3. store 公共存储系统 —— 公共数据存储,节流还能在任何组件中使用
4. request 后台交互系统 —— ajax || fetch || axios 的封装
5. language 语言系统 —— 语言切换,国际化
6. utils 公共方法 —— 龙套,就是穿插在项目中的体力工
7. config 公共配置 —— 一些常量
好的,知道了这些之后,我们就可以开始创建了,以刚才 @vue/cli 创建的项目为模板
1. css
我们先加入 stylus-loader(目前最好的样式处理器) 处理器用来编写样式
yarn add -D stylus stylus-loader@^3
// 这里注意一下 @vue/cli 内置使用的 stylus-loader 是 3.x.x 版本,高版本可能会报错
因为之后需要用到 stylus 的变量,所以我们在 my-app/src 目录下创建 variables.styl 文件来放一些初始的 css 变量和方法。
variables.styl
// Color
$brand-color = #409EFF
$success-color = #67C23A
$warning-color = #E6A23C
$danger-color = #F56C6C
$info-color = #909399

// Font Color
$font-main = #303133
$font-plain = #606266
$font-second = #909399
$placeholder = #C0C4CC

// Border Color
$border-1 = #DCDFE6
$border-2 = #E4E7ED
$border-3 = #EBEEF5
$border-4 = #F2F6FC

// Base Color
$black = #000000
$white = #ffffff

// Border Style
$small-border-radius = 2px
$big-border-radius = 4px

// Box Shadow
$base-box-shadow = 0 2px 4px rgba(0, 0, 0, .12), 0 0 6px rgba(0, 0, 0, .04)
$tint-box-shaodw = 0 2px 12px 0 rgba(0, 0, 0, 0.1)

// Dialog Style
$dialog(width = 400, height = 400)
  _width = unit(width, px)
  _height = unit(height, px)
  width _width
  height _height
  box-shadow $base-box-shadow
我一般用的就是这几个,可以根据自己需要的变量添加,那么我们既然需要在全局使用这些变量,就需要配置一下 vue.config.js 了
我们在 my-app 根目录添加文件 vue.config.js
vue.config.js
const path = require('path')

module.exports = {
  publicPath: '/',
  css: {
    loaderOptions: {
      stylus: {
        import: [path.join(__dirname, 'src/variables.styl')]
      }
    }
  }
}
这样 stylus 就算是配置完成了,使用方法很简单,在 .vue 文件中
<style lang="stylus" scoped>
  .message
    color $success-color

  .dialog
    $dialog()
</style>
2. router
router 相对来说就比较简单了,对着 vue-router 文档无脑操作就可以
我们先下载 vue-rotuer
yarn add vue-router
在 my-app/src 目录下创建 router/index.js
import { createRouter, createWebHistory, RouteRecordRaw } from 'vue-router'
import Login from '@/views/login/index.vue'
import { getRoutes } from './routes'

const systemRoutes = getRoutes()

// 公共路由(不需要登录)
export const adminRoutes = [
  {
    path: '/login',
    name: 'Login',
    meta: { title: 'Login' },
    component: Login
  }
]

// 默认 route
const routes = [
  ...adminRoutes,
  ...systemRoutes,
  {
    path: '/',
    redirect: '/home'
  },
  {
    path: '/:pathMatch(.*)*',
    name: '404',
    meta: { title: '404' },
    component: () => import('../views/error-page/404.vue')
  }
]

const router = createRouter({
  history: createWebHistory(process.env.BASE_URL),
  routes
})

export function setRoutes(routes) {
  routes.forEach(route => router.addRoute(route))
}

export default router
上边可以看到,我的 router 一般会分开保存,这样很容易维护,我们在 router 文件夹下创建 routes.js
routes.js
import { RouteRecordRaw } from 'vue-router'
import Layout from '@/layout/index.vue'

// 管理页面路由
const manageRoutes = [
  {
    path: '/home',
    name: 'Home',
    component: Layout,
    meta: { title: 'Home', icon: 'home' },
    children: [
      { path: '', component: () => import('../views/home/manage.vue') }
    ]
  },
  // ...
]

// 其他路由
const otherRoutes = [
  {
    path: '/home',
    name: 'Home',
    component: Layout,
    meta: { title: 'Home', icon: 'home' },
    children: [
      { path: '', component: () => import('../views/home/other.vue') }
    ]
  }
]

// 其他路由2
const otherRoutes2 = [
  {
    path: '/home',
    name: 'Home',
    component: Layout,
    meta: { title: 'Home', icon: 'home' },
    children: [
      { path: '', component: () => import('../views/home/wallet-admin.vue') }
    ]
  }
]

export function getRoutes(type) {

  // 添加路由
  if (type === 'manage') {
    return manageRoutes
  } else if (type === 'other') {
    return otherRoutes
  } else if (type === 'other2') {
    return otherRoutes2
  }

  return []
}
使用也很简单,在 main.js 里 app.use(router) 就可以了
3. store
文章这么长会有人看吗?不如自己试试接下来如何创建,store 比较简单,我就不讲解了
4. request
创建 utils/request.js, 简单贴一下我的代码就可以了
import axios from 'axios'
import { ElMessage } from 'element-plus'
import { logout } from './auth'

const request = axios.create({
  baseURL: process.env.BASE_URL,
  timeout: 5000,
  headers: {
    'Content-Type': 'application/json'
  }
})

request.interceptors.request.use(
  function(config) {
    config.headers['Accept-Language'] = localStorage.getItem('lang') || 'en'
    return config
  },
  function(error) {
    const result = error.request?.data
    ElMessage.error(result?.msg || error.message)
    return Promise.reject(result || error)
  }
)

request.interceptors.response.use(
  function(response) {
    //console.log(response)
    return response.data
  },
  function(error) {
    const result = error.response?.data
    ElMessage.error(result?.msg || error.message)
    if (error.response?.status === 403) {
      logout()
    }
    return Promise.reject(result || error)
  }
)

export default request
其他的东西还有什么不会的?
本来到这里懒得更新了,但是有人说写的不错,说明有人在看,那我就附带一个项目地址,当然这个项目是个空壳子,但是五脏俱全,应该可以解决所有人项目搭建的需求