要实现这个效果,我们先看一下目前的页面展示:
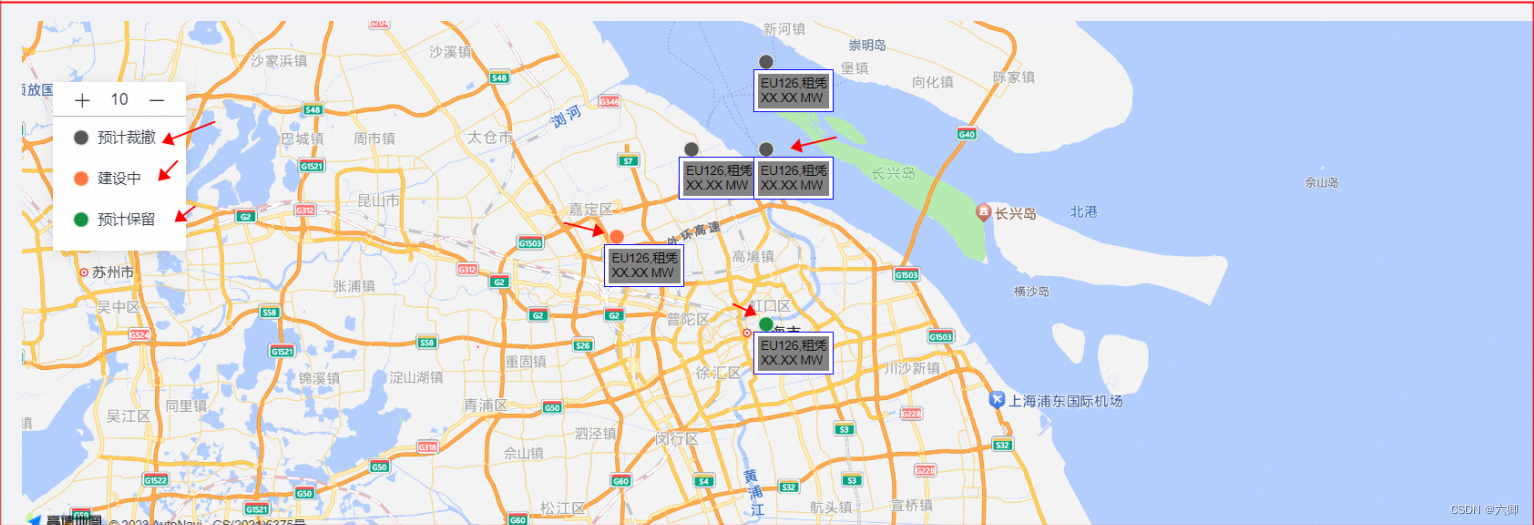
左边有一个图例,我们可以方法缩小地图,右边是动态的marker标记,到时候肯定时候是后端将对应的颜色标识、文字展示、坐标点给咱们返回、我们肯定可以拿到一个list,这个时候我们可以循环创建marker节点,然后统一增加到map中。
可以先看这部分代码:
import React, {

     Component } from 'react';
import AMapLoader from '@amap/amap-jsapi-loader';
// 目前主要设置了地图的宽和高
import '../index.scss'
//为了方便直接使用了已有的base64编码的图片
import {

    base64PNG,sanjiaoSVG,gray,red,green} from './base64png.js'
//小圆点下方的文字显示 以及样式
const content = `<div style="width:auto;padding:3px;background:gray;color:#000;border:none">EU126,租凭<br/>XX.XX MW</div>`
class  MapComponent extends Component{


    constructor(){


        super();
        this.map ={

    };
        this.AMap = null
        this.state={


        // 模拟后端返回的数据
            datalist:[
                {


                    icon:1,
                    position:[121.487899486,31.24916171],
                    title:'aaaaa',
                    zoom:3,
                    content,
                },
                {


                    icon:2,
                    position:[121.287899486,31.34916171],
                    title:'bbb',
                    zoom:3,
                    content,
                },
                {


                    icon:3,
                    position:[121.387899486,31.44916171],
                    title:'ccc',
                    zoom:3,
                    content,
                },
                {


                    icon:3,
                    position:[121.487899486,31.44916171],
                    title:'ddd',
                    zoom:3,
                    content,
                },
                {


                    icon:3,
                    position:[121.487899486,31.54916171],
                    title:'eee',
                    zoom:3,
                    content,
                },
            ]
        }
    }

    // 2.dom渲染成功后进行map对象的创建
    componentDidMount(){


        AMapLoader.reset()  //需要把这个reset一下
        AMapLoader.load({


            key:"79d80321f75bf125cb18953d4c4b2f3a",   // 申请好的Web端开发者Key,首次调用 load 时必填
            version:"2.0",              // 指定要加载的 JSAPI 的版本,缺省时默认为 1.4.15
            plugins:[''],               // 需要使用的的插件列表,如比例尺'AMap.Scale'等
        }).then((AMap)=>{


            console.log(AMap,'AMap')
            //将map对象保存起来
            this.AMap =AMap
            this.renderMapFun()
        }).catch(e=>{


            console.log(e);
        })
    }
    // 每次切换数据的时候单独调用即可
    renderMapFun(){


        this.map = new this.AMap.Map("container111",{

     //设置地图容器id
            // viewMode:"3D",         //是否为3D地图模式
            // zoom:5,                //初始化地图级别
            // center:[105.602725,37.076636], //初始化地图中心点位置
            zoom: 10, //初始化地图级别
            center: [121.487899486,31.24916171 ] //初始化地图中心点位置-上海
        });
        const obj = {


            1:green,
            2:red,
            3:gray
        }
        let arr = []
        //循环创建marker对象
        this.state.datalist.map(i=>{


            var marker1 = new AMap.Marker({


                icon: obj[i.icon],
                position: i.position,
                title:i.title,
                zoom:i.zoom,
            });
            marker1.setLabel({


                content:i.content,
                offset:new AMap.Pixel(-20,28)
            })
            arr = [...arr,marker1]
        })
        // 统计加入到map对象中绘制
        this.map.add(arr);
    }
    render(){


        // 1.初始化创建地图容器,div标签作为地图容器,同时为该div指定id属性;
        return (
              <div id="container111" className="map"  >
              </div>
          );
    }
}
//导出地图组建类
export default MapComponent;
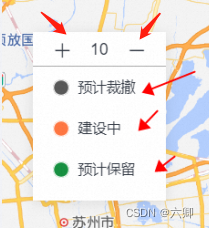
现在要显示左侧的图例盒子,我们使用绝对定位即可:
当然也是需要一部分的样式的。
#container111{


  padding: 0px;
  margin: 0px;
  width: 100%;
  height: 500px;
  position: relative;
  .leftBox{


    width: 130px;
    // height: 150px;
    position: absolute;
    top: 60px;
    left: 30px;
    z-index: 9999;
    background-color: #fff;
    padding: 10px 0 ;
    box-shadow: 0 2px 12px 0 rgba(0, 0, 0, 0.1);
    .top{


      font-size: 16px;
      display: flex;
      align-items: center;
      height: 24px;
      line-height: 24px;
      border-bottom: 1px solid #aaa;
      justify-content: space-around;
      padding-left: 10px;
      padding-bottom: 8px;
      padding-right: 10px;
    }
    .bottom{


      display: flex;
      flex-direction: column;

      .box{


        width: 100%;
        font-size: 14px;
        height: 40px;
        line-height: 40px;
        display: flex;
        align-items: center;
        padding-left: 20px;
        // justify-content: center;
        img{


          width: 16px;
          height: 16px;
          margin-right: 8px;
        }
      }
    }
  }
}
主要就是实现 父绝子相 定位 实现了效果;
页面代码:
import React, {

     Component } from 'react';
import {

     Icon } from '@alife/aisc';
import AMapLoader from '@amap/amap-jsapi-loader';
import '../index.scss';
import {

     base64PNG, sanjiaoSVG, gray, red, green } from './base64png.js';
const content = `<div style="width:auto;padding:3px;background:gray;color:#000;border:none">EU126,租凭<br/>XX.XX MW</div>`;
class MapComponent extends Component {


  constructor() {


    super();
    this.map = {

    };
    this.AMap = null;
    this.state = {


      zoom: 10,
      datalist: [
        {


          icon: 1,
          position: [121.487899486, 31.24916171],
          title: 'aaaaa',
          zoom: 3,
          content,
        },
        {


          icon: 2,
          position: [121.287899486, 31.34916171],
          title: 'bbb',
          zoom: 3,
          content,
        },
        {


          icon: 3,
          position: [121.387899486, 31.44916171],
          title: 'ccc',
          zoom: 3,
          content,
        },
        {


          icon: 3,
          position: [121.487899486, 31.44916171],
          title: 'ddd',
          zoom: 3,
          content,
        },
        {


          icon: 3,
          position: [121.487899486, 31.54916171],
          title: 'eee',
          zoom: 3,
          content,
        },
      ],
    };
  }

  // 2.dom渲染成功后进行map对象的创建
  componentDidMount() {


    AMapLoader.reset(); //需要把这个reset一下
    AMapLoader.load({


      key: '', // 申请好的Web端开发者Key,首次调用 load 时必填
      version: '2.0', // 指定要加载的 JSAPI 的版本,缺省时默认为 1.4.15
      plugins: [''], // 需要使用的的插件列表,如比例尺'AMap.Scale'等
    })
      .then((AMap) => {


        console.log(AMap, 'AMap');
        this.AMap = AMap;
        this.renderMapFun();
        // var circle = new AMap.Circle({


        //     center: new AMap.LngLat("121.487899486", "31.24916171"), // 圆心位置
        //     radius: 10000,  //半径
        //     strokeColor: "#F33",  //线颜色
        //     strokeOpacity: 1,  //线透明度
        //     strokeWeight: 3,  //线粗细度
        //     fillColor: "#ee2200",  //填充颜色
        //     fillOpacity: 0.35 //填充透明度
        // });
        // this.map.add([marker1,marker2,marker3]);
        // this.map.add([marker1,marker2,marker3,circle]);
        // this.map.add(marker);
      })
      .catch((e) => {


        console.log(e);
      });
  }
  renderMapFun() {


    this.map = new this.AMap.Map('container111', {


      //设置地图容器id
      // viewMode:"3D",         //是否为3D地图模式
      // zoom:5,                //初始化地图级别
      // center:[105.602725,37.076636], //初始化地图中心点位置
      zoom: this.state.zoom, //初始化地图级别
      center: [121.487899486, 31.24916171], //初始化地图中心点位置-上海
    });
    const obj = {


      1: green,
      2: red,
      3: gray,
    };
    let arr = [];
    this.state.datalist.map((i) => {


      var marker1 = new AMap.Marker({


        icon: obj[i.icon],
        position: i.position,
        title: i.title,
        zoom: i.zoom,
      });
      marker1.setLabel({


        content: i.content,
        offset: new AMap.Pixel(-20, 28),
      });
      arr = [...arr, marker1];
    });
    this.map.add(arr);
  }
  addFun=()=>{


    // console.log(this.map,'this.map')
    const {

    zoom} = this.state
    if(zoom!==18){


        this.setState({


            zoom:zoom+1
        },()=>{


            // 设置地图显示的缩放级别,在PC上,参数zoom可设范围:[3,18];
            // 在移动端:参数zoom可设范围:[3,19]。3D地图下,可将zoom设置为浮点数。/
            this.map.setZoom(this.state.zoom)
            // this.renderMapFun()
        })
    }
  }
  downFun=()=>{


    const {

    zoom} = this.state
    if(zoom!==3){


        this.setState({


            zoom:zoom-1
        },()=>{


            this.map.setZoom(this.state.zoom)
            // this.renderMapFun()
        })
    }
  }
  render() {


    // 1.初始化创建地图容器,div标签作为地图容器,同时为该div指定id属性;
    return (
      <div style={

    {

     width: '100%', height: '100%' }}>
        <div id="container111" className="map">
          <div className="leftBox">
            <div className="top">
              <Icon type="add" onClick={

    this.addFun}/>
              {

    this.state.zoom} <Icon type="minus" onClick={

    this.downFun}/>
            </div>
            <div className="bottom">
              <div className="box">
                <img src={

    gray} alt="" />
                预计裁撤
              </div>
              <div className="box">
                <img src={

    red} alt="" />
                建设中
              </div>
              <div className="box">
                <img src={

    green} alt="" />
                预计保留
              </div>
            </div>
          </div>
        </div>
      </div>
    );
  }
}
//导出地图组建类
export default MapComponent;
我们想实现点击左侧的 + 来实现放大; - 实现 缩小;
后来查询相关文档,官方文档上解释:
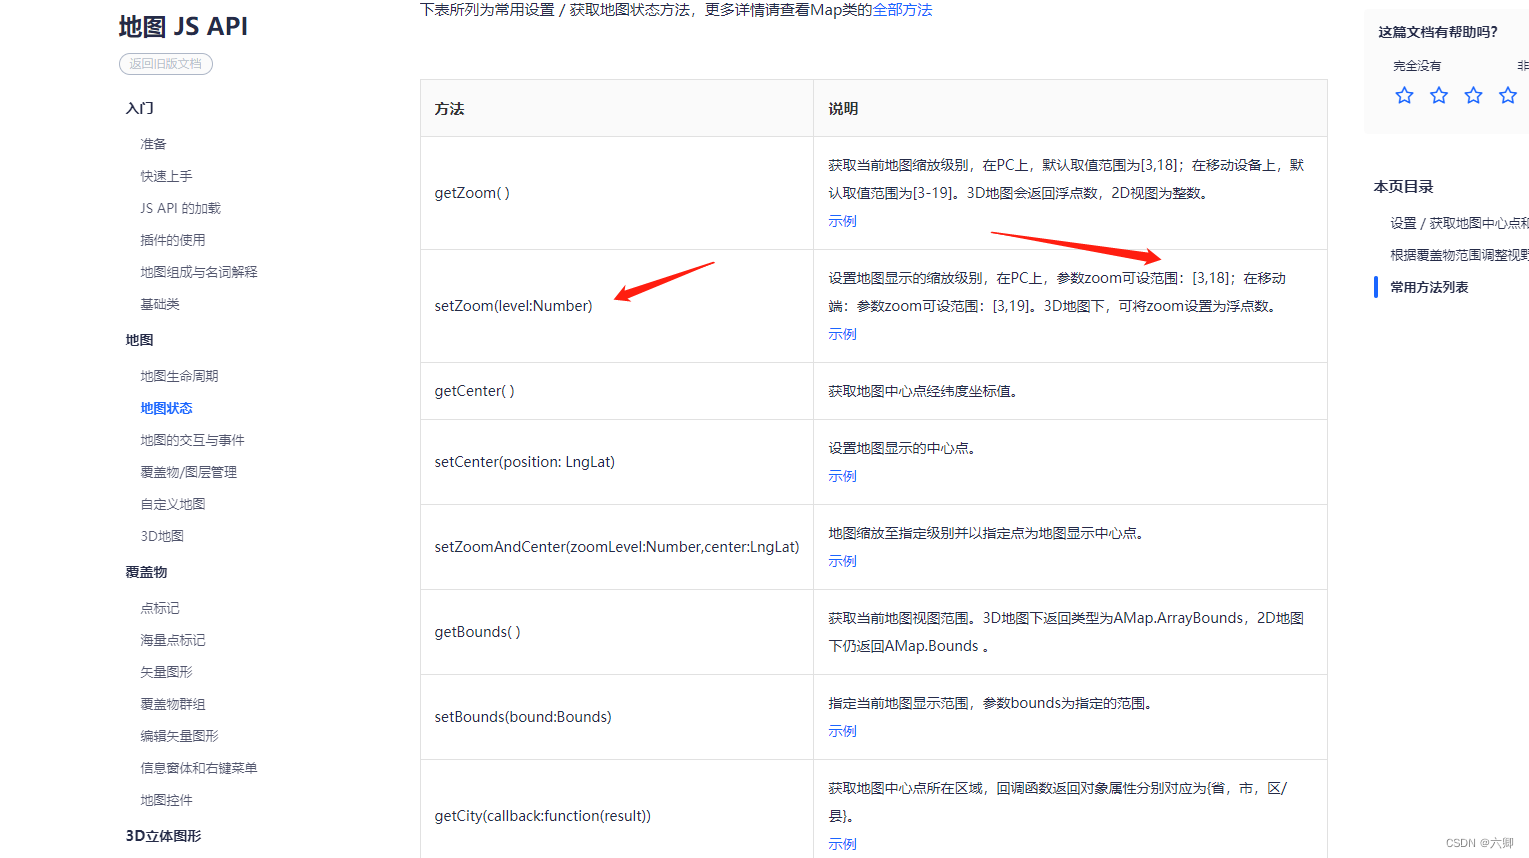
setZoom:设置地图显示的缩放级别,在PC上,参数zoom可设范围:[3,18];在移动端:参数zoom可设范围:[3,19]。3D地图下,可将zoom设置为浮点数。
意思是说我们在PC中使用只能使用的放大缩小范围为 3 - 18
所以我们在点击按钮的时候放大缩小就需要控制最大值:
  addFun=()=>{


    // console.log(this.map,'this.map')
    const {

    zoom} = this.state
    if(zoom!==18){


        this.setState({


            zoom:zoom+1
        },()=>{


            // 设置地图显示的缩放级别,在PC上,参数zoom可设范围:[3,18];
            // 在移动端:参数zoom可设范围:[3,19]。3D地图下,可将zoom设置为浮点数。/
            this.map.setZoom(this.state.zoom)
            // this.renderMapFun()
        })
    }
  }
  downFun=()=>{


    const {

    zoom} = this.state
    if(zoom!==3){


        this.setState({


            zoom:zoom-1
        },()=>{


            this.map.setZoom(this.state.zoom)
            // this.renderMapFun()
        })
    }
  }
另外献上官方连接:
https://lbs.amap.com/api/javascript-api/guide/map/state
https://lbs.amap.com/demo/javascript-api/example/map/click-to-get-lnglat
https://lbs.amap.com/demo/javascript-api/example/map/get-mapzoom