当数据集里的图片比较少的时候,就容易造成过拟合,为了避免这种情况,用数据增强的办法,增加数据集,减少过拟合的风险。
在Yolov5中除了传统的一些方法,比如,旋转,裁剪,翻转,调整色调饱和度曝光,长宽比等。还提供了Mixup,Cutout,Cutmix,Mosaic,Blur, 随机透视变换。
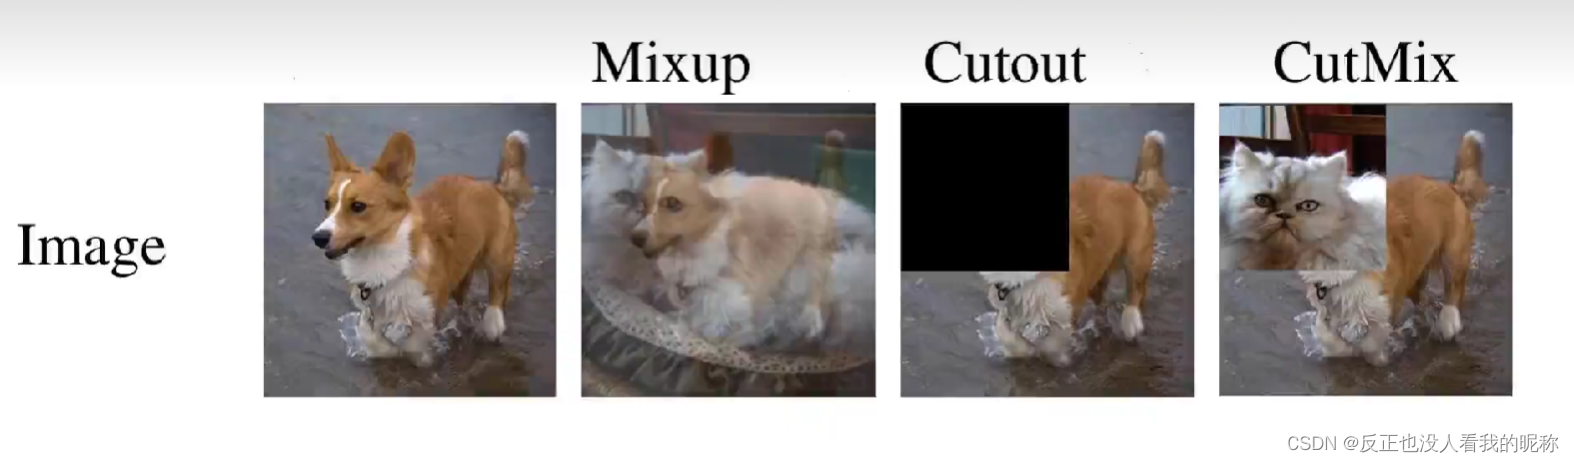
Mixup,Cutout,Cutmix这三种如下图,非常好理解。
Mosaic
Mosaic是在yolov5中最先提出的一种数据增强的方式,Mosaic的办法是把多张图片(yolov5给的是4张或者9张)去拼接成一幅图片:
像这样
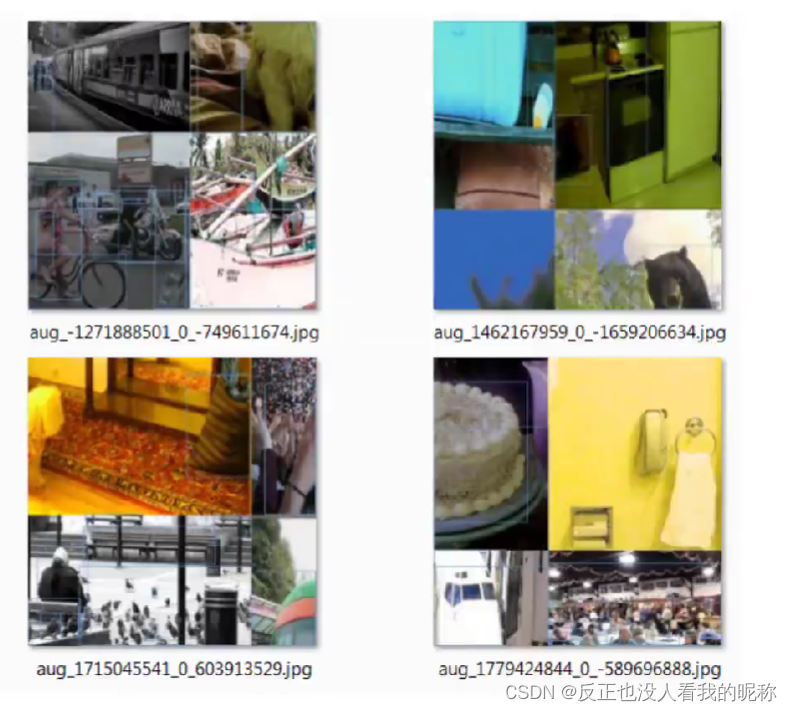
这些图片都是在原图中随机的切分出来的,这4个小图的大小是不一样的,然后进行拼接,送入网络中去训练,提高了网络的普适性和鲁棒性。
他的源码是在./yolov5_master/utils/datasets.py这个文件下,是分为了load_mosaic 和 load_mosaic9,原理相同,只不过一个是4图拼接一个是9图拼接。
def load_mosaic(self, index):
    """
    index : 图片索引
    """
    # YOLOv5 4-mosaic loader. Loads 1 image + 3 random images into a 4-image mosaic
    labels4, segments4 = [], []   # 初始化 标签 和 目标框的空列表
    s = self.img_size # 获取图片的大小

    # 随机选取mosaic的中心点
    # 这里可以看到他在选取中心点的时候,将图片大小扩大了一倍,然后选取的中心点
    yc, xc = [int(random.uniform(-x, 2 * s + x)) for x in self.mosaic_border]  # mosaic center x, y

    # 随机选取其他三张图片的索引
    indices = [index] + random.choices(self.indices, k=3)  # 3 additional image indices
    random.shuffle(indices)  # 随机打乱索引
    # 对索引进行迭代
    for i, index in enumerate(indices):
        # Load image
        # 读取图片,load_image这个函数会加载图片,并且根据设定的输入大小与原大小的比例进行resize
        img, _, (h, w) = load_image(self, index)

        # place img in img4
        # 将图片放在大图上,每一次放一个位置
        if i == 0:  # top left   左上   第一次迭代的时候创建了一个img4的大图
            # 初始化大图
            img4 = np.full((s * 2, s * 2, img.shape[2]), 114, dtype=np.uint8)  # base image with 4 tiles
            # 设置大图左上角的位置范围
            x1a, y1a, x2a, y2a = max(xc - w, 0), max(yc - h, 0), xc, yc  # xmin, ymin, xmax, ymax (large image)
            # 在小图上选取位置
            x1b, y1b, x2b, y2b = w - (x2a - x1a), h - (y2a - y1a), w, h  # xmin, ymin, xmax, ymax (small image)
        elif i == 1:  # top right   右上
            x1a, y1a, x2a, y2a = xc, max(yc - h, 0), min(xc + w, s * 2), yc
            x1b, y1b, x2b, y2b = 0, h - (y2a - y1a), min(w, x2a - x1a), h
        elif i == 2:  # bottom left  左下
            x1a, y1a, x2a, y2a = max(xc - w, 0), yc, xc, min(s * 2, yc + h)
            x1b, y1b, x2b, y2b = w - (x2a - x1a), 0, w, min(y2a - y1a, h)
        elif i == 3:  # bottom right  右下
            x1a, y1a, x2a, y2a = xc, yc, min(xc + w, s * 2), min(s * 2, yc + h)
            x1b, y1b, x2b, y2b = 0, 0, min(w, x2a - x1a), min(y2a - y1a, h)

        # 把小图上的位置帖到大图上
        img4[y1a:y2a, x1a:x2a] = img[y1b:y2b, x1b:x2b]  # img4[ymin:ymax, xmin:xmax]

        # 计算小图到大图上的偏移量,因为你后面还得把标签给弄过去
        padw = x1a - x1b
        padh = y1a - y1b
        # Labels
        # 加载标签和目标框
        labels, segments = self.labels[index].copy(), self.segments[index].copy()
        # 如果标签信息存在则计算在大图上目标框的位置
        if labels.size:
            labels[:, 1:] = xywhn2xyxy(labels[:, 1:], w, h, padw, padh)  # normalized xywh to pixel xyxy format
            segments = [xyn2xy(x, w, h, padw, padh) for x in segments]
        # 添加标签信息和目标框的信息
        labels4.append(labels)
        segments4.extend(segments)

    # 虽然添加好了目标框但是有些框会跑到图片的外部去,要调整一下
    # Concat/clip labels
    labels4 = np.concatenate(labels4, 0)
    for x in (labels4[:, 1:], *segments4):
        np.clip(x, 0, 2 * s, out=x)  # clip when using random_perspective()
    # img4, labels4 = replicate(img4, labels4)  # replicate

    # 然后在加载图片,在加载之前,还得进行随机的翻转,平移等等操作
    # Augment
    img4, labels4, segments4 = copy_paste(img4, labels4, segments4, p=self.hyp['copy_paste'])
    img4, labels4 = random_perspective(img4, labels4, segments4,
                                       degrees=self.hyp['degrees'],
                                       translate=self.hyp['translate'],
                                       scale=self.hyp['scale'],
                                       shear=self.hyp['shear'],
                                       perspective=self.hyp['perspective'],
                                       border=self.mosaic_border)  # border to remove

return img4, labels4当中我们用到了load_image这个类:
# 加载图片,并且根据设定的输入大小与原大小的比例进行resize
def load_image(self, i):
    # loads 1 image from dataset index 'i', returns im, original hw, resized hw
    # 先图片取值
    im = self.imgs[i]
    # 如果没有读到图片则要去按照路径拿图片
    if im is None:  # not cached in ram
        npy = self.img_npy[i]
        if npy and npy.exists():  # load npy  先看是不是np文件,如果不是再读图片
            im = np.load(npy)
        else:  # read image   读取图片
            path = self.img_files[i]
            im = cv2.imread(path)  # BGR
            assert im is not None, 'Image Not Found ' + path   # 要实在不行就抛出异常

        # 读到图片后的操作
        h0, w0 = im.shape[:2]  # orig hw   # 拿到宽高
        # 计算图片的ratio
        r = self.img_size / max(h0, w0)  # ratio
        # 如果 r不等于1 则进行插值
        if r != 1:  # if sizes are not equal
            im = cv2.resize(im, (int(w0 * r), int(h0 * r)),
                            interpolation=cv2.INTER_AREA if r < 1 and not self.augment else cv2.INTER_LINEAR)
        return im, (h0, w0), im.shape[:2]  # im, hw_original, hw_resized
    else:
        return self.imgs[i], self.img_hw0[i], self.img_hw[i]  # im, hw_original, hw_resized