原文链接:点击打开链接
摘要: 深入剖析Android官方新模块化方案——App Bundles,技术要点全方位挖掘。
App Bundles是2018 Google I/O新引入的一个概念。不同于以往传统的App是以一个完整的Apk作为单位,而App Bundles有下面几个技术特点:
- 一个App被分割成一个基础APK和多个模块APK。
- 基础APK在安装后,可以按需请求或者更新模块APK。
- 模块APK可以划分为更细的粒度,根据当前运行的设备特征来请求特定粒度的APK。
- 请求与安装过程是通过与Google Play商店交互来进行的。
- Android Studio中通过开发者引入dynamic-feature模块,来实现模块APK的开发。
- 模块APK的方式只在Android 5.0(API 21)及以上机型使用,在Android 4.4及以下机型Play商店仍会下发完整的APK。
一图胜千言,

App Bundles可以在运行时选取设备所需的APK组合运行,与传统方式对比如下:

编译期技术
需要上传到Play商店的是一个Android App Bundle(.aab)文件,通过Android Studio中的Build > Build Bundle(s)/APK(s) > Build Bundle(s) 可以在project-name/module-name/build/outputs/bundle/目录下生成。它有如下结构:

在我自己构造demo中,有base和feature0模块,在base中无法直接引用feature0模块的类,反过来是可以的。
可以看到这个demo生成的aab文件内容是这样的:
Archive:  app/build/outputs/bundle/debug/bundle.aab
  Length     Date   Time    Name
 --------    ----   ----    ----
    67086  05-17-18 13:21   META-INF/MANIFEST.MF
    67248  05-17-18 13:21   META-INF/ANDROIDD.SF
      773  05-17-18 13:21   META-INF/ANDROIDD.RSA
     4056  05-17-18 13:21   base/manifest/AndroidManifest.xml
      541  05-17-18 13:21   base/res/anim/abc_fade_in.xml
      541  05-17-18 13:21   base/res/anim/abc_fade_out.xml
                            ... ...
   448151  05-17-18 13:21   base/resources.pb
  3121604  05-17-18 13:21   base/dex/classes.dex
        7  05-17-18 13:21   base/root/META-INF/com.android.support_appcompat-v7.version
        7  05-17-18 13:21   base/root/META-INF/com.android.support_support-core-utils.version
                            ... ...
   182504  05-17-18 13:21   base/lib/arm64-v8a/libnative-lib.so
   104160  05-17-18 13:21   base/lib/armeabi-v7a/libnative-lib.so
   177924  05-17-18 13:21   base/lib/x86/libnative-lib.so
   174712  05-17-18 13:21   base/lib/x86_64/libnative-lib.so
       85  05-17-18 13:21   base/native.pb
     1719  05-17-18 13:21   feature0/manifest/AndroidManifest.xml
      375  05-17-18 13:21   feature0/res/layout/feature0_activity.xml
     1272  05-17-18 13:21   feature0/res/layout/feature0_fragment.xml
      573  05-17-18 13:21   feature0/resources.pb
     4192  05-17-18 13:21   feature0/dex/classes.dex
    27292  05-17-18 13:21   feature0/dex/classes2.dex
        6  05-17-18 13:21   feature0/root/META-INF/android.arch.lifecycle_extensions.version
        6  05-17-18 13:21   feature0/root/META-INF/android.arch.lifecycle_livedata.version
      273  05-17-18 13:21   BundleConfig.pb
 --------                   -------
  4977479                   528 files
Play商店会根据这个文件自动生成基线APK与其他模块APK。
另外Google也提供了bundletool调试工具,我们通过执行以下命令,可以生成一个.apks文件:
bundletool build-apks --bundle=app/build/outputs/bundle/debug/bundle.aab --output=bundle.apks.apks文件的内容是这样的:
Length     Date   Time    Name
 --------    ----   ----    ----
    56679  05-11-18 10:32   base-xhdpi.apk
    47738  05-11-18 10:32   base-ldpi.apk
    51733  05-11-18 10:32   base-hdpi.apk
    47350  05-11-18 10:32   base-mdpi.apk
    67465  05-11-18 10:32   base-xxhdpi.apk
    71691  05-11-18 10:32   base-xxxhdpi.apk
    85949  05-11-18 10:32   base-tvdpi.apk
    58942  05-11-18 10:32   base-armeabi_v7a.apk
    75591  05-11-18 10:32   base-arm64_v8a.apk
    79456  05-11-18 10:32   base-x86.apk
    76614  05-11-18 10:32   base-x86_64.apk
  1278608  05-11-18 10:32   base-master.apk
     6456  05-11-18 10:32   feature0-ldpi.apk
     6455  05-11-18 10:32   feature0-mdpi.apk
     6453  05-11-18 10:32   feature0-hdpi.apk
     6455  05-11-18 10:32   feature0-xhdpi.apk
     6458  05-11-18 10:32   feature0-xxhdpi.apk
     6459  05-11-18 10:32   feature0-xxxhdpi.apk
     6459  05-11-18 10:32   feature0-tvdpi.apk
    23840  05-11-18 10:32   feature0-master.apk
  1399736  05-11-18 10:32   standalone-arm64_v8a_mdpi.apk
  1404122  05-11-18 10:32   standalone-arm64_v8a_hdpi.apk
  1400150  05-11-18 10:32   standalone-arm64_v8a_ldpi.apk
  1409067  05-11-18 10:32   standalone-arm64_v8a_xhdpi.apk
  1419850  05-11-18 10:32   standalone-arm64_v8a_xxhdpi.apk
  1383502  05-11-18 10:32   standalone-armeabi_v7a_ldpi.apk
  1424094  05-11-18 10:32   standalone-arm64_v8a_xxxhdpi.apk
  1438398  05-11-18 10:32   standalone-arm64_v8a_tvdpi.apk
  1383096  05-11-18 10:32   standalone-armeabi_v7a_mdpi.apk
  1387471  05-11-18 10:32   standalone-armeabi_v7a_hdpi.apk
  1392416  05-11-18 10:32   standalone-armeabi_v7a_xhdpi.apk
  1403202  05-11-18 10:32   standalone-armeabi_v7a_xxhdpi.apk
  1407436  05-11-18 10:32   standalone-armeabi_v7a_xxxhdpi.apk
  1403612  05-11-18 10:32   standalone-x86_mdpi.apk
  1404026  05-11-18 10:32   standalone-x86_ldpi.apk
  1421745  05-11-18 10:32   standalone-armeabi_v7a_tvdpi.apk
  1407995  05-11-18 10:32   standalone-x86_hdpi.apk
  1412940  05-11-18 10:32   standalone-x86_xhdpi.apk
  1427968  05-11-18 10:32   standalone-x86_xxxhdpi.apk
  1423722  05-11-18 10:32   standalone-x86_xxhdpi.apk
  1401172  05-11-18 10:32   standalone-x86_64_ldpi.apk
  1442270  05-11-18 10:32   standalone-x86_tvdpi.apk
  1400762  05-11-18 10:32   standalone-x86_64_mdpi.apk
  1405145  05-11-18 10:32   standalone-x86_64_hdpi.apk
  1420877  05-11-18 10:32   standalone-x86_64_xxhdpi.apk
  1410090  05-11-18 10:32   standalone-x86_64_xhdpi.apk
  1425119  05-11-18 10:32   standalone-x86_64_xxxhdpi.apk
  1439423  05-11-18 10:32   standalone-x86_64_tvdpi.apk
     6367  05-11-18 10:32   toc.pb
 --------                   -------
 41572624                   49 files
可以推测,这个就是上传到商店之后最终生成的需要按需下发的APK产物。
运行期技术
因为众所周知的原因,国内的设备不会默认包含Google Play商店,因此App Bundles对于国内App是不适用的。所以我们考虑,是否可以不经由商店,在App自身开发一套类似的更新机制?
我们要想自行实现这个功能,就得探清其原理,知其所以然。
在本地安装之后,我们发现在APK安装路径下存在两个APK,
gemini:/ # ls -l  data/app/com.taobao.myappbundledemo-2/
total 4664
-rw-r--r-- 1 system system  2343434 2018-05-13 12:41 base.apk
drwxr-xr-x 3 system system     4096 2018-05-13 12:41 lib
drwxrwx--x 3 system install    4096 2018-05-13 12:41 oat
-rw-r--r-- 1 system system 25412 2018-05-13 12:41 split_feature0.apk这里确实有些违反常理,通常我们一个App只有一个APK,而这里我们可以看到,在一个App的安装目录下出现了多个APK。实际上,安装目录可以安装多Apk的特性是Android 5.0开始引入的,这也就解释了为何4.4以下机型只能安装一个单独的完整包。那么,这种多个APK是以什么方式安装的?我们是否可以模仿这种安装方式对App自身进行更新呢?
官方接口请求
我们先看下官方SDK采用的方式。首先,如果想通过商店请求安装新模块,可以通过下面的代码进行:
// Creates an instance of SplitInstallManager.
SplitInstallManager splitInstallManager =
    SplitInstallManagerFactory.create(context);

// Creates a request to install a module.
SplitInstallRequest request =
    SplitInstallRequest
        .newBuilder()
        // You can download multiple on demand modules per
        // request by invoking the following method for each
        // module you want to install.
        .addModule("pictureMessages")
        .addModule("promotionalFilters")
        .build();

splitInstallManager
    // Submits the request to install the module through the
    // asynchronous startInstall() task. Your app needs to be
    // in the foreground to submit the request.
    .startInstall(request)
    // You should also be able to gracefully handle
    // request state changes and errors. To learn more, go to
    // the section about how to Monitor the request state.
    .addOnSuccessListener(sessionId -> { ... })
.addOnFailureListener(errorCode -> { ... });使用这个类需要引入依赖com.google.android.play:core:1.2.0
这里的关键自然是startInstall,我们就顺藤摸瓜往下挖。
final class k {
    private static final b b = new b("SplitInstallService");
    private static final Intent c = new Intent("com.google.android.play.core.splitinstall.BIND_SPLIT_INSTALL_SERVICE").setPackage("com.android.vending");
    final com.google.android.play.core.a.b<a> a;
    private final Context d;
    private final String e;
    private final f f;

    private k(Context context, String str) {
        this.f = new j(this);
        this.d = context;
        this.e = str;
        this.a = new com.google.android.play.core.a.b(context.getApplicationContext(), b, "SplitInstallService", c, l.a, this.f);
    }

    public final Task<Integer> a(Collection<String> collection) {
        b.a("startInstall(%s)", collection);
        i iVar = new i();
        this.a.a(new m(this, iVar, collection, iVar));
        return iVar.a();
    }

... ...
public final class b<T extends IInterface> {
private static final Map<String, Handler> a = Collections.synchronizedMap(new HashMap());
private final Context b;
private final com.google.android.play.core.splitcompat.b.b c;
private final String d;
private final List<a> e = new ArrayList();
private boolean f;
private final Intent g;
private final g<T> h;
private final WeakReference<f> i;
private final DeathRecipient j = new c(this);
private ServiceConnection k;
private T l;
public b(Context context, com.google.android.play.core.splitcompat.b.b bVar, String str, Intent intent, g<T> gVar, f fVar) {
this.b = context;
this.c = bVar;
this.d = str;
this.g = intent;
this.h = gVar;
this.i = new WeakReference(fVar);
}
private final void b(a aVar) {
if (this.l == null && !this.f) {
this.c.a("Initiate binding to the service.", new Object[0]);
this.e.add(aVar);
this.k = new h();
this.f = true;
if (!this.b.bindService(this.g, this.k, 1)) {
this.c.a("Failed to bind to the service.", new Object[0]);
this.f = false;
for (a a : this.e) {
i a2 = a.a();
if (a2 != null) {
a2.a(new k());
}
}
this.e.clear();
}
} else if (this.f) {
this.c.a("Waiting to bind to the service.", new Object[0]);
this.e.add(aVar);
} else {
aVar.run();
}
}
... ...可以看到class k的a字段是一个class b,在这个class b的构造函数中,通过com.google.android.play.core.splitinstall.BIND_SPLIT_INSTALL_SERVICE绑定了一个Service,然而这个Service并不在App自身,而是属于Play商店的一个Service.
我们反编译商店,发现确实存在com.google.android.play.core.splitinstall.BIND_SPLIT_INSTALL_SERVICE的filter。
<service android:name="com.google.android.finsky.splitinstallservice.SplitInstallService" android:enabled="true" android:exported="true" android:visibleToInstantApps="true">
    <meta-data android:name="instantapps.clients.allowed" android:value="true"/>
    <intent-filter>
        <action android:name="com.google.android.play.core.splitinstall.BIND_SPLIT_INSTALL_SERVICE"/>
    </intent-filter>
</service>其对应的正是SplitInstallService,由于这里混淆比较严重,很难往下继续跟了,不过我们可以知道的是,安装APK的操作确实是通过请求Play商店的Service进行的。
使用bundletool安装
接下来我们转换一下思路继续探索。
使用bundletool调试工具可以直接安装apks,命令如下:
bundletool install-apks --apks=bundle.apks通过跟进bundletool源码,我们最终找到了关键方法:
private String createMultiInstallSession(List<File> apkFiles, String pmOptions, long timeout, TimeUnit unit) throws TimeoutException, AdbCommandRejectedException, ShellCommandUnresponsiveException, IOException {
    long totalFileSize = 0;
    for (File apkFile : apkFiles) {
        totalFileSize += apkFile.length();
    }
    InstallCreateReceiver receiver = new InstallCreateReceiver();
    this.mDevice.executeShellCommand(String.format(this.mPrefix + " install-create %1$s -S %2$d", new Object[]{pmOptions, Long.valueOf(totalFileSize)}), receiver, timeout, unit);
    return receiver.getSessionId();
}


private boolean uploadApk(String sessionId, File fileToUpload, int uniqueId, long timeout, TimeUnit unit) {
    Throwable e;
    Throwable th;
    Log.d(sessionId, String.format("Uploading APK %1$s ", new Object[]{fileToUpload.getPath()}));
    if (!fileToUpload.exists()) {
        Log.e(sessionId, String.format("File not found: %1$s", new Object[]{fileToUpload.getPath()}));
        return false;
    } else if (fileToUpload.isDirectory()) {
        Log.e(sessionId, String.format("Directory upload not supported: %1$s", new Object[]{fileToUpload.getAbsolutePath()}));
        return false;
    } else {
        String baseName;
        if (fileToUpload.getName().lastIndexOf(46) != -1) {
            baseName = fileToUpload.getName().substring(0, fileToUpload.getName().lastIndexOf(46));
        } else {
            baseName = fileToUpload.getName();
        }
        baseName = UNSAFE_PM_INSTALL_SESSION_SPLIT_NAME_CHARS.replaceFrom(baseName, '_');
        Log.d(sessionId, String.format("Executing : %1$s", new Object[]{String.format(this.mPrefix + " install-write -S %d %s %d_%s -", new Object[]{Long.valueOf(fileToUpload.length()), sessionId, Integer.valueOf(uniqueId), baseName})}));
... ...
    }
}


public void install(long timeout, TimeUnit unit) throws InstallException {
    try {
        String sessionId = createMultiInstallSession(this.mApks, this.mOptions, timeout, unit);
        if (sessionId == null) {
            Log.d(LOG_TAG, "Failed to establish session, quit installation");
            throw new InstallException("Failed to establish session");
        }
        int index = 0;
        boolean allUploadSucceeded = true;
        while (allUploadSucceeded) {
            if (index >= this.mApks.size()) {
                break;
            }
            int index2 = index + 1;
            allUploadSucceeded = uploadApk(sessionId, (File) this.mApks.get(index), index, timeout, unit);
            index = index2;
        }
        String command = this.mPrefix + " install-" + (allUploadSucceeded ? "commit " : "abandon ") + sessionId;
        InstallReceiver receiver = new InstallReceiver();
        this.mDevice.executeShellCommand(command, receiver, timeout, unit);
        if (receiver.getErrorMessage() != null) {
            String message = String.format("Failed to finalize session : %1$s", new Object[]{receiver.getErrorMessage()});
            Log.e(LOG_TAG, message);
            throw new InstallException(message);
        } else if (!allUploadSucceeded) {
            throw new InstallException("Failed to install all ");
        }
    } catch (InstallException e) {
        throw e;
    } catch (Throwable e2) {
        throw new InstallException(e2);
    }
}
可见其真正使用的命令是以下三条:
adb shell pm install-create ...
adb shell pm install-write ...
adb shell pm install-commit ...
我们继续看下Pm.java,具体看下这三个命令是如何实现安装的。
frameworks-base-p-preview-1/cmds/pm/src/com/android/commands/pm/Pm.java
public int run(String[] args) throws RemoteException {
... ...
    mPm = IPackageManager.Stub.asInterface(ServiceManager.getService("package"));

    mInstaller = mPm.getPackageInstaller();
... ...

    if ("install-create".equals(op)) {
        return runInstallCreate();
    }

    if ("install-write".equals(op)) {
        return runInstallWrite();
    }

    if ("install-commit".equals(op)) {
        return runInstallCommit();
    }
... ...
}

private int runInstallCreate() throws RemoteException {
    final InstallParams installParams = makeInstallParams();
    final int sessionId = doCreateSession(installParams.sessionParams,
            installParams.installerPackageName, installParams.userId);

    // NOTE: adb depends on parsing this string
    System.out.println("Success: created install session [" + sessionId + "]");
    return PackageInstaller.STATUS_SUCCESS;
}

private int doCreateSession(SessionParams params, String installerPackageName, int userId)
        throws RemoteException {
    userId = translateUserId(userId, "runInstallCreate");
    if (userId == UserHandle.USER_ALL) {
        userId = UserHandle.USER_SYSTEM;
        params.installFlags |= PackageManager.INSTALL_ALL_USERS;
    }

    final int sessionId = mInstaller.createSession(params, installerPackageName, userId);
    return sessionId;
}
private int runInstallWrite() throws RemoteException {
    long sizeBytes = -1;

    String opt;
    while ((opt = nextOption()) != null) {
        if (opt.equals("-S")) {
            sizeBytes = Long.parseLong(nextArg());
        } else {
            throw new IllegalArgumentException("Unknown option: " + opt);
        }
    }

    final int sessionId = Integer.parseInt(nextArg());
    final String splitName = nextArg();
    final String path = nextArg();
    return doWriteSession(sessionId, path, sizeBytes, splitName, true /*logSuccess*/);
}

private int doWriteSession(int sessionId, String inPath, long sizeBytes, String splitName,
        boolean logSuccess) throws RemoteException {
    if (STDIN_PATH.equals(inPath)) {
        inPath = null;
    } else if (inPath != null) {
        final File file = new File(inPath);
        if (file.isFile()) {
            sizeBytes = file.length();
        }
    }

    final SessionInfo info = mInstaller.getSessionInfo(sessionId);

    PackageInstaller.Session session = null;
    InputStream in = null;
    OutputStream out = null;
    try {
        session = new PackageInstaller.Session(
                mInstaller.openSession(sessionId));

        if (inPath != null) {
            in = new FileInputStream(inPath);
        } else {
            in = new SizedInputStream(System.in, sizeBytes);
        }
        out = session.openWrite(splitName, 0, sizeBytes);

        int total = 0;
        byte[] buffer = new byte[65536];
        int c;
        while ((c = in.read(buffer)) != -1) {
            total += c;
            out.write(buffer, 0, c);

            if (info.sizeBytes > 0) {
                final float fraction = ((float) c / (float) info.sizeBytes);
                session.addProgress(fraction);
            }
        }
        session.fsync(out);

        if (logSuccess) {
            System.out.println("Success: streamed " + total + " bytes");
        }
        return PackageInstaller.STATUS_SUCCESS;
    } catch (IOException e) {
        System.err.println("Error: failed to write; " + e.getMessage());
        return PackageInstaller.STATUS_FAILURE;
    } finally {
        IoUtils.closeQuietly(out);
        IoUtils.closeQuietly(in);
        IoUtils.closeQuietly(session);
    }
}
由此可知,pm是通过PackageInstaller类来实现安装的。
自行模拟安装
知道了这个流程后,我们就可以自己实现这种安装方法了:
PackageInstaller.SessionParams sessionParams = new PackageInstaller.SessionParams(
        PackageInstaller.SessionParams.MODE_INHERIT_EXISTING);

PackageInstaller installer = context.getPackageManager().getPackageInstaller();
int sessionId = installer.createSession(sessionParams);
PackageInstaller.Session session = installer.openSession(sessionId);

File apkFile = new File(getFilesDir(), "feature0-debug.apk");
in = new FileInputStream(apkFile.getPath());
out = session.openWrite("anything", 0, apkFile.length());
int total = 0;
byte[] buffer = new byte[65536];
int c;
while ((c = in.read(buffer)) != -1) {
    total += c;
    out.write(buffer, 0, c);
}
session.fsync(out);

IntentSender intentSender = createIntentSender(context, sessionId);
session.commit(intentSender);

session.close();这里的重点是,需要在创建SessionParams的时候指定模式为MODE_INHERIT_EXISTING,才能覆盖安装模块APK。模块APK的名称为split_<module name>.apk。这里的<module name>是模块APK的AndroidManifest中指定的,<manifest ... ... package="com.taobao.myappbundledemo" split="feature0">,因此,系统会自动识别安装位置并确定安装后的文件名称,如果manifest中不带split,其名称就是base.apk。
调用完上述代码,并不是很顺利地直接装上了,而是弹出了几个界面:
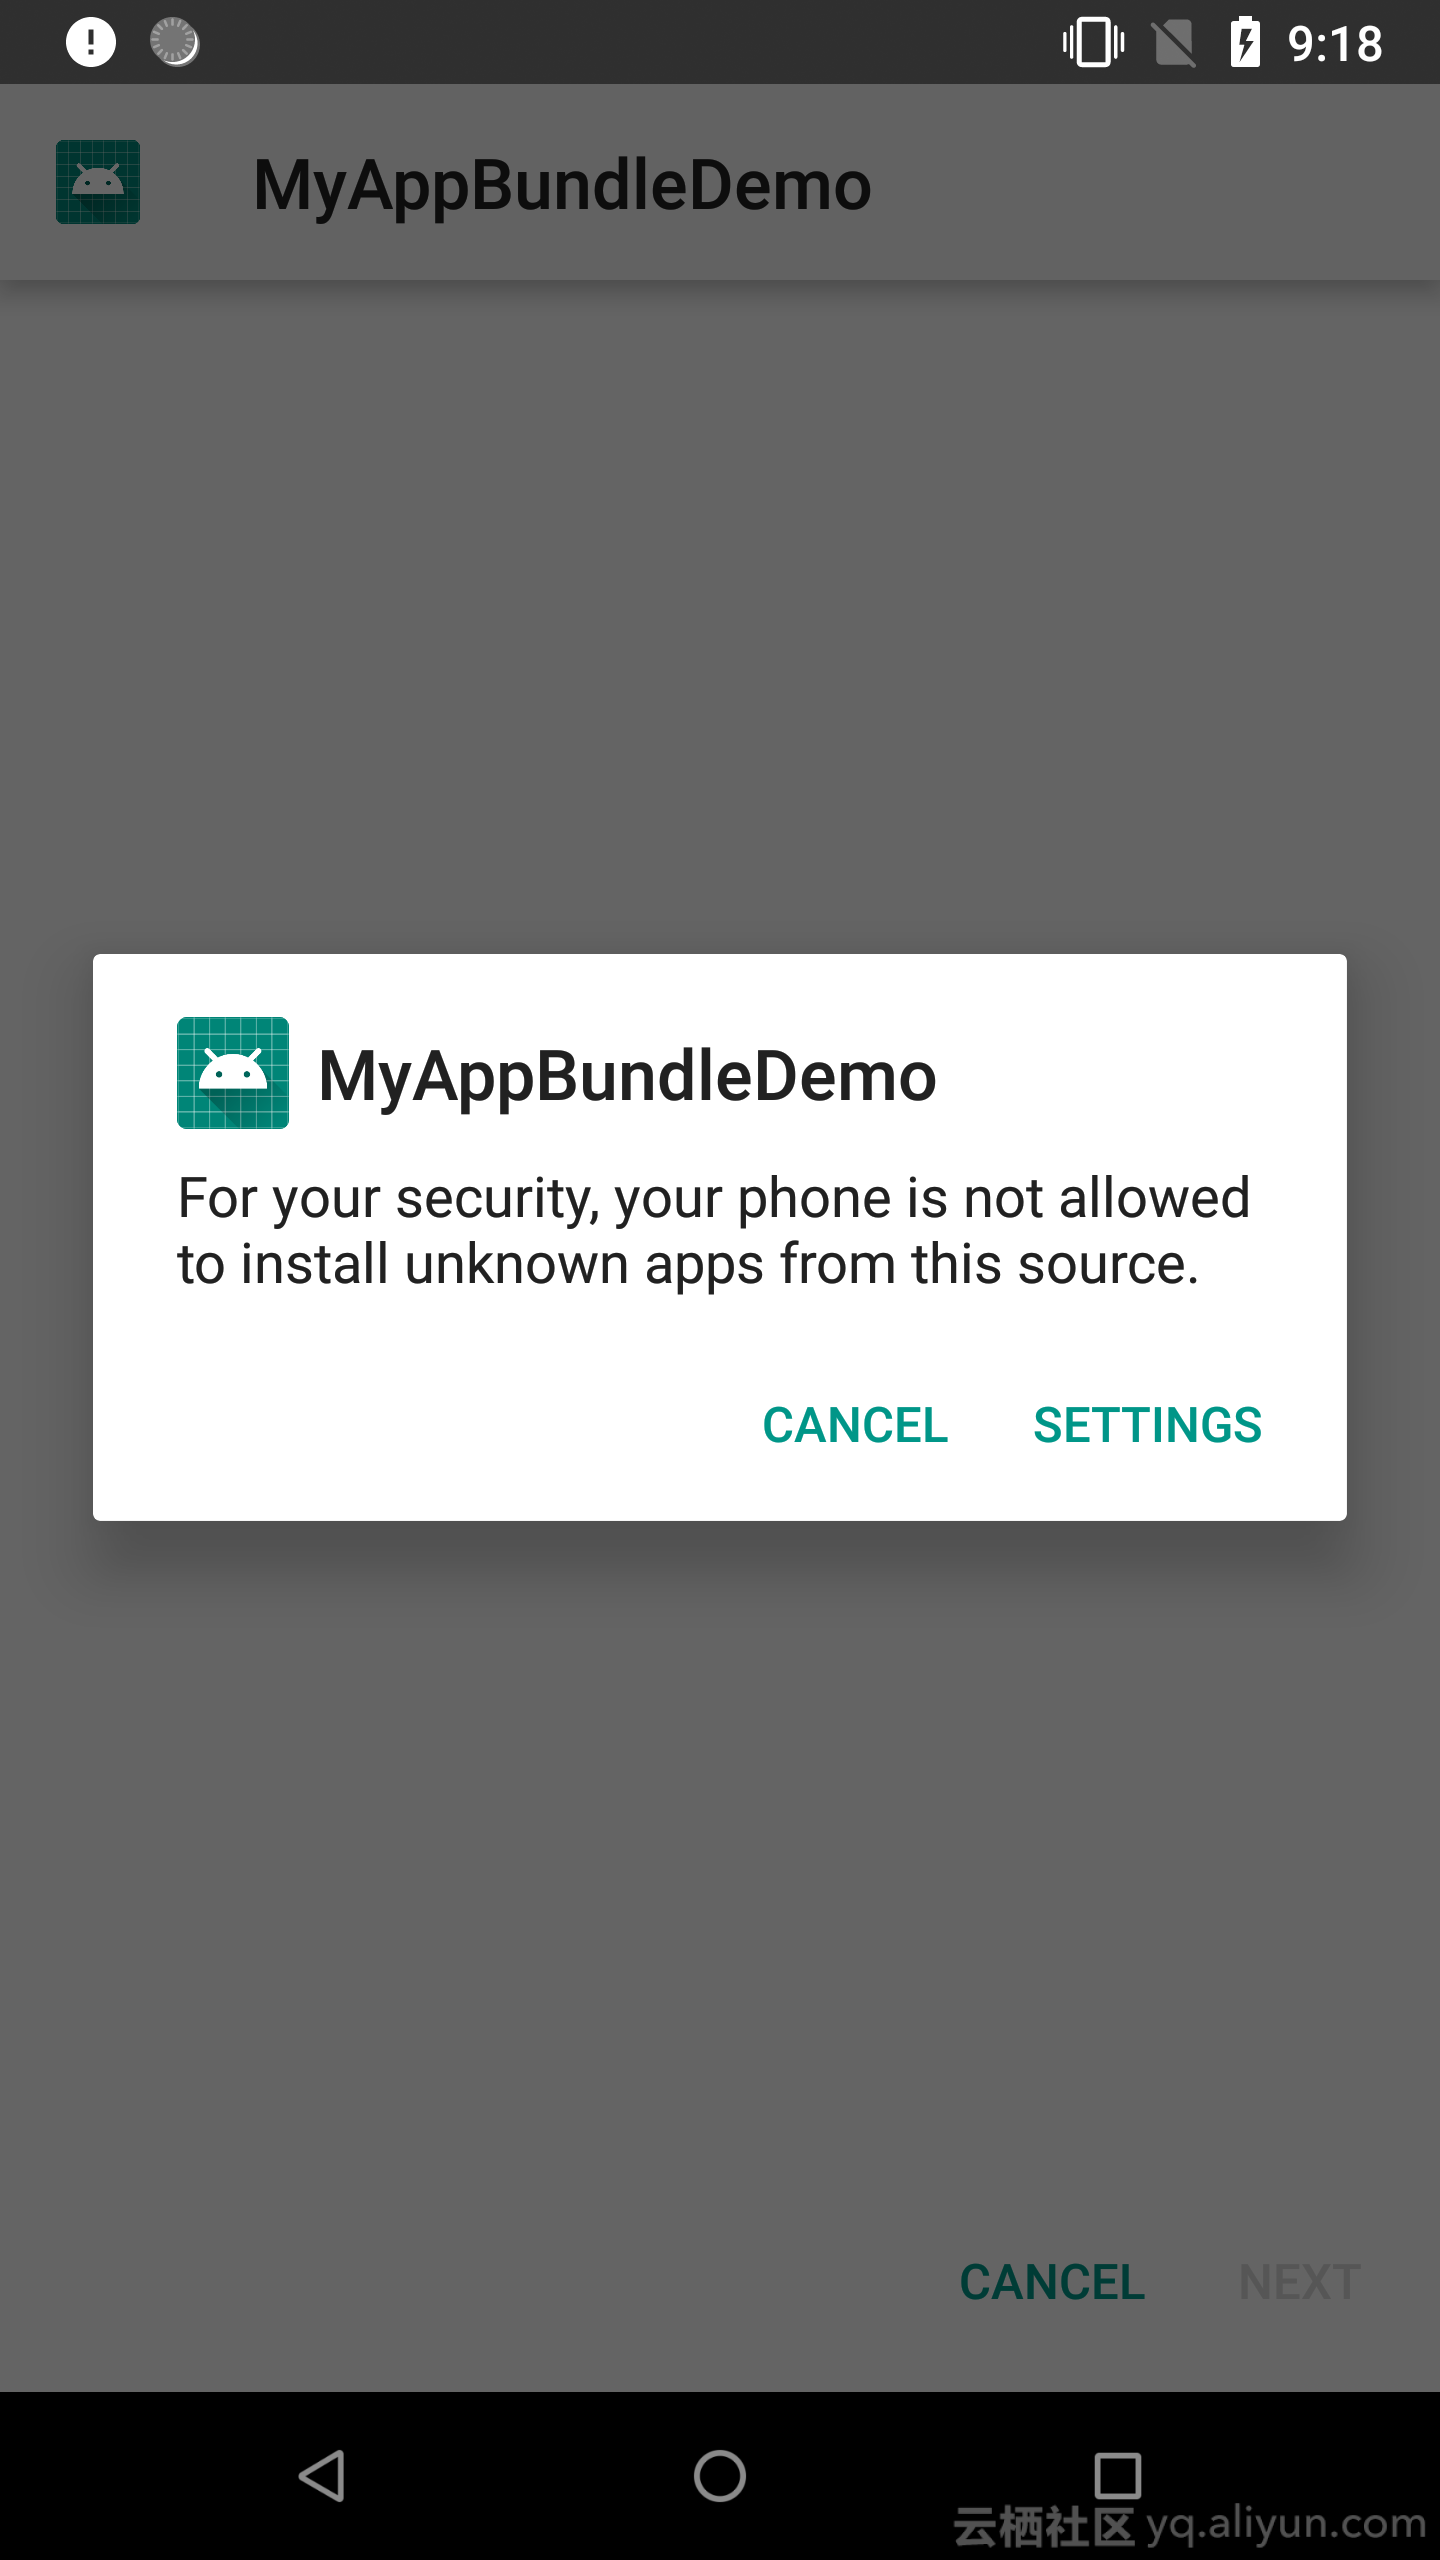
允许未知安装来源提示:
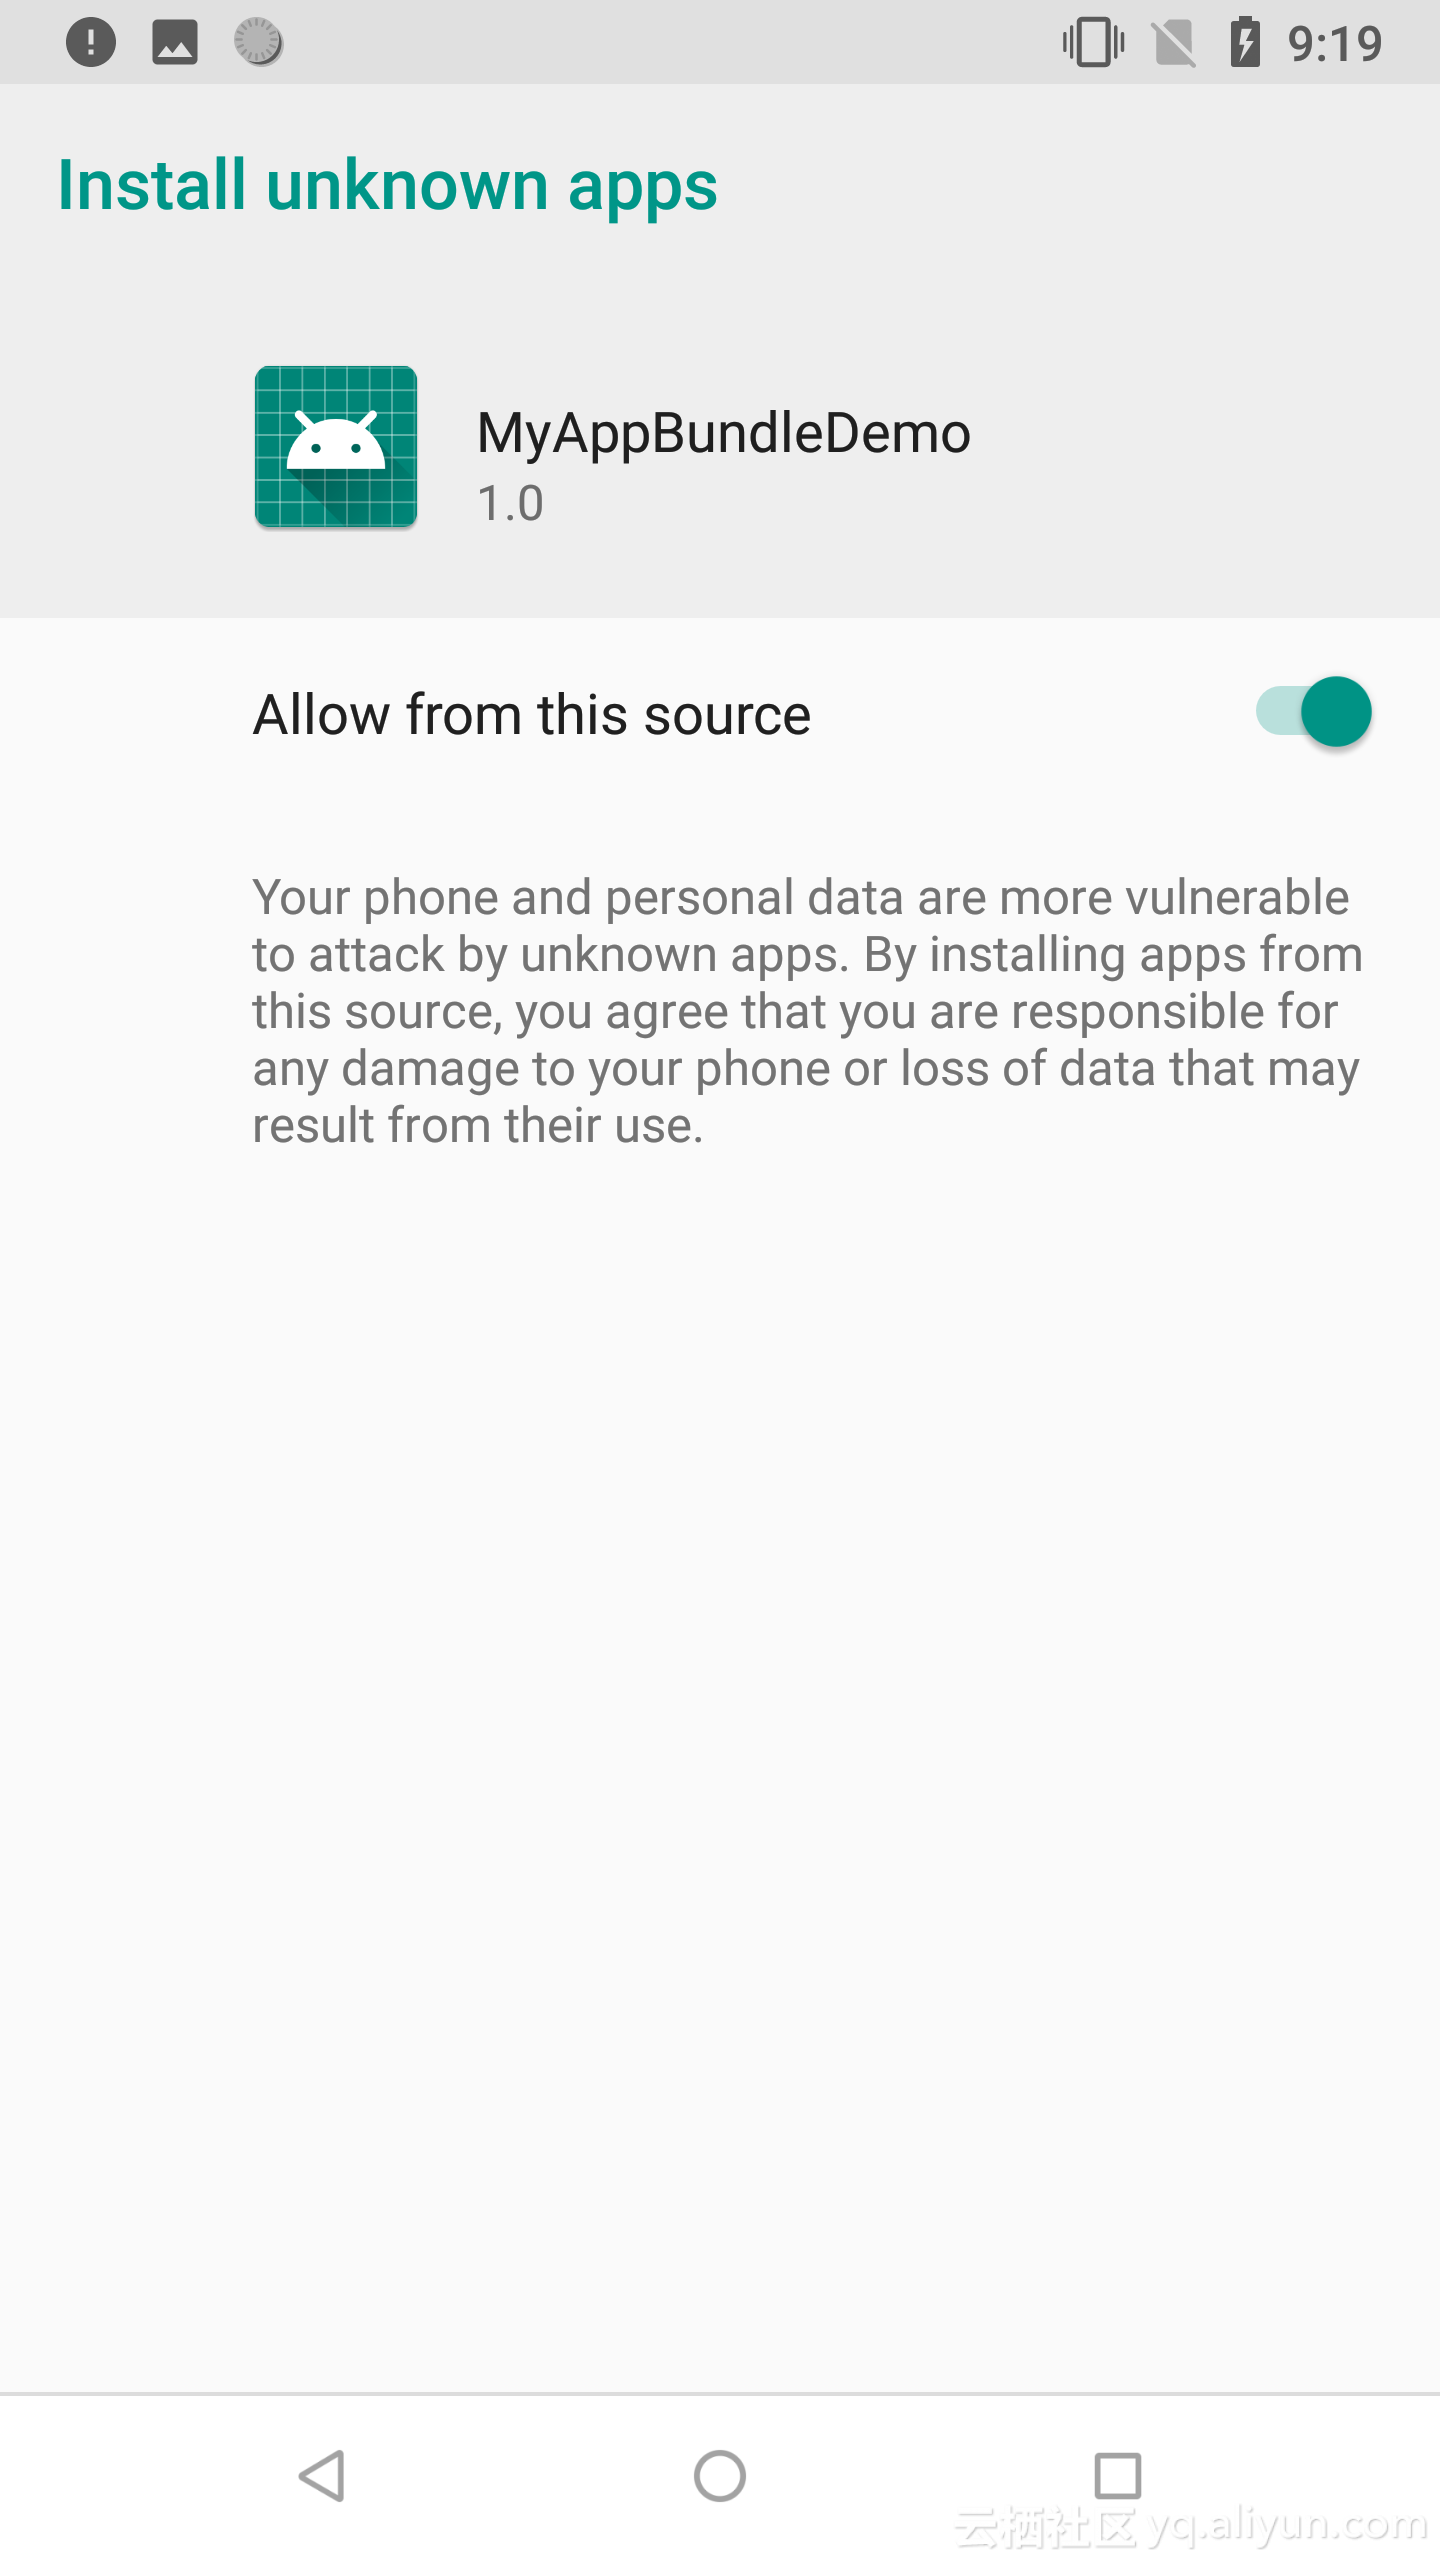
允许该App进行安装:
确认安装:
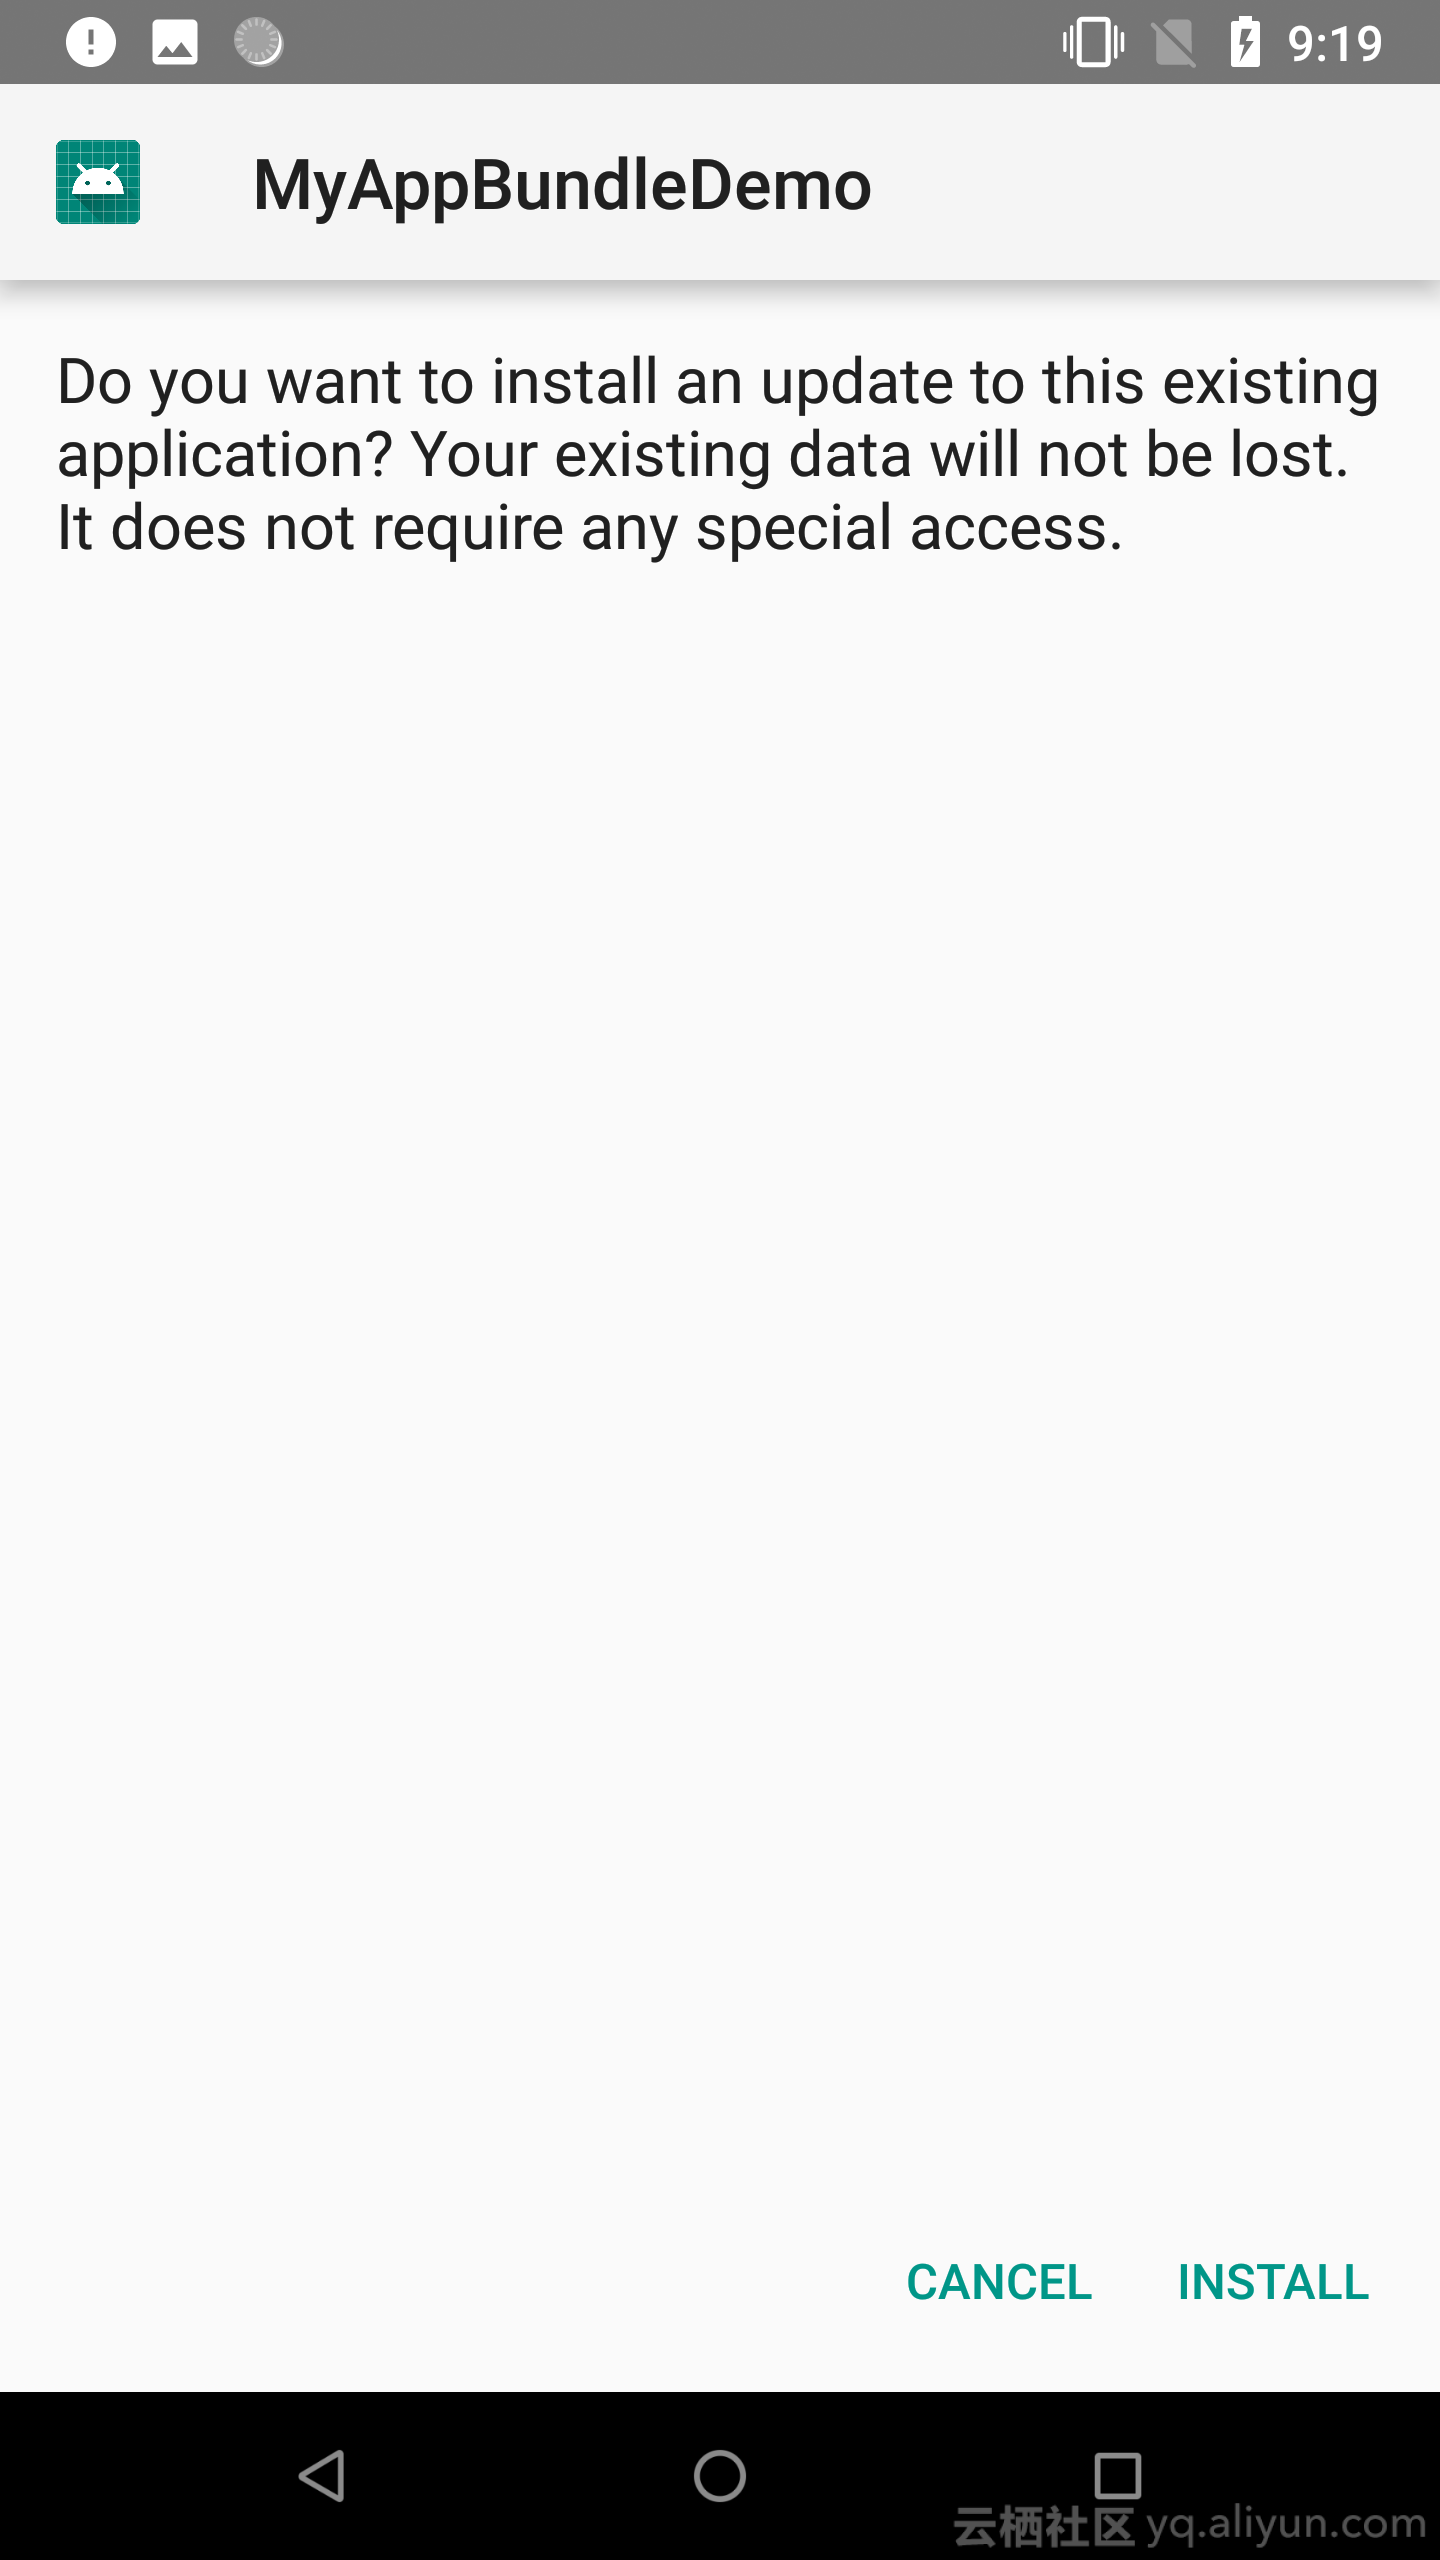
允许未知来源只需要一次,确认安装窗口在每次进行安装操作的时候都会弹出。可以看到,安装操作执行完毕后,split_feature0.apk确实发生了更新,而不是之前旧的,因为可以比较出与base.apk的安装的时间不同:
angler:/ # ls -l data/app/com.taobao.myappbundledemo-6XP2HdNBRWLquWr3U15iJA\=\=/
total 2376
-rw-r--r-- 1 system system  2392626 2018-05-16 12:04 base.apk
drwxr-xr-x 3 system system     4096 2018-05-16 12:18 lib
drwxrwx--x 3 system install    4096 2018-05-16 12:18 oat
-rw-r--r-- 1 system system    25412 2018-05-16 12:18 split_feature0.apk
安装后不杀死进程
然而还有个问题,在安装执行后,App会立马被杀死。而根据官方文档,在Android 7.0及以上版本的设备是可以直接请求安装模块后立即进行使用,如果直接杀死,那肯定体验很糟糕。因此应该可以找到办法,在安装后不杀当前进程。
然而从PackageInstaller.SessionParams 接口中我们并没有发现相关设置,是否有隐藏的API可以做到呢?我们通过反编译Play商店来寻找答案。
    private final synchronized void a(String str, long j, String str2, Bitmap bitmap, int i, int i2, fk fkVar, int i3) {
        if (this.c.containsKey(str)) {
            FinskyLog.e("Creating session for %s when one already exists", str);
        } else {
            SessionParams sessionParams = new SessionParams(i3);
            if (i3 == 2 && android.support.v4.os.a.a()) {
                sessionParams.setDontKillApp(true);
            }
            if (bitmap != null) {
                sessionParams.setAppIcon(bitmap);
            }
            if (!TextUtils.isEmpty(str2)) {
                sessionParams.setAppLabel(str2);
            }
            sessionParams.setAppPackageName(str);
            sessionParams.setInstallLocation(i);
            if (j > 0) {
                sessionParams.setSize(j);
            }
            if (android.support.v4.os.a.b()) {
                sessionParams.setInstallReason(i2);
            }
... ...sessionParams.setDontKillApp似乎正是我们需要的,它也的确不在公开API中,所以编辑器里面无法直接引用,我们通过反射打开它:
sessionParams.getClass().getDeclaredMethod("setDontKillApp", boolean.class).invoke(sessionParams, true);这样果然实现了安装后不杀进程。
还有一个疑问,虽然不杀死进程,但新安装的APK是否可以直接被现在的进程立即使用到呢?通过查看进程空间,我们发现,
7265874000-7265876000 r--p 00000000 fd:00 1439142                        /data/app/com.taobao.myappbundledemo-I1BztqjLDnwA1LZ7mxP6kg==/oat/arm64/split_feature0.odex
7265876000-7265879000 rw-p 00000000 00:00 0                              [anon:.bss]
7265879000-726587a000 r--p 00002000 fd:00 1439142                        /data/app/com.taobao.myappbundledemo-I1BztqjLDnwA1LZ7mxP6kg==/oat/arm64/split_feature0.odex
726587a000-726587b000 rw-p 00003000 fd:00 1439142                        /data/app/com.taobao.myappbundledemo-I1BztqjLDnwA1LZ7mxP6kg==/oat/arm64/split_feature0.odex
... ...
7265ce1000-7265d0b000 r-xp 00000000 fd:00 1439025                        /data/app/com.taobao.myappbundledemo-4tyKF-aM9SLiSM28Z4YkkQ==/lib/arm64/libnative-lib.so (deleted)
7265d0b000-7265d1b000 ---p 00000000 00:00 0
7265d1b000-7265d1d000 r--p 0002a000 fd:00 1439025                        /data/app/com.taobao.myappbundledemo-4tyKF-aM9SLiSM28Z4YkkQ==/lib/arm64/libnative-lib.so (deleted)
7265d1d000-7265d1e000 rw-p 0002c000 fd:00 1439025                        /data/app/com.taobao.myappbundledemo-4tyKF-aM9SLiSM28Z4YkkQ==/lib/arm64/libnative-lib.so (deleted)
7265d1e000-7265d30000 rw-p 00000000 00:00 0                              [anon:.bss]
7265d53000-7265d54000 ---p 00000000 00:00 0                              [anon:thread stack guard page]
7265d54000-7265d55000 ---p 00000000 00:00 0
7265d55000-7265e50000 rw-p 00000000 00:00 0                              [stack:20896]
7265e50000-7265e5e000 r--p 00000000 fd:00 1439058                        /data/app/com.taobao.myappbundledemo-4tyKF-aM9SLiSM28Z4YkkQ==/oat/arm64/base.odex (deleted)
7265e5e000-7265e5f000 r-xp 0000e000 fd:00 1439058                        /data/app/com.taobao.myappbundledemo-4tyKF-aM9SLiSM28Z4YkkQ==/oat/arm64/base.odex (deleted)
7265e5f000-7265e6d000 rw-p 00000000 00:00 0                              [anon:.bss]
7265e6d000-7265e6e000 r--p 0000f000 fd:00 1439058                        /data/app/com.taobao.myappbundledemo-4tyKF-aM9SLiSM28Z4YkkQ==/oat/arm64/base.odex (deleted)
7265e6e000-7265e6f000 rw-p 00010000 fd:00 1439058                        /data/app/com.taobao.myappbundledemo-4tyKF-aM9SLiSM28Z4YkkQ==/oat/arm64/base.odex (deleted)
7265eb1000-72661b4000 r--s 00000000 fd:00 1439062                        /data/app/com.taobao.myappbundledemo-4tyKF-aM9SLiSM28Z4YkkQ==/oat/arm64/base.vdex (deleted)
... ...
72ff84f000-72ff850000 r--s 00004000 fd:00 1439097 /data/app/com.taobao.myappbundledemo-I1BztqjLDnwA1LZ7mxP6kg==/split_feature0.apk从中可以看出,安装后,split_feature0.apk确实被加载进了进程的内存空间。并且安装路径发生了变化——data/app/com.taobao.myappbundledemo-后面跟字母由4tyKF-aM9SLiSM28Z4YkkQ变为I1BztqjLDnwA1LZ7mxP6kg并且base.odex文件显示为deleted。
上述是feature0还未被请求的情况,现在我们来看下,如果本地已经安装过了feature0模块,再次进行覆盖安装的话,会是怎么的情况:
7265874000-7265876000 r--p 00000000 fd:00 1439142                        /data/app/com.taobao.myappbundledemo-I1BztqjLDnwA1LZ7mxP6kg==/oat/arm64/split_feature0.odex (deleted)
7265876000-7265879000 rw-p 00000000 00:00 0                              [anon:.bss]
7265879000-726587a000 r--p 00002000 fd:00 1439142                        /data/app/com.taobao.myappbundledemo-I1BztqjLDnwA1LZ7mxP6kg==/oat/arm64/split_feature0.odex (deleted)
726587a000-726587b000 rw-p 00003000 fd:00 1439142                        /data/app/com.taobao.myappbundledemo-I1BztqjLDnwA1LZ7mxP6kg==/oat/arm64/split_feature0.odex (deleted)
... ...
7265ce1000-7265d0b000 r-xp 00000000 fd:00 1439025                        /data/app/com.taobao.myappbundledemo-4tyKF-aM9SLiSM28Z4YkkQ==/lib/arm64/libnative-lib.so (deleted)
7265d0b000-7265d1b000 ---p 00000000 00:00 0
7265d1b000-7265d1d000 r--p 0002a000 fd:00 1439025                        /data/app/com.taobao.myappbundledemo-4tyKF-aM9SLiSM28Z4YkkQ==/lib/arm64/libnative-lib.so (deleted)
7265d1d000-7265d1e000 rw-p 0002c000 fd:00 1439025                        /data/app/com.taobao.myappbundledemo-4tyKF-aM9SLiSM28Z4YkkQ==/lib/arm64/libnative-lib.so (deleted)
7265d1e000-7265d30000 rw-p 00000000 00:00 0                              [anon:.bss]
7265d53000-7265d54000 ---p 00000000 00:00 0                              [anon:thread stack guard page]
7265d54000-7265d55000 ---p 00000000 00:00 0
7265d55000-7265e50000 rw-p 00000000 00:00 0                              [stack:20896]
7265e50000-7265e5e000 r--p 00000000 fd:00 1439058                        /data/app/com.taobao.myappbundledemo-4tyKF-aM9SLiSM28Z4YkkQ==/oat/arm64/base.odex (deleted)
7265e5e000-7265e5f000 r-xp 0000e000 fd:00 1439058                        /data/app/com.taobao.myappbundledemo-4tyKF-aM9SLiSM28Z4YkkQ==/oat/arm64/base.odex (deleted)
7265e5f000-7265e6d000 rw-p 00000000 00:00 0                              [anon:.bss]
7265e6d000-7265e6e000 r--p 0000f000 fd:00 1439058                        /data/app/com.taobao.myappbundledemo-4tyKF-aM9SLiSM28Z4YkkQ==/oat/arm64/base.odex (deleted)
7265e6e000-7265e6f000 rw-p 00010000 fd:00 1439058                        /data/app/com.taobao.myappbundledemo-4tyKF-aM9SLiSM28Z4YkkQ==/oat/arm64/base.odex (deleted)
7265eb1000-72661b4000 r--s 00000000 fd:00 1439062                        /data/app/com.taobao.myappbundledemo-4tyKF-aM9SLiSM28Z4YkkQ==/oat/arm64/base.vdex (deleted)
...
72ff5a4000-72ff5a5000 r--s 00006000 fd:00 1439145 /data/app/com.taobao.myappbundledemo-6XP2HdNBRWLquWr3U15iJA==/split_feature0.apk可以发现,由于安装后,安装路径发生变化,data/app/com.taobao.myappbundledemo-I1BztqjLDnwA1LZ7mxP6kg==/oat/arm64/split_feature0.odex已经显示为deleted,同时,未发现有新安装路径下的split_feature0.apk被加载进内存。由此可以推断:如果模块已经被安装,当他进行覆盖安装更新时,必须冷启动App才能生效。
使用SpltCompat支持低版本
前面说过,Android 7.0及以上版本的设备可以在请求到新模块后直接使用。而对于6.0以下版本的机型,是无法直接使用下载的新模块的。不过Google也提供了一种兼容方式,使得低版本机型可以即时使用新模块,那就是采用SplitCompat。
可以用以下两种方式来接入SplitCompat:
一、直接继承SplitCompatApplication
public class MyApplication extends SplitCompatApplication {
    ...
}
二、在attachBaseContext中调用 SplitCompat.install
protected void attachBaseContext(Context base) {
    super.attachBaseContext(base);
    // Emulates installation of future on demand modules using SplitCompat.
    SplitCompat.install(this);
}
SplitCompatApplication 最后也是走的SplitCompat.install(this),这跟MultiDex十分类似,我们来看下SplitCompat.install(this)的实现。
public class SplitCompat {
    private static final AtomicReference<SplitCompat> a = new AtomicReference(null);
    private final Context b;
    private final c c;
    private final Set<String> d = new HashSet();

    public static boolean install(Context context) {
        return a(context, false);
    }

    private static boolean a(Context context, boolean z) {
        if (VERSION.SDK_INT >= 24) {
            return true;
        }
        if (VERSION.SDK_INT <= 19) {
            return false;
        }
        SplitCompat splitCompat = (SplitCompat) a.get();
        if (a.compareAndSet(null, new SplitCompat(context))) {
            com.google.android.play.core.splitinstall.a.a(new com.google.android.play.core.splitcompat.a.a(context, a.a(), new c(context, splitCompat.c, new com.google.android.play.core.splitcompat.c.b()), splitCompat.c));
            d.a(new l(splitCompat));
        }
        try {
            splitCompat.a(z);
            return true;
        } catch (Throwable e) {
            Log.e("SplitCompat", "Error installing additional splits", e);
            return false;
        }
    }

    private final synchronized void a(boolean z) {
        Iterator it;
        if (z) {
            this.c.a();
        } else {
            a.a().execute(new m(this));
        }
        Set<o> b = b(z);
        d dVar = new d(this.c);
        a a = b.a();
        ClassLoader classLoader = this.b.getClassLoader();
        if (z) {
            a.a(classLoader, dVar.a());
        } else {
            it = b.iterator();
            while (it.hasNext()) {
                Set a2 = dVar.a((o) it.next());
                if (a2 == null) {
                    it.remove();
                } else {
                    a.a(classLoader, a2);
                }
            }
        }
        Set<File> hashSet = new HashSet();
        for (o oVar : b) {
            if (a.a(classLoader, this.c.c(oVar.a()), oVar.b(), z)) {
                hashSet.add(oVar.b());
            }
        }
        AssetManager assets = this.b.getAssets();
        for (File path : hashSet) {
            int intValue = ((Integer) com.google.android.play.core.splitcompat.c.b.a(assets, "addAssetPath", Integer.class, String.class, path.getPath())).intValue();
            StringBuilder stringBuilder = new StringBuilder(39);
            stringBuilder.append("addAssetPath completed with ");
            stringBuilder.append(intValue);
            Log.d("SplitCompat", stringBuilder.toString());
        }
        for (o oVar2 : b) {
            String a3 = oVar2.a();
            StringBuilder stringBuilder2 = new StringBuilder(String.valueOf(a3).length() + 30);
            stringBuilder2.append("Split '");
            stringBuilder2.append(a3);
            stringBuilder2.append("' installation emulated");
            Log.d("SplitCompat", stringBuilder2.toString());
            this.d.add(oVar2.a());
        }
}addAssetPath这里可以明显看到是在新增资源了,另外需要注意的是,模块APK中的资源包id并非传统的0x7f,而是往下递减的0x7e、0x7d、...
加载代码和so的地方是在:
public static a a() {
    if (VERSION.SDK_INT == 21) {
        return new c();
    }
    if (VERSION.SDK_INT == 22) {
        return new f();
    }
    if (VERSION.SDK_INT == 23) {
        return new g();
    }
    throw new AssertionError();
}


final class c implements a {
    c() {
    }

    static Object a(ClassLoader classLoader) {
        return b.b(classLoader, "pathList", Object.class).a();
    }

    static boolean a(ClassLoader classLoader, File file, File file2, boolean z, e eVar) {
        Collection arrayList = new ArrayList();
        Object a = a(classLoader);
        a c = b.c(a, "dexElements", Object.class);
        List<Object> asList = Arrays.asList((Object[]) c.a());
        List arrayList2 = new ArrayList();
        for (Object b : asList) {
            arrayList2.add((File) b.b(b, "zip", File.class).a());
        }
        if (arrayList2.contains(file2)) {
            return true;
        }
        int i = 0;
        if (!z) {
            if (!new File((String) b.a(a.getClass(), "optimizedPathFor", String.class, File.class, file2, File.class, file)).exists()) {
                return false;
            }
        }
        c.a(eVar.a(a, new ArrayList(Collections.singleton(file2)), file, arrayList));
        if (arrayList.isEmpty()) {
            return true;
        }
        Throwable kVar = new k("DexPathList.makeDexElement failed");
        ArrayList arrayList3 = (ArrayList) arrayList;
        int size = arrayList3.size();
        while (i < size) {
            Object obj = arrayList3.get(i);
            i++;
            IOException iOException = (IOException) obj;
            Log.e("SplitCompat", "DexPathList.makeDexElement failed", iOException);
            com.google.a.a.a.a.a.a.a(kVar, iOException);
        }
        b.c(a, "dexElementsSuppressedExceptions", IOException.class).a(arrayList);
        throw kVar;
    }

    static void b(ClassLoader classLoader, Set<File> set) {
        if (!set.isEmpty()) {
            Collection hashSet = new HashSet();
            for (File file : set) {
                String str = "Splitcompat";
                String str2 = "Adding native library parent directory: ";
                String valueOf = String.valueOf(file.getParentFile().getAbsolutePath());
                Log.d(str, valueOf.length() != 0 ? str2.concat(valueOf) : new String(str2));
                hashSet.add(file.getParentFile());
            }
            a c = b.c(a(classLoader), "nativeLibraryDirectories", File.class);
            hashSet.removeAll(Arrays.asList((File[]) c.a()));
            int size = hashSet.size();
            StringBuilder stringBuilder = new StringBuilder(30);
            stringBuilder.append("Adding directories ");
            stringBuilder.append(size);
            Log.d("Splitcompat", stringBuilder.toString());
            c.a(hashSet);
        }
    }

    public final void a(ClassLoader classLoader, Set<File> set) {
        b(classLoader, set);
    }

    public final boolean a(ClassLoader classLoader, File file, File file2, boolean z) {
        return a(classLoader, file, file2, z, new d());
    }
}这里只列出了SDK = 21情况下的c类,SDK = 22和SDK = 23的情况其实也大同小异。熟悉Instant Run或者热修复的同学都能一眼看出端倪了,这不就是新增DEX和so库吗?确实,SplitCompat的本质,就是类似冷启动的热修复的方式,插入新模块包。
模块间依赖
通过分析运行时各个模块类中ClassLoader的情况,我们可以大致看出模块间的依赖关系。
我们发现,所有模块中的类其实都是用的同一个ClassLoader:
dalvik.system.PathClassLoader
[DexPathList[
    [zip file "/data/app/com.taobao.myappbundledemo-y4Ih9MutYd4z43hpON6LVg==/base.apk",
     zip file "/data/app/com.taobao.myappbundledemo-y4Ih9MutYd4z43hpON6LVg==/split_feature0.apk",
     zip file "/data/app/com.taobao.myappbundledemo-y4Ih9MutYd4z43hpON6LVg==/split_feature1.apk"],
    nativeLibraryDirectories=[
        /data/app/com.taobao.myappbundledemo-y4Ih9MutYd4z43hpON6LVg==/lib/arm64,
        /data/app/com.taobao.myappbundledemo-y4Ih9MutYd4z43hpON6LVg==/base.apk!/lib/arm64-v8a,
        /data/app/com.taobao.myappbundledemo-y4Ih9MutYd4z43hpON6LVg==/split_feature0.apk!/lib/arm64-v8a,
        /data/app/com.taobao.myappbundledemo-y4Ih9MutYd4z43hpON6LVg==/split_feature1.apk!/lib/arm64-v8a,
        /system/lib64, /vendor/lib64]
]]
而这个ClassLoader里面包含了三个模块所有的APK路径与so路径,可见模块之间的类和so库的访问是完全相通的。也就是说一个模块中声明的类,能够直接在另一个模块中毫无差别的使用,就像使用自己模块中的类一样。而如果两个模块引入了相同的依赖,两个依赖会被分别打进两个模块的APK中,这就可能引发问题。所以,如果两个不同的模块依赖了相同的库,需要先改为provided(gradle 3.0.0以上称为compileOnly)依赖,而在base模块中引入compile(gradle 3.0.0以上称为api)依赖。
优势与局限
App Bundles提供了一整套动态模块化App的机制,依托Google官方的插件支持,开发者可以直接进行模块化开发,而不再需要自己造轮子,也可以避免Android官方插件不断升级带来的兼容性问题。Google Play商店天然承载了更新APK的使命,用户可以直接在商店上发布新模块APK,来实现静默升级,由于是直接安装,因而不存在任何兼容性问题。按需获取对应特征APK,能够极大减小本地安装的包大小。
然而它的局限也是比较多的,
- 首先,Goolge Play商店无法在国内正常使用。
- 其次,模块更新只从Android 5.0开始支持,对于大量留存的老设备,都无法享受这一福利。
- manifest中新注册的组件与系统显示的资源都无法即时使用。官方文档说明
- 对于已有模块的更新,必须进行冷启动。
当然,随着时间的推移,App Bundles这一套模式对于海外应用仍具有很强的吸引力。
还需要注意的是,App Bundles没有实现多模块之间包依赖的自动管理。也就是说各个模块的依赖是独立的,因此各个模块对于使用的相同的依赖都会各自引入,从而导致冗余。并且,若多个模块使用相同依赖包的不同版本,可能还会有兼容性问题。因此需要在各个模块中进行provided依赖,而把公共依赖放入base模块中。
引申
回到我们之前抛出的问题,我们是否可以直接利用Google为我们提供好的构建机制,模仿Play商店构造一个SDK对App自身进行更新呢?
通过前面的技术分析,我们有两种方案可以实现自行更新:
- 直接利用PackageInstaller进行安装,这种方式最接近App Bundles的在Google Play中的实际作用效果,但是,最大问题就是会对用户造成极大的干扰,首先,很多用户出于安全考虑,是不会轻易允许未知安装来源的。另外,每次安装都会弹出界面,也会打断用户正常的操作流程,使用户体验不再流畅。并且如果需要通过国内各个厂商应用商店来更新,各大商店可能没有这么快支持APK分包功能。
- 模仿SplitCompat的方式,在所有机型版本上,本地下载后直接加载安装包。这种方式和热修复插件化这类技术比较类似,问题是也需要不断对新机型进行维护,并且未来随着Google对私有API的更进一步收紧,反射技术可能会受到更大限制,未来对机型兼容性的支持是比较大的挑战。并且无法像直接安装那样能够享受到JIT优化带来的性能改进。
App Bundles的模块化,主要基于APK直接安装的方式,不需要用户任何对系统组件的修改,就能天然获得原生优化能力(如JIT、DEX优化等),因而不存在任何兼容性问题。这个思路与传统组件化/插件化方式截然不同,因为Google作为Android官方主体,把控了Play商店这个唯一安装渠道(国内除外),所以可以采用这种玩法来做到前所未有的稳定性和动态能力。App Bundles也存在一个问题,就是无法在运行过程中直接新增四大组件,需要覆盖安装base模块之后再重启。而后面两个方案由于都是基于App Bundles的,因而有更大局限性。
目前看来,指望Google回归恐怕遥遥无期,不过这或许能吸引国内各个厂商自带应用市场的跟进,甚至可能像统一推送那样协商出一套符合国情的标准,从而改善国内的App更新环境。不过,App Bunndles的一些思想,如细致化配置,确实值得现有的模块化方案进行借鉴和吸收。