一、开发环境搭建
1、安装Node.js
下载地址:https://nodejs.org/zh-cn/download/
按提示安装,根据系统环境不同,可能需要安装C++Build和Python.
验证
C:\Users\zhoujy>node --version
v14.15.0

C:\Users\zhoujy>npm --version
6.14.8
2、安装Vue组件
因直接使用npm国外源安装速度较慢,推荐使用国内淘宝源
npm config set registry https://registry.npm.taobao.org

#验证

npm config get registry
安装Vue最新稳定版
# 最新稳定版
npm install vue
安装其他依赖包
npm install webpack -g
npm install vue-router -g
npm install vue-cli -g
二、创建项目与结构
vue init webpack my-vueapp

? Project name vue-application1
? Project description descript
? Vue build standalone
? Install vue-router? Yes
? Use ESLint to lint your code? No
? Set up unit tests No
? Setup e2e tests with Nightwatch? No
? Should we run `npm install` for you after the project has been created? (recommended) npm

   vue-cli · Generated "VueApp1".


# Installing project dependencies ...
# ========================

npm WARN deprecated [email protected]: Deprecated. Please use wanted {"os":"darwin","arch":"any"} (current: {"os":"win32","arch":"x64"})

added 1274 packages from 675 contributors in 43.558s

40 packages are looking for funding
  run `npm fund` for details


# Project initialization finished!
# ========================

To get started:

  cd VueApp1
  npm run dev

Documentation can be found at https://vuejs-templates.github.io/webpack
目录结构
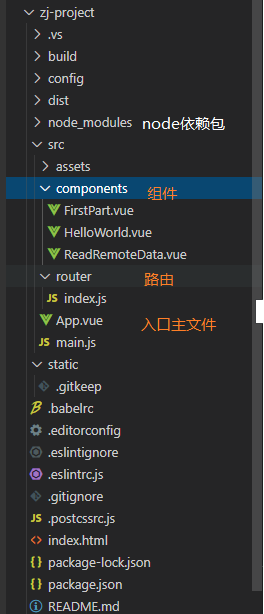
这时候项目已经可以运行,进入项目目录,运行
>npm run dev

DONE  Compiled successfully in 3221ms                                                                                                                                                                                                                                                                            下午3:27:02

 I  Your application is running here: http://localhost:8080
浏览器访问 http://localhost:8080

三、创建第一个组件
在compenonts目录下创建第一个组件FirstPart.vue 代码如下
<template>
  <div class="FirstPart">
    <h1>{

   { msg }}</h1>
    <h2 class="FirstPart">{

   {msg}}</h2>
    <input type="text" v-model="msg">
  </div>
</template>
<script>
export default {
  name: 'FirstPart',
  data () {
    return {
      msg: 'Hello world!第一个自定义组件'
    }
  }
}
</script>
<style>

</style>
四、加入路由使其可以访问
打开router目录下index.js,添加路径 /FirstPart
import Vue from 'vue'
import Router from 'vue-router'
import VueResource from 'vue-resource'
import HelloWorld from '@/components/HelloWorld'
import FirstPart from '@/components/FirstPart'
import ReadRemoteData from '@/components/ReadRemoteData'

Vue.use(Router)
Vue.use(VueResource)
export default new Router({
  routes: [
    {
      path: '/',
      name: 'HelloWorld',
      component: HelloWorld
    },
    {
      path: '/FirstPart',
      name: 'FirstPart',
      component: FirstPart
    },
    {
      path: '/ReadRemoteData',
      name: 'ReadRemoteData',
      component: ReadRemoteData
    }
  ]
})
保存后,浏览器访问地址http://localhost:8080/#/FirstPart, 内容已可访问如下。
五、服务器异步数据交互
异步数据访问使用vue-resource,在项目目录下安装vue-resource包
npm install vue-resource在components目录下,添加ReadRemoteData.vue组件。
<template>
  <div class="ReadRemoteData">
    请输入关键字:<input type="text" v-model="keyword" @keyup="sendJsonP(keyword)">
    <ul>
        <li v-for="r in result">{

   { r }}</li>
    </ul>
    <FirstPart></FirstPart>
  </div>
</template>
<script>
import FirstPart from '@/components/FirstPart'
import Vue from 'vue'
import VueResource from 'vue-resource'
Vue.use(VueResource)
export default {
  name: 'ReadRemoteData',
  components: {
    FirstPart
  },
  data () {
    return {
      keyword: '',
      result: ''
    }
  },
  methods: {
      sendJsonP(keyword) {
        let url = 'https://www.baidu.com/sugrec?pre=1&p=3&ie=utf-8&json=1&prod=pc&from=pc_web';
        this.$http.jsonp(url, {
          params: {
            wd: keyword
          },
          jsonp: 'cb'//jsonp默认是callback,百度缩写成了cb,所以需要指定下                     }
        }).then(res => {
          if (res.data.g) {
            this.result = res.data.g.map(x => x['q']);
          } else {
            this.result = [];
          }
        });
      }
  }
}
</script>
同样在路由中加入路径例使其可访问,并且在这个组件中可以重用刚才创建的组件FirstPart。Vue的组件可以重用和嵌套使用非常的方便。保存后访问http://localhost:8080/#/ReadRemoteData,内容如下

六、Visual Studio 2019创建开发Vue项目
1、Visual Studio 2019中导入node.js开发环境
菜单:工具->获取工具和功能,选中 node.js开发
安装完成后,进入Visual studio 2019, 新建项目->基于Vue.js的Web应用程序

下一步后,创建。创建后,Visual studio会在后台自动用npm进行文件安装,根据网络情况等完成就可以运行了。还可以用解决方案进行包管理及添加组件、文件等管理。


七、极简原理
根据Vue规则书写的网页会被node.js编译成一个.jsp文件由浏览器来执行渲染成网页,如下

app.js部分内容,主要是函数库和生成网页的内容
/******/ (function(modules) { // webpackBootstrap
/******/ 	function hotDisposeChunk(chunkId) {
/******/ 		delete installedChunks[chunkId];
/******/ 	}
/******/ 	var parentHotUpdateCallback = window["webpackHotUpdate"];
/******/ 	window["webpackHotUpdate"] =
/******/ 	function webpackHotUpdateCallback(chunkId, moreModules) { // eslint-disable-line no-unused-vars
/******/ 		hotAddUpdateChunk(chunkId, moreModules);
/******/ 		if(parentHotUpdateCallback) parentHotUpdateCallback(chunkId, moreModules);
/******/ 	} ;
/******/
/******/ 	function hotDownloadUpdateChunk(chunkId) { // eslint-disable-line no-unused-vars

......

......

/***/ "./node_modules/babel-loader/lib/index.js!./node_modules/vue-loader/lib/selector.js?type=script&index=0!./src/components/ReadRemoteData.vue":
/***/ (function(module, __webpack_exports__, __webpack_require__) {

"use strict";
eval("/* harmony import */ var __WEBPACK_IMPORTED_MODULE_0__components_FirstPart__ = __webpack_require__(\"./src/components/FirstPart.vue\");\n/* harmony import */ var __WEBPACK_IMPORTED_MODULE_1_vue__ = __webpack_require__(\"./node_modules/vue/dist/vue.esm.js\");\n/* harmony import */ var __WEBPACK_IMPORTED_MODULE_2_vue_resource__ = __webpack_require__(\"./node_modules/[email protected]@vue-resource/dist/vue-resource.esm.js\");\n//\n//\n//\n//\n//\n//\n//\n//\n//\n\n\n\n\n__WEBPACK_IMPORTED_MODULE_1_vue__[\"default\"].use(__WEBPACK_IMPORTED_MODULE_2_vue_resource__[\"a\" /* default */]);\n/* harmony default export */ __webpack_exports__[\"a\"] = ({\n  name: 'ReadRemoteData',\n  components: {\n    FirstPart: __WEBPACK_IMPORTED_MODULE_0__components_FirstPart__[\"a\" /* default */]\n  },\n  data: function data() {\n    return {\n      keyword: '',\n      result: ''\n    };\n  },\n\n  methods: {\n    sendJsonP: function sendJsonP(keyword) {\n      var _this = this;\n\n      var url = 'https://www.baidu.com/sugrec?pre=1&p=3&ie=utf-8&json=1&prod=pc&from=pc_web';\n      this.$http.jsonp(url, {\n        params: {\n          wd: keyword\n        },\n        jsonp: 'cb' //jsonp默认是callback,百度缩写成了cb,所以需要指定下                     }\n      }).then(function (res) {\n        if (res.data.g) {\n          _this.result = res.data.g.map(function (x) {\n            return x['q'];\n          });\n        } else {\n          _this.result = [];\n        }\n      });\n    }\n  }\n\n});//# sourceURL=[module]\n//# sourceMappingURL=data:application/json;charset=utf-8;base64,eyJ2ZXJzaW9uIjozLCJmaWxlIjoiLi9ub2RlX21vZHVs
执行npm run build时会在/dist目录下生成需发布的CSS jsp文件等,用webpack会更优发布的jsp库和资源等
最后希望微软出一个所见即所得的编辑环境,类似传统winFormApp程序,导入各种组件库把网页画好,加上一点事件驱动代码就可以运行了,前端一键开发,那微软定能重现VB时的辉煌! ^-^.
参考文档