在本快速入门中,将对通过OpenID Connect协议进行的交互式用户身份验证的支持添加到上一章中构建的IdentityServer中。
实现后,我们将创建一个将使用IdentityServer进行身份验证的MVC应用程序。
本文假设已创建《IdentityServer4 (IDS4) 快速入门》一文中的IdentityServer服务项目,将修改部分配置以支持带UI的MVC客户端。
系统环境与上文相同。
一、添加UI
从QuickStart\src\IdentitySever目录,运行以下命令。
dotnet new is4ui运行此命令后将在IdentityServer项目中增加支持UI模版, 添加MVC UI后,还需要在DI系统和管道中启用MVC。当您查看时,Startup.cs您会在ConfigureServices和Configure方法中找到注释,这些注释告诉您如何启用MVC。
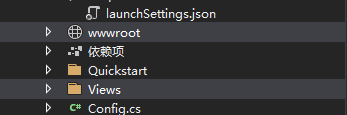
你可以在IdentityServer项目中看到新增了wwwroot、Views目录和一些支持文件。
二、创建一个MVC客户端
从QuickStart\src目录下,运行以下命令。
dotnet new mvc -n MvcClient
cd ..
dotnet sln add .\src\MvcClient\MvcClient.csproj
添加依赖包,在src\MvcClient目录下运行
dotnet add package Microsoft.AspNetCore.Authentication.OpenIdConnect打开MvcClient项目,在startup.cs文件中添加代码,修改完成后如下:
using System;
using System.Collections.Generic;
using System.Linq;
using System.Threading.Tasks;
using Microsoft.AspNetCore.Builder;
using Microsoft.AspNetCore.Hosting;
using Microsoft.AspNetCore.HttpsPolicy;
using Microsoft.Extensions.Configuration;
using Microsoft.Extensions.DependencyInjection;
using Microsoft.Extensions.Hosting;
using System.IdentityModel.Tokens.Jwt;

namespace MvcClient
{
    public class Startup
    {
        public Startup(IConfiguration configuration)
        {
            Configuration = configuration;
        }

        public IConfiguration Configuration { get; }

        // This method gets called by the runtime. Use this method to add services to the container.
        public void ConfigureServices(IServiceCollection services)
        {
            services.AddControllersWithViews();

            JwtSecurityTokenHandler.DefaultMapInboundClaims = false;

            services.AddAuthentication(options =>
            {
                options.DefaultScheme = "Cookies";
                options.DefaultChallengeScheme = "oidc";
            })
                .AddCookie("Cookies")
                .AddOpenIdConnect("oidc", options =>
                {
                    options.Authority = "https://localhost:5001";

                    options.ClientId = "mvc";
                    options.ClientSecret = "secret";
                    options.ResponseType = "code";

                    options.SaveTokens = true;
                });
        }

        // This method gets called by the runtime. Use this method to configure the HTTP request pipeline.
        public void Configure(IApplicationBuilder app, IWebHostEnvironment env)
        {
            if (env.IsDevelopment())
            {
                app.UseDeveloperExceptionPage();
            }
            else
            {
                app.UseExceptionHandler("/Home/Error");
                // The default HSTS value is 30 days. You may want to change this for production scenarios, see https://aka.ms/aspnetcore-hsts.
                app.UseHsts();
            }
            app.UseHttpsRedirection();

            /*
            app.UseStaticFiles();

            app.UseRouting();

            app.UseAuthorization();

            app.UseEndpoints(endpoints =>
            {
                endpoints.MapControllerRoute(
                    name: "default",
                    pattern: "{controller=Home}/{action=Index}/{id?}");
            });
            */

            app.UseStaticFiles();

            app.UseRouting();
            app.UseAuthentication();
            app.UseAuthorization();

            app.UseEndpoints(endpoints =>
            {
                endpoints.MapDefaultControllerRoute()
                    .RequireAuthorization();
            });
        }
    }
}
AddAuthentication 将身份验证服务添加到依赖注入DI。
使用一个Cookie在本地登录的用户(通过"Cookies"为DefaultScheme),和设定的DefaultChallengeScheme到oidc,因为当我们需要用户登录,我们将使用ID连接协议。
然后AddCookie,我们使用添加可以处理cookie的处理程序。
最后,AddOpenIdConnect用于配置执行OpenID Connect协议的处理程序。该Authority指示了信任令牌服务所在。然后,我们通过ClientId和标识此客户ClientSecret。 SaveTokens用于将来自IdentityServer的令牌保留在cookie中
还需要修改Views\Home\index.cshtml主视图以显示用户的声明以及cookie属性:
@using Microsoft.AspNetCore.Authentication

<h2>Claims</h2>

<dl>
    @foreach (var claim in User.Claims)
    {
        <dt>@claim.Type</dt>
        <dd>@claim.Value</dd>
    }
</dl>

<h2>Properties</h2>

<dl>
    @foreach (var prop in (await Context.AuthenticateAsync()).Properties.Items)
    {
        <dt>@prop.Key</dt>
        <dd>@prop.Value</dd>
    }
</dl>
三、修改IdentityServer服务端
1、添加对OpenID Connect Identity Scope的支持
修改config.cs文件,通过修改以下属性来添加对标准openid(主题ID)和profile(名字,姓氏等)范围的支持:
 public static IEnumerable<IdentityResource> IdentityResources =>
            new IdentityResource[]
            {
                new IdentityResources.OpenId(),
                new IdentityResources.Profile(),
};在startup.cs文件ConfigureServices中位置向IdentityServer注册身份资源:
 var builder = services.AddIdentityServer(options =>
            {
                // see https://identityserver4.readthedocs.io/en/latest/topics/resources.html
                options.EmitStaticAudienceClaim = true;
            })
                .AddInMemoryIdentityResources(Config.IdentityResources)
                .AddInMemoryApiScopes(Config.ApiScopes)
                .AddInMemoryClients(Config.Clients);
2、添加测试用户
示例UI还带有一个内存中的“用户数据库”。可以通过添加AddTestUsers扩展方法在IdentityServer中启用它:
  var builder = services.AddIdentityServer(options =>
            {
                // see https://identityserver4.readthedocs.io/en/latest/topics/resources.html
                options.EmitStaticAudienceClaim = true;
            })
                .AddInMemoryIdentityResources(Config.IdentityResources)
                .AddInMemoryApiScopes(Config.ApiScopes)
                .AddInMemoryClients(Config.Clients)
.AddTestUsers(TestUsers.Users);3、将MVC客户端添加到IdentityServer配置
修改config.cs文件,客户端列表应如下所示:
public static IEnumerable<Client> Clients =>
    new List<Client>
    {
        // machine to machine client (from quickstart 1)
        new Client
        {
            ClientId = "client",
            ClientSecrets = { new Secret("secret".Sha256()) },

            AllowedGrantTypes = GrantTypes.ClientCredentials,
            // scopes that client has access to
            AllowedScopes = { "api1" }
        },
        // interactive ASP.NET Core MVC client
        new Client
        {
            ClientId = "mvc",
            ClientSecrets = { new Secret("secret".Sha256()) },

            AllowedGrantTypes = GrantTypes.Code,

            // where to redirect to after login
            RedirectUris = { "https://localhost:5002/signin-oidc" },

            // where to redirect to after logout
            PostLogoutRedirectUris = { "https://localhost:5002/signout-callback-oidc" },

            AllowedScopes = new List<string>
            {
                IdentityServerConstants.StandardScopes.OpenId,
                IdentityServerConstants.StandardScopes.Profile
            }
        }
    };
四、测试运行
修改MvcClient项目launchSettings.json文件,将运行端口设为5002(5001已被IdentityServer占用)
"MvcClient": {
"commandName": "Project",
"dotnetRunMessages": "true",
"launchBrowser": true,
"applicationUrl": "https://localhost:5002",
"environmentVariables": {
"ASPNETCORE_ENVIRONMENT": "Development"
}
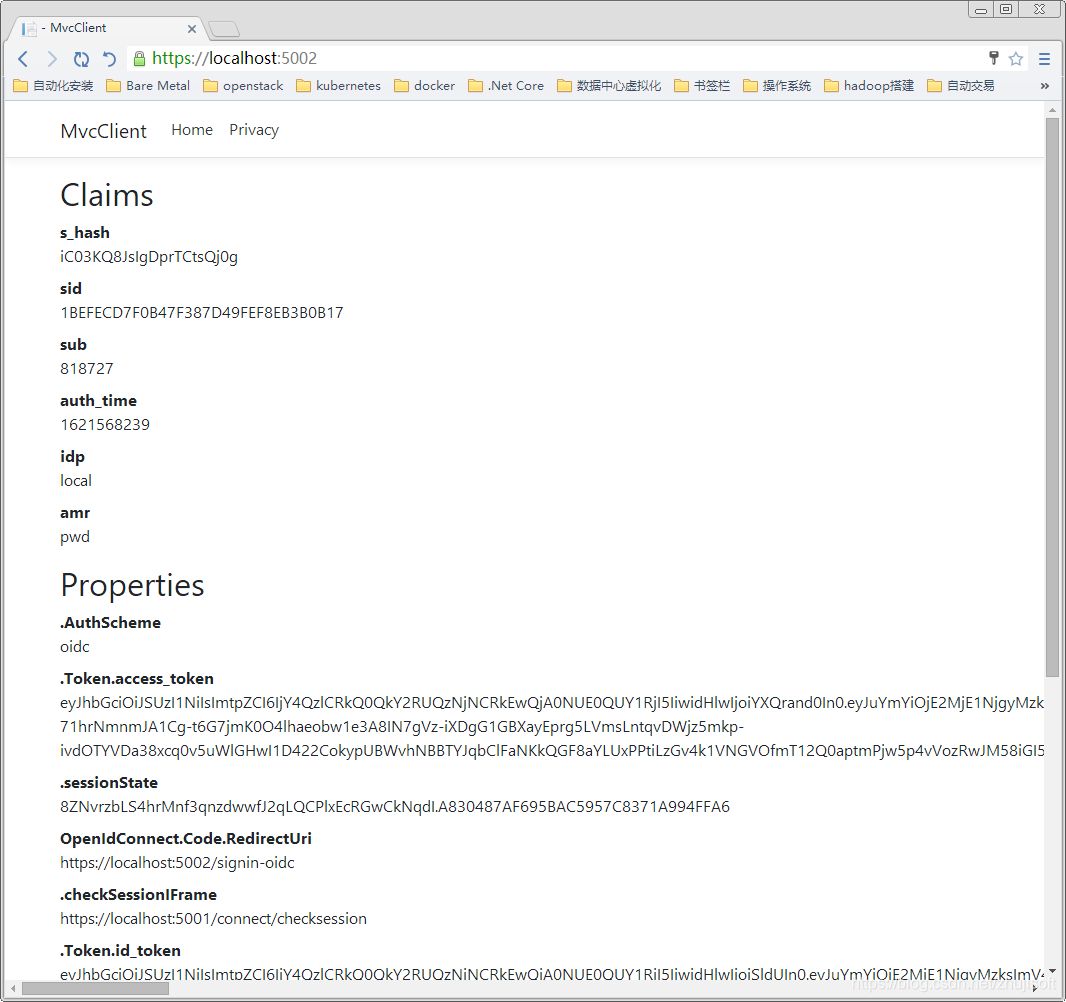
}先运行IdentityServer项目,然后运行MvcClient,再访问 https://localhost:5002
输入TestUsers中的用户名和密码 ,则可以看到从IdentityServer中取得的token。
五、其他实验测试
六、参考文章
https://identityserver4.readthedocs.io/en/latest/quickstarts/2_interactive_aspnetcore.html