SharePoint is a popular document collaboration platform from Microsoft, capable of running multiple web applications which in turn consist of multiple web sites. SharePoint also comes with of the box support with other Microsoft products such as Office 365 and Active Directory.
But what if you want to use SharePoint with non-Active Directory accounts? Or have SSO across all of your applications, even on mobile devices? Even Azure AD B2C struggles with this, due to it’s lack of support for SAML 1.1 tokens. This is where traditional identity providers start to struggle and IdentityServer steps in.
IdentityServer 4 is an authentication framework capable of out of the box Single Sign On (SSO) and security for your APIs, and most recently support for implementing your own authentication protocols and tokens, with a sample implementation for the WS-Federation protocol and SAML tokens. SSO works across all applications regardless of whether they are using OpenID Connect or WS-Federation.
This article will look at how we can integrate IdentityServer as a Trusted Identity Token Issuer for SharePoint.
Configuring IdentityServer 4 for WS-Federation
In this demo we’re going to assume you have completed the tutorials for configuring IdentityServer 4 using my previous getting started article or those found in the IdentityServer 4 quick starts, where you have a completed IdentityServer 4 solution capable of authenticating users using OpenID Connect. In-memory users will do.
To have IdentityServer 4 act as an identity provider via WS-Federation we are going to use the IdentityServer4.WsFederation sample implementation from GitHub. As this is just a sample, it is not available on nuget, so lets download the repository and drop the WsFederation folder into our project. This folder includes all of the necessary code for metadata & token generation, and authentication.
Unfortunately, we are forced to target .NET Framework until the WS-Federation and SAML support is built into .NET Core (see this GitHub issue for background and this one to track progress).
So let’s get the .NET Framework specifics into the project and making ASP.NET Core work with WS-Federation, ensure you have the following in your project.json.
"frameworks": {
  "net46": {
    "frameworkAssemblies": {
      "System.IdentityModel": "4.0.0.0",
      "System.IdentityModel.Services": "4.0.0.0"
    }
  }
}
Resources, Clients & Relying Parties
We now need to configure our resources (what applications can request, allowing for scoped access), clients (the list of applications allowed to use IdentityServer), and relying parties (extra, WS-Federation specific, details about our clients). So just create these in code:
public class Config {
    public static List<IdentityResource> GetIdentityResources() {
        return new List<IdentityResource> {
            // The sub/nameid claim
            new IdentityResources.OpenId(),

            // All claim for user profile info (think name, email, etc.)
            new IdentityResources.Profile()
        };
    }

    public static List<Client> GetClients() {
        return new List<Client> {
            new Client {
                // The realm of your RP
                ClientId = "urn:sharepoint",

                // Required for ws-fed clients
                ProtocolType = IdentityServerConstants.ProtocolTypes.WsFederation,

                // Trust uri of your SharePoint web application (web app, appended with _trust/default.aspx)
                RedirectUris = { "http://win-ok5ojhtg3d9/_trust/default.aspx" },

                // SAML token lifetime (in seconds)
                IdentityTokenLifetime = 36000,

                // Links to configured resources
                AllowedScopes = {"openid", "profile"}
            }
        };
    }

    public static List<RelyingParty> GetRelyingParties() {
        return new List<RelyingParty> {
            new RelyingParty {
                // Same as ClientId. Used to link config
                Realm = "urn:sharepoint",

                // SAML 1.1 token type required by SharePoint
                TokenType = WsFederationConstants.TokenTypes.Saml11TokenProfile11,

                // Transform claim types from oidc standard to xml types
                // Only mapped claims will be returned for SAML 1.1 tokens
                ClaimMapping = new Dictionary<string, string> {
                    {JwtClaimTypes.Subject, ClaimTypes.NameIdentifier},
                    {JwtClaimTypes.Email, ClaimTypes.Email}
                },

                // Defaults
                DigestAlgorithm = SecurityAlgorithms.Sha256Digest,
                SignatureAlgorithm = SecurityAlgorithms.RsaSha256Signature,
                SamlNameIdentifierFormat = WsFederationConstants.SamlNameIdentifierFormats.UnspecifiedString
            }
        };
    }
}
Users
For users, we’ll use some in-memory, test users, making sure they have a subject, credentials and an email address.
public static List<TestUser> GetUsers() {
    return new List<TestUser> {
        new TestUser {
            SubjectId = "B9734696-5CC4-45FC-8674-C9340449D082",
            Username = "scott",
            Password = "password",
            Claims = new List<Claim> {new Claim(JwtClaimTypes.Email, "[email protected]"}
        }
    };
}
Registrations
Now we need to configure IdentityServer to use the WS-Federation plugin. We do this in the ConfigureServices method of our Startup class. Here we will also register our our relying parties, using an in memory store.
public void ConfigureServices(IServiceCollection services) {
    services.AddMvc();

    services.AddIdentityServer()
        .AddSigningCredential("CN=ScottBrady91")
        .AddInMemoryIdentityResources(Config.GetIdentityResources())
        .AddInMemoryClients(Config.GetClients())
        .AddTestUsers(Config.GetUsers())
        .AddWsFederation()
        .AddInMemoryRelyingParties(Config.GetRelyingParties());
}

public void Configure(IApplicationBuilder app, IHostingEnvironment env, ILoggerFactory loggerFactory) {
    app.UseDeveloperExceptionPage();

    app.UseIdentityServer();

    app.UseStaticFiles();
    app.UseMvcWithDefaultRoute();
}
For our signing certificate we need to have access to both the certificate and the root certificate for later use with SharePoint. We can retrieve a certificate from our local machine’s certificate store using AddSigningCredential("CN=ScottBrady91"). See one of my other articles for how to create a suitable token signing certificate for IdentityServer.
Ensure when install signing certificates that you set private keys to be exportable.
SharePoint Integration
This article will use SharePoint 2013 but the same concepts apply for SharePoint 2016
Now we want to configure IdentityServer to be a Trusted Identity Provider within SharePoint.
As we previously mentioned we are going to need both the signing certificate and all certificates in the chain up to the root authority to be added to SharePoint. Unfortunately we cannot get around this as SharePoint does not use WS-Federation metadata.
To add these certificates and add IdentityServer 4 as a trusted identity provider we will use the SharePoint 2013 Management Shell:
$realm = "urn:sharepoint"
$identityProviderUrl = "http://rskdev/wsfederation"
# Add the root CA for the Identity Server token signing certificate
$rootCert = New-Object System.Security.Cryptography.X509Certificates.X509Certificate2("C:\Users\Administrator\Desktop\ScottBrady91Root.cer")
New-SPTrustedRootAuthority -Name "Token Signing Cert Root" -Certificate $rootCert
# Add the Identity Server token signing certificate
$signingCert = New-Object System.Security.Cryptography.X509Certificates.X509Certificate2("C:\Users\Administrator\Desktop\ScottBrady91.cer")
New-SPTrustedRootAuthority -Name "Token Signing Cert" -Certificate $signingCert
# Create SP Claim Mappings (Required)
$nameIdClaimMap=New-SPClaimTypeMapping -IncomingClaimType "http://schemas.xmlsoap.org/ws/2005/05/identity/claims/nameidentifier" -IncomingClaimTypeDisplayName "NameId" -LocalClaimType "https://identityserver/name"
$emailClaimMap=New-SPClaimTypeMapping -IncomingClaimType "http://schemas.xmlsoap.org/ws/2005/05/identity/claims/emailaddress" -IncomingClaimTypeDisplayName "Email" -SameAsIncoming
# Create SP Trusted Identity Provider
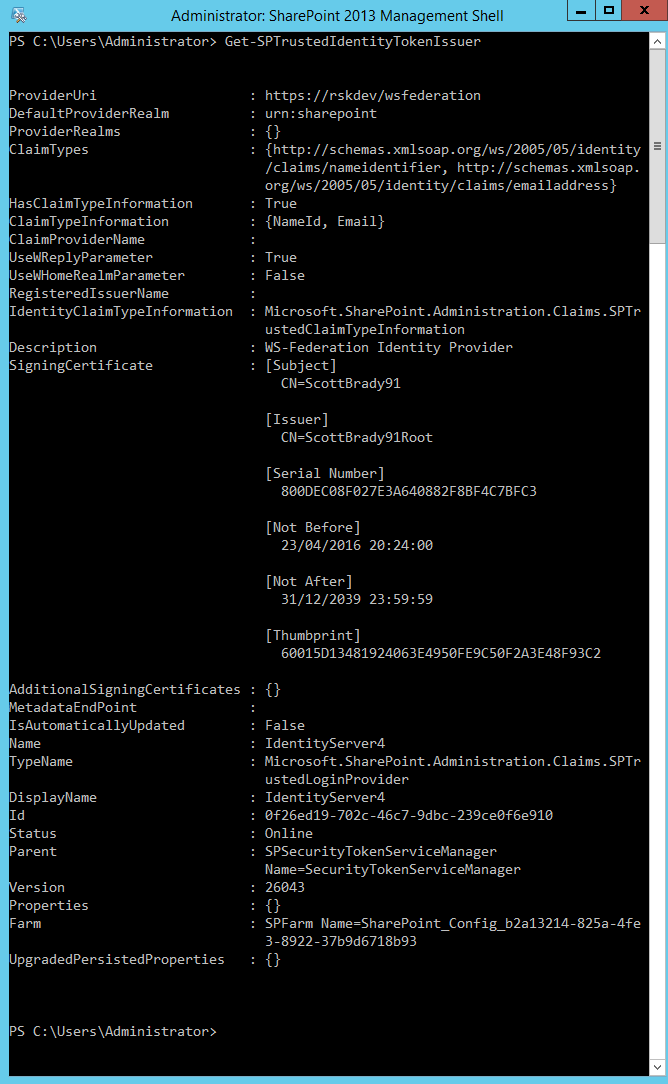
New-SPTrustedIdentityTokenIssuer -Name "IdentityServer4" -Description "WS-Federation Identity Provider" -Realm $realm -SignInUrl $identityProviderUrl -ClaimsMappings $nameIdClaimMap, $emailClaimMap -IdentifierClaim $nameIdClaimMap.InputClaimType -ImportTrustCertificate $signingCert -UseWReply
Your final configuration should look something like this:
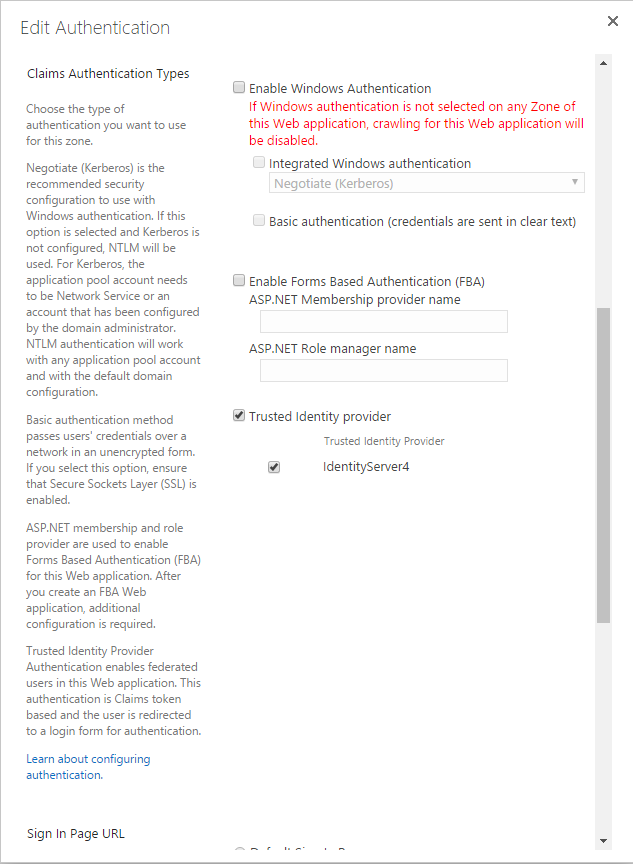
Now we can go into our SharePoint Central Administration site and configure a web application to use IdentityServer as it’s Trusted Identity Provider. This is done in the Application Management > Manage Web Applications, then for your chosen web application, select Authentication Providers. Then we can select IdentityServer as an authentication provider. You can deselect windows now, or once you have finished configuration.
Saving changes here can take quite a while.
We can also set a user policy now using an All Users policy for users from IdentityServer. This will resolve to something like c:0!.s|trusted|identityserver4. Authorization for users is done within SharePoint (for each site or web app, it’s up to you). IdentityServer is only responsible for authentication.
And now when we visit our web application, we get challenged by IdentityServer to authenticate, and if successful, we end up in our application.
Advanced
This is just the basic integration of IdentityServer with SharePoint, using the well known method of configuring a SharePoint identity provider. The next steps get a little more advanced and are not covered in this article.
People Picker
Currently the people picker within SharePoint will not be able to resolve individual users from IdentityServer, meaning we cannot configure permission rules based on user. To get around this we must create a claims provider for IdentityServer for use within SharePoint. This claims provider will need to query IdentityServer’s user store. This could be done directly to the database or using an API (protected by IdentityServer using OAuth).
User Profile Synchronization
One feature we lose that was out of the box with AD is a hook for the user profile synchronization service. This would require custom development to recreate this functionality.
https://www.scottbrady91.com/Identity-Server/Getting-Started-with-IdentityServer-4