文章目录
1.前言
Vuejs如今成为了主流的前端框架之一,每个前端开发人员都避免不了要学习这款优秀的框架。本文章使用Vue3并且结合Vite脚手架开发一个移动端的天气预报系统。
2.准备工作
由于项目的数据需要保证实时性,没有办法自己写后端来生成数据,所以去调用别人的API。个人推荐这几个免费的天气API:
- 高德天气 API -免费、 稳定、极简,适合天气预报基础需求
- 心知天气 API - 免费、轻便、专业,适合天气预报的初级需求
- 和风天气 API - 免费和付费同权限,非商业无限免费,含空气质量、天文气象
- OpenWeather - 免费 100 万次/月 分钟级实时预报,天气云图
- AccuWeather - 全球最大的气象数据服务商,历史悠久,数据精准,天气 API 王者
- Visual Crossing - 非开发者使用友好 50年历史气象数据免费调用。
后面的三个天气API是国外的,气象数据十分齐全,但对英语不好的朋友可能有点困难,因为接口对于我来说不是很方便,所以不考虑使用,但个人强推。而高德天气和心知天气的数据比较简洁,我想要的数据都没有。所以本人使用的是心知天气API。
3.项目创建与配置
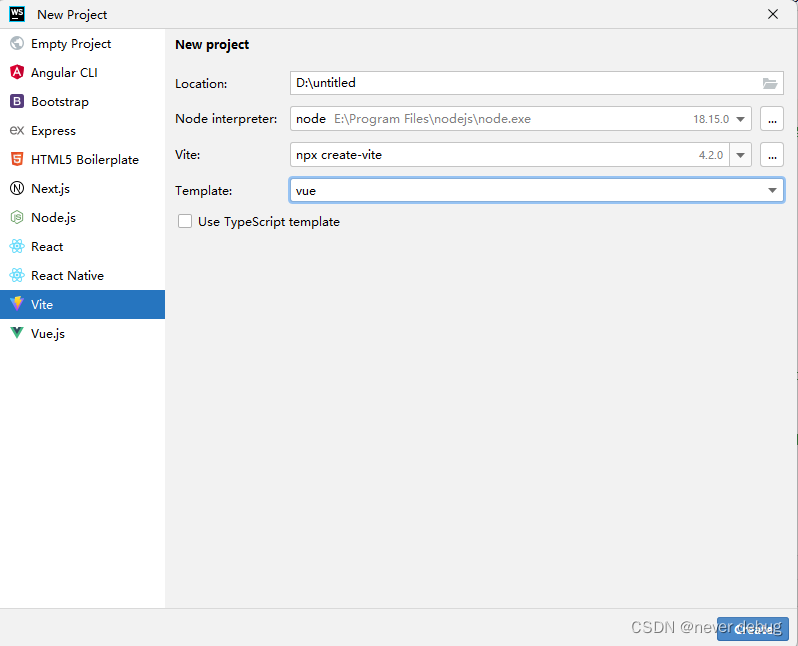
我使用的是WebStorm(个人觉得JetBrains全家桶是最好用的软件,哈哈哈)进行开发。如上图,点击File->New->Project,然后选择左边的Vite脚手架,输入项目名称,选择Vue模板,如果你想使用TypeScript开发,可以勾选下面的use TypeScript template选项,然后点击创建。
项目创建完后,等一会右下角会出现一个npm install按钮,点击后下载相关的依赖,下载完后删掉原有的组件及相关代码,特别是css文件和App.vue文件中。
因为需要适配移动端,所以需要下载一些插件,同时也要下载router来实现路由跳转和axios来请求数据。废话不多说,直接执行下面的命令即可;
3.1适配移动端
npm install axios
npm install vue-router@4
npm install autoprefixer --save
npm install amfe-flexible --save
npm install postcss postcss-pxtorem --save
然后打开vue.config.js文件,加上下面的代码
 css: {


        postcss: {


            plugins: [
                autoprefixer({


                    overrideBrowserslist: ['Android 4.1', 'iOS 7.1', 'Chrome > 31', 'ff > 31', 'ie >= 8'],
                }),
                postCssPxToRem({


                    // 自适应,px>rem转换
                    rootValue: 75, // 75表示750设计稿,37.5表示375设计稿
                    propList: ['*'], // 需要转换的属性,这里选择全部都进行转换
                    selectorBlackList: ['norem'], // 过滤掉norem-开头的class,不进行rem转换
                }),
            ],
        },
    }
最后在main.js中添加上下面代码,到此移动端适配就完成了
import 'amfe-flexible'
3.2路由配置
首选先明确自己的功能,根据功能划分不同的模块。本系统共分为首页、指南页、指南详情、我的天气和页脚等5个组件。由于页脚在每个组件中都会用到,所以在components目录下创建一个Footer组件。然后在src目录下分别创建api、router、views等目录,在views目录下创建Guide、GuideInfo、Home、Mine等四个vue组件。在router目录下创建一个index.js文件用来编写路由。
index.js文件的内容
import {

    createRouter,createWebHistory} from "vue-router";
import Mine from "../views/Mine.vue";
import Guide from "../views/Guide.vue";
import Home from "../views/Home.vue";
import GuideInfo from "../views/GuideInfo.vue";

const router=createRouter({


    history:createWebHistory(),
    routes:[
        {


            name: 'home',
            path: '/',
            component: Home
        },
        {


            name:'mine',
            path:'/mine',
            component:Mine
        },
        {


            name:'guide',
            path:'/guide',
            component:Guide,
        },
        {


            name:'guideInfo',
            path:'/info',
            component:GuideInfo,
        }
    ]
})

export default router
在main.js中添加上路由,至此路由就配置完成了。
import router from "./router/index.js";
const app = createApp(App)
app.use(router)
app.mount('body')
4.功能实现
每个模块都是直接上代码,然后在分析。
4.1Footer组件的实现
<template>
  <div id="footer">
    <div class="footer-item">
      <router-link to="/" exact-active-class="active">首页</router-link>
    </div>
    <div class="footer-item">
      <router-link to="/guide" exact-active-class="active">指南</router-link>
    </div>
    <div class="footer-item">
      <router-link to="/mine" exact-active-class="active">我的</router-link>
    </div>
  </div>
</template>

<script>
export default {


  name: "Footer"
}
</script>

<style scoped>
#footer {


  width: 100%;
  display: flex;
  justify-content: space-between;
  align-items: center;
  text-align: center;
  border-top: solid 1px #e0e0e0;
  font-size: 25px;
}

.footer-item {


  width: 33%;
  padding: 10px;
  line-height: 5vh;

}

.active {


  color: #a0cfff;
}
</style>
这部分没有什么好讲的,照抄就行了。
4.2Mine组件的实现
<template>
  <div class="mine-box">
    <div class="mine-title">
      <span>我的天气</span>
    </div>
    <div class="mine-content">
      <div class="mine-w-item" v-for="(item,index) in cityInfo.info" :key="index">
        <div @click="toHomeByCityName(item)">{

    {

     item }}-中国</div>
        <div>
          <svg class="icon" aria-hidden="true" @click="deleteCity(item)">
            <use xlink:href="#icon-guanbi"></use>
          </svg>
        </div>
      </div>
    </div>
    <div class="add-city-btn">
      <svg class="icon" aria-hidden="true" @click="isShow = true">
        <use xlink:href="#icon-jia"></use>
      </svg>
    </div>
  </div>

  <div class="add-city" @click.self="isShow= false" v-show="isShow">
    <div class="add-box">
      <div class="add-row1">
        <input type="text" placeholder="请输入地区名字" v-model="target">
      </div>
      <div class="add-row2">
        <button @click="addCity">添加</button>
      </div>
    </div>

  </div>
</template>

<script>
import {

    ref, onMounted, reactive} from "vue";
import {

    useRouter} from "vue-router";

export default {


  name: "Mine",
  setup() {


    const router=useRouter()
    const isShow = ref(false)
    const cityInfo = reactive({


      info:""
    })
    const target = ref("")
    //挂载时从localStorage读取已经添加的数据
    onMounted(() => {


      let citys = JSON.parse(localStorage.getItem("addCityInfo"))
      //当localStorage中有数据时
      if (citys != null) {


        cityInfo.info = citys
        return
      }
      cityInfo.info=new Array()
    })

    function addCity() {


      cityInfo.info.push(target.value)
      localStorage.setItem("addCityInfo", JSON.stringify(cityInfo.info))
      isShow.value=false
    }

    function deleteCity(city) {


      //当只有一个城市时
      if (cityInfo.info.length == 1) {


        cityInfo.info.length = 0
        localStorage.removeItem("addCityInfo")
        return
      }
      //否则指定删除
      else {


        cityInfo.info = cityInfo.info.filter(item => item != city)
      }
      localStorage.setItem("addCityInfo", JSON.stringify(cityInfo.info))
    }

    function toHomeByCityName(cityName){


      router.push({


        path:'/',
        query:{


          city:cityName
        }
      })
    }


    return {


      isShow,
      target,
      cityInfo,
      addCity,
      deleteCity,
      toHomeByCityName
    }
  }
}
</script>

<style scoped>
.mine-box {


  width: 100%;
  height: 100%;
  overflow-y: auto;
}

.mine-title {


  font-size: 39px;
  text-align: center;
  line-height: 80px;
}

.mine-content {


  width: 90%;
  margin: 50px auto 0px;
}

.mine-w-item {


  background: rgba(150, 150, 150, 0.2);
  width: 85%;
  margin: 46px auto;
  display: flex;
  justify-content: space-around;
  font-size: 30px;
  line-height: 105px;
  border-radius: 16px;
}

.mine-w-item .icon {


  width: 30px;
  height: 30px;
}

.add-city {


  position: absolute;
  z-index: 1;
  top: 0;
  left: 0;
  width: 100%;
  height: 100%;
  background: rgba(150, 150, 150, 0.5);
}

.add-city-btn {


  text-align: center;
}

.add-city-btn .icon {


  width: 50px;
  height: 50px;
}

.add-box {


  position: absolute;
  z-index: 10;
  left: 50%;
  top: 50%;
  transform: translate(-50%, -50%);
  width: 80%;
  background: #ffffff;
  border-radius: 15px;
}

.add-box div {


  text-align: center;
}

.add-box input {


  margin: 60px 0px 20px;
  width: 85%;
  height: 55px;
  outline: none;
  border: 1px solid #DCDFE6;
  font-size: 19px;
  vertical-align: bottom;
}

.add-box button {


  background: #409EFF;
  height: 60px;
  width: 120px;
  border: none;
  font-size: 25px;
  color: #ffffff;
  border-radius: 10px;
  margin: 50px 0px 30px;

}
</style>
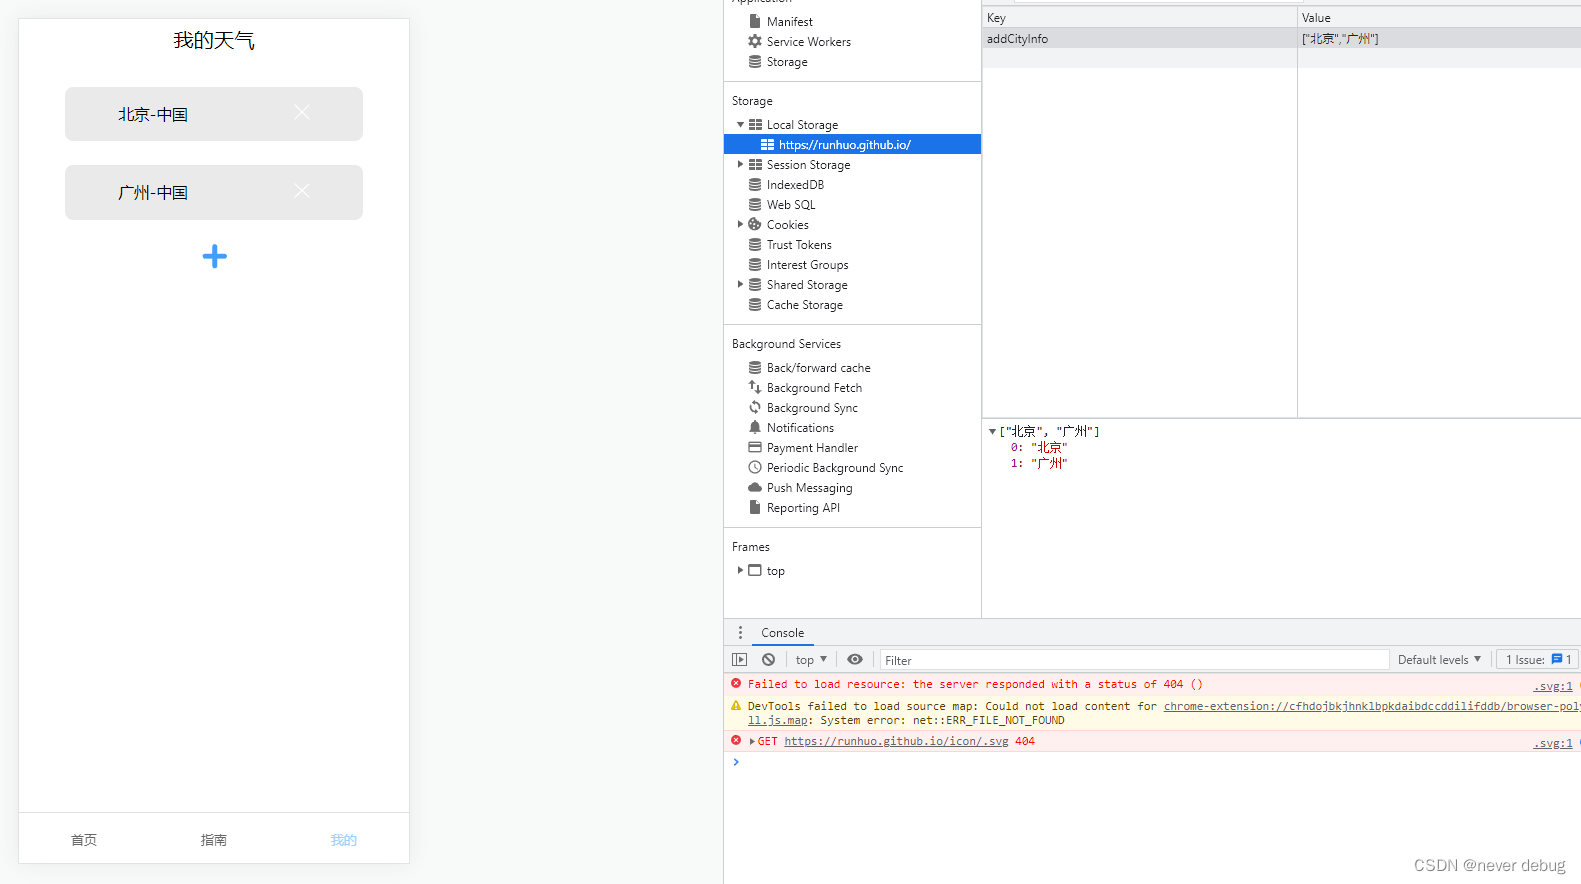
当Mine组件挂载时从localStorage中读取用户已经添加的城市,然后渲染在页面中。当用户添加数据时,将数据添加在cityInfo变量中,这样页面会自动刷新数据,然后在将cityInfo重新存进localStorage中。当用户删除数据时,需要先判断cityInfo中是否只有一个元素,如果是则设置cityInfo长度为0,同时删除localStorage中的数据。如果还有多个数据则指定删除,并且刷新localStorage中的数据。
生成看片后不可能只是拿来看,还要实现点击卡片可以跳转,所以toHomeByCityName函数将城市名字带着跳转到主页,同时进行查询。
4.3Guide组件的实现
<template>
  <div class="guide-box">
    <div class="guide-title">
      <span>预警信号及防御指南</span>
    </div>
    <div class="guide-content">
      <div class="guide-item" v-for="(item,index) in guides" :key="index" @click="toGuideInfo(item.id)">
        <span>{

    {

     item.title }}</span>
        <span>2023-03-21</span>
      </div>
    </div>
  </div>
</template>

<script>
import guides from "../assets/js/guide.js";
import {

    useRouter} from "vue-router";

export default {


  name: "Guide",
  setup() {


    const router = useRouter()

    function toGuideInfo(id) {


      router.push({


        path: '/info',
        query: {


          id: id
        }
      })
    }

    return {


      guides,
      toGuideInfo
    }
  }
}
</script>

<style scoped>
.guide-box {


  width: 100%;
  height: 100%;
  overflow-y: auto;
}

.guide-title {


  font-size: 39px;
  text-align: center;
  line-height: 80px;
}

.guide-content {


  width: 80%;
  margin: 20px auto 0px;
}

.guide-item {


  display: flex;
  justify-content: space-between;
  font-size: 30px;
  line-height: 80px;
  color: #999999;
}
</style>
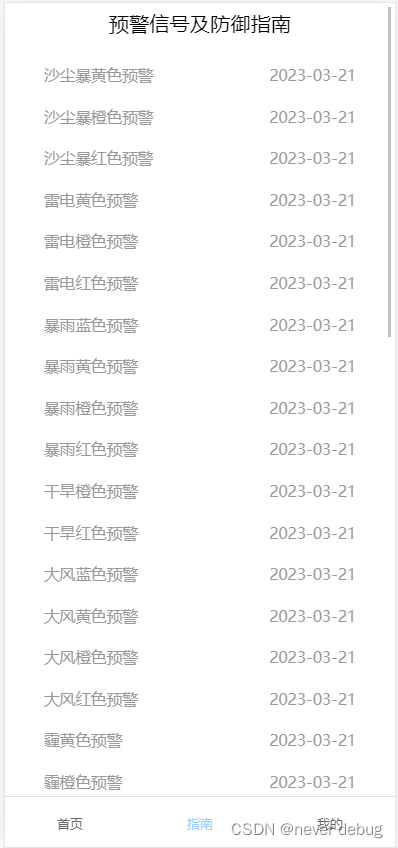
这部分没有什么重点,只是用来展示内容。其中guide.js文件保存的是各种预警图标的信息,这些信息可以去中国天气网复制粘贴。
guide.js文件的内容(太多了就不全部展示了):
const guides = [
{
id: '1',
title: '沙尘暴黄色预警',
image: '/img/1.jpg',
desc: '标准:12小时内可能出现沙尘暴天气(能见度小于1000米),或者已经出现沙尘暴天气并可能持续。',
guide: [
'1.政府及相关部门按照职责做好防沙尘暴工作;',
'2.关好门窗,加固围板、棚架、广告牌等易被风吹动的搭建物,妥善安置易受大风影响的室外物品,遮盖建筑物资,做好精密仪器的密封工作;',
'3.注意携带口罩、纱巾等防尘用品,以免沙尘对眼睛和呼吸道造成损伤;',
'4.呼吸道疾病患者、对风沙较敏感人员不要到室外活动。'
]
},
{
id: '2',
title: '沙尘暴橙色预警',
image: '/img/2.jpg',
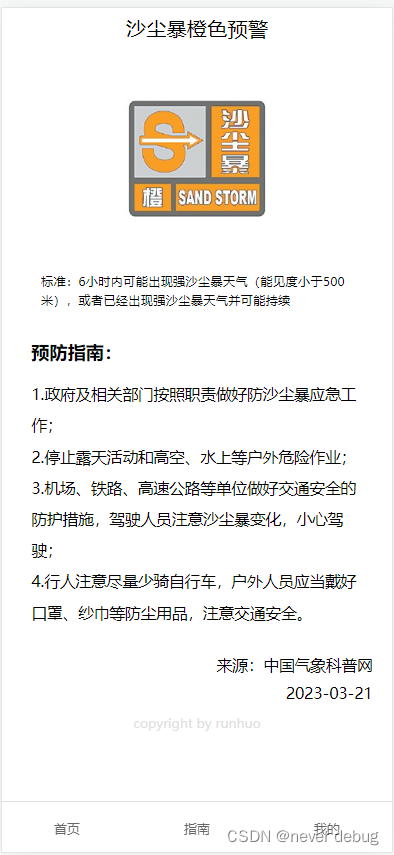
desc: '标准:6小时内可能出现强沙尘暴天气(能见度小于500米),或者已经出现强沙尘暴天气并可能持续',
guide: [
'1.政府及相关部门按照职责做好防沙尘暴应急工作;',
'2.停止露天活动和高空、水上等户外危险作业;',
'3.机场、铁路、高速公路等单位做好交通安全的防护措施,驾驶人员注意沙尘暴变化,小心驾驶;',
'4.行人注意尽量少骑自行车,户外人员应当戴好口罩、纱巾等防尘用品,注意交通安全。'
]
},
{
id: '3',
title: '沙尘暴红色预警',
image: '/img/3.jpg',
desc: '标准:6小时内可能出现特强沙尘暴天气(能见度小于50米),或者已经出现特强沙尘暴天气并可能持续。',
guide: [
'1.政府及相关部门按照职责做好防沙尘暴应急抢险工作;',
'2.人员应当留在防风、防尘的地方,不要在户外活动;',
'3.学校、幼儿园推迟上学或者放学,直至特强沙尘暴结束;',
'4.飞机暂停起降,火车暂停运行,高速公路暂时封闭。'
]
},
{
4.4GuideInfo组件的实现
<template>
  <div class="info-box">
    <div class="info-title">{

    {

     guide.data.title }}</div>
    <div class="info-row1">
      <div class="info-icon">
        <img :src="guide.data.image" alt="image">
      </div>
      <div class="info-desc">
        <span>{

    {

     guide.data.desc }}</span>
      </div>
    </div>
    <div class="info-row2">
      <p>预防指南:</p>
      <div class="info-guides">
        <div v-for="(item,index) in guide.data.guide" :key="index">{

    {

     item }}</div>
      </div>
    </div>
    <div class="info-row3">
      <p>来源:中国气象科普网</p>
      <p>2023-03-21</p>
    </div>
    <div class="info-row4"><span>copyright by runhuo</span></div>
  </div>

</template>

<script>
import guides from "../assets/js/guide.js";
import {

    useRoute} from "vue-router";
import {

    onMounted, ref, reactive} from "vue";

export default {


  name: "GuideInfo",
  setup() {


    const route = useRoute()
    const id = ref('0')
    const guide = reactive({


      data: ''
    })
    onMounted(() => {


      id.value = route.query.id
      for (let i = 0; i < guides.length; i++) {


        if (id.value === guides[i].id) {


          guide.data = guides[i]
          break
        }
      }
    })
    return {


      guide
    }
  }
}
</script>

<style scoped>
.info-box {


  width: 100%;
  height: 100%;
  overflow-y: auto;
}
.info-title{


  font-size: 39px;
  text-align: center;
  line-height: 80px;
}
.info-row1{


  margin-top: 36px;
}
.info-icon{


  text-align: center;

}
.info-icon img{


  width: 350px;
  height: 350px;
}

.info-desc{


  width: 80%;
  font-size: 24px;
  line-height: 36px;
  margin: 36px auto 0px;
}
.info-row2{


  width: 85%;
  margin: 60px auto 0px;
}
.info-row2 p{


  margin: 30px 0px;
  font-size: 35px;
  font-weight: 600;
}
.info-guides div{


  font-size: 30px;
  line-height: 60px;
}
.info-row3{


 width: 90%;
  margin: 50px auto 0px;
}
.info-row3 p{


  font-size: 30px;
  margin: 15px 0px;
  text-align: right;
}
.info-row4 {


  text-align: center;
  font-size: 25px;
  line-height: 50px;
  color: #e0e0e0;
}
</style>
这部分内容很简单,也不讲了,直接复制就行。
4.5 Home组件的实现
<template>
<div class="home-box">
<div class="home-search">
<input type="text" placeholder="请输入地区名字" v-model="newCity">
<button @click="searchInfo">搜索</button>
</div>
<div class="w-current">
<div class="w-current-p">{
{
cityPosition.data.name }}-{
{
cityPosition.data.adm2 }}-{
{
cityPosition.data.adm1 }}
</div>
<div class="w-current-temp">{
{
cityCurrentWeather.data.temp }}℃</div>
<div class="w-current-info">
<div class="w-current-info-row1">
<span><img :src="`/icon/${cityCurrentWeather.data.icon}.svg`" alt="icon">
{
{
cityCurrentWeather.data.text }}
</span>
<span>{
{
cityFutureWeather.data[0].tempMin }}℃~{
{
cityFutureWeather.data[0].tempMax }}℃</span>
</div>
<div class="w-current-info-row2">
<span>{
{
cityCurrentWeather.data.windDir }}-{
{
cityCurrentWeather.data.windSpeed }}km/h</span>
<span>降水:{
{
cityCurrentWeather.data.precip }}mm</span>
</div>
</div>
</div>
<div class="w-next-24h">
<div class="w-next-box">
<div class="w-next-item" v-for="(item,index) in next.data" :key="index">
<p>{
{
item.fxTime}}</p>
<p>{
{
item.temp }}℃</p>
<p>{
{
item.precip }}mm</p>
<p>{
{
item.humidity }}%</p>
<p>{
{
item.windDir }} {
{
item.windScale }}</p>
</div>
</div>
</div>
<div class="w-current-other">
<div class="other-left">
<div><span>日出</span><span>{
{
cityFutureWeather.data[0].sunrise }}</span></div>
<div><span>日落</span><span>{
{
cityFutureWeather.data[0].sunset }}</span></div>
</div>
<div class="other-right">
<div class="other-right-child"><span>湿度</span><span>{
{
cityFutureWeather.data[0].humidity }}%</span></div>
<div class="other-right-child"><span>紫外线</span><span>{
{
cityFutureWeather.data[0].uvIndex }}</span></div>
<div class="other-right-child"><span>气压</span><span>{
{
cityFutureWeather.data[0].pressure }}hPa</span></div>
</div>
</div>
<div class="w-future">
<div class="w-future-item" v-for="(item,index) in cityFutureWeather.data" :key="index">
<div class="w-future-item-top">{
{
item.fxDate }}</div>
<div class="w-future-item-bottom">
<div class="future-bottom-item">
<div>{
{
item.tempMax }}</div>
<div>{
{
item.tempMin }}</div>
</div>
<div class="future-bottom-item">
<div><img :src="`/icon/${item.iconDay}.svg`" alt="icon">{
{
item.textDay }}</div>
<div><img :src="`/icon/${item.iconNight}.svg`" alt="icon">{
{
item.textNight }}</div>
</div>
<div class="future-bottom-item">
<div>降水:{
{
item.precip }}mm</div>
<div>紫外线:{
{
item.uvIndex }}</div>
</div>
</div>
</div>
</div>
<div class="copyright"><span>copyright by runhuo</span></div>
</div>
</template>
<script>
import {
ref, onBeforeMount, reactive} from "vue";
import {
useRoute} from "vue-router";
import {
getWeatherInfo} from "../api/home.js";
export default {
name: "Home",
setup() {
const route = useRoute()
const city = ref("")
const newCity=ref("")
const cityPosition = reactive({
data: {
name: '',
adm2: '',
adm1: ''
}
})
const cityCurrentWeather = reactive({
data: {
temp: '',
text: '',
windDir: '',
windScale: '',
windSpeed: '',
precip: '',
icon: ''
}
})
const cityFutureWeather = reactive({
data: [{
tempMin: '',
tempMax: '',
fxDate: '',
precip: '',
textDay: '',
textNight: '',
uvIndex: '',
iconDay: '',
iconNight: '',
sunrise: '',
sunset: '',
pressure: '',
humidity: ''
}
]
})
const next = reactive({
data: [{
fxTime: '12:00',
temp: '23',
windScale: '2',
precip: '4',
windDir: '东南',
humidity: '77'
}
]
})
onBeforeMount(() => {
//先获取url上的数据,如果不存在使用默认的
let cityName = route.query.city
//此处留一个接口,后期可以通过定位去实时获取位置,避免写死
if (cityName == null) {
city.value = "北京"
} else {
city.value = cityName
}
search(city)
})
function searchInfo(){
search(newCity)
}
async function search(city) {
let result = await getWeatherInfo(city.value)
cityPosition.data=result.position.data.location[0]
cityCurrentWeather.data=result.info1.data.now
cityFutureWeather.data=result.info2.data.daily
next.data=result.info3.data.hourly
//因为后面24小时的时间格式不对,所以需要转换
for(let i=0;i<24;i++){
let oldTime=next.data[i].fxTime
let newTime=oldTime.split("T")[1].split("+")[0]
next.data[i].fxTime=newTime
}
}
return {
newCity,
cityPosition,
cityCurrentWeather,
cityFutureWeather,
next,
searchInfo
}
}
}
</script>
<style scoped>
.home-box {
width: 100%;
height: 100%;
overflow-y: auto;
}
.home-search {
width: 600px;
margin: 20px auto;
}
.home-search input {
width: 465px;
border: 1px solid #DCDFE6;
outline: none;
height: 50px;
font-size: 24px;
vertical-align: middle;
border-radius: 5px;
}
.home-search button {
width: 120px;
border: none;
height: 56px;
background: #a0cfff;
color: #ffffff;
vertical-align: middle;
border-radius: 5px;
}
.w-current {
width: 85%;
margin: 60px auto 10px;
}
.w-current-p {
text-align: center;
font-size: 25px;
}
.w-current-temp {
text-align: center;
font-size: 120px;
margin: 30px 0px 20px;
}
.w-current-info-row1 {
width: 60%;
margin: 0 auto 10px;
font-size: 30px;
display: flex;
justify-content: space-around;
}
.w-current-info-row2 {
width: 95%;
margin: 0 auto;
font-size: 30px;
display: flex;
justify-content: space-around;
}
.w-current-info-row2 span {
padding: 10px 30px;
background: rgba(200, 200, 200, 0.3);
border-radius: 15px;
}
.w-next-24h {
width: 90%;
margin: 50px auto;
background: rgba(200, 200, 200, 0.3);
border-radius: 15px;
overflow: hidden;
}
.w-next-box {
overflow-x: auto;
white-space: nowrap;
padding: 20px 0px 0px;
}
.w-next-box::-webkit-scrollbar {
width: 0 !important
}
.w-next-item {
text-align: center;
width: 165px;
font-size: 25px;
display: inline-block;
vertical-align: top;
}
.w-current-other {
width: 90%;
margin: 10px auto;
}
.w-current-other > div {
display: inline-block;
width: 40%;
margin: 0px 2%;
font-size: 30px;
/*height: 300px;*/
padding: 20px 20px;
vertical-align: top;
background: rgba(200, 200, 200, 0.3);
border-radius: 15px;
}
.other-left div {
line-height: 120px;
display: flex;
justify-content: space-between;
border-bottom: 1px solid #e0e0e0;
}
.other-right div {
line-height: 80px;
display: flex;
justify-content: space-between;
border-bottom: 1px solid #e0e0e0;
}
.w-future {
width: 90%;
margin: 50px auto 10px;
background: rgba(200, 200, 200, 0.3);
border-radius: 15px;
font-size: 30px;
}
.w-future-item {
padding-bottom: 30px;
border-bottom: 1px solid #e0e0e0;
}
.w-future-item-top {
text-align: center;
padding: 30px 0px;
}
.w-future-item-bottom {
width: 95%;
margin: 0px auto;
}
.future-bottom-item {
width: 33%;
display: inline-block;
text-align: center;
}
.future-bottom-item div {
line-height: 80px;
}
.copyright {
text-align: center;
margin-bottom: 20px;
font-size: 25px;
line-height: 50px;
color: #e0e0e0;
}
</style>
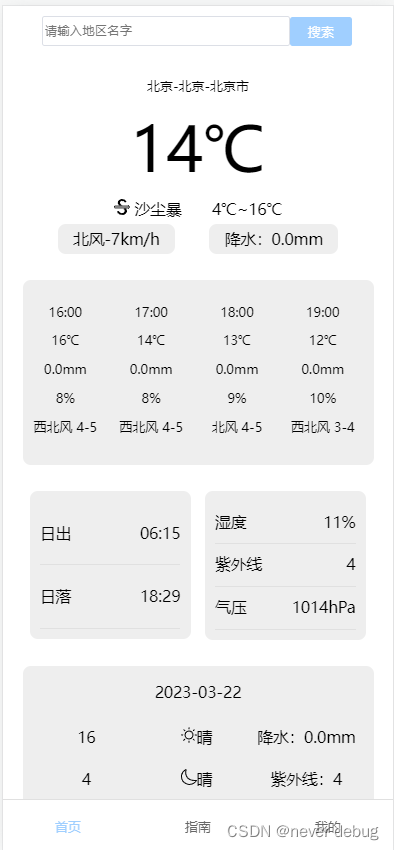
这组件在挂载之前先判断url是否有参数,如果有说明从Mine组件跳转过来的,即获取该参数的实时天气、未来24小时和未来7天的数据。同时支持搜索。
4.6封装请求
在api目录下创建home.js文件,然后在Home组件中使用。
import axios from "axios";

const key = '自己的key'

function getPosition(city) {


    return new Promise((resolve, reject) => {


        let url = `https://geoapi.qweather.com/v2/city/lookup?location=${

      city}&key=${

      key}`
        axios.get(url).then((result) => {


            resolve(result)
        }, (error) => {


            reject(error)
        })
    })

}

function getCurrentWeather(cityId) {


    return new Promise((resolve, reject) => {


        let url = `https://devapi.qweather.com/v7/weather/now?location=${

      cityId}&key=${

      key}`
        axios.get(url).then((result) => {


            resolve(result)
        }, (error) => {


            reject(error)
        })
    })
}

function getFutureWeather(cityId) {


    return new Promise((resolve, reject) => {


        let url = `https://devapi.qweather.com/v7/weather/7d?location=${

      cityId}&key=${

      key}`
        axios.get(url).then((result) => {


            resolve(result)
        }, (error) => {


            reject(error)
        })
    })
}

function getNext24hWeather(cityId){


    return new Promise((resolve, reject) => {


        let url = `https://devapi.qweather.com/v7/weather/24h?location=${

      cityId}&key=${

      key}`
        axios.get(url).then((result) => {


            resolve(result)
        }, (error) => {


            reject(error)
        })
    })
}

/**
 * 功能:获取某个地区的实时天气数据和未来7天的天气数据
 * 步骤:1、根据用户输入的城市名字调用getPosition去获取该城市的id(如果是地级市为身份前6位,县级市以及区县为身份前8位)
 *      2、根据地区id调用getCurrentWeather去获取实时的天气数据
 *      3、根据地区id调用getFutureWeather去获取未来7天的天气数据
 *      4、将两部分数据返回给component组件并渲染
 *
 *
 * @param city
 * @returns {Promise<void>}
 */

export async function getWeatherInfo(city) {


    let position = await getPosition(city)
    let cityId=position.data.location[0].id
    let info1 = await getCurrentWeather(cityId)
    let info2 = await getFutureWeather(cityId)
    let info3=await getNext24hWeather(cityId)
    return {


        position,
        info1,
        info2,
        info3
    }
}
首先根据城市名字去获取该城市的id,然后再获取相关数据。
5.效果演示
6.总结
该系统只是完成了最基本的功能,很多细节还没有实现。比如添加城市时需要判断该城市是否添加了、搜索的内容无效后处理等问题。后面会不断完善该系统。
读完这篇文章,复制代码差不多也能写的出来了,如果想要源代码,可以私我,感谢各位朋友的支持。