Pre
名词解释
- @Cacheable:表示该方法支持缓存。当调用被注解的方法时,如果对应的键已经存在缓存,则不再执行方法体,而从缓存中直接返回。当方法返回null时,将不进行缓存操作。
- @CachePut:表示执行该方法后,其值将作为最新结果更新到缓存中,每次都会执行该方法。
- @CacheEvict:表示执行该方法后,将触发缓存清除操作。
- @Caching:用于组合前三个注解,比如
@Caching(cacheable = @Cacheable("CacheConstants.GET_USER"),
         evict = {

      @CacheEvict("CacheConstants.GET_DYNAMIC",allEntries = true)}
public User find(Integer id) {


    return null;
}
注解属性
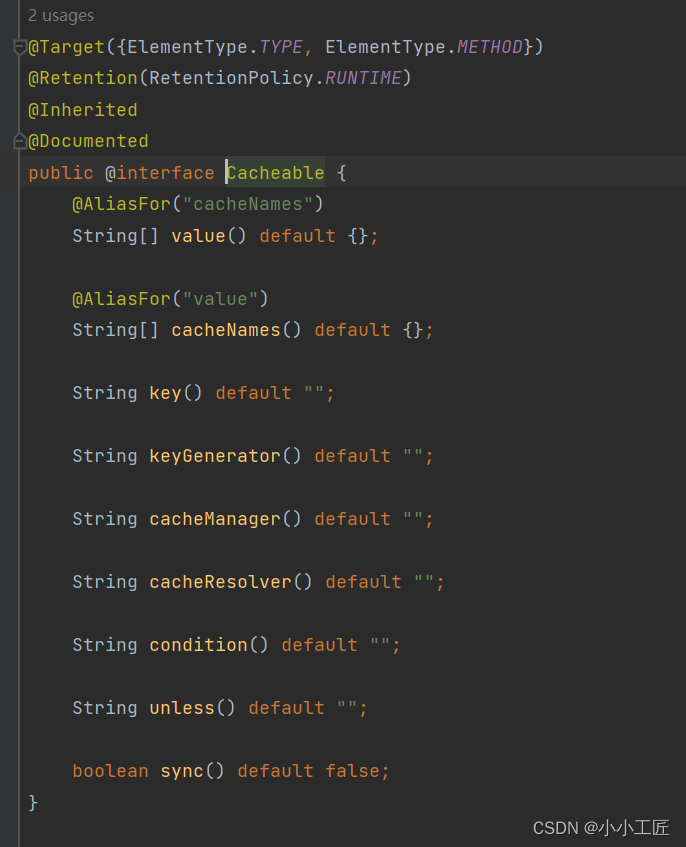
- cacheNames/value:缓存组件的名字,即cacheManager中缓存的名称。
- key:缓存数据时使用的key。默认使用方法参数值,也可以使用SpEL表达式进行编写。
- keyGenerator:和key二选一使用。
- cacheManager:指定使用的缓存管理器。
- condition:在方法执行开始前检查,在符合condition的情况下,进行缓存
- unless:在方法执行完成后检查,在符合unless的情况下,不进行缓存
- sync:是否使用同步模式。若使用同步模式,在多个线程同时对一个key进行load时,其他线程将被阻塞。
sync开启或关闭,在Cache和LoadingCache中的表现是不一致的:
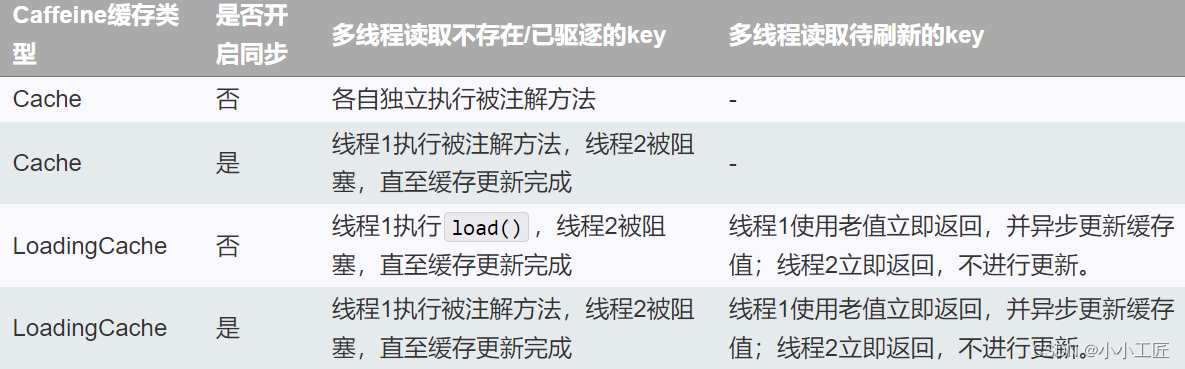
- Cache中,sync表示是否需要所有线程同步等待
- LoadingCache中,sync表示在读取不存在/已驱逐的key时,是否执行被注解方法
指导步骤
要在Spring Boot中整合Caffeine缓存,可以按照以下步骤进行操作:
步骤 1:添加依赖
在pom.xml文件中添加Caffeine依赖项。确保选择与您的Spring Boot版本兼容的Caffeine版本。以下是一个示例依赖项:
<dependency>
    <groupId>com.github.ben-manes.caffeine</groupId>
    <artifactId>caffeine</artifactId>
    <version>2.9.0</version>
</dependency>
步骤 2:配置缓存
在Spring Boot的配置文件(例如application.properties或application.yml)中添加Caffeine缓存的配置。以下是一个示例配置:
application.properties:
spring.cache.type=caffeine
spring.cache.cache-names=myCache
spring.cache.caffeine.spec=maximumSize=100,expireAfterAccess=600s
application.yml:
spring:
  cache:
    type: caffeine
    cache-names: myCache
    caffeine:
      spec: maximumSize=100,expireAfterAccess=600s
这将配置一个名为myCache的Caffeine缓存,最大容量为100,访问后在600秒内过期。
步骤 3:使用缓存
在需要使用缓存的地方,使用@Cacheable注解标记方法。例如,以下是一个使用缓存的示例:
import org.springframework.cache.annotation.Cacheable;
import org.springframework.stereotype.Service;

@Service
public class MyService {


    @Cacheable("myCache")
    public String getDataFromCache(String key) {


        // 如果缓存中存在数据,则直接返回
        // 如果缓存中不存在数据,则执行相应的业务逻辑,并将结果放入缓存
        return fetchDataFromDatabase(key);
    }

    private String fetchDataFromDatabase(String key) {


        // 执行获取数据的业务逻辑
        return "Data for key: " + key;
    }
}
在上面的示例中,getDataFromCache方法使用了@Cacheable("myCache")注解,表示该方法的结果将被缓存到名为myCache的缓存中。
现在,当调用getDataFromCache方法时,首先会检查缓存中是否存在与给定参数对应的数据。如果存在,将直接返回缓存的数据;如果不存在,则会执行方法体内的业务逻辑,并将结果放入缓存。
这就是在Spring Boot中整合Caffeine缓存的基本步骤。我们可以根据自己的需求进行进一步的配置和定制。
Code
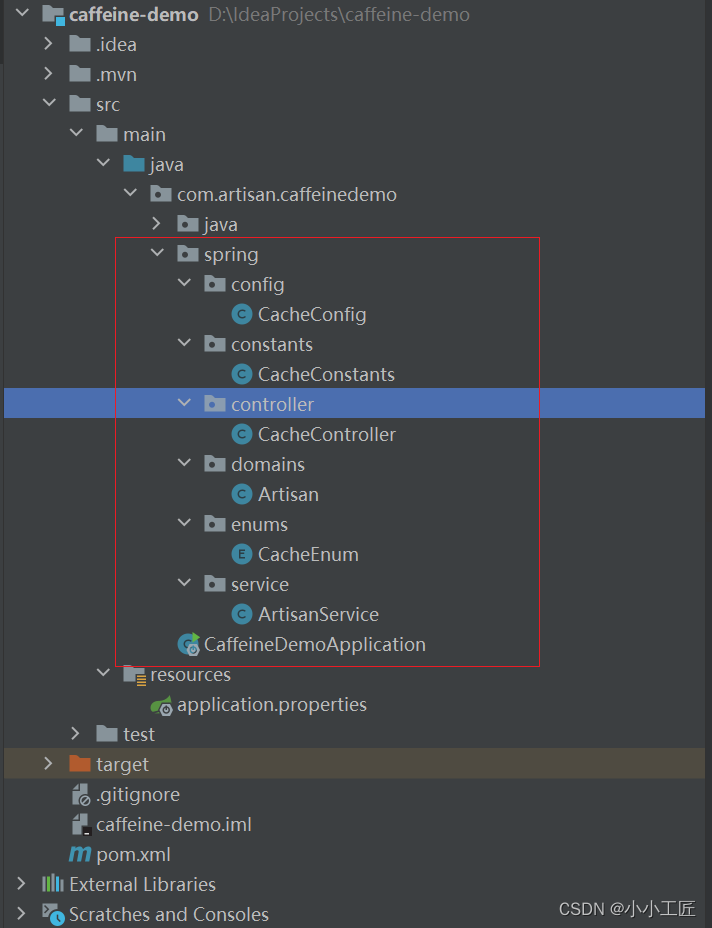
接下来我们使用另一种方式来实现
pom
<?xml version="1.0" encoding="UTF-8"?>
<project xmlns="http://maven.apache.org/POM/4.0.0" xmlns:xsi="http://www.w3.org/2001/XMLSchema-instance"
         xsi:schemaLocation="http://maven.apache.org/POM/4.0.0 https://maven.apache.org/xsd/maven-4.0.0.xsd">
    <modelVersion>4.0.0</modelVersion>
    <parent>
        <groupId>org.springframework.boot</groupId>
        <artifactId>spring-boot-starter-parent</artifactId>
        <version>2.7.13</version>
        <relativePath/> <!-- lookup parent from repository -->
    </parent>
    <groupId>com.artisan</groupId>
    <artifactId>caffeine-demo</artifactId>
    <version>0.0.1-SNAPSHOT</version>
    <name>caffeine-demo</name>
    <description>caffeine-demo</description>
    <properties>
        <java.version>1.8</java.version>
    </properties>
    <dependencies>
        <dependency>
            <groupId>org.springframework.boot</groupId>
            <artifactId>spring-boot-starter-web</artifactId>
        </dependency>

        <dependency>
            <groupId>org.springframework.boot</groupId>
            <artifactId>spring-boot-starter</artifactId>
        </dependency>

        <dependency>
            <groupId>org.springframework.boot</groupId>
            <artifactId>spring-boot-starter-test</artifactId>
            <scope>test</scope>
        </dependency>


        <dependency>
            <groupId>org.projectlombok</groupId>
            <artifactId>lombok</artifactId>
        </dependency>
        <dependency>
            <groupId>junit</groupId>
            <artifactId>junit</artifactId>
        </dependency>


        <dependency>
            <groupId>com.github.ben-manes.caffeine</groupId>
            <artifactId>caffeine</artifactId>
            <!-- Java 8 users can continue to use version 2.x, which will be supported -->
            <version>2.9.3</version>
        </dependency>

        <dependency>
            <groupId>org.springframework.boot</groupId>
            <artifactId>spring-boot-starter-cache</artifactId>
        </dependency>


    </dependencies>

    <build>
        <plugins>
            <plugin>
                <groupId>org.springframework.boot</groupId>
                <artifactId>spring-boot-maven-plugin</artifactId>
            </plugin>
        </plugins>
    </build>

</project>
Config
package com.artisan.caffeinedemo.spring.config;

import com.artisan.caffeinedemo.spring.enums.CacheEnum;
import com.github.benmanes.caffeine.cache.Caffeine;
import org.springframework.cache.CacheManager;
import org.springframework.cache.annotation.EnableCaching;
import org.springframework.cache.caffeine.CaffeineCache;
import org.springframework.cache.support.SimpleCacheManager;
import org.springframework.context.annotation.Bean;
import org.springframework.context.annotation.Configuration;

import java.util.ArrayList;
import java.util.List;
import java.util.concurrent.TimeUnit;

/**
 * @author 小工匠
 * @version 1.0
 * @mark: show me the code , change the world
 */
@Configuration
@EnableCaching
public class CacheConfig {


    /**
     * Caffeine配置说明:
     * initialCapacity=[integer]: 初始的缓存空间大小
     * maximumSize=[long]: 缓存的最大条数
     * maximumWeight=[long]: 缓存的最大权重
     * expireAfterAccess=[duration]: 最后一次写入或访问后经过固定时间过期
     * expireAfterWrite=[duration]: 最后一次写入后经过固定时间过期
     * refreshAfterWrite=[duration]: 创建缓存或者最近一次更新缓存后经过固定的时间间隔,刷新缓存
     * weakKeys: 打开key的弱引用
     * weakValues:打开value的弱引用
     * softValues:打开value的软引用
     * recordStats:开发统计功能
     * 注意:
     * expireAfterWrite和expireAfterAccess同事存在时,以expireAfterWrite为准。
     * maximumSize和maximumWeight不可以同时使用
     * weakValues和softValues不可以同时使用
     */
    @Bean
    public CacheManager cacheManager() {


        SimpleCacheManager cacheManager = new SimpleCacheManager();
        List<CaffeineCache> list = new ArrayList<>();
        //循环添加枚举类中自定义的缓存,可以自定义
        for (CacheEnum cacheEnum : CacheEnum.values()) {


            list.add(new CaffeineCache(cacheEnum.getName(),
                    Caffeine.newBuilder()
                            .initialCapacity(50)
                            .maximumSize(1000)
                            .expireAfterAccess(cacheEnum.getExpireTime(), TimeUnit.SECONDS)
                            .build()));
        }
        cacheManager.setCaches(list);
        return cacheManager;
    }
}
Service
package com.artisan.caffeinedemo.spring.service;

import com.artisan.caffeinedemo.spring.constants.CacheConstants;
import com.artisan.caffeinedemo.spring.domains.Artisan;
import lombok.extern.slf4j.Slf4j;
import org.springframework.cache.annotation.CacheEvict;
import org.springframework.cache.annotation.CachePut;
import org.springframework.cache.annotation.Cacheable;
import org.springframework.stereotype.Service;

/**
 * @author 小工匠
 * @version 1.0
 * @mark: show me the code , change the world
 */

@Service
@Slf4j
public class ArtisanService {


    /**
     * @Cacheable注解是 通过 Spring AOP机制进行的,因此类内的调用将无法触发缓存操作,必须由外部进行调用,之前也算是踩了一遍坑,特别提醒一下
     */

    /**
     * cacheNames/value:缓存组件的名字,即cacheManager中缓存的名称。
     * key:缓存数据时使用的key。默认使用方法参数值,也可以使用SpEL表达式进行编写。
     * keyGenerator:和key二选一使用。
     * cacheManager:指定使用的缓存管理器。
     * condition:在方法执行开始前检查,在符合condition的情况下,进行缓存
     * unless:在方法执行完成后检查,在符合unless的情况下,不进行缓存
     * sync:是否使用同步模式。若使用同步模式,在多个线程同时对一个key进行load时,其他线程将被阻塞。
     */
    @Cacheable(value = CacheConstants.GET_USER, key = "'user'+#userId", sync = true)
    public Artisan getUserByUserId(Integer userId) {


        log.info("----------------触发DB查询----------------------------");
        // 模拟从DB查询数据
        Artisan artisan = Artisan.builder().id(userId).name("artisan-" + userId).address("China-" +  userId).build();
        return artisan;
    }


    @CacheEvict(value = CacheConstants.GET_USER, key = "'user'+#userId")
    public Integer cacheEvictTest(Integer userId) {


        log.info("cacheEvictTest 清除 {} 对应的缓存", userId);
        return 1;
    }

    @CachePut(value = CacheConstants.GET_USER, key = "'user'+#userId")
    public Artisan cachePut(Integer userId) {


        log.info("cachePut execute -------------------");
        Artisan artisan = Artisan.builder().id(userId).name("artisan1").address("China").build();
        return artisan;
    }

}
缓存名枚举 & 常量
package com.artisan.caffeinedemo.spring.enums;

import com.artisan.caffeinedemo.spring.constants.CacheConstants;
import lombok.Getter;

/**
 * @author 小工匠
 * @version 1.0
 * @mark: show me the code , change the world
 */
@Getter
public enum CacheEnum {


    MY_CACHE_1("工匠1", CacheConstants.DEFAULT_EXPIRES),
    MY_CACHE_2("工匠2", CacheConstants.EXPIRES_5_MIN),
    MY_CACHE_3(CacheConstants.GET_USER, CacheConstants.EXPIRES_10_MIN);

    private String name;
    private Integer expireTime;

    CacheEnum(String name, Integer expireTime) {


        this.name = name;
        this.expireTime = expireTime;
    }


}
package com.artisan.caffeinedemo.spring.constants;

/**
 * @author 小工匠
 * @version 1.0
 * @mark: show me the code , change the world
 */
public class CacheConstants {


    /**
     * 默认过期时间(配置类中使用的时间单位是秒,所以这里如 3*60 为3分钟)
     */
    public static final int DEFAULT_EXPIRES = 3 * 60;
    public static final int EXPIRES_5_MIN = 5 * 60;
    public static final int EXPIRES_10_MIN = 10 * 60;

    public static final String GET_USER = "GET:USER";
    public static final String GET_DYNAMIC = "GET:DYNAMIC";

}
创建缓存常量类,把公共的常量提取一层,复用,这里也可以通过配置文件加载这些数据,例如@ConfigurationProperties和@Value
package com.artisan.caffeinedemo.spring.domains;

import lombok.AllArgsConstructor;
import lombok.Builder;
import lombok.Data;
import lombok.NoArgsConstructor;
import lombok.extern.slf4j.Slf4j;

/**
 * @author 小工匠
 * @version 1.0
 * @mark: show me the code , change the world
 */
@Slf4j
@Builder
@NoArgsConstructor
@AllArgsConstructor
@Data
public class Artisan {


    private Integer id;
    private String name;
    private String address;
}
测试入口
package com.artisan.caffeinedemo.spring.controller;

import com.artisan.caffeinedemo.spring.domains.Artisan;
import com.artisan.caffeinedemo.spring.service.ArtisanService;
import lombok.extern.slf4j.Slf4j;
import org.springframework.web.bind.annotation.*;

import javax.annotation.Resource;

/**
 * @author 小工匠
 * @version 1.0
 * @mark: show me the code , change the world
 */
@Slf4j
@RestController
@RequestMapping("/testCache")
public class CacheController {


    @Resource
    private ArtisanService artisanService;

    @RequestMapping("/get/{id}")
    @ResponseBody
    public String getArtisanById(@PathVariable Integer id) {


        Artisan artisan = artisanService.getUserByUserId(id);
        log.info("--------->{}", artisan.toString());
        return artisan.toString();
    }


    @RequestMapping("/evit/{id}")
    @ResponseBody
    public String cacheEvit(@PathVariable Integer id) {


        artisanService.cacheEvictTest(id);

        return "cacheEvit";
    }


    @RequestMapping("/put/{id}")
    @ResponseBody
    public String cachePut(@PathVariable Integer id) {


        Artisan artisan = artisanService.cachePut(id);

        return artisan.toString();
    }
}
测试
根据以下的访问,可以得到如下结论
http://127.0.0.1:8080/testCache/get/1  ----->  查询DB ,加入缓存

http://127.0.0.1:8080/testCache/get/1 ------>  直接从缓存中读取


http://127.0.0.1:8080/testCache/evit/1 ------> 清除缓存的id=1的数据


http://127.0.0.1:8080/testCache/get/1  ----->  查询DB ,加入缓存


http://127.0.0.1:8080/testCache/put/1  ----->  操作DB ,加入缓存

http://127.0.0.1:8080/testCache/put/2  ----->  操作DB ,加入缓存


http://127.0.0.1:8080/testCache/get/2 ------>  直接从缓存中读取
