1、前期准备
2、数据收集
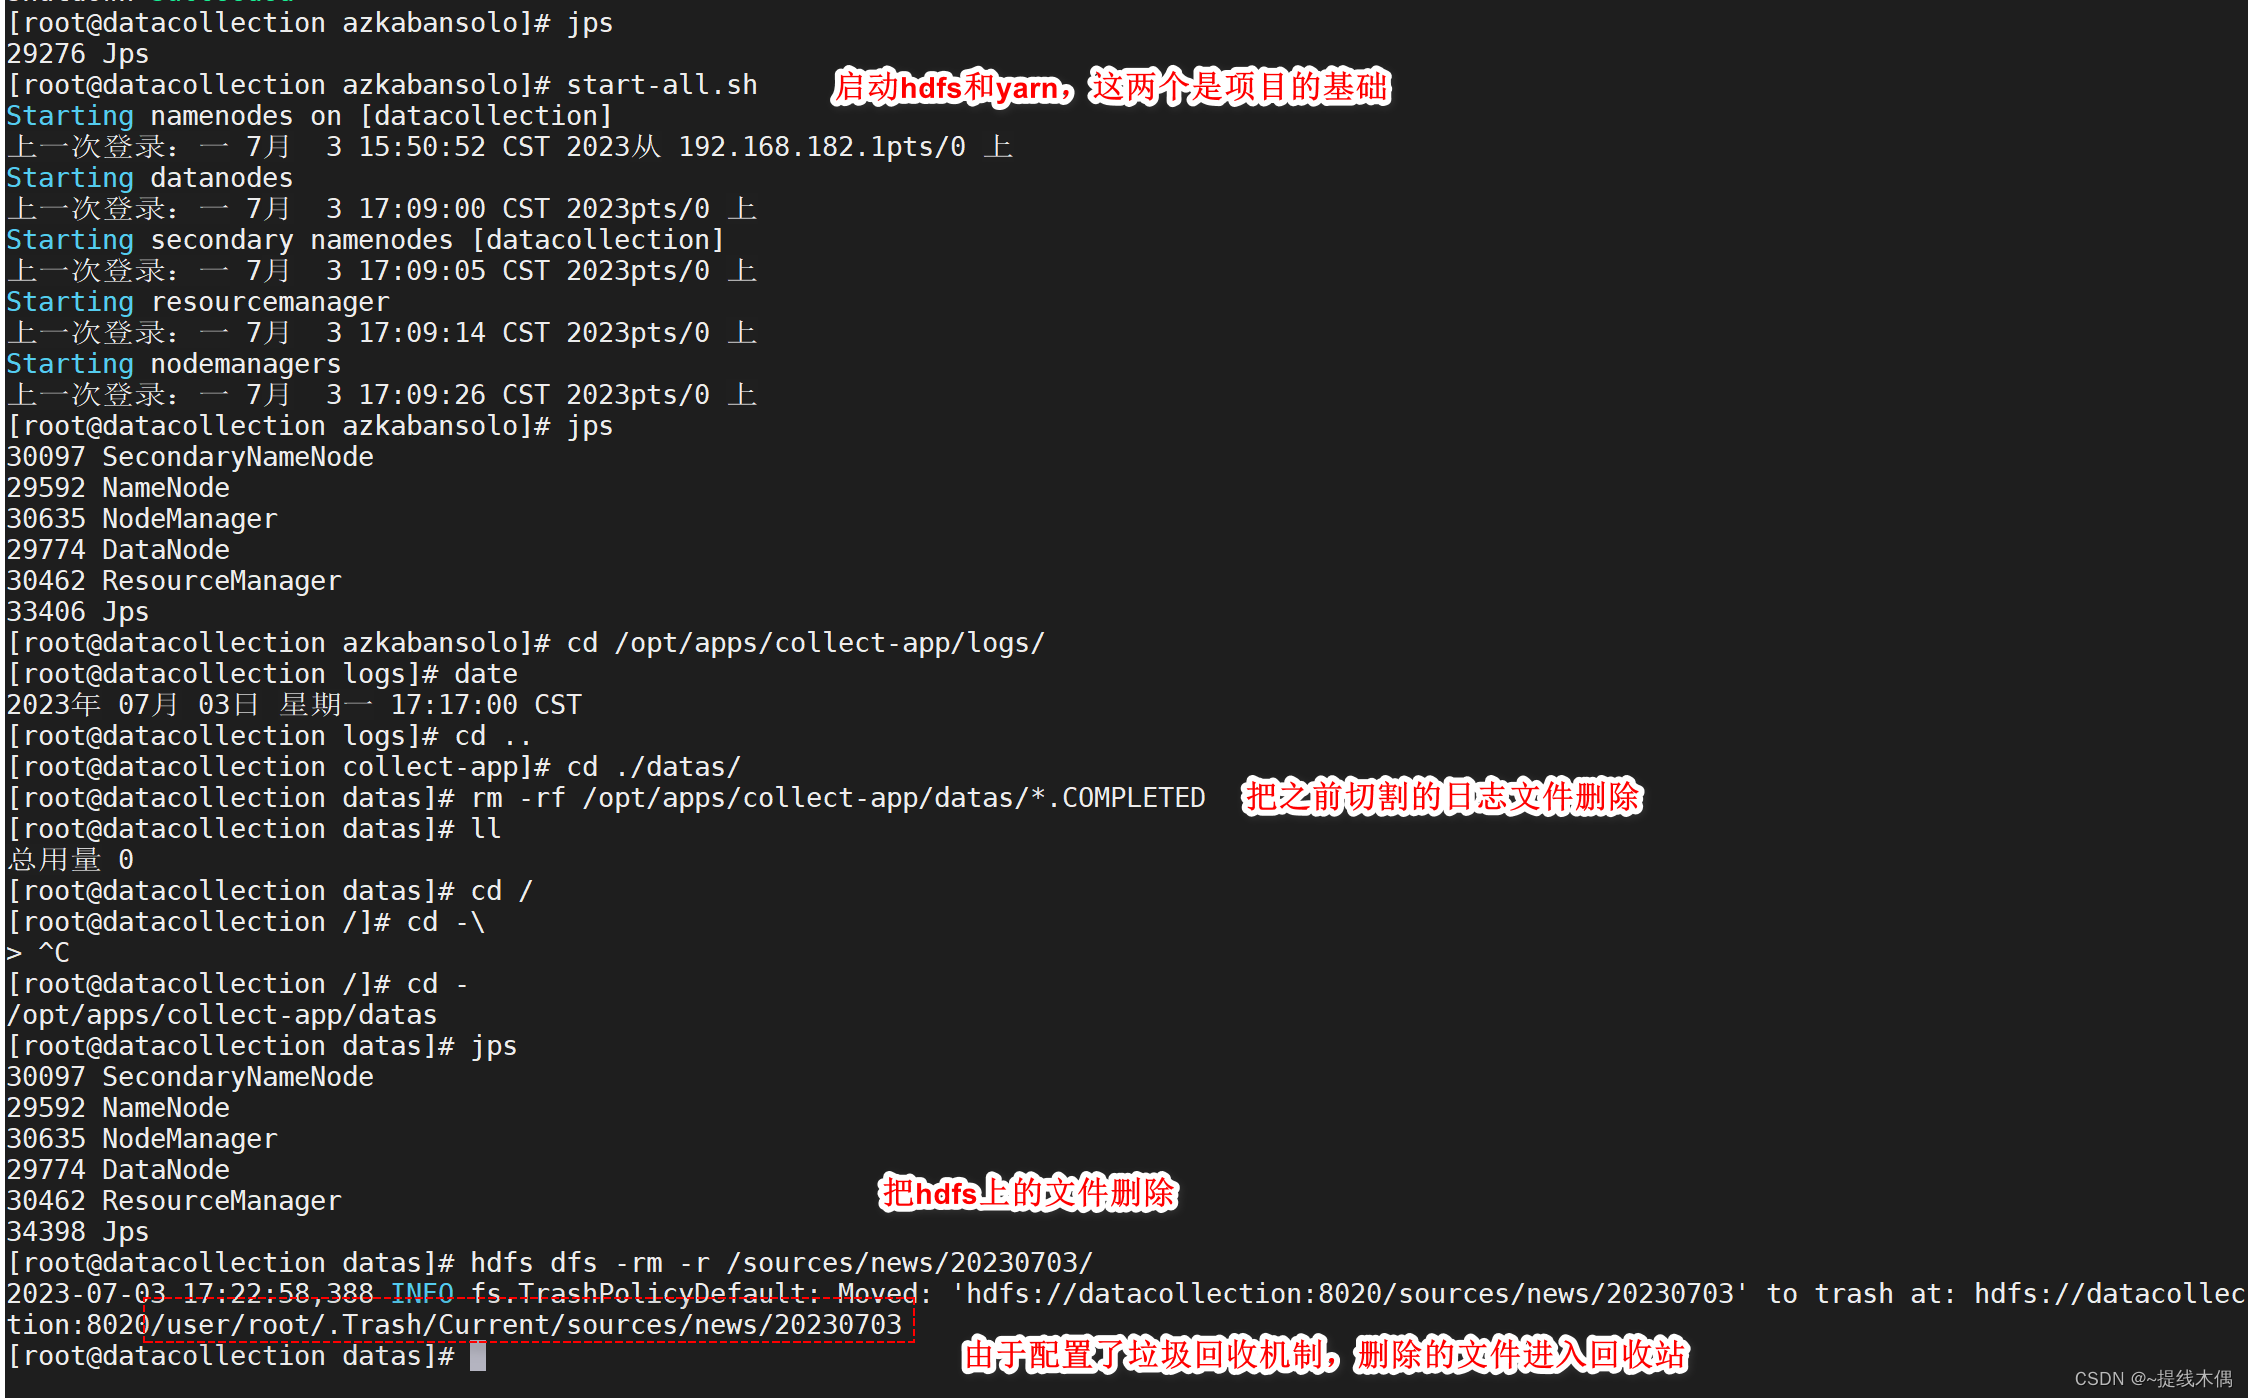
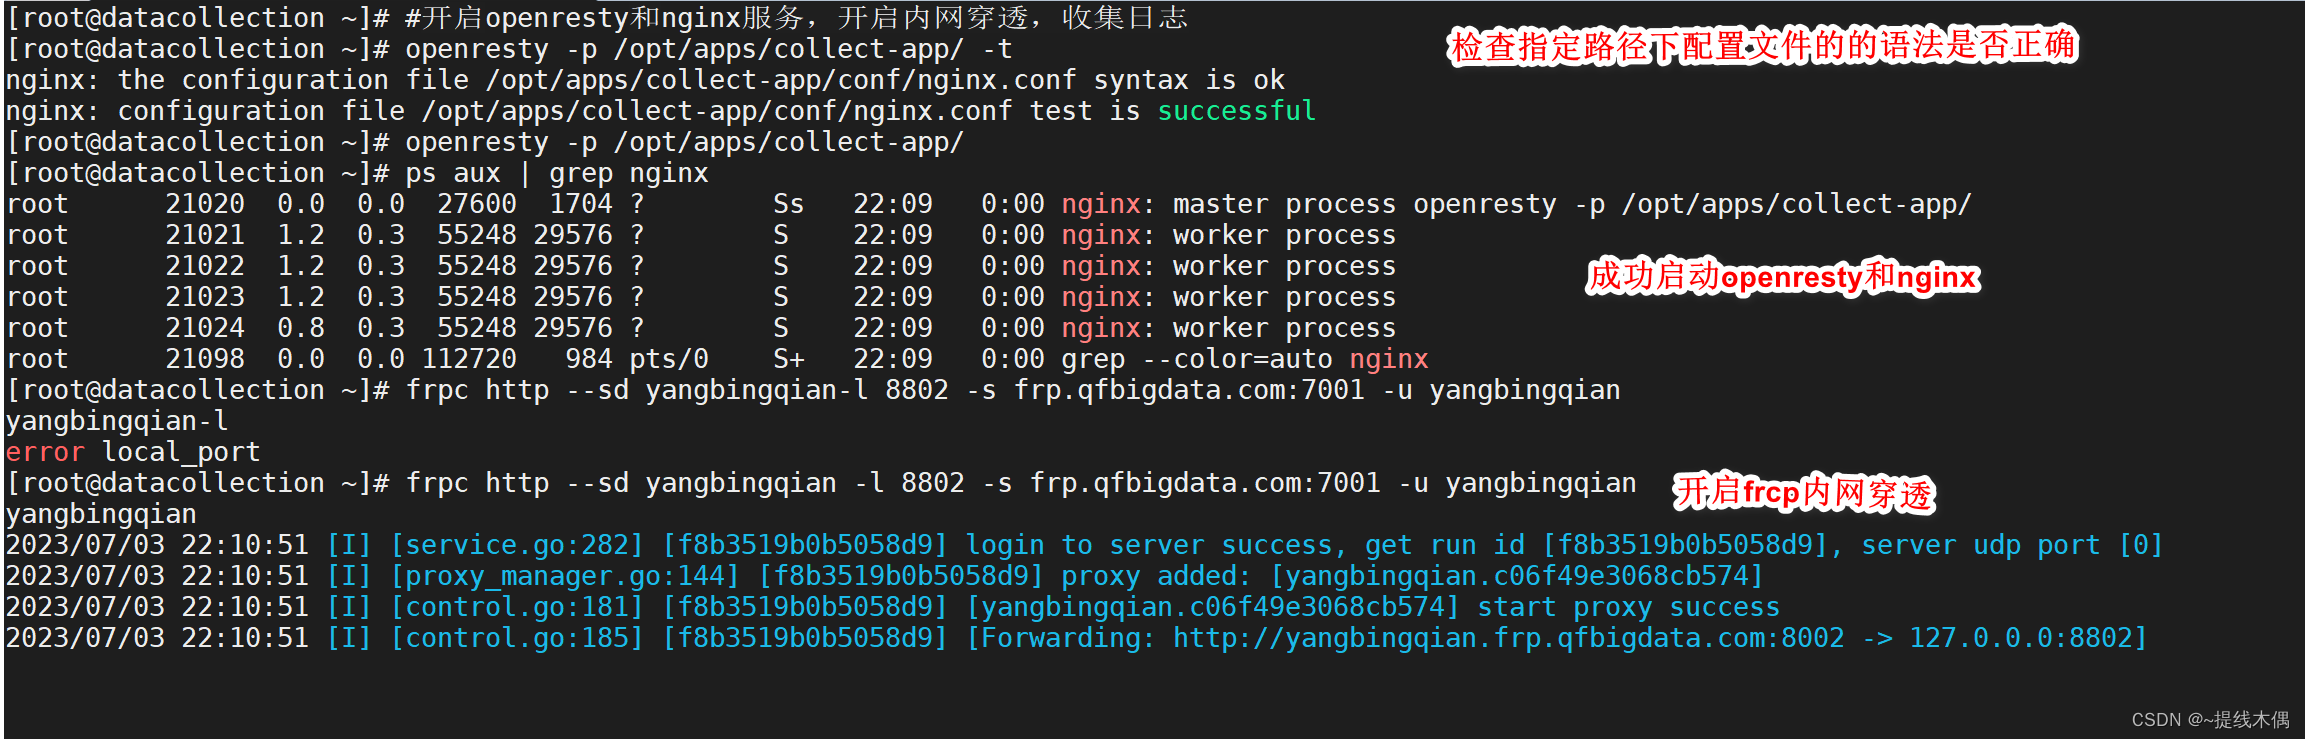
1、开启openresty,nginx和frcp内网穿透
2、编辑并启动定时器

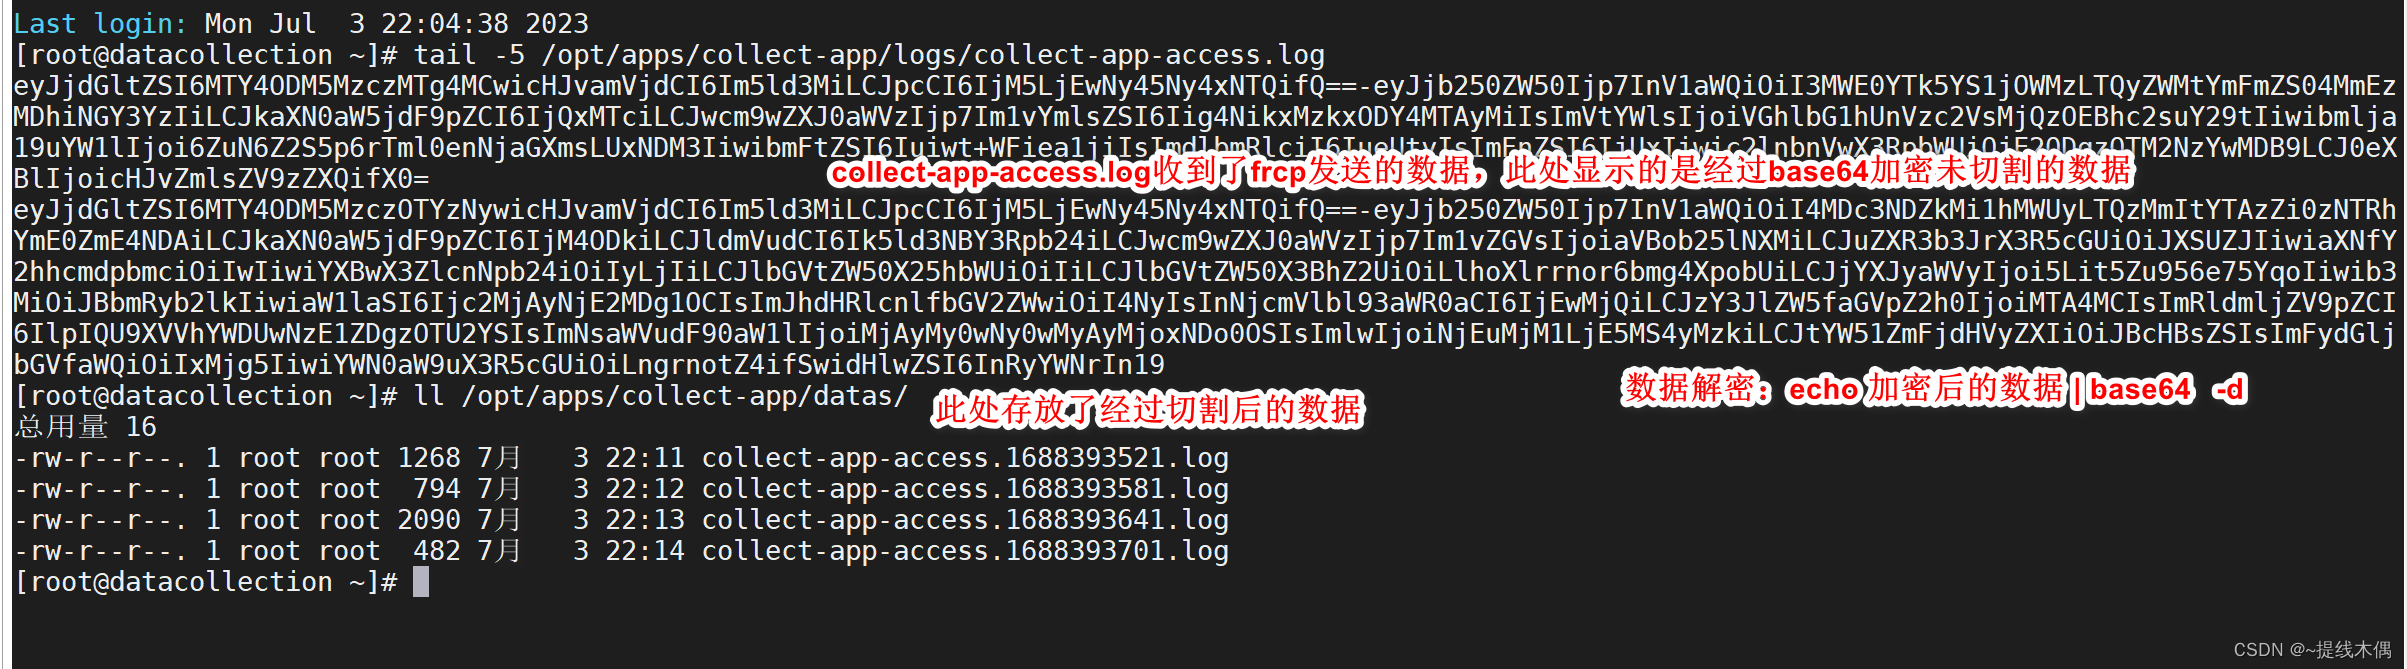
3、查看是否收集到了数据
数据收集阶段结束,进入下一个阶段
2、将收集到的切分好的数据上传到hdfs
使用的工具:flume
flume像一个管道一样,将文件数据上传到hdfs上
需要配置好source ,channel 和 sink
source:spooling(监视目录中的新文件,一有新文件产生便上传)
channel:memory (速度快)
sink:hdfs
1、使用flume
编写配置文件
vim /opt/installs/flume1.9.0/conf/job/collect-app_spooling_memory_hdfs.conf

# 内容
a1.sources.source1.type = spooldir
a1.sources.source1.spoolDir = /opt/apps/collect-app/datas
a1.sources.source1.fileSuffix = .COMPLETED
a1.sources.source1.fileHeader = true
a1.sources.source1.includePattern = ^collect-app-access.*.log
a1.sources.source1.deserializer.maxLineLength = 5120

a1.sources.source1.interceptors = i1
a1.sources.source1.interceptors.i1.type = demo.DcInterceptor$Builder

# channel
a1.channels.channel1.type = memory
a1.channels.channel1.capacity = 10000
a1.channels.channel1.transactionCapacity = 10000
a1.channels.channel1.byteCapacityBufferPercentage = 20
a1.channels.channel1.byteCapacity = 800000

# sink
a1.sinks.sink1.type = hdfs
a1.sinks.sink1.hdfs.path = hdfs://datacollection:8020/sources/news/%{

    ctime}
a1.sinks.sink1.hdfs.filePrefix = news-%Y%m%d_%H
a1.sinks.sink1.hdfs.fileSuffix = .gz
a1.sinks.sink1.hdfs.codeC = gzip
a1.sinks.sink1.hdfs.batchSize = 100
a1.sinks.sink1.hdfs.fileType = CompressedStream
a1.sinks.sink1.hdfs.writeFormat = Text
a1.sinks.sink1.hdfs.useLocalTimeStamp = true
a1.sinks.sink1.hdfs.threadsPoolSize = 10
a1.sinks.sink1.hdfs.idleTimeout = 60

## 目录滚动
a1.sinks.sink1.hdfs.round = true
a1.sinks.sink1.hdfs.roundValue = 24
a1.sinks.sink1.hdfs.roundUnit = hour

## 文件滚动
a1.sinks.sink1.hdfs.rollInterval = 600
a1.sinks.sink1.hdfs.rollSize = 1048576
a1.sinks.sink1.hdfs.rollCount = 0

a1.sources.source1.channels = channel1
a1.sinks.sink1.channel = channel1
编写一个自定义过滤器
在pom.xml中添加依赖
<?xml version="1.0" encoding="UTF-8"?>
<project xmlns="http://maven.apache.org/POM/4.0.0"
         xmlns:xsi="http://www.w3.org/2001/XMLSchema-instance"
         xsi:schemaLocation="http://maven.apache.org/POM/4.0.0 http://maven.apache.org/xsd/maven-4.0.0.xsd">
    <modelVersion>4.0.0</modelVersion>

    <groupId>org.example</groupId>
    <artifactId>flume-test</artifactId>
    <version>1.0-SNAPSHOT</version>
    <packaging>jar</packaging>

    <properties>
        <maven.compiler.source>8</maven.compiler.source>
        <maven.compiler.target>8</maven.compiler.target>
    </properties>

    <dependencies>
        <!-- https://mvnrepository.com/artifact/org.apache.flume/flume-ng-core -->
        <dependency>
            <groupId>org.apache.flume</groupId>
            <artifactId>flume-ng-core</artifactId>
            <version>1.9.0</version>
        </dependency>
        <!-- https://mvnrepository.com/artifact/com.alibaba/fastjson -->
        <dependency>
            <groupId>com.alibaba</groupId>
            <artifactId>fastjson</artifactId>
            <version>1.2.48</version>
        </dependency>
    </dependencies>

    <build>
        <plugins>
            <plugin>
                <groupId>org.apache.maven.plugins</groupId>
                <artifactId>maven-shade-plugin</artifactId>
                <version>3.1.1</version>
                <configuration>
                    <!-- 禁止生成 dependency-reduced-pom.xml-->
                    <createDependencyReducedPom>false</createDependencyReducedPom>
                </configuration>
                <executions>
                    <!-- Run shade goal on package phase -->
                    <execution>
                        <phase>package</phase>
                        <goals>
                            <goal>shade</goal>
                        </goals>
                        <configuration>
                            <relocations>
                                <relocation>
                                    <!-- 解决包冲突 进行转换-->
                                    <pattern>com.google.protobuf</pattern>
                                    <shadedPattern>shaded.com.google.protobuf</shadedPattern>
                                </relocation>
                            </relocations>
                            <artifactSet>
                                <excludes>
                                    <exclude>log4j:*</exclude>
                                </excludes>
                            </artifactSet>
                            <filters>
                                <filter>
                                    <!-- Do not copy the signatures in the META-INF folder.
                                    Otherwise, this might cause SecurityExceptions when using the JAR. -->
                                    <artifact>*:*</artifact>
                                    <excludes>
                                        <exclude>META-INF/*.SF</exclude>
                                    </excludes>
                                </filter>
                            </filters>
                            <transformers>
                                <!-- 某些jar包含具有相同文件名的其他资源(例如属性文件)。 为避免覆盖,您可以选择通过将它们的内容附加到一个文件中来合并它们-->
                                <transformer implementation="org.apache.maven.plugins.shade.resource.AppendingTransformer">
                                    <resource>reference.conf</resource>
                                </transformer>
                                <transformer implementation="org.apache.maven.plugins.shade.resource.ManifestResourceTransformer">
                                    <mainClass>mainclass</mainClass>
                                </transformer>
                            </transformers>
                        </configuration>
                    </execution>
                </executions>
            </plugin>
        </plugins>
    </build>

</project>
Java代码:
package demo;

import com.alibaba.fastjson.JSON;
import com.alibaba.fastjson.JSONArray;
import com.alibaba.fastjson.JSONObject;
import com.alibaba.fastjson.JSONPath;
import com.google.common.collect.Lists;
import org.apache.commons.codec.binary.Base64;
import org.apache.flume.Context;
import org.apache.flume.Event;
import org.apache.flume.interceptor.Interceptor;

import java.nio.charset.StandardCharsets;
import java.text.DateFormat;
import java.text.SimpleDateFormat;
import java.util.ArrayList;
import java.util.HashMap;
import java.util.List;

public class DcInterceptor implements Interceptor {


    /**
     * 初始化方法,当拦截器初始化的时候调用一次
     */
    public void initialize() {

    }

    /**
     * 处理单条数据
     * @param event 一条数据
     *
     * jksflkdsfjklasdjlfkas-fjaskfasdfjkasdflasdfljkasdlk
     */
    public Event intercept(Event event) {


        //1. 获取数据本身
        String text = new String(event.getBody());
        //2. 切割
        String[] textArray = text.split("-");

        byte[] body = null;
        //3. 判断
        if (textArray.length == 2) {


            try {


                //4. 获取到解码的字符串
                String meta = new String(Base64.decodeBase64(textArray[0]));
                String content = new String(Base64.decodeBase64(textArray[1]));

                //5. 将json的字符串转换为json的对象:ctime、project、ip
                JSONObject jsonMeta = JSONObject.parseObject(meta);

                //6. 获取到字段: ctime: 111111.111
                String ctime = JSONPath.eval(jsonMeta, "$.ctime").toString();
                DateFormat fmt = new SimpleDateFormat("yyyyMMdd");
                ctime = fmt.format(Double.parseDouble(ctime)); // 20220622

                //7. 将ctime的字段插入到flume的event的header中
                event.getHeaders().put("ctime", ctime);

                //8. 解析content
                JSONObject jsonContent = JSONObject.parseObject(content);

                //9. 将jsonContent和jsonMeta对象合并为一个json对象
                //{"project":"news","ip":"127.0.0.1","ctime":1589781236541}
                JSONObject jsonObject = new JSONObject();
                jsonObject.put("ctime", JSONPath.eval(jsonMeta, "$.ctime"));
                jsonObject.put("project", JSONPath.eval(jsonMeta, "$.project"));
                jsonObject.put("content",JSONPath.eval(jsonContent, "$.content"));

                //10. 复制body数组
                body = jsonObject.toString().getBytes();
            }catch (Exception e) {


                e.printStackTrace();
                return null;
            }
        }
        //11. 设置event的值
        event.setBody(body);
        return event;
    }

    /**
     * 自动被调用
     */
    public List<Event> intercept(List<Event> list) {


        //1. 创建数组返回这个结果
        ArrayList<Event> inter = Lists.newArrayListWithCapacity(list.size());
        //2. 遍历
        for(Event event : list) {


            Event e = intercept(event);
            if (e != null) inter.add(e);
        }
        return inter;
    }

    /**
     * 临死之前调用一次
     */
    public void close() {

    }

    /**
     * 申明Builder,这个方法会在flume拦截器创建的时候自动被调用
     */
    public static class Builder implements Interceptor.Builder {


        public Interceptor build() {


            return new DcInterceptor();
        }
        public void configure(Context context) {

    }
    }
}
经过clean——compile——package后上传至Linux的flume安装文件夹的lib目录下
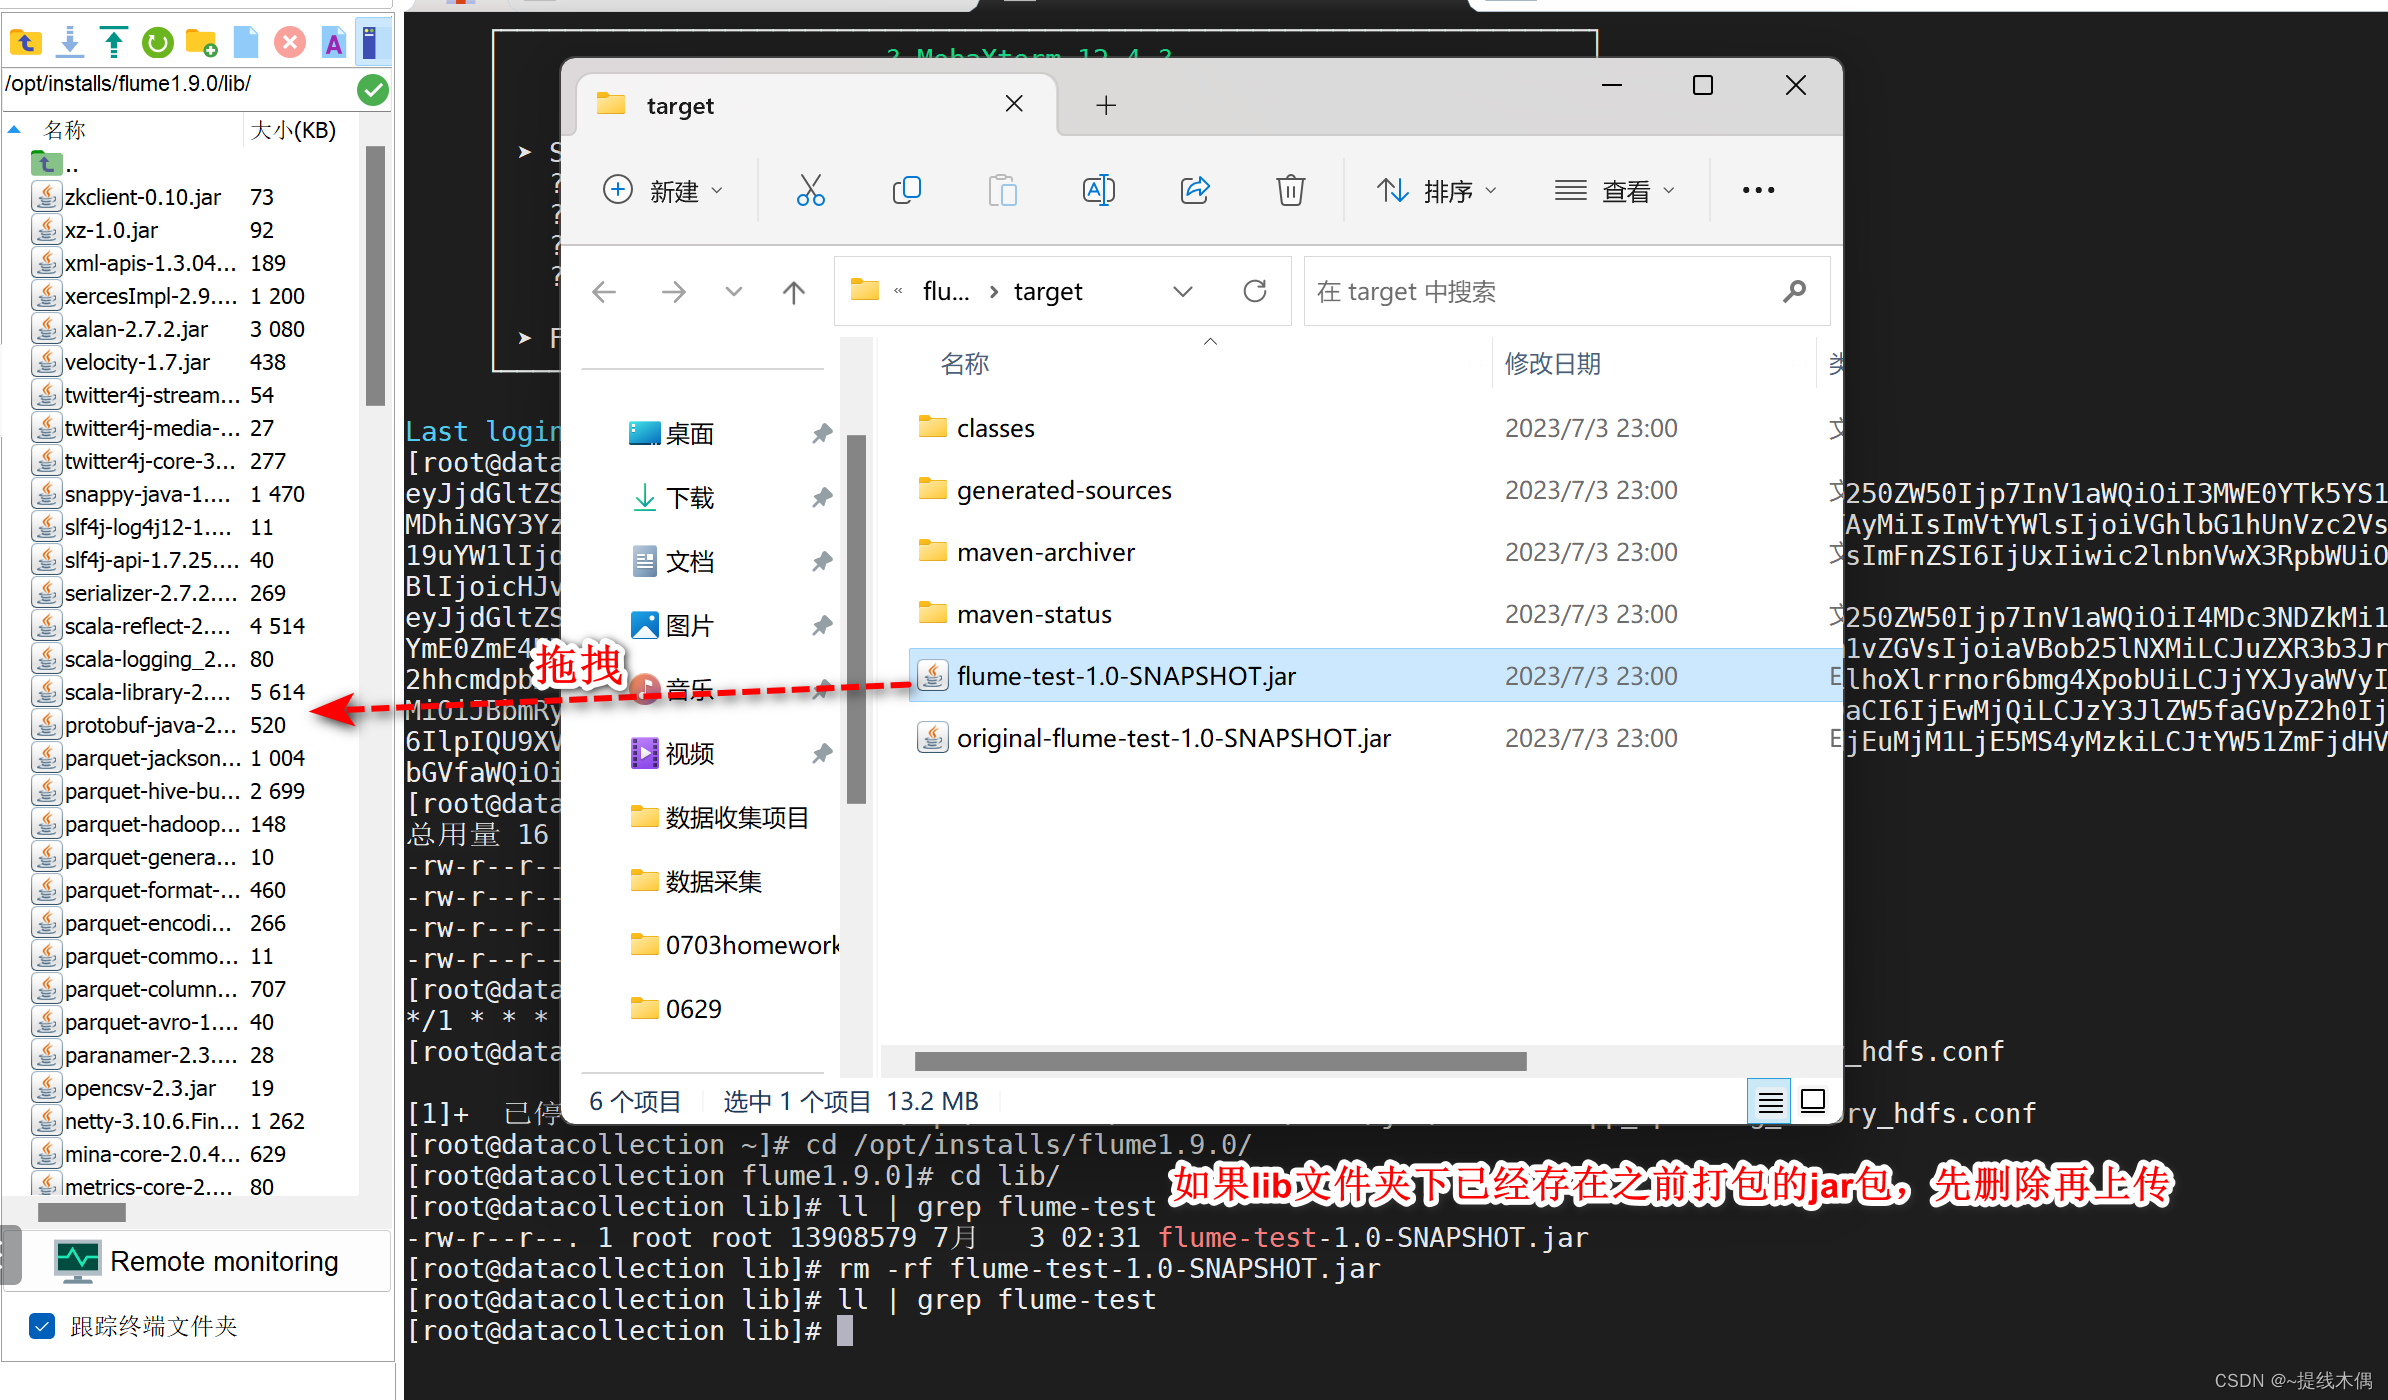
启动flume:
扫描二维码关注公众号,回复:
15680253 查看本文章

flume-ng agent -n a1 -c ../conf/job -f collect_spooling_memory_hdfs.conf
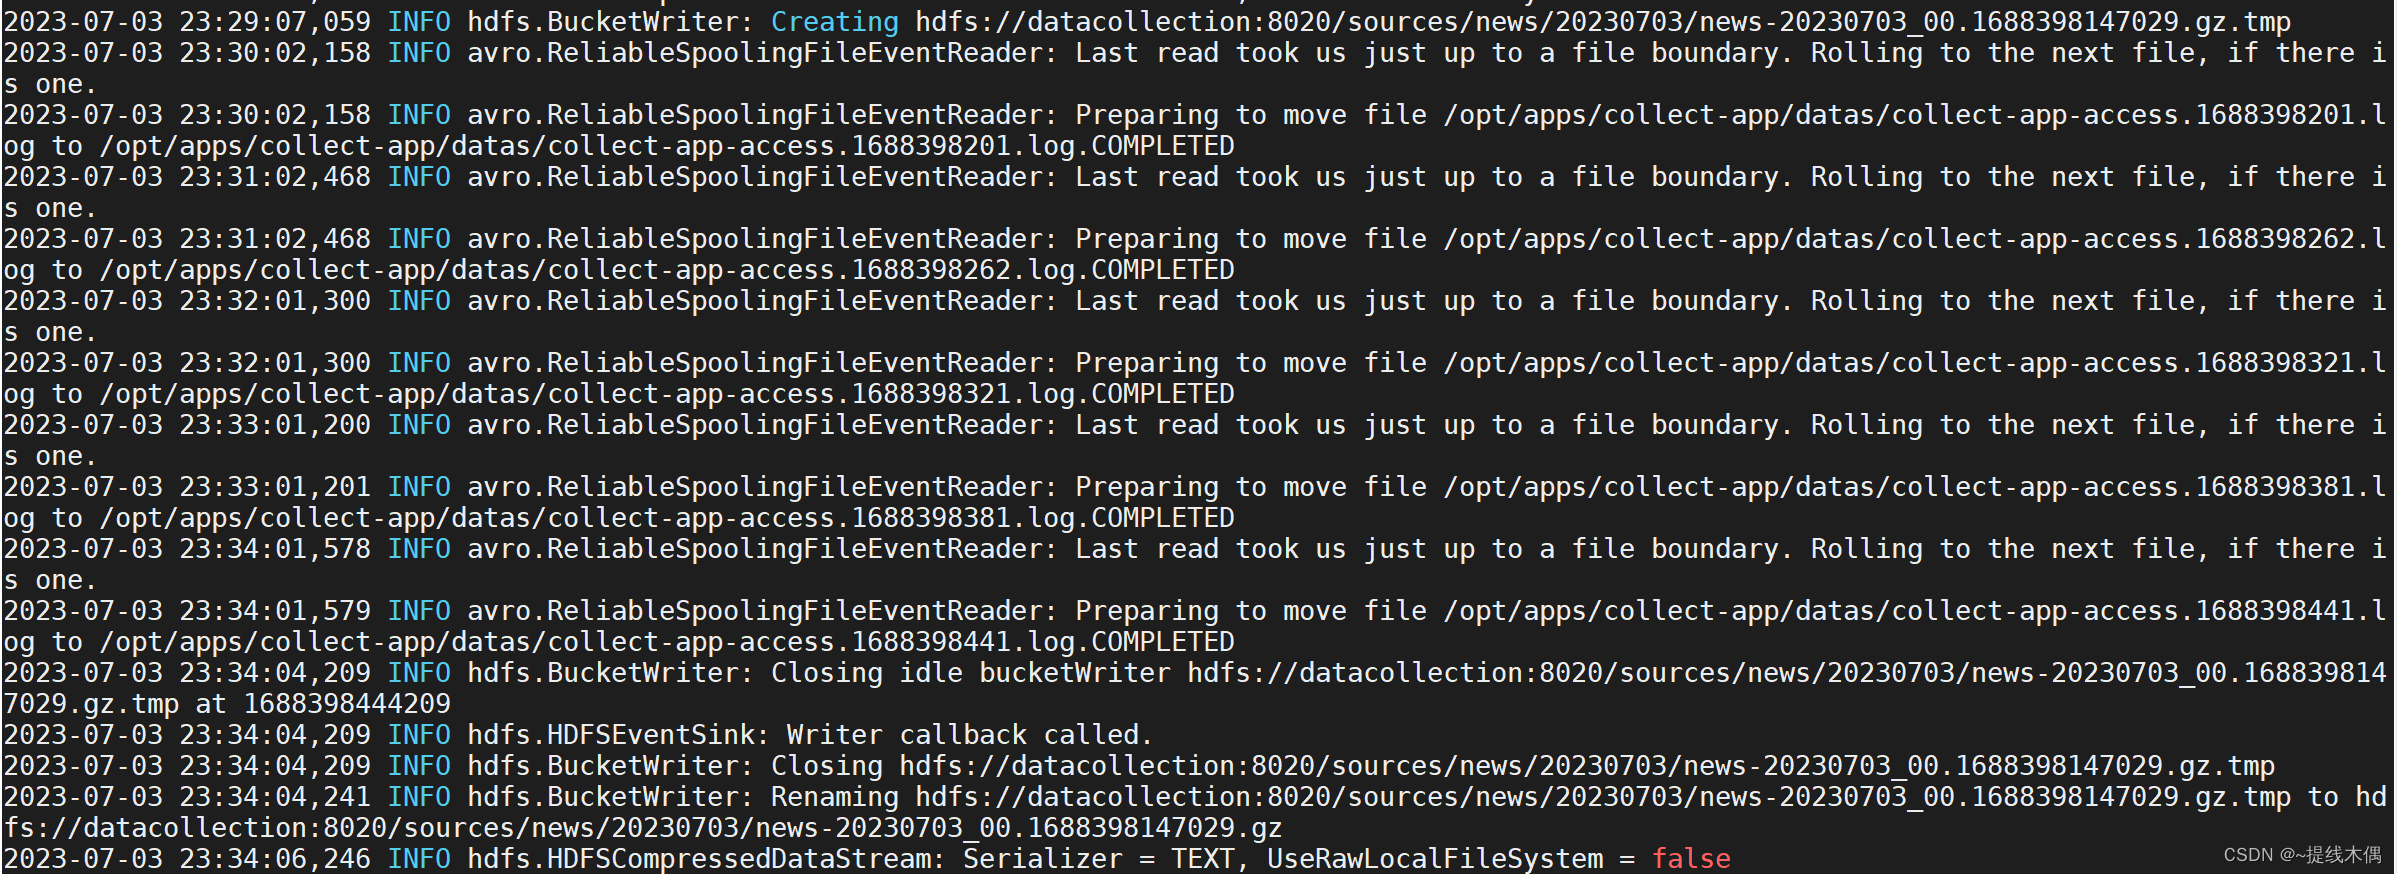
出现下图中的日志说明文件上传成功:
查看hdfs:
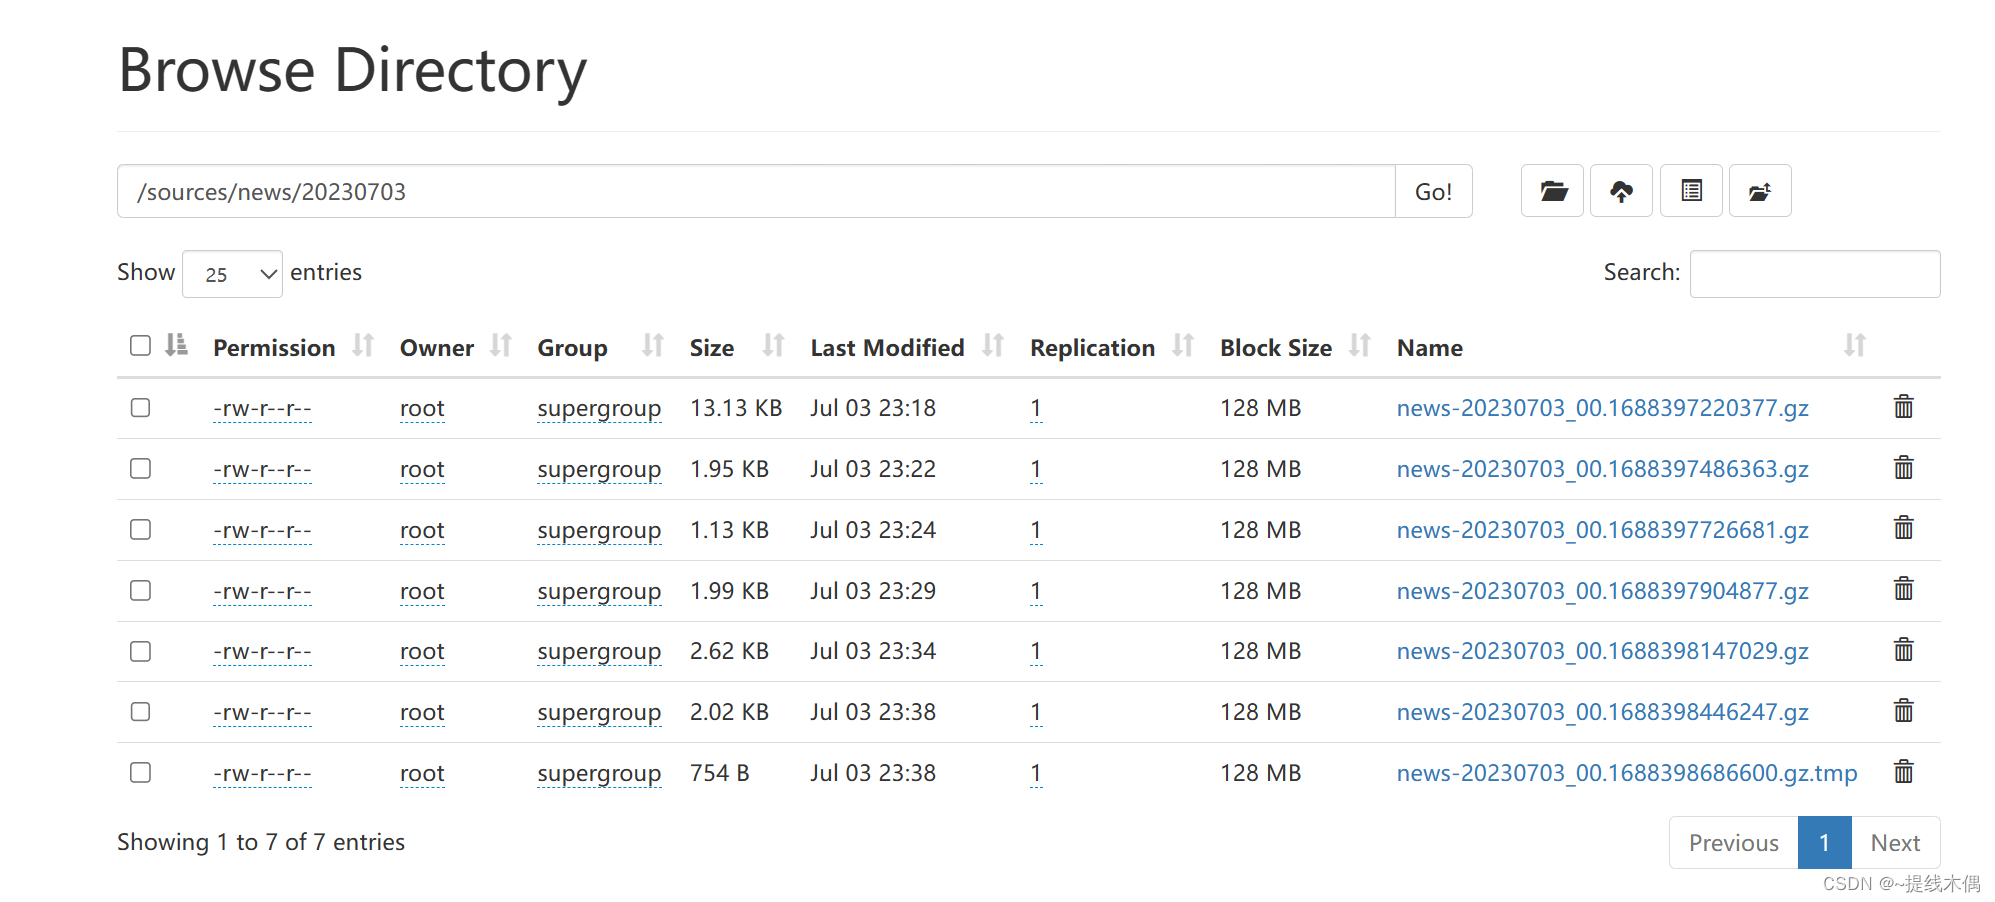
在Linux中通过命令解压查看hdfs上的数据
hdfs dfs -cat /sources/news/20230703/news-20230703_00.1688397220377.gz | gzip -d

复制其中的数据:
{

    "ctime":1688393544569,
"project":"news",
"content":{


	"distinct_id":"1544",
	"event":"AppPageView",
	"type":"track",
	"uuid":"7583344f-8059-4763-b2d1-b4d56be4880c",
	"properties":{


		"element_page":"注册登录页",
		"screen_width":"1080",
		"app_version":"2.2",
		"os":"Windows",
		"battery_level":"17",
		"device_id":"MEIYAXXXXXA8667F3D4EBD",
		"client_time":"2023-07-03 22:11:19",
		"action_type":"",
		"ip":"106.94.118.3",
		"is_charging":"1",
		"manufacturer":"",
		"article_id":"",
		"carrier":"中国电信",
		"screen_height":"1152",
		"imei":"418324002819",
		"model":"Unknown",
		"network_type":"4G",
		"element_name":""
		}
	}
}

{

    "ctime":1688393601776,
"project":"news",
"content":{


	"distinct_id":"4115",
	"type":"profile_set",
	"uuid":"14513e1e-b4fd-486f-a50b-aad00183738d",
	"properties":{


		"gender":"女",
		"nick_name":"沈音华Harris*0273",
		"mobile":"86-13594019409",
		"name":"盛采珊",
		"signup_time":1688393536000,
		"email":"[email protected]",
		"age":"45"
		}
	}
}
4、hdfs上的数据导入到hive表中
1、将两个解析JSON需要用到的jar包导入到hdfs上
创建文件夹:hdfs dfs -mkdir -p /common/lib
将两个文件上传至hdfs的这个/common/lib目录下面
hdfs dfs -put json-serde-1.3.8-jar-with-dependencies.jar /common/lib
hdfs dfs -put json-udf-1.3.8-jar-with-dependencies.jar /common/lib
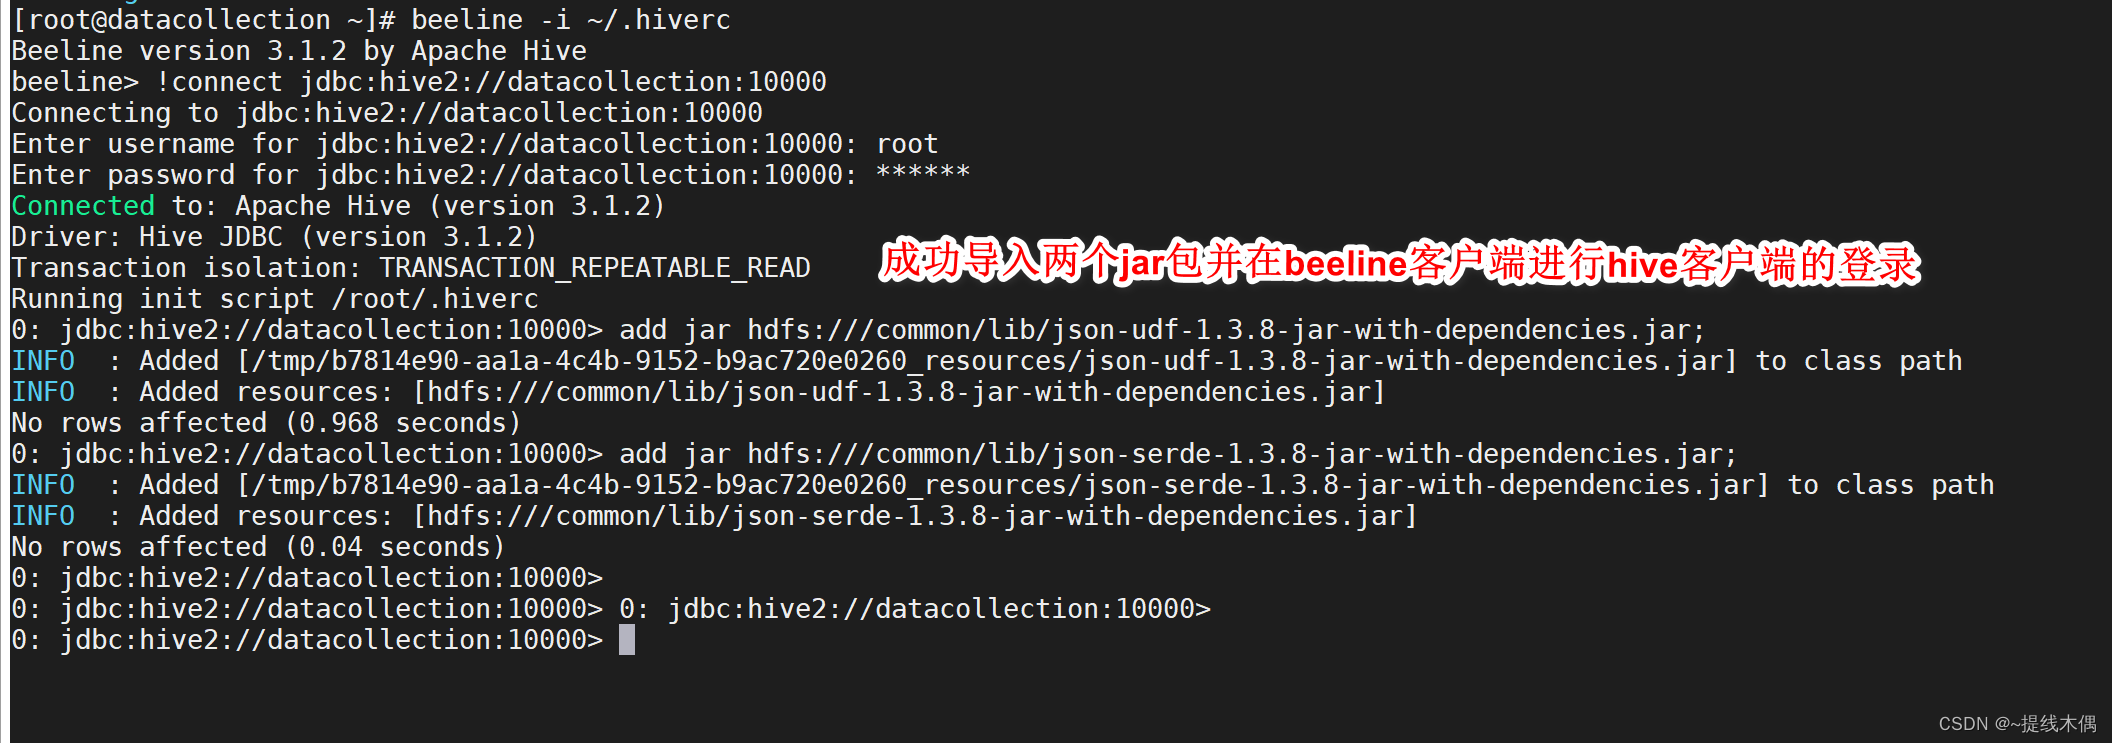
2、编辑.hiverc文件,每次启动beeline时导入这两个jar包
[root@hadoop ~]# vi ~/.hiverc
add jar hdfs:///common/lib/json-udf-1.3.8-jar-with-dependencies.jar;
add jar hdfs:///common/lib/json-serde-1.3.8-jar-with-dependencies.jar;

##7.beeline需要手动指定这个文件的位置
beeline -i ~/.hiverc
3、启动metastore 和hiveserver2服务
命令:
hive --service metastore &
hive -- service hiveserver2
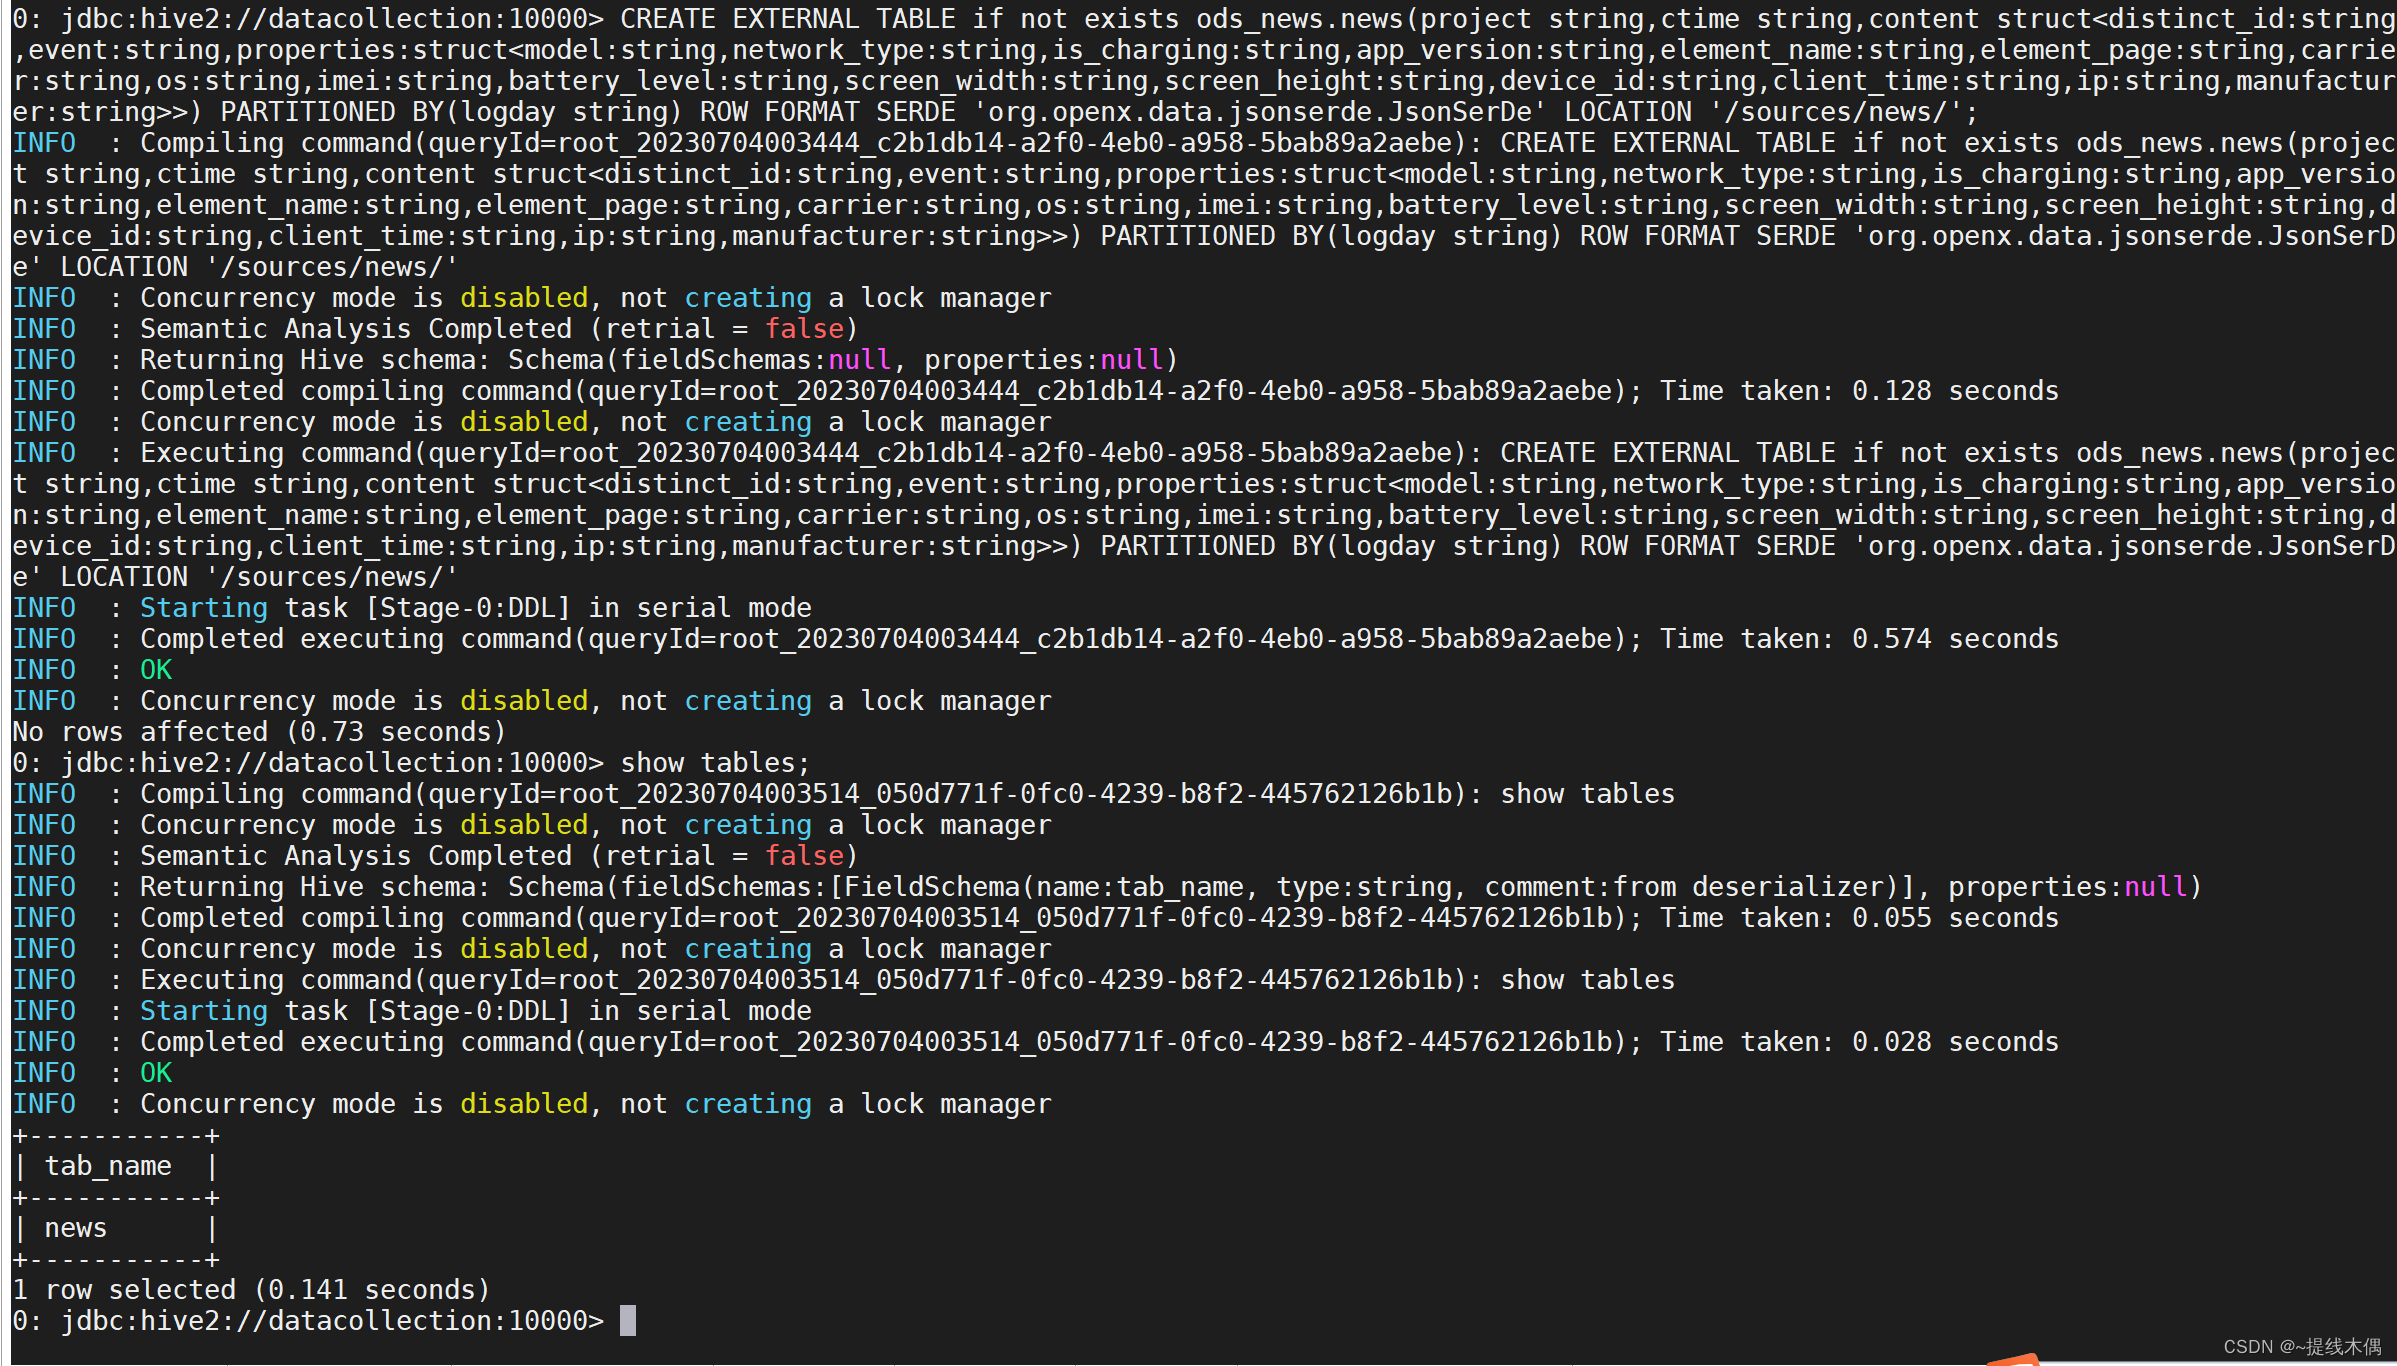
4、在hive中创建分区表:
创建表:
CREATE EXTERNAL TABLE if not exists ods_news.news(project string,ctime string,content struct<distinct_id:string,event:string,properties:struct<model:string,network_type:string,is_charging:string,app_version:string,element_name:string,element_page:string,carrier:string,os:string,imei:string,battery_level:string,screen_width:string,screen_height:string,device_id:string,client_time:string,ip:string,manufacturer:string>>) PARTITIONED BY(logday string) ROW FORMAT SERDE 'org.openx.data.jsonserde.JsonSerDe' LOCATION '/sources/news/';
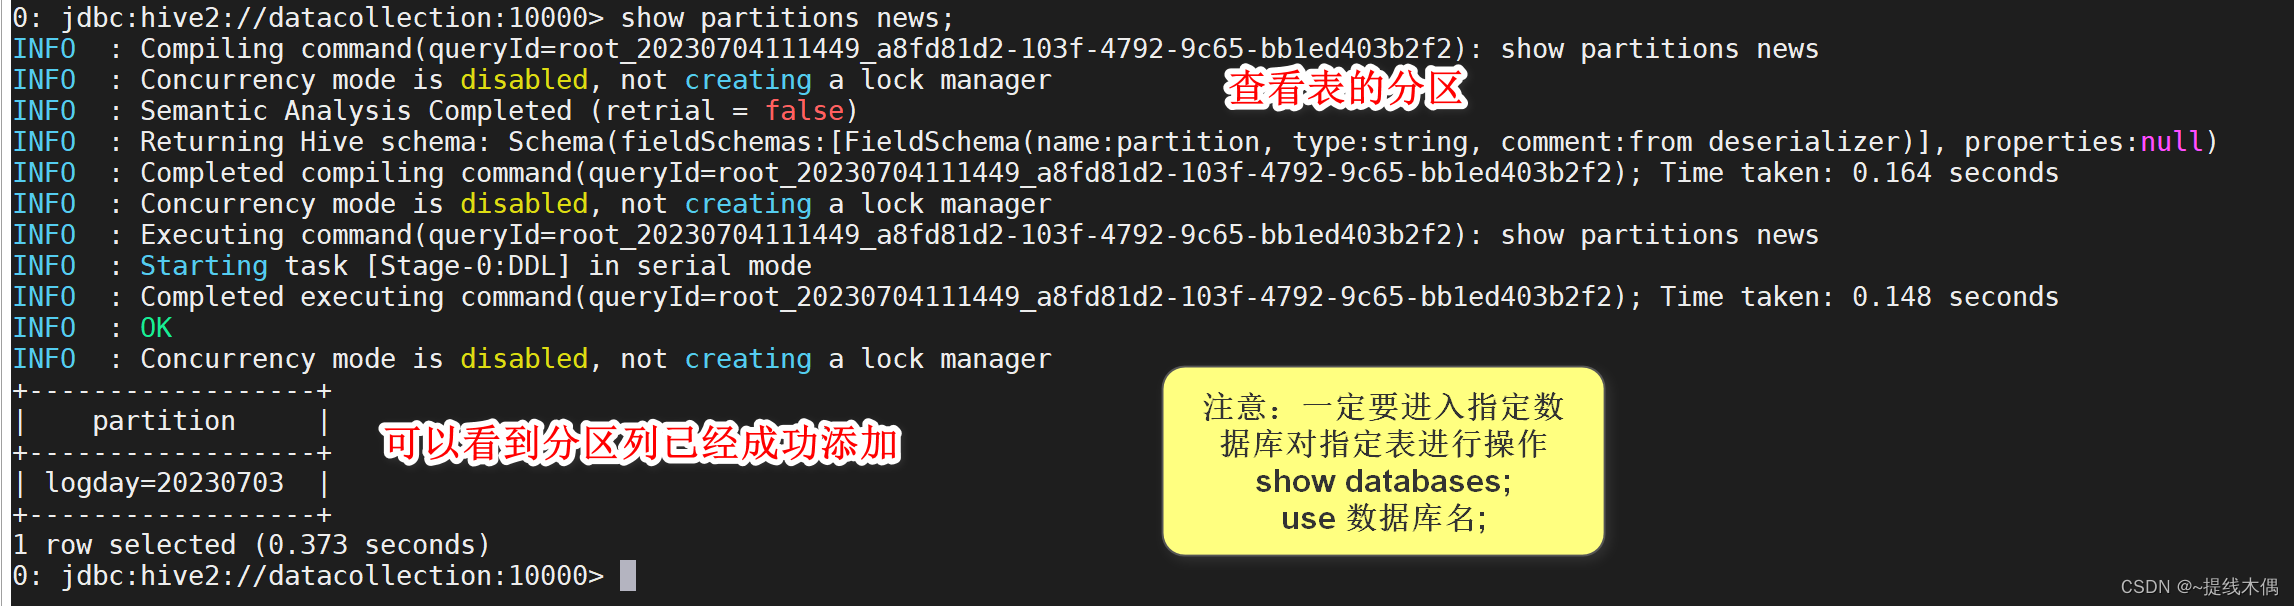
添加分区列:
# ${exec_date} 是指传进来的日期,一般今天导入昨天的数据,昨天导入前天的数据
alter table ods_news.news drop if exists partition(logday='${exec_date}');alter table ods_news.news add partition(logday='${exec_date}') location 'hdfs://${B_HOST}:8020/sources/news/${exec_date}';
# 这两句修改表的HQL语句意思是:如果存在以某日期为分区字段的分区列,则删除。再新增一个以${exec_date}为名的分区列,并指定它在hdfs上的分区路径。
alter table ods_news.news drop if exists partition(logday='20230703');alter table ods_news.news add partition(logday='20230703') location 'hdfs://datacollection:8020/sources/news/20230703';
查看数据:
select * from news limit 3;
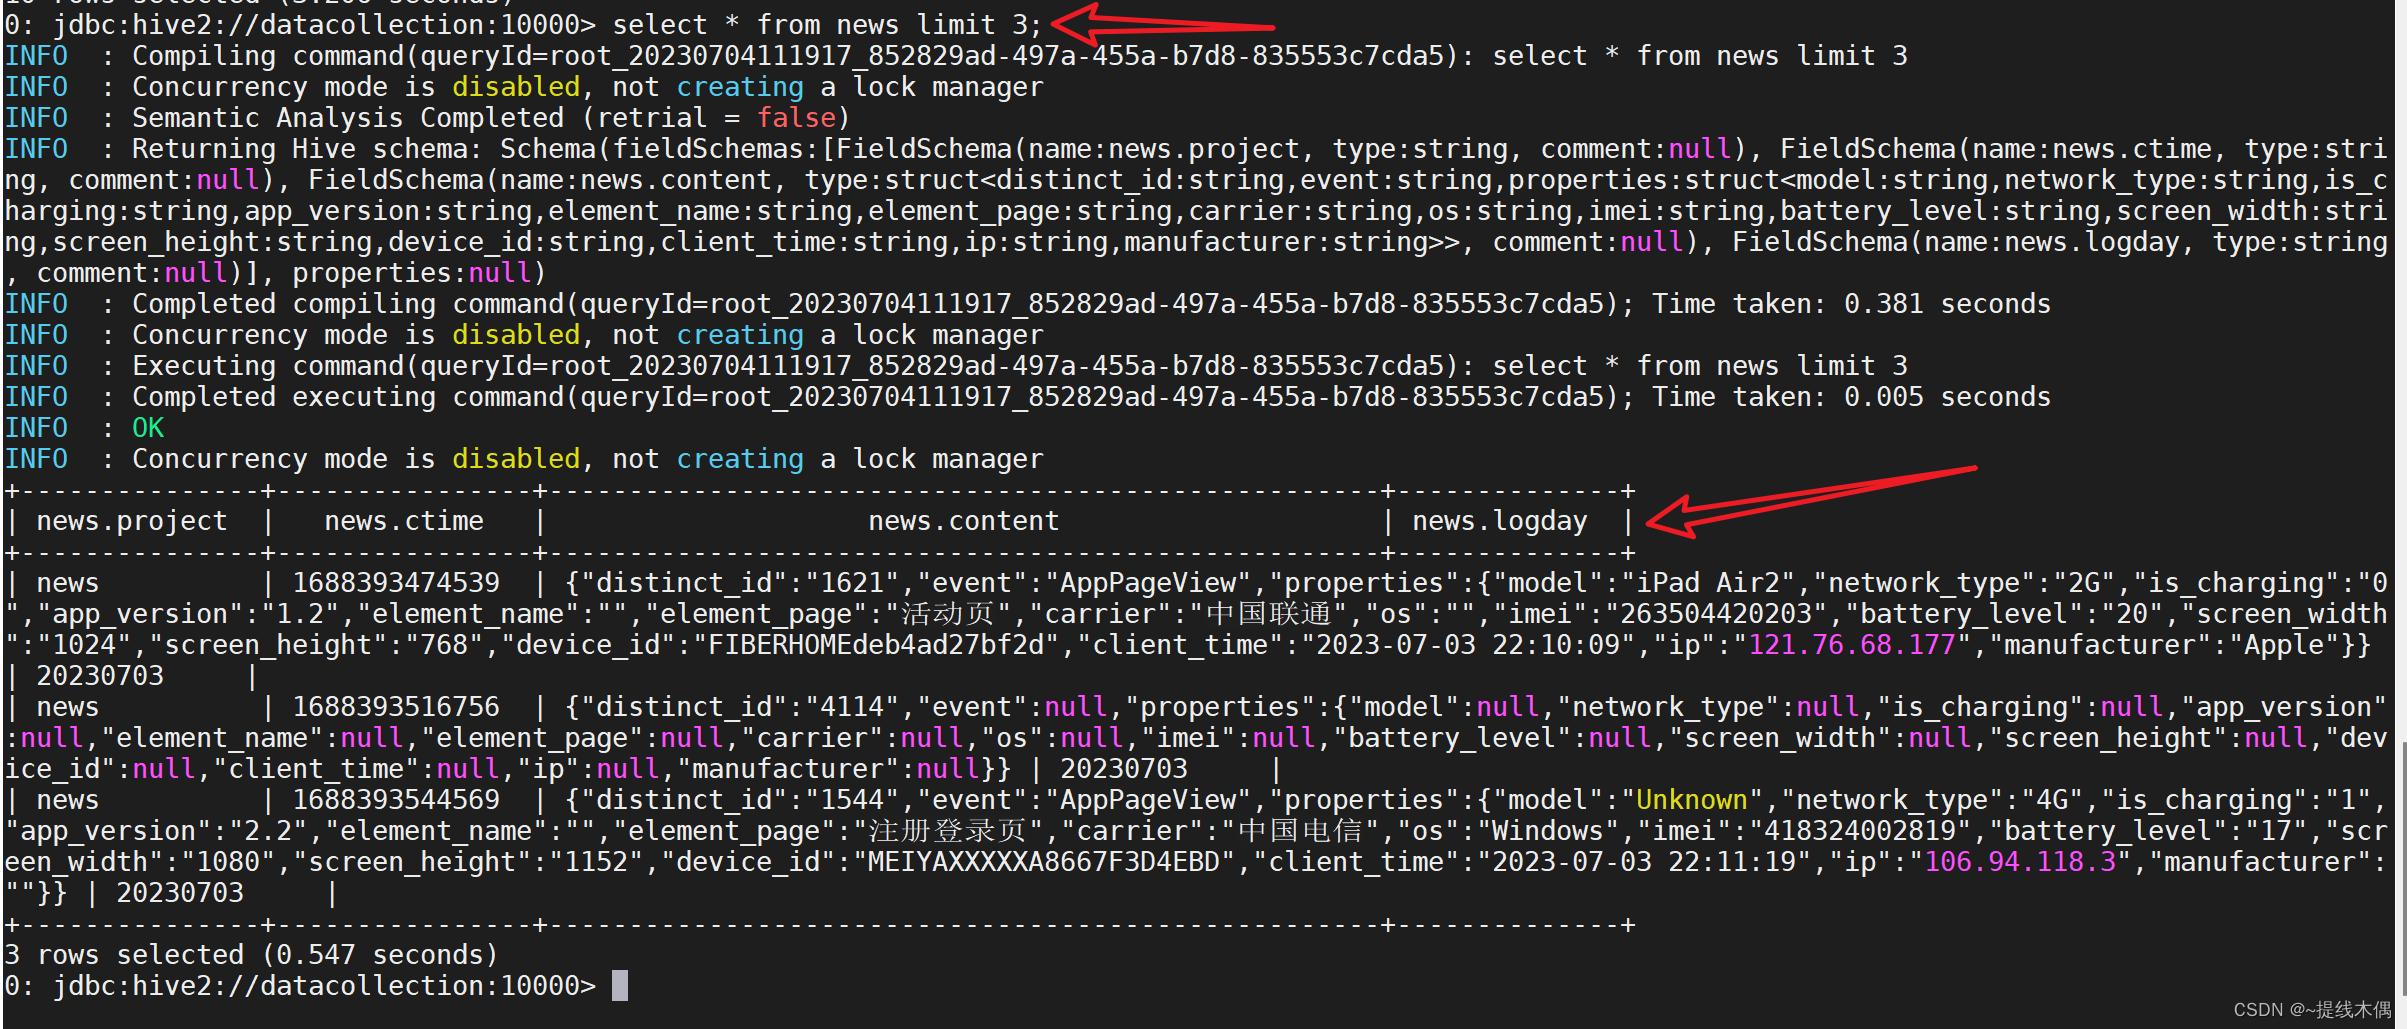
| news
| 1688393474539
| {

    "distinct_id":"1621",
"event":"AppPageView",
	"properties":{


	"model":"iPad Air2",
	"network_type":"2G",
	"is_charging":"0",
	"app_version":"1.2",
	"element_name":"",
	"element_page":"活动页",
	"carrier":"中国联通",
	"os":"",
	"imei":"263504420203",
	"battery_level":"20",
	"screen_width":"1024",
	"screen_height":"768",
	"device_id":"FIBERHOMEdeb4ad27bf2d",
	"client_time":"2023-07-03 22:10:09",
	"ip":"121.76.68.177",
	"manufacturer":"Apple"
	}
}
| 20230703     |
观察上面的数据,我们如果想要查询carrier字段的值,我们需要select news.properties.carrier,查询的时候有些费劲,我们可以创建一个news_parquet表将news表中的数据查询出来,插入到news_parquet表中。
把上面的需求编写成一个脚本:news_parquet.sh
#!/bin/bash
# desc:将news表的数据导出到news_parquet表中

##1. 申明变量
B_HOST=datacollection
B_PORT=10000
B_USER=root
HIVE_HOME=/opt/installs/hive3.1.2

##2. 导入的日期
exec_date=$1
# 在执行脚本时,传入了参数,则exec_date为传入日期的前一天,否则,exec_date为当前日期的前一天
if [ "${exec_date}" ]; then
	exec_date=`date -d "${exec_date} 1 days ago" +%Y%m%d`
else
	exec_date=`date -d "1 days ago" +%Y%m%d`
fi

echo "news_parquet.sh exec_date is ${exec_date}"

##3. 建表的SQL
CREATE_TABLE_SQL="create external table if not exists ods_news.news_parquet(
event string,
ctime string,
distinct_id string,
model string,
network_type string,
is_charging string,
app_version string,
element_name string,
element_page string,
carrier string,
os string,
imei string,
battery_level string,
screen_width string,
screen_height string,
device_id string,
client_time string,
ip string,
manufacturer string
)
partitioned by(logday string)
stored as parquet
location '/sources/news-parquet'"
# hdfs 上需要有news-parquet这个目录
echo "${CREATE_TABLE_SQL}"

# 在不进入beeline的情况下执行创建表的SQL语句
${

    HIVE_HOME}/bin/beeline -i ~/.hiverc -n ${

    B_USER} -p 123456 -u jdbc:hive2://${

    B_HOST}:${

    B_PORT} -e "${CREATE_TABLE_SQL}"

##4. 修改表:添加分区
NEWS_PARQUET_SQL="set hive.exec.dynamic.partition=true;
set hive.exec.dynamic.partition.mode=nonstrict;
insert overwrite table ods_news.news_parquet partition(logday)
select
content.event,
ctime,
content.distinct_id,
content.properties.model,
content.properties.network_type,
content.properties.is_charging,
content.properties.app_version,
content.properties.element_name,
content.properties.element_page,
content.properties.carrier,
content.properties.os,
content.properties.imei,
content.properties.battery_level,
content.properties.screen_width,
content.properties.screen_height,
content.properties.device_id,
content.properties.client_time,
content.properties.ip,
content.properties.manufacturer,
logday
from ods_news.news
where logday=${exec_date}
"

echo "${NEWS_PARQUET_SQL}"
# 在不进入beeline的情况下执行修改表的SQL语句
${

    HIVE_HOME}/bin/beeline -i ~/.hiverc -n ${

    B_USER} -p 123456 -u jdbc:hive2://${

    B_HOST}:${

    B_PORT} -e "${NEWS_PARQUET_SQL}"

##5. 结束
echo "executable sql successful"
执行脚本:
sh news_parquet.sh [日期]
创建表成功: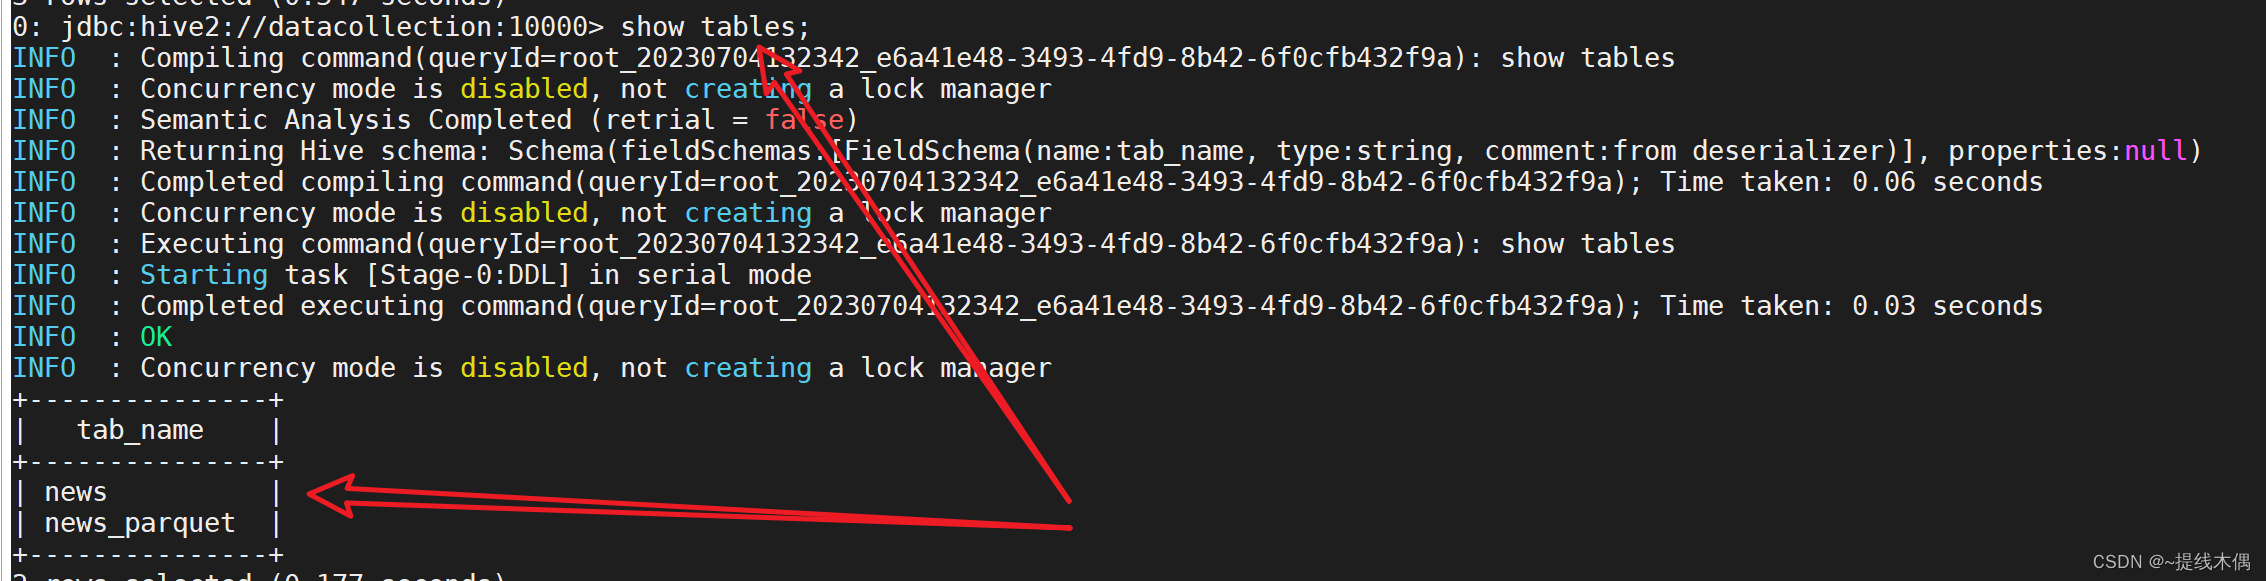
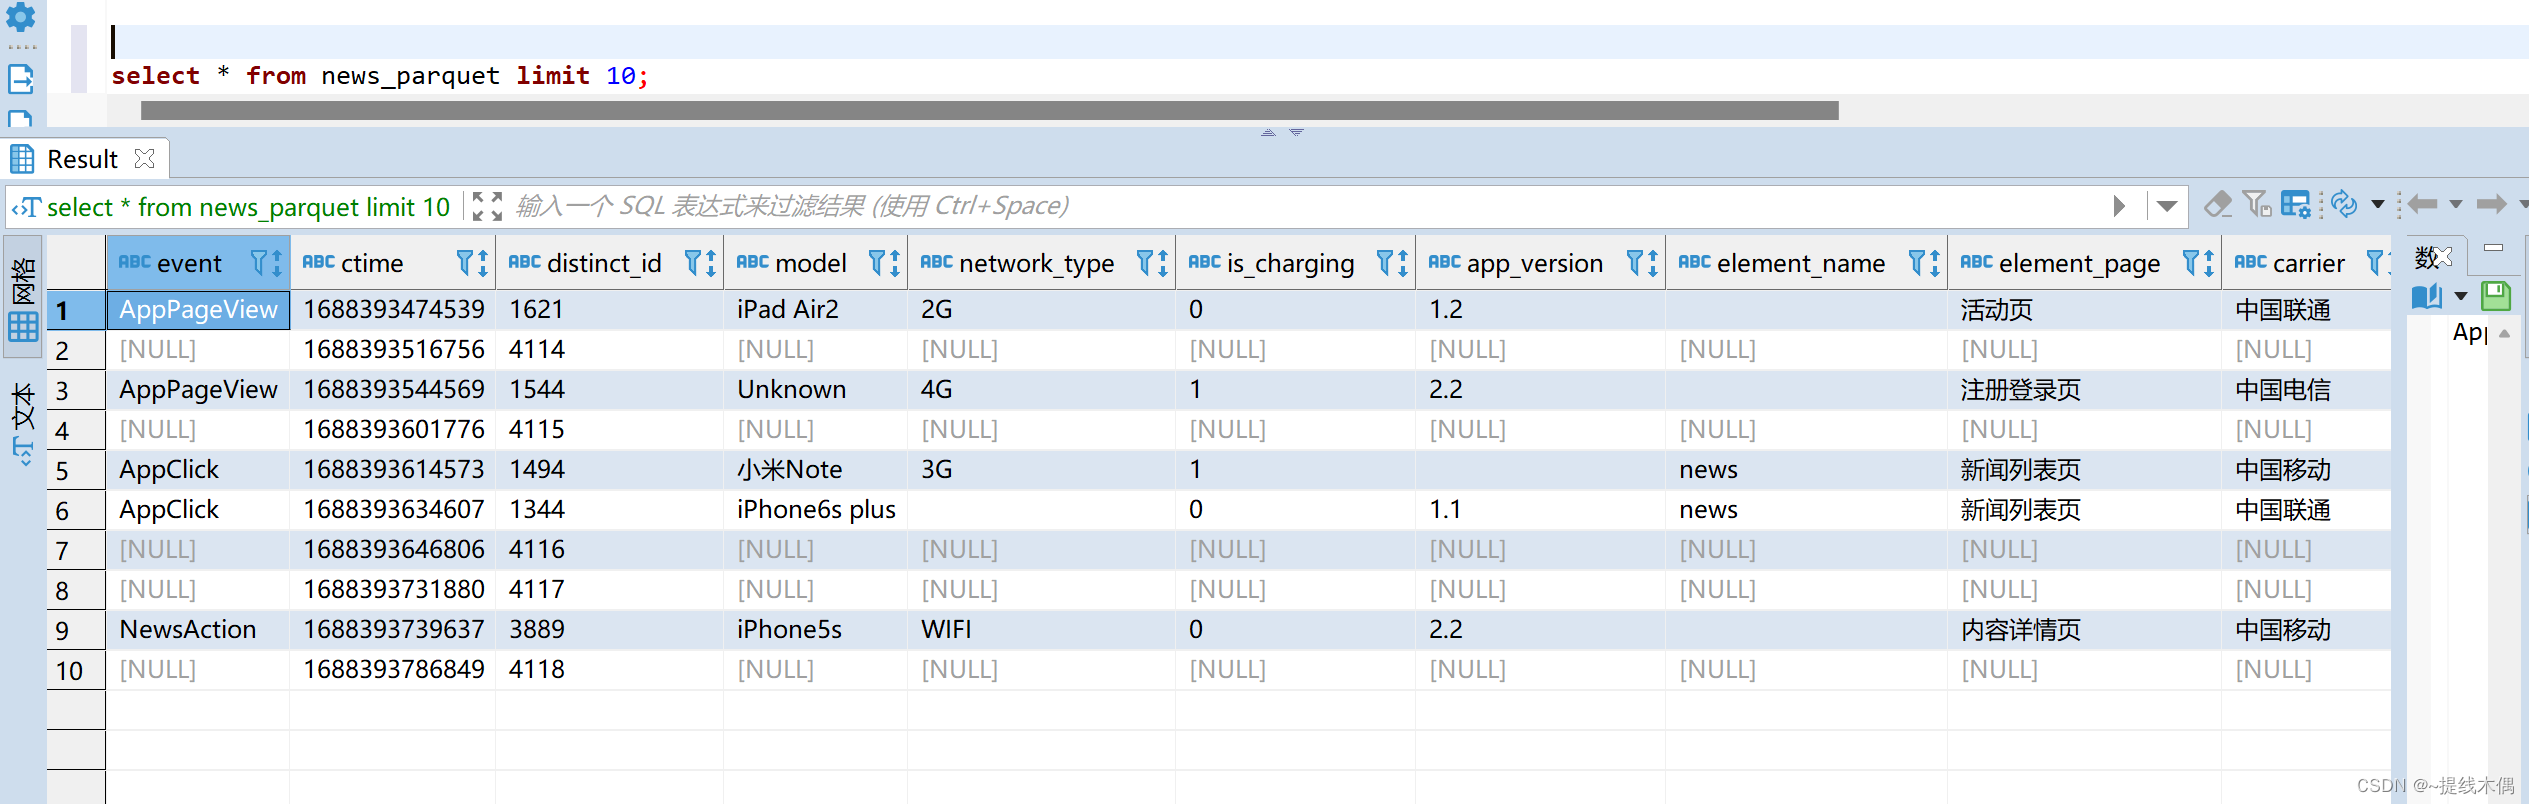
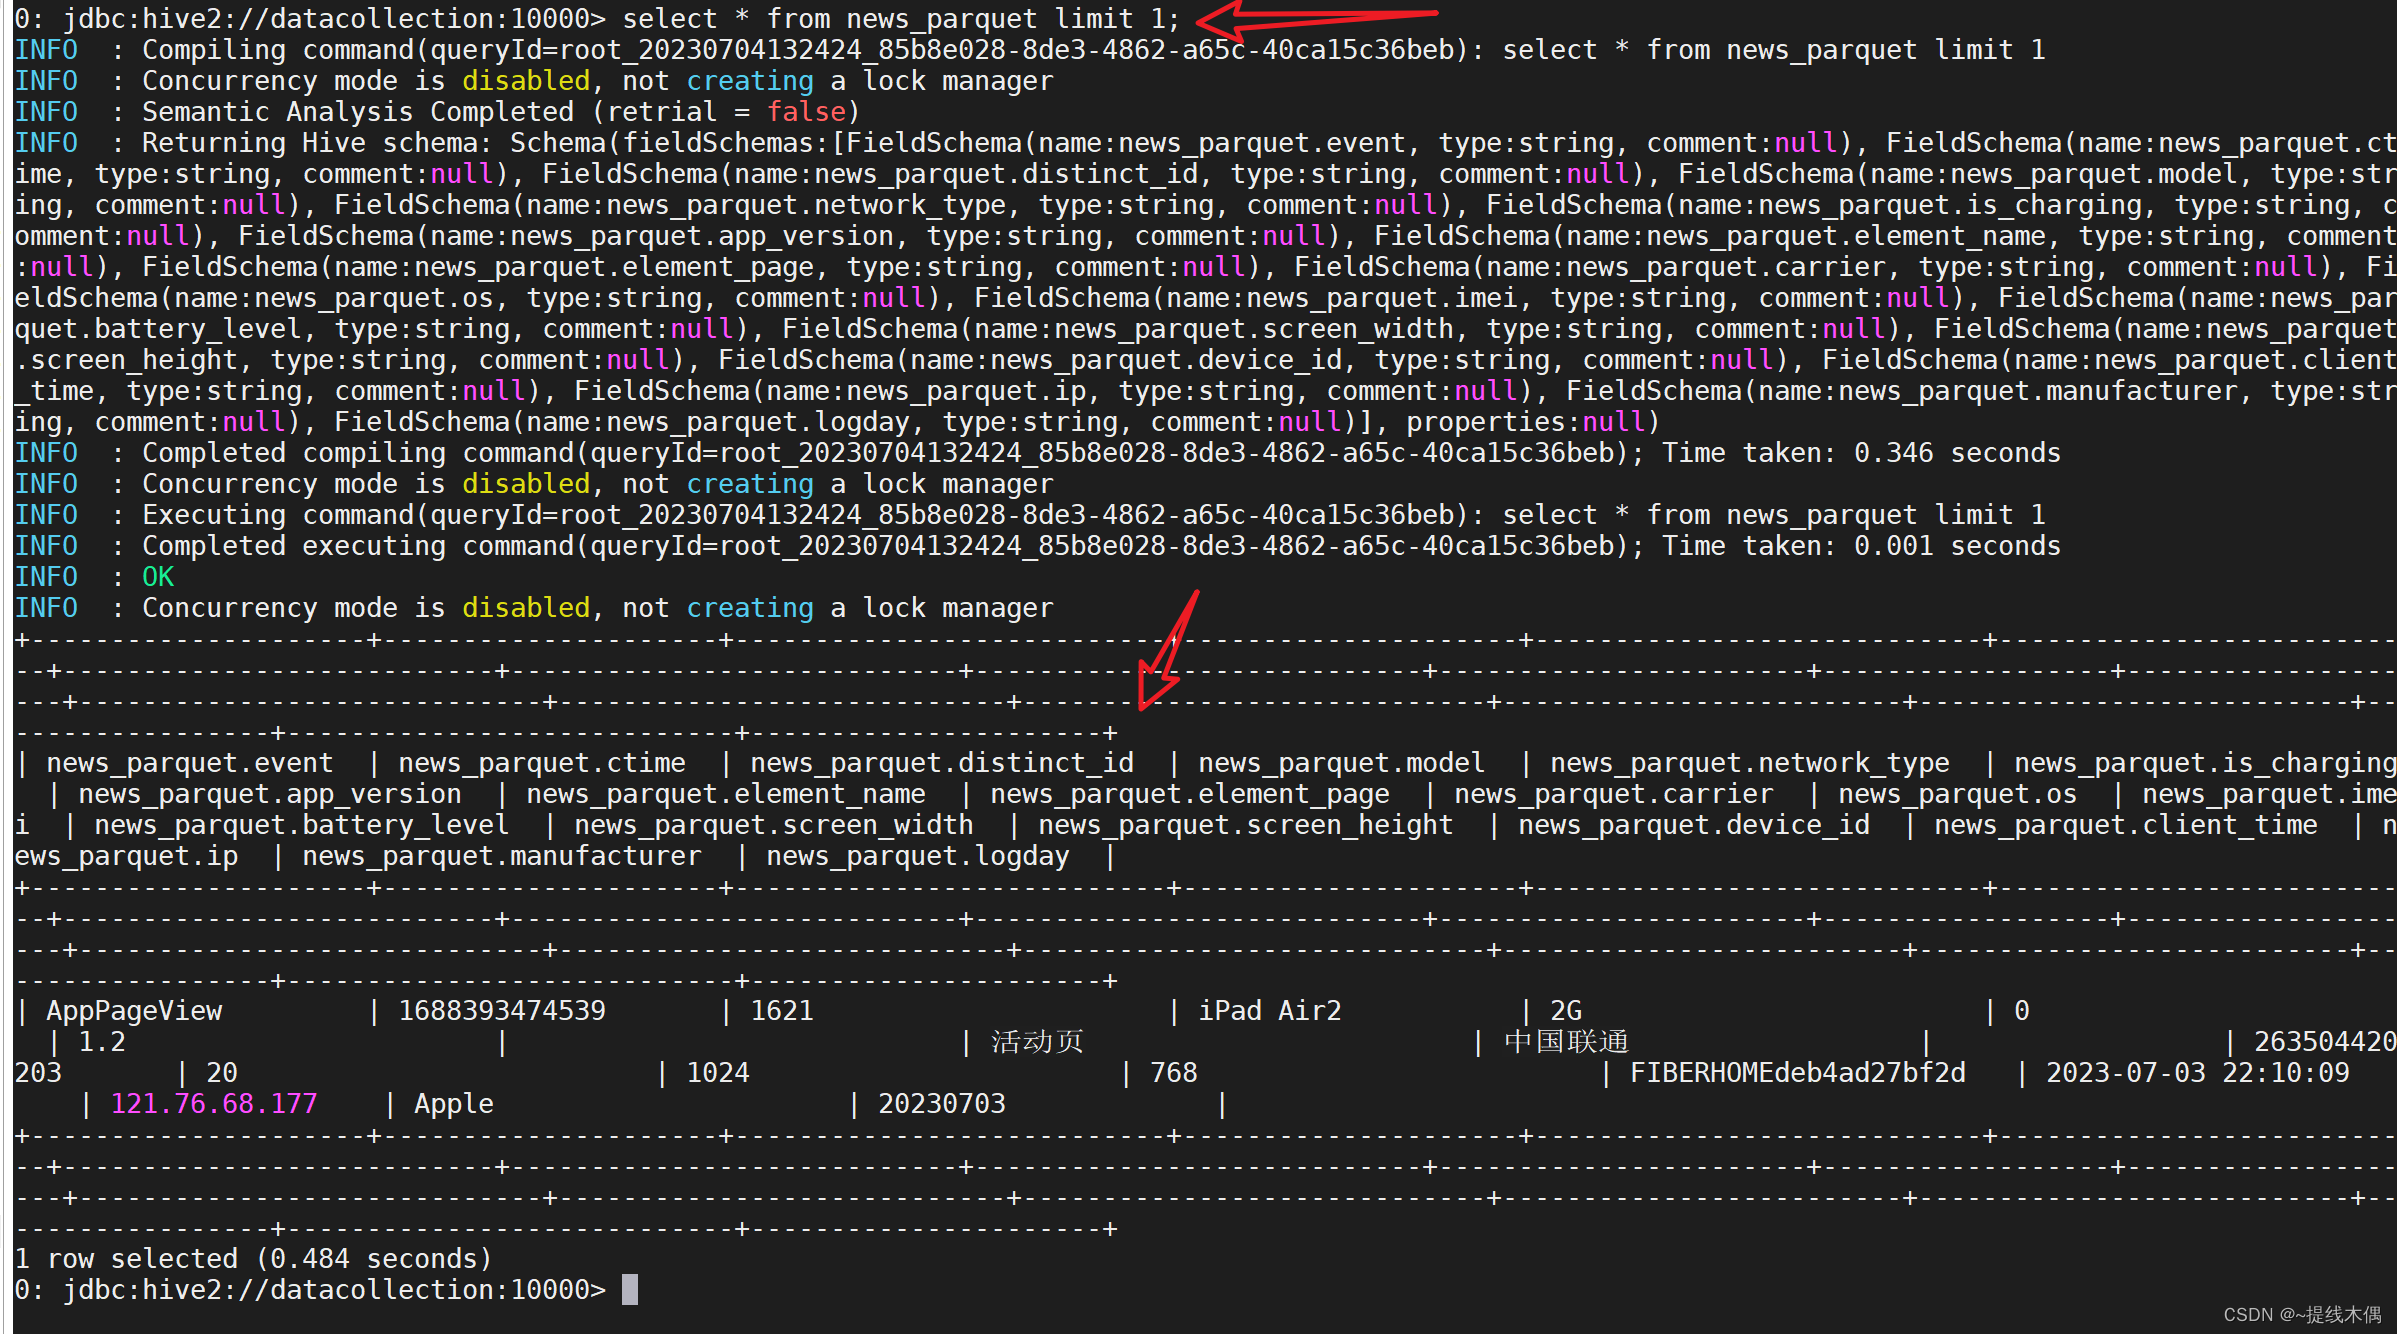
查询数据:
使用DBever查询结果展示: