3D基础
前言
手写 AI 推出的全新保姆级从零手写自动驾驶 CV 课程,链接。记录下个人学习笔记,仅供自己参考。
本次课程我们来学习下 nuScenes 数据集的可视化。
课程大纲可看下面的思维导图。

1. nuScenes数据集
明确下我们本次学习的目的:将 nuScenes 数据集中 sample 的 Lidar 点云投影到 Camera 图像上
在具体实现之前有一些基本概念需要我们了解,由于每个传感器安装在车辆的不同位置,为了方便描述它们之间的关系需要建立不同的坐标系,同时还需要对传感器进行标定,获取它们位置的相对关系,方便后续进行多传感器融合。
我们先来简单了解下几种常见坐标系
-
全局坐标系 (global coordinate)
- 可以简单的认为,车辆在 t0 时刻的位置是全局坐标系的原点
-
车体坐标系 (ego_pose/ego coordinate)
- 以车体为原点的坐标系
-
传感器坐标系
- lidar 坐标系
- camera 坐标系
- radar 坐标系
接下来我们再来简单了解下几种传感器的标定 (calibration)
- lidar 标定获得的结果是:
- lidar 相对于 ego 而言的位置 (translation) 和旋转 (rotation)
- translation 使用 3 个 float 数字表示
- 相对于 ego 而言的位置
- rotation 使用 4 个 float 数字表示即四元数
- camera 标定获得的结果是:
- camera 相对于 ego 而言的位置 (translation) 和旋转 (rotation)
- 相机内参 camera intrinsic (3d->2d平面)
- 相机畸变参数 (目前 nuScenes 数据集不考虑)
- translation 使用 3 个 float 数字表示
- 相对于 ego 而言的位置
- rotation 使用 4 个 float 数字表示即四元数
我们再来看看如何将 Lidar 的点云数据转换到 Camera 上面呢?你可能会说那就将 Lidar 坐标系先转换到 ego 坐标系再将 ego 坐标系转换到 Camera 坐标是不就行了吗?那这样转换其实是有问题的
那存在什么问题呢?我们不难发现 Lidar 和 Camera 这两种传感器的频率不同,也就是捕获数据的时间不同。假设当前 lidar 捕获的 timestamp 是 t0,对应的车体坐标系为 ego_pose0,而 camera 捕获的 timestamp 是 t1,对应的车体坐标系为 ego_pose1,因此考虑时间问题,最终的转换应该如下:
lidar_points -> ego_pose0 -> global -> ego_pose1 -> camera -> intrinsic -> image
2. 代码实现
我们需要熟悉 nuScenes 数据集中的数据格式,后续具体代码实现的过程中需要经常参考 图2-1

2.1 前置工作
在正式开始前需要安装 nuScenes 的包,安装指令如下:
pip install nuscenes-devkit
在安装过程中,遇到了如下问题:

解决方案可参考这篇博文,比较简单大家按步骤走就行
2.2 初始化nuScenes类
利用 nuscenes 库来初始化 nuScenes 类并进行样本处理
示例代码如下:
# pip install nuscenes-devkit
from nuscenes.nuscenes import NuScenes
from pyquaternion import Quaternion
import numpy as np
import cv2
import os

# 构建nuScenes类
version = "v1.0-mini"
dataroot = "D:\\Data\\nuScenes"
nuscenes = NuScenes(version, dataroot, verbose=False)

sample = nuscenes.sample[0]
上述示例代码导入了一些库包,并初始化了NuScenes类,对第一个样本进行了打印
输出如下,可以看到我们打印 nuScenes 第一个样本中的内容,它的结果是一个字典,后续我们需要按照字典中的 键 对应的 token 去访问对应的值
{

    'token': 'ca9a282c9e77460f8360f564131a8af5', 'timestamp': 1532402927647951, 'prev': '', 'next': '39586f9d59004284a7114a68825e8eec', 'scene_token': 'cc8c0bf57f984915a77078b10eb33198', 'data': {

    'RADAR_FRONT': '37091c75b9704e0daa829ba56dfa0906', 'RADAR_FRONT_LEFT': '11946c1461d14016a322916157da3c7d', 'RADAR_FRONT_RIGHT': '491209956ee3435a9ec173dad3aaf58b', 'RADAR_BACK_LEFT': '312aa38d0e3e4f01b3124c523e6f9776', 'RADAR_BACK_RIGHT': '07b30d5eb6104e79be58eadf94382bc1', 'LIDAR_TOP': '9d9bf11fb0e144c8b446d54a8a00184f', 'CAM_FRONT': 'e3d495d4ac534d54b321f50006683844', 'CAM_FRONT_RIGHT': 'aac7867ebf4f446395d29fbd60b63b3b', 'CAM_BACK_RIGHT': '79dbb4460a6b40f49f9c150cb118247e', 'CAM_BACK': '03bea5763f0f4722933508d5999c5fd8', 'CAM_BACK_LEFT': '43893a033f9c46d4a51b5e08a67a1eb7', 'CAM_FRONT_LEFT': 'fe5422747a7d4268a4b07fc396707b23'}, 'anns': ['ef63a697930c4b20a6b9791f423351da', '6b89da9bf1f84fd6a5fbe1c3b236f809', '924ee6ac1fed440a9d9e3720aac635a0', ...]}
2.3 获取lidar数据
从上述样本打印的结果可知,数据都存储在 'data' 中,而 lidar 的数据对应的键的 token 是 LIDAR_TOP,因此 lidar 的数据可通过下面的示例代码获取:
# 获取lidar的数据
lidar_token = sample["data"]["LIDAR_TOP"]
lidar_sample_data = nuscenes.get('sample_data', lidar_token)
print(lidar_sample_data)
lidar_file = os.path.join(dataroot, lidar_sample_data['filename'])

# 加载点云数据
lidar_points = np.fromfile(lidar_file, dtype=np.float32).reshape(-1, 5)
通过字典中的键获取 token,通过 token 来获取 lidar 数据,值得注意的是我们通过 lidar 文件的路径读取点云数据后会将其 reshape 成 (-1,5) 的形式,其中 5 分别代码一个点云数据所代表的 x、y、z、intensity、ring_index
输出如下:
# lidar_sample_data
{

    'token': '9d9bf11fb0e144c8b446d54a8a00184f', 'sample_token': 'ca9a282c9e77460f8360f564131a8af5', 'ego_pose_token': '9d9bf11fb0e144c8b446d54a8a00184f', 'calibrated_sensor_token': 'a183049901c24361a6b0b11b8013137c', 'timestamp': 1532402927647951, 'fileformat': 'pcd', 'is_key_frame': True, 'height': 0, 'width': 0, 'filename': 'samples/LIDAR_TOP/n015-2018-07-24-11-22-45+0800__LIDAR_TOP__1532402927647951.pcd.bin', 'prev': '', 'next': '0cedf1d2d652468d92d23491136b5d15', 'sensor_modality': 'lidar', 'channel': 'LIDAR_TOP'}

# lidar_points
[[-3.1243734e+00 -4.3415368e-01 -1.8671920e+00  4.0000000e+00
   0.0000000e+00]
 [-3.2906363e+00 -4.3220678e-01 -1.8631892e+00  1.0000000e+00
   1.0000000e+00]
 [-3.4704101e+00 -4.3068862e-01 -1.8595628e+00  2.0000000e+00
   2.0000000e+00]
 ...
 [-1.4129141e+01  4.9357712e-03  1.9857219e+00  8.0000000e+01
   2.9000000e+01]
 [-1.4120683e+01  9.8654358e-03  2.3199446e+00  7.5000000e+01
   3.0000000e+01]
 [-1.4113669e+01  1.4782516e-02  2.6591547e+00  4.0000000e+01
   3.1000000e+01]]
2.4 lidar坐标转换
获取完 lidar 数据后我们需要通过一些坐标变换将点云数据从 lidar 坐标系转换到 global 坐标系,转换流程是 lidar -> ego -> global,先将 lidar 坐标系转换到 ego 坐标系,再将 ego 坐标系转换到 global 坐标系,具体实现代码如下:
# lidar坐标变换
# 获取lidar相对于车体坐标系而言的translation和rotation标定数据
lidar_calibrated_data = nuscenes.get("calibrated_sensor", lidar_sample_data["calibrated_sensor_token"])
print(lidar_calibrated_data)

def get_matrix(calibrated_data, inverse=False):
    # 返回的结果是 lidar->ego 坐标系的变换矩阵
    output = np.eye(4)
    output[:3, :3] = Quaternion(calibrated_data["rotation"]).rotation_matrix
    output[:3,  3] = calibrated_data["translation"]
    if inverse:
        output = np.linalg.inv(output)
    return output

# lidar->ego 变换矩阵
lidar_to_ego = get_matrix(lidar_calibrated_data)
print(lidar_to_ego)

# 获取lidar数据时对应的车体位姿
ego_pose = nuscenes.get("ego_pose", lidar_sample_data["ego_pose_token"])
print(ego_pose)
# ego->global 变换矩阵
ego_to_global = get_matrix(ego_pose)
print(ego_to_global)
# lidar->global 变换矩阵
lidar_to_global = ego_to_global @ lidar_to_ego
print(lidar_to_global)

# x, y, z -> x, y, z, 1 转换为齐次坐标,方便做矩阵相乘
hom_points = np.concatenate([lidar_points[:, :3], np.ones((len(lidar_points), 1))], axis=1)
# lidar_points -> global
global_points = hom_points @ lidar_to_global.T
print(global_points)
上述代码中我们通过 lidar_sample_data 中的 'calibrated_sensor_token' 获取到了标定时的 translation 和 rotation,通过函数 get_matrix 获取变换矩阵,其中 rotation 表示旋转变换而 translation 表示位置变换
那你可能会问 'rotation' 中只包含4个值,为什么能表示为 3x3 的旋转矩阵呢?这是因为 rotation 的 4 个值,它们代表着四元数,通过一定的变换可以转换为旋转矩阵,假设四元数 q \mathbf{q} q 的向量形式为 q = ( w , x , y , z ) \mathbf{q} = (w,x,y,z) q=(w,x,y,z),则对应于四元数 q \mathbf{q} q 的旋转矩阵计算如下:
R q = [ 1 − 2 y 2 − 2 z 2 2 x y − 2 w z 2 x z + 2 w y 2 x y + 2 w z 1 − 2 x 2 − 2 z 2 2 y z − 2 w x 2 x z − 2 w y 2 y z + 2 w x 1 − 2 x 2 − 2 y 2 ] \mathbf{R_q}=\left[\begin{array}{ccc}1-2y^2-2z^2&2xy-2wz&2xz+2wy\\ 2xy+2wz&1-2x^2-2z^2&2yz-2wx\\ 2xz-2wy&2yz+2wx&1-2x^2-2y^2\end{array}\right] Rq=
1−2y2−2z22xy+2wz2xz−2wy2xy−2wz1−2x2−2z22yz+2wx2xz+2wy2yz−2wx1−2x2−2y2
更多细节描述:四元数和旋转(Quaternion & rotation)
在上述代码中我们首先计算了 lidar->ego 的变换矩阵,然后计算了 ego->global 的变换矩阵,将二者相乘后得到了 lidar->global 的变换矩阵,将该变换矩阵应用到每个点云上就可以得到最终的 global_points,值得注意的是,为了方便矩阵相乘我们将 lidar_points 数据转换成为了齐次坐标
输出如下:
# lidar_calibrated_data
{

    'token': 'a183049901c24361a6b0b11b8013137c', 'sensor_token': 'dc8b396651c05aedbb9cdaae573bb567', 'translation': [0.943713, 0.0, 1.84023], 'rotation': [0.7077955119163518, -0.006492242056004365, 0.010646214713995808, -0.7063073142877817], 'camera_intrinsic': []}

# lidar_to_ego
[[ 0.00203327  0.99970406  0.02424172  0.943713  ]
 [-0.99998053  0.00217566 -0.00584864  0.        ]
 [-0.00589965 -0.02422936  0.99968902  1.84023   ]
 [ 0.          0.          0.          1.        ]]

# ego_pose0
{

    'token': '9d9bf11fb0e144c8b446d54a8a00184f', 'timestamp': 1532402927647951, 'rotation': [0.5720320396729045, -0.0016977771610471074, 0.011798001930183783, -0.8201446642457809], 'translation': [411.3039349319818, 1180.8903791765097, 0.0]}

# ego_to_global0
[[-3.45552926e-01  9.38257989e-01  1.62825160e-02  4.11303935e+02]
 [-9.38338111e-01 -3.45280305e-01 -1.74097708e-02  1.18089038e+03]
 [-1.07128245e-02 -2.12945025e-02  9.99715849e-01  0.00000000e+00]
 [ 0.00000000e+00  0.00000000e+00  0.00000000e+00  1.00000000e+00]]

# lidar_to_global
[[-9.39038386e-01 -3.43803850e-01  2.41312207e-03  4.11007796e+02]
 [ 3.43468398e-01 -9.38389802e-01 -3.81318685e-02  1.17997282e+03]
 [ 1.53743323e-02 -3.49784571e-02  9.99269802e-01  1.82959727e+00]
 [ 0.00000000e+00  0.00000000e+00  0.00000000e+00  1.00000000e+00]]

# global_points
[[ 4.14086460e+02  1.17937830e+03 -6.90804743e-02  1.00000000e+00]
 [ 4.14241928e+02  1.17931922e+03 -6.77048676e-02  1.00000000e+00]
 [ 4.14410229e+02  1.17925591e+03 -6.68980550e-02  1.00000000e+00]
 ...
 [ 4.24278696e+02  1.17503955e+03  3.59647049e+00  1.00000000e+00]
 [ 4.24269865e+02  1.17502509e+03  3.93040672e+00  1.00000000e+00]
 [ 4.24262408e+02  1.17500995e+03  4.26930490e+00  1.00000000e+00]]
2.5 camera坐标变换
在之前的分析中我们已经实现了将 lidar 坐标系的点云数据转换到了 global 坐标系下,要将其投影到 camera 下面还要计算 global 到 camera 的坐标变换,下面我们就来实现,具体代码如下:
# camera坐标变换
cameras = ['CAM_FRONT_LEFT', 'CAM_FRONT', 'CAM_FRONT_RIGHT', 'CAM_BACK_LEFT', 'CAM_BACK', 'CAM_BACK_RIGHT']

for cam in cameras:
    # 获取camera的数据
    camera_token = sample["data"][cam]
    camera_data  = nuscenes.get("sample_data", camera_token)
    print(camera_data)
    # 加载图像
    image_file = os.path.join(dataroot, camera_data["filename"])
    image = cv2.imread(image_file)

    # 获取camera数据时对应的车体位姿
    camera_ego_pose = nuscenes.get("ego_pose", camera_data["ego_pose_token"])
    # global->ego 变换矩阵
    global_to_ego = get_matrix(camera_ego_pose, True)

    # 获取camera相对于车体坐标系而言的translation、rotation和camera_intrinsic标定数据
    camera_calibrated_data = nuscenes.get("calibrated_sensor", camera_data["calibrated_sensor_token"])
    print(camera_calibrated_data)
    # ego->camera 变换矩阵
    ego_to_camera = get_matrix(camera_calibrated_data, True)
    camera_intrinsic = np.eye(4)
    camera_intrinsic[:3, :3] = camera_calibrated_data["camera_intrinsic"]

    # global->camera_ego_pose->camera->image
    global_to_image = camera_intrinsic @ ego_to_camera @ global_to_ego

    image_points = global_points @ global_to_image.T
    image_points[:, :2] /= image_points[:, [2]] # 归一化

    # 过滤z<=0的点,因为它在图像平面的后面,形不成投影
    # z > 0
    for x, y in image_points[image_points[:, 2] > 0, :2].astype(int):
        cv2.circle(image, (x, y), 3, (255, 0, 0), -1, 16)

    cv2.imwrite(f"{

      cam}.jpg", image)
在上述示例代码中我们通过一系列的坐标变换最终实现了 global->camera 的变换,且 camera 的 3D->2D 变换是通过相机内参矩阵变换得到的。
image_points[:, :2] /= image_points[:, [2]] 这行代码是将 x,y 坐标值除以 z 深度值,实现了归一化处理,目的是将点云投影坐标归一化到图像平面上的单位坐标系,以便后续的绘制和处理。
输出如下:
# camera_data
{

    'token': 'fe5422747a7d4268a4b07fc396707b23', 'sample_token': 'ca9a282c9e77460f8360f564131a8af5', 'ego_pose_token': 'fe5422747a7d4268a4b07fc396707b23', 'calibrated_sensor_token': '75ad8e2a8a3f4594a13db2398430d097', 'timestamp': 1532402927604844, 'fileformat': 'jpg', 'is_key_frame': True, 'height': 900, 'width': 1600, 'filename': 'samples/CAM_FRONT_LEFT/n015-2018-07-24-11-22-45+0800__CAM_FRONT_LEFT__1532402927604844.jpg', 'prev': '', 'next': '48f7a2e756264647bcf8870b02bf711f', 'sensor_modality': 'camera', 'channel': 'CAM_FRONT_LEFT'}

# camera_calibrated_data
{

    'token': '75ad8e2a8a3f4594a13db2398430d097', 'sensor_token': 'ec4b5d41840a509984f7ec36419d4c09', 'translation': [1.52387798135, 0.494631336551, 1.50932822144], 'rotation': [0.6757265034669446, -0.6736266522251881, 0.21214015046209478, -0.21122827103904068], 'camera_intrinsic': [[1272.5979470598488, 0.0, 826.6154927353808], [0.0, 1272.5979470598488, 479.75165386361925], [0.0, 0.0, 1.0]]}
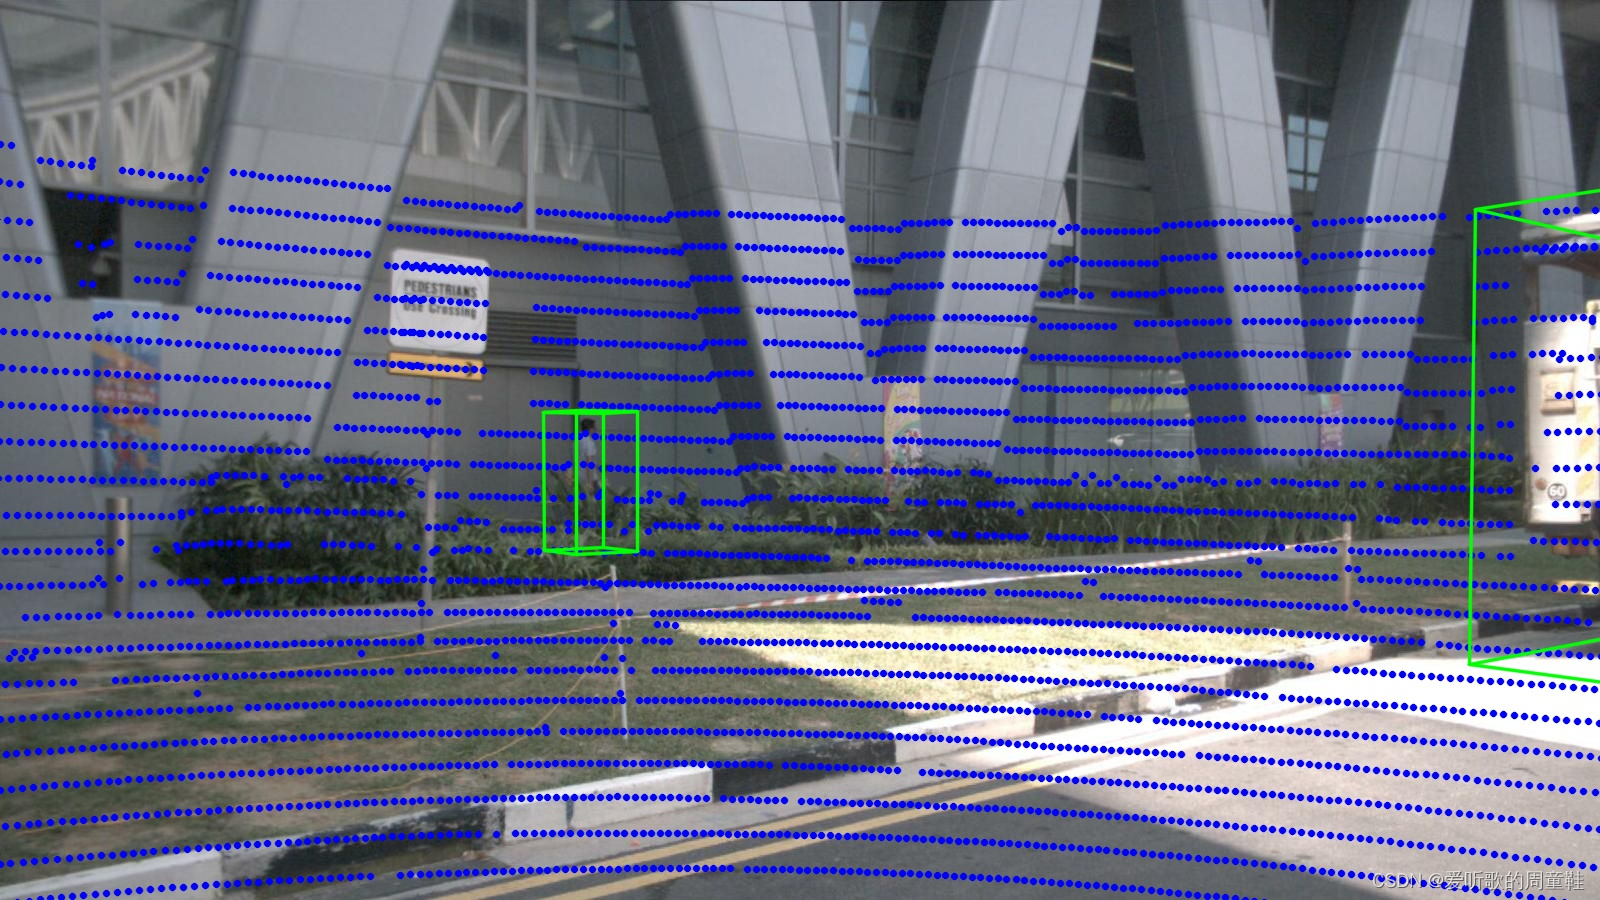
绘制的图像如下:

当然我们也可以把 3D 框的信息绘制上去,代码如下所示:
from nuscenes.utils.data_classes import Box
for token in sample["anns"]:
    annotation = nuscenes.get("sample_annotation", token)
    # print(annotation)
    box = Box(annotation['translation'], annotation['size'], Quaternion(annotation['rotation']))
    # print(box)
    # 坐标变换
    corners = box.corners().T # 3x8 => 立体框角点
    global_corners = np.concatenate([corners, np.ones((len(corners), 1))], axis=1)
    image_based_corners = global_corners @ global_to_image.T
    image_based_corners[:, :2] /= image_based_corners[:, [2]] # 归一化
    image_based_corners = image_based_corners.astype(np.int32)

    # 长方体12条棱
    ix, iy = [0, 1, 2, 3, 0, 1, 2, 3, 4, 5, 6, 7], [4, 5, 6, 7, 1, 2, 3, 0, 5, 6, 7, 4]
    for p0, p1 in zip(image_based_corners[ix], image_based_corners[iy]):
        if p0[2] <= 0 or p1[2] <= 0: continue # 过滤z<0
            cv2.line(image, (p0[0], p0[1]), (p1[0], p1[1]), (0, 255, 0), 2, 16)
2.5 完整示例代码
完整的示例代码如下:
# pip install nuscenes-devkit
from nuscenes.nuscenes import NuScenes
from pyquaternion import Quaternion
import numpy as np
import cv2
import os

# 构建nuScenes类
version = "v1.0-mini"
dataroot = "D:\\Data\\nuScenes"
nuscenes = NuScenes(version, dataroot, verbose=False)

sample = nuscenes.sample[0]

# 获取lidar的数据
lidar_token = sample["data"]["LIDAR_TOP"]
lidar_sample_data = nuscenes.get('sample_data', lidar_token)
lidar_file = os.path.join(dataroot, lidar_sample_data['filename'])

# 加载点云数据
lidar_points = np.fromfile(lidar_file, dtype=np.float32).reshape(-1, 5)

# lidar坐标变换
# 获取lidar相对于车体坐标系而言的translation和rotation标定数据
lidar_calibrated_data = nuscenes.get("calibrated_sensor", lidar_sample_data["calibrated_sensor_token"])
# print(lidar_calibrated_data)

def get_matrix(calibrated_data, inverse=False):
    # 返回的结果是 lidar->ego 坐标系的变换矩阵
    output = np.eye(4)
    output[:3, :3] = Quaternion(calibrated_data["rotation"]).rotation_matrix
    output[:3,  3] = calibrated_data["translation"]
    if inverse:
        output = np.linalg.inv(output)
    return output

# lidar->ego 变换矩阵
lidar_to_ego = get_matrix(lidar_calibrated_data)
# print(lidar_to_ego)

# 获取lidar数据时对应的车体位姿
ego_pose = nuscenes.get("ego_pose", lidar_sample_data["ego_pose_token"])
# print(ego_pose)
# ego->global 变换矩阵
ego_to_global = get_matrix(ego_pose)
# print(ego_to_global)
# lidar->global 变换矩阵
lidar_to_global = ego_to_global @ lidar_to_ego
# print(lidar_to_global)

# x, y, z -> x, y, z, 1 转换为齐次坐标,方便做矩阵相乘
hom_points = np.concatenate([lidar_points[:, :3], np.ones((len(lidar_points), 1))], axis=1)
# lidar_points -> global
global_points = hom_points @ lidar_to_global.T
# print(global_points)

# camera坐标变换
cameras = ['CAM_FRONT_LEFT', 'CAM_FRONT', 'CAM_FRONT_RIGHT', 'CAM_BACK_LEFT', 'CAM_BACK', 'CAM_BACK_RIGHT']

for cam in cameras:
    # 获取camera的数据
    camera_token = sample["data"][cam]
    camera_data  = nuscenes.get("sample_data", camera_token)
    # print(camera_data)
    # 加载图像
    image_file = os.path.join(dataroot, camera_data["filename"])
    image = cv2.imread(image_file)

    # 获取camera数据时对应的车体位姿
    camera_ego_pose = nuscenes.get("ego_pose", camera_data["ego_pose_token"])
    # global->ego 变换矩阵
    global_to_ego = get_matrix(camera_ego_pose, True)

    # 获取camera相对于车体坐标系而言的translation、rotation和camera_intrinsic标定数据
    camera_calibrated_data = nuscenes.get("calibrated_sensor", camera_data["calibrated_sensor_token"])
    # print(camera_calibrated_data)
    # ego->camera 变换矩阵
    ego_to_camera = get_matrix(camera_calibrated_data, True)
    camera_intrinsic = np.eye(4)
    camera_intrinsic[:3, :3] = camera_calibrated_data["camera_intrinsic"]

    # global->camera_ego_pose->camera->image
    global_to_image = camera_intrinsic @ ego_to_camera @ global_to_ego

    image_points = global_points @ global_to_image.T
    image_points[:, :2] /= image_points[:, [2]] # 归一化

    # 过滤z<=0的点,因为它在图像平面的后面,形不成投影
    # z > 0
    for x, y in image_points[image_points[:, 2] > 0, :2].astype(int):
        cv2.circle(image, (x, y), 3, (255, 0, 0), -1, 16)

    from nuscenes.utils.data_classes import Box
    for token in sample["anns"]:
        annotation = nuscenes.get("sample_annotation", token)
        # print(annotation)
        box = Box(annotation['translation'], annotation['size'], Quaternion(annotation['rotation']))
        # print(box)
        # 坐标变换
        corners = box.corners().T # 3x8 => 立体框角点
        global_corners = np.concatenate([corners, np.ones((len(corners), 1))], axis=1)
        image_based_corners = global_corners @ global_to_image.T
        image_based_corners[:, :2] /= image_based_corners[:, [2]] # 归一化
        image_based_corners = image_based_corners.astype(np.int32)

        # 长方体12条棱
        ix, iy = [0, 1, 2, 3, 0, 1, 2, 3, 4, 5, 6, 7], [4, 5, 6, 7, 1, 2, 3, 0, 5, 6, 7, 4]
        for p0, p1 in zip(image_based_corners[ix], image_based_corners[iy]):
            if p0[2] <= 0 or p1[2] <= 0: continue # 过滤z<0
            cv2.line(image, (p0[0], p0[1]), (p1[0], p1[1]), (0, 255, 0), 2, 16)

    cv2.imwrite(f"{

      cam}.jpg", image)
3. 需要补充的知识
学习本次课程我们还需要补充一些额外的知识
- 坐标变换
- 齐次坐标系
- 四元数
- 小孔成像模型
- 时间同步
总结
本次课程学习了可视化 nuScenes 数据集,将 lidar 点云数据投影到 camera 图像上。在实现的过程中需要我们去了解坐标变换、四元数等相关知识,总的来说可视化代码好理解,但是一些相关的基础知识却需要我们自己去了解掌握。