1. 介绍一下JSX?
JSX是一种JavaScript的语法扩展,运用于React架构中用来描述用户界面。在这种语法环境下,用大括号表示JSX表达式,表达式里可以是声明的变量、函数。引用样式时,属性名称class要改成className,如:
var myDivElement = <div className="foo" />;
ReactDOM.render(myDivElement, document.getElementById('example'));
2. 什么是虚拟DOM?
虚拟DOM(VDOM)可以理解为使用JavaScript描述真实DOM树形结构的对象,它包括整个DOM结构的全部信息。虚拟DOM的诞生源于对界面渲染优化的需求,浏览器要渲染一个页面,大概可以分为5个步骤:
- 用HTML分析器,分析HTML元素,构建一颗DOM树。
- 用CSS分析器,分析CSS文件和元素上的inline样式,生成页面的样式表。
- 将上面的DOM树和样式表,关联起来,构建一颗Render树。这一过程又称为Attachment。每个DOM节点都有attach方法,接受样式信息,返回一个render对象,这些render对象最终会被构建成一颗Render树。
- 有了Render树后,浏览器开始布局,会为每个Render树上的节点确定一个在显示屏上出现的精确坐标值。
- Render树有了,节点显示的位置坐标也有了,最后就是调用每个节点的paint方法,让它们显示出来。
令人遗憾的是,浏览器在渲染时并没有很聪明,比如要更新10个DOM节点信息,理想状态是一次性构建完DOM树,再执行渲染,但浏览器却会重复10次这个过程,这样频繁地操作DOM的代价是很昂贵的。
虚拟DOM就是为了解决这个浏览器性能问题而被设计出来的,假如一次操作中有10次更新DOM的动作,虚拟DOM不会立即操作DOM,而是将这10次更新的diff内容保存到本地的一个js对象中,最终将这个js对象一次性构建到DOM树上,通知浏览器去执行渲染,这样可以避免大量的无谓的计算量。
3. React父子组件之间如何传值?
父子组件之间传递参数可以使用props属性,如:
import React, { Component } from 'react';
import PropTypes from 'prop-types';

class Child extends Component {
  static propTypes = {
    name: PropTypes.string,
    clickHandle: PropTypes.func
  }

  render() {
    const { name, clickHandle } = this.props;
    return (
      <div onClick={clickHandle}>{name}</div>
    );
  }
}

class App extends Component {
  state = {
    name: 'App'
  }

  clickHandle = () => {
    console.log('click!!!');
  }

  render() {
    return (
      <Child name={this.state.name} clickHandle={this.clickHandle} />
    );
  }
}

export default App;
4. 一个对象数组,每个子对象包含一个id和name,React如何渲染出name列表?
在React技术栈中,当把一个包含元素的数组直接放到JSX表达式中,那么该数组就会被直接展开并把数组中的元素渲染到界面。如:
class App extends React.Component{
    render(){
        return (
            <ul>
                {[
                    <li>1</li>,
                    <li>2</li>,
                    <li>3</li>
                ]}
            </ul>
        )
    }
}

// 渲染结果
<ul>
    <li>1</li>
    <li>2</li>
    <li>3</li>
</ul>
因此,当我们拿到的是一个数组对象[obj1, obj2]时,可以配个Array.proptypes.map()函数将数据渲染出来。注意,要给每个Item项添加key属性作为唯一标识。如:
import React, { Component } from 'react';

class App extends Component {

  state = {
    list: [
      {
        id: '1',
        name: 'one'
      },
      {
        id: '2',
        name: 'two'
      }
    ]
  }

  renderList = (list) => {
    let listDom = null;
    listDom = (
      <ul>
        {list.map((item)=>{
          return this.renderItem(item);
        })}
      </ul>
    );
    return listDom;
  }

  renderItem = (item) => {
    return <li key={item.id}>{item.name}</li>;
  }

  render() {
    return (
      <div>
        {this.renderList(this.state.list)}
      </div>
    );
  }
}

export default App;
5. 页面上有一个input,还有一个p标签,改变input后p标签就跟着变化,如何处理?监听input的哪个事件?
这道面试题考的是对双向绑定的理解。主要是把input的值和p的值绑定在同一状态,通过监听input的onChange事件,当input值发生变化时,改变绑定的状态值,这样,p的值也会跟着改变。实现代码如下:
import React, { Component } from 'react';

class App extends Component {

  state = {
    value: ''
  }

  changeHandle = (e) => {
    this.setState({value:e.target.value});
  }

  render() {
    return (
      <div>
        <input value={this.state.value} onChange={this.changeHandle} />
        <p>{this.state.value}</p>
      </div>
    );
  }
}

export default App;
6. React生命有哪些钩子函数,怎么理解它们?componentWillReceiveProps的触发条件是什么?shouldComponentUpdate是为了解决什么问题?
React生命周期钩子函数共有7个:
| 钩子函数 | 描述 |
|---|---|
| componentWillMount | 组件挂载前:在渲染前调用,适用于客户端也适用于服务端。 |
| componentDidMount | 组件挂载后:在第一次渲染完成后调用,适用于客户端,之后组件已经生成了对应的DOM结构,可以通过this.getDOMNode()来访问。 |
| componentWillReceiveProps | 组件接收到新参数:在组件接收到一个新的prop时被触发,该钩子函数在组件初始化时不会被调用。 |
| shouldComponentUpdate | 是否更新组件:返回一个布尔值,在组件接收到新的props或者state时被触发,该钩子函数在初始化或者使用forceUpdate时不会被调用。当返回false时表示不会更新组件。 |
| componentWillUpdate | 组件更新前:在组件接收到新的props或者state但还没有render时被调用,该钩子函数在初始化时不会被调用。 |
| componentDidUpdate | 组件更新后:在组件完成更新后立即调用。在初始化时不会被调用。 |
| componentWillUnmount | 组件移除:在组件从 DOM 中移除的时候立刻被调用。 |
componentWillReceiveProps的触发条件是:当发现父组件传入的props参数发生变化时触发,该钩子函数常用于实现父组件的入参变化驱动子组件界面变化的效果。
shouldComponentUpdate主要是通过对props参数的判断来确定是否需要更新组件,当返回false时表示不会更新组件。
import React, { Component } from 'react';
import PropTypes from 'prop-types';

class Content extends Component {

  static propTypes = {
    num: PropTypes.number
  }

  state = {
    name: 'Content'
  }

  UNSAFE_componentWillMount(){
    console.log('componentWillMount');
  }

  componentDidMount(){
    console.log('componentDidMount');
  }

  UNSAFE_componentWillReceiveProps(newProps){
    console.log('componentWillReceiveProps', newProps);
  }

  shouldComponentUpdate(newProps, newState){
    console.log('shouldComponentUpdate', newProps, newState);
    return true;
  }

  UNSAFE_componentWillUpdate(nextProps, currentState){
    console.log('componentWillUpdate', nextProps, currentState);
  }

  componentDidUpdate(prevProps, prevState){
    console.log('componentDidUpdate', prevProps, prevState);
  }

  componentWillUnmount(){
    console.log('componentWillUnmount');
  }

  render(){
    return (<p>{this.props.num}</p>);
  }
}

class App extends Component {

  state = {
    num: 0
  }

  setNum = () => {
    this.setState({num:this.state.num+1});
  }

  render() {
    return (
      <div>
        <button onClick={this.setNum}>addOne</button>
        <Content num={this.state.num}></Content>
      </div>
    );
  }
}

export default App;

// 点击前
// componentWillMount
// componentDidMount
// 点击后
// componentWillReceiveProps {num: 1}
// {num: 1} {name: "Content"}
// {num: 1} {name: "Content"}
// {num: 0} {name: "Content"}
7. 如何配置react-router?react-router怎么实现路由切换?react-router里的<Link>标签和<a>标签有什么区别?<a>标签默认事件禁掉之后做了什么才实现了跳转?
React Router 主要使用场景是单页面富应用(SPA)。实现有两种,一种是利用url的hash,就是常说的锚点(#),JavaScript通过hashChange事件来监听url的改变;另一种是HTML5的History模式,它使url看起来像普通网站那样,以“ / ”分割,没有#,不过这种模式需要服务端支持,否则刷新时将报404。
React Router 引入有两种方式,react-router 和 react-router-dom,大多数时候,我们使用的是react-router-dom包,因为它包括了一些便于路由实现的DOM组件,如NavLink。react-router-dom初始化语句如下:
$ npm install react-router-dom -S安装完成后,就可以搭建路由了,最简单的路由结构如下:
import {Route, NavLink, Switch, HashRouter } from 'react-router-dom'

render() {
	return(
		<HashRouter basename="/">
			<div>
				<div>
					<ul>
						<li><NavLink exact to="/" activeClassName="selected">打开First页面</NavLink></li>
						<li><NavLink exact to='/second' activeClassName="selected">打开Second页面</NavLink></li>
						<li><NavLink exact to='/third' activeClassName="selected">打开Third页面</NavLink></li>
					</ul>
				</div>
				<div>
					<Switch>
						<Route exact path="/" component={First}></Route>
						<Route exact path="/second" component={Second}></Route>
						<Route exact path="/third" component={Third}></Route>
						<Route component={NoMatch}/>
					</Switch>
				</div>
			</div>
		</HashRouter>
	);
}
<NavLink>标签表示可访问的导航链接,exact 表示完全匹配,即to值与<Route>标签中的path值一致时才会打开该响应界面。activeClassName表示该链接处于活动状态时的样式。<Switch>标签表示只要匹配上就停止继续往下匹配,确保每次打开导航链接都只显示一个页面,component属性表示匹配正确时显示的路由页面。最后一个<Route>没有path属性,表示当都匹配不上时,显示NoMatch页面。
在打开导航链接时,传递参数有两种方式,都在to属性中设置:
<ul>
	<li><NavLink exact to="/" activeClassName="selected">打开First页面</NavLink></li>
	<li><NavLink to='/second/002' activeClassName="selected">打开Second页面</NavLink></li>
	<li><NavLink to={

   {
		  pathname: '/third',
		  search: '?search=userinfo',
		  state: { id: '003' }
		}} activeClassName="selected">打开Third页面</NavLink></li>
</ul>
<Switch>
	<Route exact path="/" component={First}></Route>
	<Route path="/second/:id" component={Second}></Route>
	<Route path="/third" component={Third}></Route>
</Switch>- to路径后面直接加上字符参数,如上例中的second。
- to指向的是一个对象,在对象中设置参数,如上例中的third。
页面要获取传递进来的参数,通过this.props.match对象获取。
如果需要实现重定向,可以使用Redirect,用法如下:
<Route exact path="/second" render={props => (
	<Redirect
        to={

   {
          pathname: "/third",
          state: { from: props.location }
        }}
    />)}>
</Route>
这段代码表示当点击second连接时,打开的将是third页面。
react-router里的<Link>标签和<a>标签的区别在于,通过<a>标签实现的页面跳转将会重新渲染整个页面,而<Link>标签将只渲染变化部分,即路由渲染组件部分,更节约性能。
<a>标签实现跳转:

<Link>标签实现跳转:

<a>标签默认事件禁掉之后,如果想要实现跳转页面,可以添加click事件通过js脚本逻辑实现跳转。
有关路由更详细的配置和用法,可以参考我的另一篇文章《React Router 4 使用实例和api详解》
8. 路由如何实现动态加载?
路由动态加载,也称为路由懒加载。表示在打包时,按导航页面import进来的路由分页面分割成多个chunk模块并按需加载,避免都打包进导航页面,造成文件过大加载缓慢。当点击某路由导航<Link>时,再去加载该页面的js文件。要实现路由动态加载可以使用react-loadable库。
cnpm install --save react-loadable示例:
import Loadable from 'react-loadable';
import Loading from './my-loading-component';

const LoadableComponent = Loadable({
  loader: () => import('./my-component'),
  loading: Loading,
});

export default class App extends React.Component {
  render() {
    return <LoadableComponent/>;
  }
}
想要了解其它更详细的方法,可以参考
https://www.jianshu.com/p/462bb9d1c982
http://www.cnblogs.com/zhuzeliang/p/9110400.html
9. 路由history和hash的区别?
- 显示的路径不同。hash显示的路径带有锚点(#),而history则看起来像大部分普通网站地址那样,以“ / ”分割,没有#。
- 执行刷新操作的结果不同。hash可以随便刷新页面,但是history刷新时会报404错误,因为服务器中是没有这个资源的,需要配置一下apache或是nginx的url重定向到index首页。
- 浏览器兼容程度不同。hash支持低版本浏览器和IE浏览器,history使用的浏览器必须支持HTML5新推出的API:
pushState,replaceState(可以实现将url替换并且不刷新页面)。
关于选择哪个路由:除了考虑显示的url和浏览器兼容问题外,还要考虑#号可能带来的一些问题,比如说app分享,有的app里面url是不允许带有#号的,所以要将#号去除那么就要使用history模式。其它的就没有太大关系了。
10. 介绍Redux,主要解决什么问题?数据流程是怎么样的?多个组件使用相同状态如何进行管理?
Redux是一种MVC的设计思想,或者说是一种MVC机制。
主要解决问题:
在React技术栈中,Redux主要解决了组件间的状态共享问题,实现了多组件通信。
Redux数据流程:
Redux主要包括4个模块,大概数据流程如下:
- view - 用户界面,当有用户操作组件使组件状态发生变化时,则触发一个action。
- action - 生成一个描述状态变化的action对象,并传递给store。
- store - 接收action对象并传递给reducer,驱动reducer执行状态更新任务,并在状态更新后自动刷新dom节点,即view中执行render()函数。
- reducer - 对action对象处理,更新组件状态,并将新的状态值返回store。
关于更多Redux的数据流程和react-redux库源码解读,可以参考我另一篇文章《Flux、Redux到react-redux发展衍变之Redux解读》
多组件使用相同状态管理:
多个组件使用相同的状态,只需要都放到同一个reducer管理即可。
11. state是怎么注入到组件的,从reducer到组件经历了什么样的过程?
通过connect和mapStateToProps将state注入到组件中,示例:
import { connect } from 'react-redux'
import { setVisibilityFilter } from '@/reducers/Todo/actions'
import Link from '@/containers/Todo/components/Link'

const mapStateToProps = (state, ownProps) => ({
	active: ownProps.filter === state.visibilityFilter
})

const mapDispatchToProps = (dispatch, ownProps) => ({
	setFilter: () => {
		dispatch(setVisibilityFilter(ownProps.filter))
	}
})

export default connect(
	mapStateToProps,
	mapDispatchToProps
)(Link)
示例中active就是注入到Link组件中的状态。mapStateToProps(state, ownProps)中带有两个参数,含义是:
- state - store管理的全局状态对象,所有都组件状态数据都存储在该对象中。
- ownProps - 组件通过props传入的参数。
从reducer到组件,状态经历的过程如下:
(1)reducer对action对象处理,更新组件状态,并将新的状态值返回store。
(2)通过connect(mapStateToProps, mapDispatchToProps)(Component)对组件Component进行升级,此时将状态值从store取出并作为props参数传递到组件。
高阶组件connect的主要实现源码如下:
import React from 'react'
import PropTypes from 'prop-types'

// 高阶组件 contect
export const connect = (mapStateToProps, mapDispatchToProps) => (WrappedComponent) => {
	class Connect extends React.Component {
		// 通过对context调用获取store
		static contextTypes = {
			store: PropTypes.object
		}

		constructor() {
			super()
			this.state = {
				allProps: {}
			}
		}

		// 第一遍需初始化所有组件初始状态
		componentWillMount() {
			const store = this.context.store
			this._updateProps()
			store.subscribe(() => this._updateProps()); // 加入_updateProps()至store里的监听事件列表
		}

		// 执行action后更新props,使组件可以更新至最新状态(类似于setState)
		_updateProps() {
			const store = this.context.store;
			let stateProps = mapStateToProps ?
				mapStateToProps(store.getState(), this.props) : {} // 防止 mapStateToProps 没有传入
			let dispatchProps = mapDispatchToProps ?
				mapDispatchToProps(store.dispatch, this.props) : {
                                    dispatch: store.dispatch
                                } // 防止 mapDispatchToProps 没有传入
			this.setState({
				allProps: {
					...stateProps,
					...dispatchProps,
					...this.props
				}
			})
		}

		render() {
			return <WrappedComponent {...this.state.allProps} />
		}
	}
	return Connect
}
12. 多个组件之间如何拆分各自的state,每块小的组件有自己的状态,它们之间还有一些公共的状态需要维护,如何思考这块?
这个问题可以理解为,是不是应该把应用的所有状态都交给redux来处理?答案是NO。
Redux应该只负责管理共用的状态,如用户信息、登录信息以及一些数据层面上的状态,如时间、天气、购物车、产品列表等。
而针对一些UI级别的状态变化,应该放在组件私有state,这些类别包括:
- UI层面的toggle状态,如展开全部、加载更多等。
- 为了实现动画而维护的状态值,如拖拽改变组件坐标。
- 表单中的input的state。
回到这个问题,每块小的组件有自己的状态,那么就把这部分状态放在组件私有state;它们公共的状态将放在Redux中。
13. Redux中间件是什么东西,接受几个参数?中间件是怎么拿到store和action,然后怎么处理?使用过的Redux中间件有哪些,并简单介绍一下它们?
Redux中间件是指在触发dispatch(action)后但在reducer(state, action)前的这个过程之间再搞点事情,如果看不懂这句话,看一下createStore源码就明白了,createStore部分源码:
export const createStore = (reducer) => {
	let state = null
	const listeners = []; // 事件监听列表
	const subscribe = (listener) => listeners.push(listener); // 定义添加事件对外接口
	const getState = () => state; // 定义获取状态总值对外接口
	// 定义驱动 Aciton 的对外接口,每次驱动会遍历执行listeners列表里的所有事件
	const dispatch = (action) => {
		state = reducer(state, action)
		listeners.forEach((listener) => listener())
	}
	dispatch({}); // 首次初始化state
	return {
		getState,
		dispatch,
		subscribe
	}
}
也就是说,如果没有添加中间件,执行dispatch(action)函数实际上就是执行reducer(state, action)。
中间件接收的参数主要有两个:store 和 action。
那么中间件是如何拿到store和action这两个参数的呢?我们先来看一段使用中间件redux-thunk的脚本:
import React from 'react'
import { render } from 'react-dom'
import { createStore, applyMiddleware } from 'redux'
import { Provider } from 'react-redux'
import thunk from 'redux-thunk'
import reducer from './reducers'
import App from './containers/App'

const middleware = [thunk];
const store = createStore(reducer, applyMiddleware(...middleware))

render(
	<Provider store={store}>
    	    <App />
  	</Provider>, document.getElementById('root')
)可见中间件是通过applyMiddleware函数把redux-thunk和store关联起来的,也就是说store是在store初始化时传入中间件的。现在,我们再来看看一个用于实现异步获取状态值的中间件redux-thunk源码:
function createThunkMiddleware(extraArgument) {
  return function (_ref) {
    var dispatch = _ref.dispatch,
        getState = _ref.getState;
    return function (next) {
      return function (action) {
        if (typeof action === 'function') {
          return action(dispatch, getState, extraArgument);
        }

        return next(action);
      };
    };
  };
}

var thunk = createThunkMiddleware();
thunk.withExtraArgument = createThunkMiddleware;通过源码分析可知,action是在第一次触发dispatch(action)后传入中间件的。第一次触发dispatch(action)后由于中间件的存在,Redux并没有马上执行next(action),即reducer(state, action),而是先对action类型进行判断,如果是function类型,则中断执行next(action),并且把dispach的控制权交给action,也就是说,由何时执行reducer(state, action)你自己看着办。这就是中间件redux-thunk实现异步的关键所在,拿到dispach的控制权。
另外,如果同时应用有多个中间件,则中间件的参数action是迭代更新的。如:
const middleware = [A, B, C];
const store = createStore(reducer, applyMiddleware(...middleware))
此时,中间件拿到的action值的过程是:
- 中间件A拿到的action是第一次值dispatch(action)的action值,经过中间件A处理后,触发dispatch(actionA)
- 中间件B拿到的是经过中间件A处理的action值,即actionA,再经过中间件B处理后,触发dispatch(actionB)
- 同理,中间件C拿到的是经过中间件B处理的action值,即actionB,再经过中间件C处理后,触发dispatch(actionC)
- 最终执行的结果是:reducer(state, actionC)
如果想要自定义中间件,可以使用如下函数定义:
const myMiddleware = (store) => (next) => (action) => {
	// 对action数据进行操作
	// 返回action对象
	next(action)
}
const middleware = [myMiddleware];
const store = createStore(reducer, applyMiddleware(...middleware))
最后,关于使用过哪些中间件?这个问题因人而异,比如中间件redux-thunk,拿到Dispatch控制权,并用于实现异步获取状态值的功能。
14. Redux请求中间件如何处理并发?
首先需要使用redux-thunk中间件取得Dispatch的控制权,这样就可以自由控制何触发reducer改变状态值。接着只要实现并发请求即可,这里推荐使用两种办法实现:
- 使用Promise.all()函数实现并发。
- 使用async、await配合Array.map()实现并发。注意,若使用 for 或 for...of 循环触发的是顺序请求而不是并发。
并发代码参考《高级前端面试整理之异步篇》最后一点。
15. 介绍React组件事件代理的原理以及主要解决什么问题?
React 构建了一套区别于JavaScript原生的事件绑定机制,这套机制完全符合W3C规范并且支持原生事件的所有功能,除此之外,还实现了事件的代理功能。事件代理是指无论绑定多少个相同类型的事件,都只注册一次,它们之间会建立起1对N的映射关系。当触发事件时,将会遍历执行映射的N个事件函数。在React这套事件机制下绑定的事件被称为合成事件(SyntheticEvent)。
React的事件绑定机制与原生的区别在于:绑定对象、回调函数中e.stopPropagation阻止冒泡的范围及事件移除机制不同。
(1) 原生
- 绑定对象 - 元素绑定,如 div 等
- e.stopPropagation的范围 - e.stopPropagation阻止冒泡时可到达document层
- 事件移除 - 当删除元素时,需要使用removeEventListener移除相应事件,否则会造成内存泄漏
(2) react
- 绑定对象 - document绑定
- e.stopPropagation的范围 - 使用e.stopPropagation阻止冒泡时不可到达document层
- 事件移除 - 当删除元素时,会自动移除相应事件
我们来看一个示例:
import React, { Component } from 'react';

class App extends Component {

  componentDidMount() {
    document.getElementById('nativeDom').addEventListener('click', this.nativeDomClick);
    document.addEventListener('click',()=>{
      alert('document');
    });
  }

  componentWillUnmount() {
    document.getElementById('nativeDom').removeEventListener('click');
    document.removeEventListener('click');
  }

  reactDomClick = (e) => {
    alert('react');
    e.stopPropagation(); // 冒泡失败,无法阻止document触发click事件

    // 打印:
    // native
    // document
  }

  nativeDomClick = (e) => {
    alert('native');
    e.stopPropagation(); // 冒泡成功,阻止了document触发click事件

    // 打印:
    // native
  }

  render() {
    return (
      <div>
        <div id='reactDom' style={styles.reactDomStyle} onClick={this.reactDomClick}></div>
        <div id='nativeDom' style={styles.nativeDomStyle}></div>
      </div>
    );
  }
}

const styles = {
  reactDomStyle: {
    width: '100px',
    height: '100px',
    backgroundColor: 'red'
  },
  nativeDomStyle: {
    width: '100px',
    height: '100px',
    backgroundColor: 'yellow'
  }
};

export default App;
通过示例可以证明,在react中使用使用e.stopPropagation阻止冒泡是不可到达document层(其它就和原生没什么区别了,也就是说document层以外的父级容器还是和原生一样已经被阻止冒泡)。
那么如何解决这个问题?可以使用e.nativeEvent.stopImmediatePropagation()
reactDomClick = (e) => {
  alert('react');
  e.nativeEvent.stopImmediatePropagation(); // 冒泡成功,阻止了document触发click事件

  // 打印:
  // native
}React的事件代理主要解决的问题是避免了注册多个相同类型的事件,增加性能消耗。因此可以在react中放心执行以下这类代码:
this.state.list.map(
  (item) => {
    return (<li key={item.key} onClick={()=>{this.clickHandle(item.name);}}>{item.name}</li>);
  }
)更多参考资料:https://github.com/youngwind/blog/issues/107
16. setState是同步还是异步?那什么场景下是异步的,可不可能是同步,什么场景下又是同步的?
setState可以是异步,也可以是同步,主要决定因素看setState是在什么环境下触发的。
异步情景:
- 在合成事件中触发setState。如 onClick 等。
- 在生命周期钩子函数中触发setState。
示例:
import React, { Component } from 'react';

class App extends Component {

  state = {
    a: 0,
    b: 0
  }

  clickHandle = () => {
      this.setState({a: this.state.a + 1, b: 1});
      this.setState({a: this.state.a + 2});
      this.setState({a: this.state.a + 3});
      console.log('a:',this.state.a); // 0
      console.log('b:',this.state.b); // 0
  }

  render() {
    console.log('ra:',this.state.a); // 3
    console.log('rb:',this.state.b); // 1
    return (
      <div onClick={this.clickHandle}>
        click
      </div>
    );
  }
}

export default App;
在合成函数环境中setState是异步执行的,所以在clickHandle函数里打印的a和b的值都为0,另外,在渲染结束后,打印的ra值为3,rb值为1。可是,a 值明明自加了3次,为什么不是1+2+3=6呢?
这是因为在异步执行的情况下,无论setState执行多少次,如果包含相同状态属性,后一次都会覆盖前一次的设置,所以最终覆盖结果是:setState({a:this.state.a + 3, b:1}),实际上只渲染了一次。
同步情景:
- 在setTimeout函数中触发setState
- 在原生事件中触发setState,如document.addEventListener('click',function(){...})
示例:
import React, { Component } from 'react';

class App extends Component {

  state = {
    a: 0,
    b: 0
  }

  clickHandle = () => {
    setTimeout(()=>{
      this.setState({a: this.state.a + 1, b: 1});
      this.setState({a: this.state.a + 2});
      this.setState({a: this.state.a + 3});
      console.log('a:',this.state.a); // 6
      console.log('b:',this.state.b); // 1
    },0);
  }

  render() {
    // 最后一次渲染
    console.log('ra:',this.state.a); // 6
    console.log('rb:',this.state.b); // 1
    return (
      <div onClick={this.clickHandle}>
        click
      </div>
    );
  }
}

export default App;

// 点击后打印结果:
// ra: 1
// rb: 1
// ra: 3
// rb: 1
// ra: 6
// rb: 1
// a: 6
// b: 1
示例证明,在同步环境下,setState几次就会同步执行几次 ,会在render函数执行完成后才会进入下一次setState。
17. pureComponent和Component区别?
React.PureComponent 与 React.Component 几乎完全相同,但 React.PureComponent 通过props和state的浅对比来实现 shouldComponentUpate()。浅比较判断源码如下:
if (this._compositeType === CompositeTypes.PureClass) {
  shouldUpdate = !shallowEqual(prevProps, nextProps) || ! shallowEqual(inst.state, nextState);
}
其中shallowEqual是react中的一个函数。但使用pureComponent也会有一定风险,比如包含比较复杂的数据结构,可能会因深层的数据不一致而产生错误的否定判断,导致界面得不到更新。这时就得需要使用 forceUpate() 手动强制更新。
所以,如果状态值是基础类型如string、number、boolean且渲染成本较大时,可以使用React.PureComponent,否则个人建议使用React.Component。
18. 介绍纯函数?
一个函数的返回结果只依赖于它的参数,并且在执行的过程中没有副作用,我们就把该函数称作纯函数。
示例:纯函数组件MsgComp
import React, { Component } from 'react';
import PropTypes from 'prop-types';

const MsgComp = ({ msg, buttonlabel, clickHandle }) => {
  return (
    <div>
      <p>{msg}</p>
      <button onClick={clickHandle}>{buttonlabel}</button>
    </div>
  );
};
MsgComp.propTypes = {
  msg: PropTypes.string,
  buttonlabel: PropTypes.string,
  clickHandle: PropTypes.func
};

class App extends Component {
  state = {
    msg: 'Hello React',
    buttonlabel: 'OK'
  }

  clickHandle = () => {
    console.log('APP CLICK');
  }

  render() {
    return (
      <div>
        <MsgComp msg={this.state.msg} buttonlabel={this.state.buttonlabel} clickHandle={this.clickHandle} />
      </div>
    );
  }
}

export default App;
19. 介绍高阶组件?
高阶组件(HOC),它是指接受React组件作为输入,输出一个新的React组件的组件。更通俗地描述为,高阶组件通过包裹(wrapped)被传入的React组件,经过一系列处理,最终返回一个相对增强(enhanced)的React组件。它只是处理统一包装(处理)其它组件的一种模式。Redux的connect就是一个高阶组件。
具体示例请看我的这篇文章:《react系列(21)高阶组件》
20. 如何解决props层级过深的问题?
在一个典型的 React 应用中,数据是通过 props 属性由上向下(由父及子)的进行传递的,当遇到多个层级多个组件间共享一个props参数,这种树形的由上而下的传参方式就显得过于繁琐。
有三种办法可以解决props层级过深:
- 使用Redux共享状态。
- 使用
React.createContext函数。 - 使用Content上下文传输。
具体示例请看我的这篇文章:《react系列(17)跨组件树传递数据 context》
21. 如何设计状态树?
这个问题是对React项目整体框架设计理解程度的考察,即框架目录结构设计,目前主要有三种方式:
- 按类型划分设计模式
官方React Demo都是这类设计模式,目录结构如下:

这种划分方法的优点就是文件类型清晰,缺点也很明显,不利于项目模块管理,项目中的每个模块文件都被拆分成N个小文件分散在这些文件夹中,当某模块出现BUG时往往会无法快速找到对应文件并解决。
- 按模块划分设计模式
既一个页面功能对应一个文件夹,这个页面功能所用到的container,component,action,reducer等文件都放在这个文件夹下。目录结构如下:

这种方法的优点是项目功能划分清晰,每个功能都可以划分成一个小单元独立开发。但缺点是不方便对公共状态进行相互引用,如用户信息、Token信息等。
- Ducks设计模式
这种设计综合了以上两种的优点,实现了视图和状态的解耦。目录结构如下:

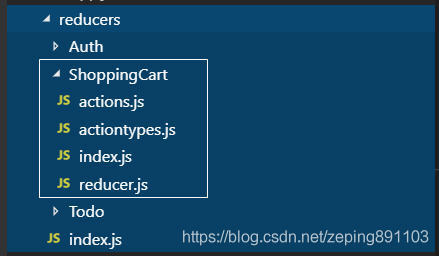

所有的视图文件都放在containers目录,所有的redux文件放在reducers目录,它们两者之间是相互独立的,每个视图文件都可以对reducers中的状态进行引用。另外,containers目录下的模块中也有一个components目录(右上图),用于放置该模块独有的组件。在最外层还有一个components目录(左上图),用于存放公共组件。这种框架是目前最常用的react状态树设计模式。