一、为什么使用图像预处理
1、图像的亮度、对比度等属性对图像的影响是非常大的,相同物体在不同的亮度,对比度下差别非常大。在图像识别的问题中,我们经常会遇到阴影、强曝光之类的图片,这些因素都不应该影响最后的识别结果,所以我们要对图像进行预处理,使得得到的神经网络模型尽可能小的被无关因素所影响。
2、在我们遇到图像样本过少,或者不均衡时,也可以使用图像预处理,增加样本数量。
3、有时物体拍摄的角度不同,也会有很大的差异,所以刻意将图像进行随机的翻转,可以提高模型健壮性。
二、图像处理函数
1、读取图像的原始数据。
图像在存储是并不是直接记录这些矩阵中的数字,而是记录经过压缩编码之后的结果,所以要将一个图片还原成三维矩阵,需要一个解码的过程。
image_raw_data = tf.gfile.FastGFile('images/image_0043.jpg', 'rb').read()
img_data = tf.image.decode_jpeg(image_raw_data)
2、图像大小调整
图像大小调整有两种方法,
第一种是通过算法使得新的图像尽量保存原始图像上的所有信息。
第二种是对图像进行裁剪或者填充,只获得感兴趣区域。
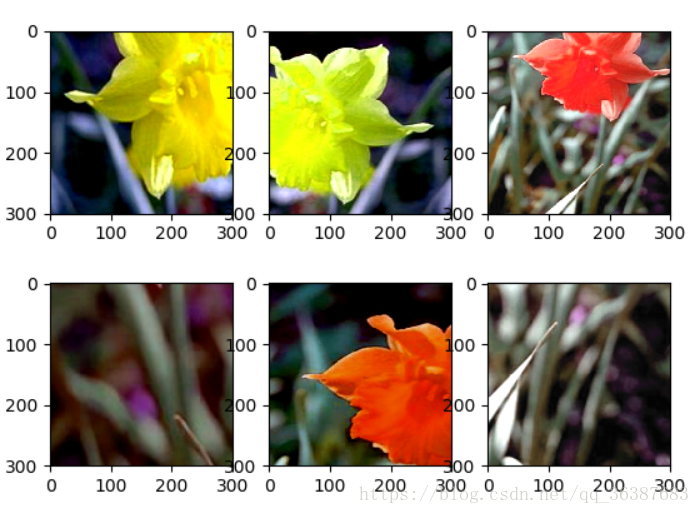
TensorFlow提供了四种缩放图像的算法,注意要加入截断函数,防止数值越界。
#重新调整图片大小
def resize(image_data):
    with tf.Session() as sess:
        image_data = tf.image.convert_image_dtype(image_data, dtype=tf.float32)
        methods=['Bilinear Interpolation', 'Nearest neighbor interpolation', 'Bicubic interpolation', 'Area interpolation']
        plt.subplot(231), plt.imshow(image_data.eval()), plt.title('original')
        step = 231
        for i in range(4):
            step += 1
            resized = tf.image.resize_images(image_data, [300, 300], method=i)
            resized = tf.clip_by_value(resized, 0.0, 1.0)
            plt.subplot(step),plt.imshow(resized.eval()), plt.title(methods[i])

        plt.show()
显示图像如下:

剪裁和填充图片,通过tf.image.resize_image_with_crop_or_pad函数实现,第一参数是输入图像,后面是裁剪以后的大小。如果小于输入图像,那么就裁剪输入图像居中部分的大小;如果大于输入图像,就填充输入图像四周。
#裁剪和填充图片
def crop_and_pad(image_data):
    with tf.Session() as sess:
        #resize_image_with_crop_or_pad 如果输入图像尺寸大于输出图像,截取原始图像中居中的部分
        #如果输入小于输出,会在原始图像四周填充全0背景
        croped_1 = tf.image.resize_image_with_crop_or_pad(image_data, 300, 300)
        croped_2 = tf.image.resize_image_with_crop_or_pad(image_data, 1000, 1000)
        padded = tf.image.resize_image_with_crop_or_pad(image_data, 3000, 3000)
        show(croped_1)
        show(croped_2)
        show(padded)
也提供了按比例调整图像大小的函数,tf.image.ecntral_crop,
#截取中间50%的图片
def central_crop(image_data):
with tf.Session()
as
sess: central_croped = tf.image.central_crop(image_data,
0.5) plt.imshow(central_croped.eval()) plt.show()
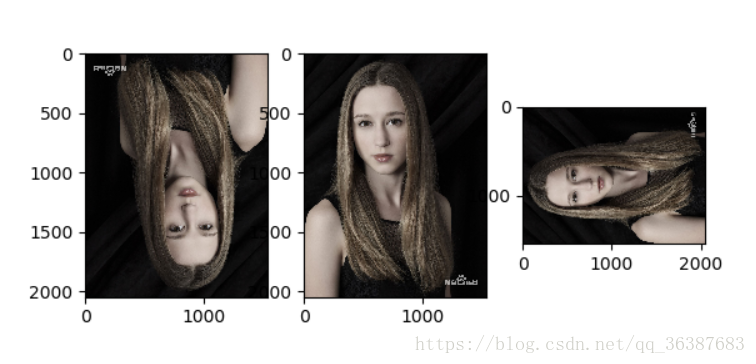
还有固定尺寸的裁剪,第二三个参数是起始点的坐标,第四五个参数是宽高
#固定边框提取
def bounding_box(image_raw_data):
    with tf.Session() as sess:

        image_data = tf.image.decode_jpeg(image_raw_data)
        # crop_to_bounding_box(image, offset_height, offset_width, target_height,arget_width)
        #第二个第三个参数是起始点的坐标, 四五是宽高
        box_croped = tf.image.crop_to_bounding_box(image_data, 100, 100, 300, 300)
        # 二三是原始图像在目标图像上所在的起始坐标,四五是目标图像的大小
        box_padded = tf.image.pad_to_bounding_box(image_data,100, 100, 3000, 3000)
        plt.imshow(box_croped.eval())
        plt.show()
        plt.imshow(box_padded.eval())
        plt.show()
3、图像翻转
#图像翻转
def flip(image_raw_data):
    with tf.Session() as sess:
        image_data = tf.image.decode_jpeg(image_raw_data)
        #上下翻转
        flipped_up = tf.image.flip_up_down(image_data)
        #左右翻转
        flipped_left = tf.image.flip_left_right(image_data)
        #对角翻转
        transposed = tf.image.transpose_image(image_data)

        plt.imshow(flipped_up.eval())
        plt.show()
        plt.imshow(flipped_left.eval())
        plt.show()
        plt.imshow(transposed.eval())
        plt.show()

        #以50%的概率上下翻转图像
        flipped_up_random = tf.image.random_flip_up_down(image_data)
        #以50%的概率左右翻转图像
        flipped_left_random = tf.image.random_flip_left_right(image_data)

        plt.imshow(flipped_up_random.eval())
        plt.show()
        plt.imshow(flipped_left_random.eval())
        plt.show()
4、图像色彩调整
#图像亮度调整
def brightness(image_raw_data):
    with tf.Session() as sess:
        image_data = tf.image.decode_jpeg(image_raw_data)
        #将图像的亮度-0.5
        adjusted = tf.image.adjust_brightness(image_data,-0.5)
        #为了防止像素超出,要进行截断处理
        # adjusted = tf.clip_by_value(adjusted, 0.0, 1.0)

        plt.imshow(adjusted.eval())
        plt.show()

        #将图像亮度+0.5
        adjusted = tf.image.adjust_brightness(image_data, 0.5)
        plt.imshow(adjusted.eval())
        plt.show()

        #在【max_delta, max_delax】的范围内随机调整
        adjusted = tf.image.random_brightness(image_data,0.5)
        plt.imshow(adjusted.eval())
        plt.show()
图像对比度
#调整图像的对比度
def contrast(image_raw_data):
    with tf.Session() as sess:

        image_data = tf.image.decode_jpeg(image_raw_data)

        #将图像的对比度减少到0.5
        adjusted = tf.image.adjust_contrast(image_data, 0.5)
        plt.imshow(adjusted.eval())
        plt.show()

        #将图像的对比度增加5倍
        adjusted = tf.image.adjust_contrast(image_data, 5)
        plt.imshow(adjusted.eval())
        plt.show()

        #在【lower, upper】之间随机调整
        adjusted = tf.image.random_contrast(image_data, 0.5, 5)
        plt.imshow(adjusted.eval())
        plt.show()
图像色相
#调整图像色相
def hue(image_data):
    with tf.Session() as sess:
        plt.subplot(231),plt.imshow(image_data.eval()),plt.title('original')
        #色相加0.1
        adjusted = tf.image.adjust_hue(image_data, 0.1)
        plt.subplot(232),plt.imshow(adjusted.eval()),plt.title('+0.1')
        adjusted = tf.image.adjust_hue(image_data, 0.3)
        plt.subplot(233), plt.imshow(adjusted.eval()), plt.title('+0.3')
        adjusted = tf.image.adjust_hue(image_data, 0.6)
        plt.subplot(234), plt.imshow(adjusted.eval()), plt.title('+0.6')
        adjusted = tf.image.adjust_hue(image_data, 0.9)
        plt.subplot(235), plt.imshow(adjusted.eval()), plt.title('+0.9')
        plt.show()

        #max_delta 的取值在[0, 0.5]之间
        adjusted = tf.image.random_hue(image_data, 0.5)
        plt.subplot(236), plt.imshow(adjusted.eval()), plt.title('random')
        plt.show()
图像饱和度
#调整饱和度
def saturation(image_data):
    with tf.Session() as sess:
        plt.subplot(221), plt.imshow(image_data.eval()), plt.title('original')
        #图像饱和度减5
        adjusted = tf.image.adjust_saturation(image_data, -5)
        plt.subplot(222), plt.imshow(adjusted.eval()), plt.title('-5')
        #图像饱和度加5
        adjusted = tf.image.adjust_saturation(image_data, 5)
        plt.subplot(223), plt.imshow(adjusted.eval()), plt.title('5')
        #在[lower,upper]的范围内随机调整图像的饱和度 lower must be non-negative
        adjusted = tf.image.random_saturation(image_data, 0., 5.)
        plt.subplot(224), plt.imshow(adjusted.eval()), plt.title('random')
        plt.show()
图片gamma校正
#图像gamma校正
def mamma(image_data):
    with tf.Session() as sess:
        image_data = tf.image.convert_image_dtype(image_data, dtype=tf.float32)
        adjusted = tf.image.adjust_gamma(image_data, gain=1.0, gamma=4.0)
        plt.imshow(adjusted.eval())
        plt.show()
图像标准化
#图像标准化
def standardization(image_data):
    with tf.Session() as sess:
        print(image_data)
        h,w = tf.shape(image_data).eval()[:2]
        #将输入图像
        reshaped = tf.reshape(image_data.eval(), [h*w, -1])
        print(reshaped.eval())
        plt.subplot(211),plt.hist(reshaped.eval()),plt.title('original')
        #图像标准化
        adjusted = tf.image.per_image_standardization(image_data)
        adjusted_reshaped = tf.reshape(adjusted.eval(), [h*w, -1])
        plt.subplot(212), plt.hist(adjusted_reshaped.eval()), plt.title('adjusted')
        plt.show()
图像预处理完整样例
import tensorflow as tf
import numpy as np
import matplotlib.pyplot as plt

def distort_color(image, color_orderding=0):
    if color_orderding == 0:
        image = tf.image.random_brightness(image, max_delta= 32. / 255.)
        image = tf.image.random_saturation(image, lower=0.5, upper=1.5)
        image = tf.image.random_hue(image, max_delta=0.2)
        image = tf.image.random_contrast(image, lower=0.5, upper=1.5)
    elif color_orderding == 1:
        image = tf.image.random_saturation(image, lower=0.5, upper=1.5)
        image = tf.image.random_brightness(image, max_delta= 32. /255.)
        image = tf.image.random_contrast(image, lower=0.5, upper=1.5)
        image = tf.image.random_hue(image, max_delta=0.2)
    elif color_orderding == 2:
        image = tf.image.random_contrast(image, lower=0.5, upper=1.5)
        image = tf.image.random_saturation(image, lower=0.5, upper=1.5)
        image = tf.image.random_brightness(image, max_delta=32. / 255.)
        image = tf.image.random_hue(image, max_delta=0.2)
    elif color_orderding == 3:
        image = tf.image.random_hue(image, max_delta=0.2)
        image = tf.image.random_contrast(image, lower=0.5, upper=1.5)
        image = tf.image.random_saturation(image, lower=0.5, upper=1.5)
        image = tf.image.random_brightness(image, max_delta=32. / 255.)
    else:
        image = tf.image.random_hue(image, max_delta=0.2)
        image = tf.image.random_saturation(image, lower=0.5, upper=1.5)
        image = tf.image.random_contrast(image, lower=0.5, upper=1.5)
        image = tf.image.random_brightness(image, max_delta=32. / 255.)
    return tf.clip_by_value(image, 0.0, 1.0) # 进行像素截断,防止越界


def perprocess_for_train(image, height, width, bbox):
    if bbox is None:
        bbox = tf.constant([0.0, 0.0, 1.0, 1.0], dtype=tf.float32, shape=[1, 1, 4])
    #转换图像的张量类型
    if image.dtype != tf.float32:
        image = tf.image.convert_image_dtype(image, dtype=tf.float32)

    # 随机截取图像,减小需要关注物体大小对图像识别算法的影响
    bbox_begin, bbox_size, _ = tf.image.sample_distorted_bounding_box(tf.shape(image),bounding_boxes=bbox)
    distorted_image = tf.slice(image, bbox_begin, bbox_size)

    #将随机截取的图像调整为神经网络输入层的大小
    distorted_image = tf.image.resize_images(distorted_image, [height, width], method=np.random.randint(4))

    #随机左右翻转图片
    distorted_image = tf.image.random_flip_left_right(distorted_image)

    #使用一种随机的顺序调整颜色图像
    distorted_image = distort_color(distorted_image, np.random.randint(5))
    return distorted_image

image_raw_data = tf.gfile.FastGFile('images/image_0043.jpg', 'rb').read()
with tf.Session() as sess:
    image_data = tf.image.decode_jpeg(image_raw_data)
    boxes = tf.constant([[[0.05, 0.05, 0.9, 0.7], [0.34, 0.47, 0.5, 0.56]]])
    # print(image_data)
    #运行6次获得6种不同的图像
    step = 230
    for i in range(6):
        result = perprocess_for_train(image_data,300, 300, boxes)
        step = step+1
        plt.subplot(step)
        plt.imshow(result.eval())
    plt.show()