前言
每台服务器只运行一个网站,有时候会造成资源的浪费,这时候可以利用虚拟主机功能,将物理服务器成多个“虚拟的服务器”来使用;Nginx的虚拟主机功能是服务器基于用户请求的不同IP地址、主机域名或端口号,提供多个网站同时为外部提供访问服务的技术。
在实验这个的基础上,需要先将Nginx给安装好,不管是通过什么方式进行安装,都可以配置虚拟主机,安装服务可参考前文《部署安装Nginx服务实例》。
这里使用编译的方式进行安装
| 服务器 | IP | 服务 |
|---|---|---|
| CentOS7 | 192.168.116.166 | nginx1.22.1 |
一. 编译安装Nginx
这里安装的步骤比较快,若已经安装了Nginx,则直接跳过这个目录一。
wget http://nginx.org/download/nginx-1.22.1.tar.gz
tar xf nginx-1.22.1.tar.gz
#安装所需依赖包
[root@localhost ~]# yum install openssl openssl-devel gcc -y
[root@localhost ~]# cd nginx-1.22.1
#配置需要到的组件
[root@localhost ~]#./configure --prefix=/usr/local/nginx --with-http_ssl_module --with-http_stub_status_module --with-pcre
[root@localhost nginx-1.22.1]# echo $?
0
#开始编译
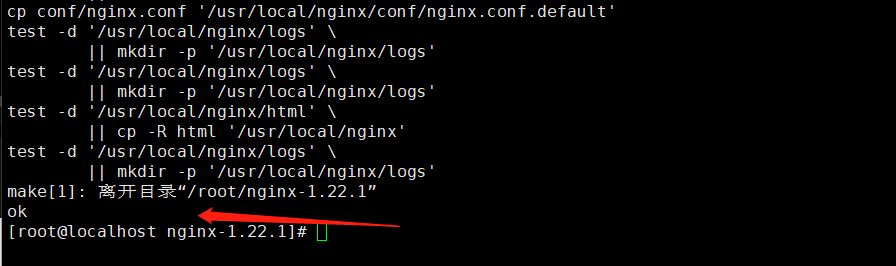
[root@localhost nginx-1.22.1]# make && make install && echo "OK"
Nginx编译安装特别的快,看到屏幕出现OK表示已经安装好了。
接着可以做一个软连接,让nginx命令在哪个路径下都可以使用。
[root@localhost nginx]# ln -sv sbin/nginx /usr/sbin/
"/usr/sbin/nginx" -> "sbin/nginx"
[root@localhost nginx]# ll /usr/sbin/nginx
lrwxrwxrwx. 1 root root 10 3月  28 15:45 /usr/sbin/nginx -> sbin/nginx
二. 配置虚拟主机
配置虚拟主机需要在Nginx的配置文件添加内容。
[root@localhost nginx]# ln -sv /usr/local/nginx/sbin/nginx /usr/sbin/nginx
"/usr/sbin/nginx" -> "/usr/local/nginx/sbin/nginx"
[root@localhost nginx]# ll /usr/sbin/nginx
lrwxrwxrwx. 1 root root 27 3月  28 15:48 /usr/sbin/nginx -> /usr/local/nginx/sbin/nginx
不知道配置文件在哪里可以使用find命令进行查找。
2.1 配置文件各参数
nginx 由模块组成,这些模块由配置文件中指定的指令控制。指令分为简单指令和块指令。简单指令由名称和参数组成,以空格分隔并以分号 ;结尾。块指令与简单指令具有相同的结构,但它以一组由大括号 {}包围的附加指令结束,而不是分号。如果块指令可以在大括号内包含其他指令,则称为上下文(示例: events、 http、 server和 location)。
我们接下来会需要部署虚拟网站主机,那么知道几个即可。
    server {

        #http server块,用来配置监听端口和域名的地方
        listen       80;    #监听端口
        server_name  localhost;   #服务器名称,url要访问的域名或IP

        #charset koi8-r;

        #access_log  logs/host.access.log  main;

        location / {

        #匹配url规则
            root   html;    	#网站网页存放路径
            index  index.html index.htm;   #文件后缀,如果是php的后缀,可以在这里加上index.php
        }
想了解更多,可以从官网nginx文档进行查阅—点击这里
那么接下来我们就开始进行配置了。
2.2 基于端口访问
端口访问还是比较容易的,只需要修改监听端口即可,我们先创建等下要使用的目录路径,用来存放显示在网页上的index.html文件。
[root@localhost nginx]# mkdir -p /data/html80 /data/html81
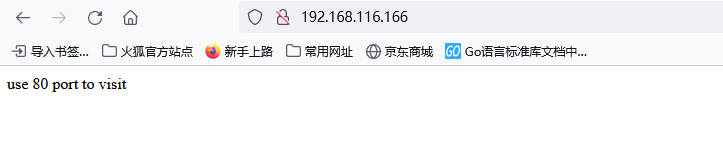
[root@localhost nginx]# echo "use 80 port to visit" > /data/html80/index.html
[root@localhost nginx]# echo "use 81 port to visit" > /data/html81/index.html
2.2.1 修改配置文件
配置端口只需要修改listen的80,然后复制server http的模块到80行,将80端口改成81;以及需要将index.html的目录路径在文件中修改。
[root@localhost nginx]# vim /usr/local/nginx/conf/nginx.conf
 35     server {


 36         listen       80;
 37         server_name  192.168.116.166;
 38
 39         #charset koi8-r;
 40
 41         #access_log  logs/host.access.log  main;
 42
 43         location / {


 44             root   /data/html80;    #目录路径
 45             index  index.html index.htm;
 46         }

 80      server {


 81          listen      81;
 82          server_name  192.168.116.166;
 83
 84          #charset koi8-r;
 85
 86          #access_log  logs/host.access.log  main;
 87
 88          location / {


 89              root   /data/html81;
 90              index  index.html index.htm;
 91          }
 92 }
注意:若是要手敲server模块信息,切记中间的内容需要在每行后面都加上一个分号,不然会报错。
直接使用nginx -t也能知道配置文件是否出错;
[root@localhost nginx]# nginx -t
nginx: the configuration file /usr/local/nginx/conf/nginx.conf syntax is ok
nginx: configuration file /usr/local/nginx/conf/nginx.conf test is successful
之后启动nginx访问,注意我前面是做了一个软连接的,若在这一步显示未找到命令,可以做一下命令的软连接,需要使用全路径。
ln -sv /usr/local/nginx/sbin/nginx /usr/sbin/nginx
直接在终端上输入nginx表示启动服务
[root@localhost nginx]# nginx
2.2.2 访问效果
直接在终端使用curl进行访问
[root@localhost nginx]# curl 192.168.116.166
use 80 port to visit
[root@localhost nginx]# curl 192.168.116.166:81
use 81 port to visit
在网页上访问需要将防火墙和selinux给关了,才可以访问成功。

2.3 基于IP访问
基于IP访问需要有多个IP,在物理机上,需要去申请外网IP,当然我们现在是使用vmware,则添加一个临时IP就可以用来实验。
[root@localhost nginx]# ifconfig ens32:0 192.168.116.167/24
[root@localhost nginx]# hostname -I
192.168.116.166 192.168.116.167 192.168.122.1
需要访问的目录文件,这里就重新创建一个;
[root@localhost nginx]# mkdir -p /data/html166 /data/html167
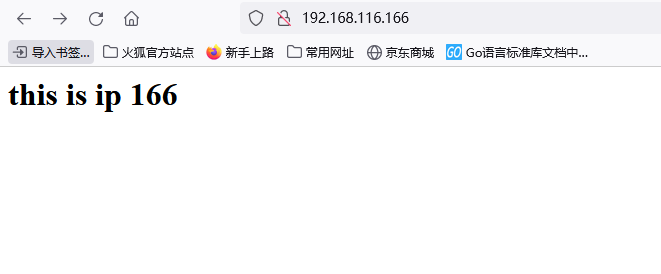
[root@localhost nginx]# echo "<h1>this is ip 166</h1> " > /data/html166/index.html
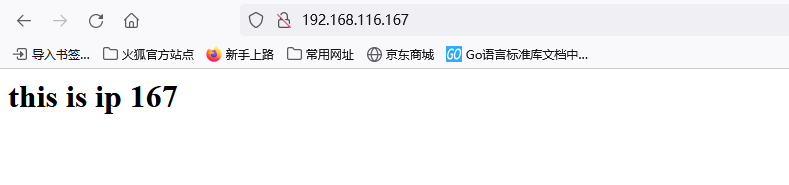
[root@localhost nginx]# echo "<h1>this is ip 167</h1> " > /data/html167/index.html
2.3.1 修改配置文件
基于IP访问需要修改的地方是server_name,由于是不同的IP,则需要添加上一个server模块,在其中,写上server_name的另一个IP。 location规则下的url访问路径也需要修改成前面创建的目录文件。
[root@localhost nginx]# vim /usr/local/nginx/conf/nginx.conf
 35     server {


 36         listen       80;
 37         server_name  192.168.116.166;
 38
 39         #charset koi8-r;
 40
 41         #access_log  logs/host.access.log  main;
 42
 43         location / {


 44             root   /data/html166;
 45             index  index.html index.htm;
 46         }

 80      server {


 81          listen      80;
 82          server_name  192.168.116.167;
 83
 84          #charset koi8-r;
 85
 86          #access_log  logs/host.access.log  main;
 87
 88          location / {


 89              root   /data/html167;
 90              index  index.html index.htm;
 91          }
 92 }
修改好之后还是一样使用nginx -t来检查文件是否出现错误的信息。
[root@localhost nginx]# nginx -t
nginx: the configuration file /usr/local/nginx/conf/nginx.conf syntax is ok
nginx: configuration file /usr/local/nginx/conf/nginx.conf test is successful
重新启动服务
[root@localhost nginx]# nginx -s reload
2.3.2 访问结果
在终端访问IP
[root@localhost nginx]# curl 192.168.116.166
<h1>this is ip 166</h1>
[root@localhost nginx]# curl 192.168.116.167
<h1>this is ip 167</h1>
在网页访问
2.4 基于域名访问
基于域名访问需要先解析域名,由于是在虚拟机当中,这里直接在内网解析。
[root@localhost nginx]# vim /etc/hosts
[root@localhost nginx]# tail -2 !$
tail -2 /etc/hosts
192.168.116.166 www.itwhoami.top
192.168.116.166 blog.itwhoami.top
解析好之后,这里重新创建一个目录
[root@localhost nginx]# mkdir /data/html_www/ /data/html_blog/
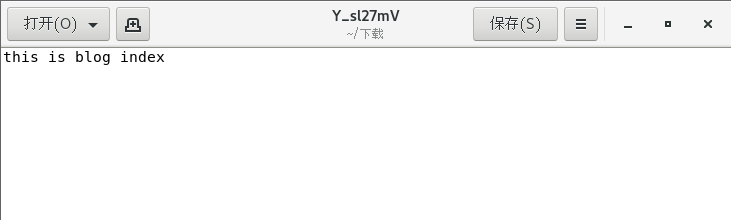
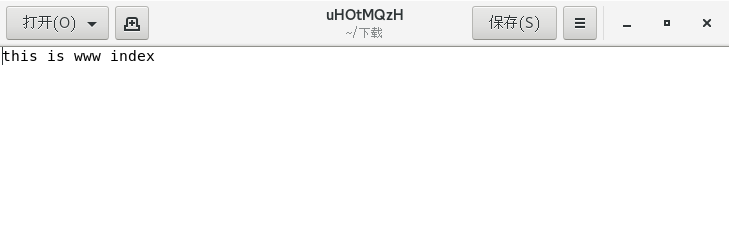
[root@localhost nginx]# echo "this is www index" > /data/html_www/index.php
[root@localhost nginx]# echo "this is blog index" > /data/html_blog/index.php
2.4.1 修改配置文件
基于域名访问需要修改server_name,location规则的root路径。`
 35     server {


 36         listen       80;
 37         server_name  www.itwhoami.top;
 38
 39         #charset koi8-r;
 40
 41         #access_log  logs/host.access.log  main;
 42
 43         location / {


 44             root   /data/html_www;
 45             index  index.php index.html index.htm;
 46         }

 80      server {


 81          listen      80;
 82          server_name  blog.itwhoami.top;
 83
 84          #charset koi8-r;
 85
 86          #access_log  logs/host.access.log  main;
 87
 88          location / {


 89              root   /data/html_blog;
 90              index  index.php index.html index.htm;
 91          }
 92 }
再次使用nginx -t 查看配置文件
[root@localhost nginx]# nginx -t
nginx: the configuration file /usr/local/nginx/conf/nginx.conf syntax is ok
nginx: configuration file /usr/local/nginx/conf/nginx.conf test is successful
重启nginx服务
[root@localhost nginx]# nginx -s reload
有时候重启不生效,也可以直接将服务给关闭,再重新打开。
[root@localhost nginx]# nginx -s stop
[root@localhost nginx]# nginx
2.4.2 访问结果
在终端访问
[root@localhost nginx]# curl www.itwhoami.top
this is www index
[root@localhost nginx]# curl blog.itwhoami.top
^C
[root@localhost nginx]# vim /etc/hosts
[root@localhost nginx]# curl blog.itwhoami.top
this is blog index
在网页访问,这里就不能在本机服务器上访问了,需要在虚拟上的Firefox访问。
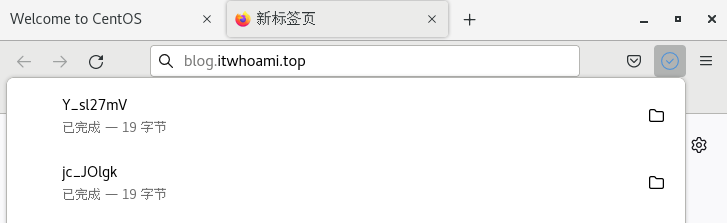
PHP页面,Firefox默认给它下载了,我们直接在文件里查看。
总结
到这里三种虚拟主机都已经配置完成了,还是比较有意思的,也可以自己动手实践一下,若觉得内容还行的,可以点赞关注。
