多个线程的创建和管理

https://blog.csdn.net/u010307521/article/details/50238997
1.起始
最近在公司做上位机和设备进行串口通信的项目,自己就写了个串口通信工具,今天是第三天,刚刚实现串口的双向通信。
2.软件的界面
先进行界面设计,将需要的功能放上来。 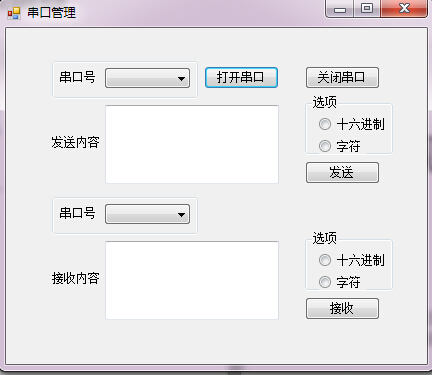
主要功能包括:打开串口、关闭串口,向串口发送数据以及从串口读取数据。在发送和接收的文本框里面,我加上了切换16进制的功能,方便调试。
在主窗体中需要一些变量用于存储串口名、串口缓冲区数据等相关信息。
private string[] portNames = null;
private List<SerialPort> serialPorts;
private byte[] portBuffer;
- 1
- 2
- 3
- 4
串口号的选择采用下拉菜单式,需要在初始化Form的时候扫描所有可用串口并显示在comboBox中。初始化之后需要加上以下代码:
this.serialPorts = new List<SerialPort>();
this.portNames = SerialPort.GetPortNames();
this.portBuffer = new byte[1000];
- 1
- 2
- 3
- 4
其中第二行将扫描到的各串口名以字符串存入this.portNames数组。之后需要将扫描到的串口读取到comboBox中。
//Assign the value of port names to serial ports display
if (this.portNames.Length > 1)
{
    for(int i = 0;i<this.portNames.Length;i++)
    {
        this.serialPorts.Add(new SerialPort(this.portNames[i]));
    }
}
            this.portNumberComboBox1.Items.AddRange(this.portNames);             this.portNumberComboBox2.Items.AddRange(this.portNames);
- 1
- 2
- 3
- 4
- 5
- 6
- 7
- 8
- 9
- 10
以上的代码完成了这些操作。到这里软件界面初始化及初步扫描串口号就完成了,接下来需要完成按钮的响应函数。
3.对串口的操作功能
打开串口和关闭串口都很简单,直接调用对应API即可。
private void openButton_Click(object sender, EventArgs e)
    {
        for (int i = 0; i < this.portNames.Length; i++)
        {
            try
            {
                if (this.portNames.ElementAt(i) == this.portNumberComboBox1.Text.ToString())
                {
                    if (!this.serialPorts.ElementAt(i).IsOpen)
                    {
                        this.serialPorts.ElementAt(i).Open();
                        MessageBox.Show("已打开串口!");
                    }
                    //this.serialPorts.ElementAt(i).
                }
            }
            catch (IOException eio)
            {
                MessageBox.Show("打开串口异常:" + eio);
            }

        }
    }

    private void closeButton_Click(object sender, EventArgs e)
    {
        for (int i = 0; i < this.portNames.Length; i++)
        {
            try
            {
                if (this.portNames.ElementAt(i) == this.portNumberComboBox1.Text.ToString())
                {
                    if (this.serialPorts.ElementAt(i).IsOpen)
                    {
                        this.serialPorts.ElementAt(i).Close();
                        MessageBox.Show("已关闭串口!");
                    }

                }
            }
            catch (IOException eio)
            {
                MessageBox.Show("关闭串口异常:" + eio);
            }
        }
    }
- 1
- 2
- 3
- 4
- 5
- 6
- 7
- 8
- 9
- 10
- 11
- 12
- 13
- 14
- 15
- 16
- 17
- 18
- 19
- 20
- 21
- 22
- 23
- 24
- 25
- 26
- 27
- 28
- 29
- 30
- 31
- 32
- 33
- 34
- 35
- 36
- 37
- 38
- 39
- 40
- 41
- 42
- 43
- 44
- 45
- 46
- 47
通过某个串口发送数据的时候,需要先读取文本框中需要发送的内容,再调用write函数。
private void sendButton_Click(object sender, EventArgs e)
    {
        for (int i = 0; i < this.portNames.Length; i++)
        {
            try
            {
                if (this.portNames.ElementAt(i) == this.portNumberComboBox1.Text.ToString())
                {
                    if (this.serialPorts.ElementAt(i).IsOpen)
                    {
                        string sendContent = this.sendTextBox.Text.ToString();
                        this.serialPorts.ElementAt(i).Write(sendContent);
                        MessageBox.Show("已发送数据!");
                    }

                }
            }
            catch (IOException eio)
            {
                MessageBox.Show("串口发送异常:" + eio);
            }
        }
    }
- 1
- 2
- 3
- 4
- 5
- 6
- 7
- 8
- 9
- 10
- 11
- 12
- 13
- 14
- 15
- 16
- 17
- 18
- 19
- 20
- 21
- 22
- 23
- 24
对于读操作,由于串口有dataReceived事件可以监听,这里选择不用线程,而是监听事件。建立一个timer用来扫描第二个comboBox,当第二个comboBox中有选中的时候,事件会被监听到。
private void timer1_Tick(object sender, EventArgs e)
{
    this.AddEventHandlerForResponse();
}

private void AddEventHandlerForResponse()
    {
        for (int i = 0; i < this.portNames.Length; i++)
        {
            try
            {
                if (this.portNames.ElementAt(i) == this.portNumberComboBox2.Text.ToString())
                {
                    if ((this.serialPorts.ElementAt(i).IsOpen)&&(this.serialPorts.ElementAt(i).BytesToRead > 0))
                    {
                        this.serialPorts.ElementAt(i).Read(this.portBuffer, 0, this.serialPorts.ElementAt(i).BytesToRead);
                        this.serialPorts.ElementAt(i).DataReceived += new SerialDataReceivedEventHandler(this.DataReceiveEventHandler);
                    }

                }
            }
            catch (IOException eio)
            {
                MessageBox.Show("串口异常:" + eio);
            }
        }
    }
- 1
- 2
- 3
- 4
- 5
- 6
- 7
- 8
- 9
- 10
- 11
- 12
- 13
- 14
- 15
- 16
- 17
- 18
- 19
- 20
- 21
- 22
- 23
- 24
- 25
- 26
- 27
- 28
上面的代码中出现了处理DataReceived事件的函数this.DataReceiveEventHandler
这里由于串口的读操作相对特殊,串口读取缓冲区数据通过辅助线程进行,进行读操作的时候不能直接修改UI中的内容,所以文本框中的接收内容要通过invoke来实现。
private void DataReceiveEventHandler(object sender, SerialDataReceivedEventArgs e)
{
    SerialPort sp = (SerialPort)sender;
    this.receiveTextBox.Invoke(
        new MethodInvoker(
            delegate
        {
                this.receiveTextBox.AppendText(sp.ReadExisting());
                this.receiveTextBox.Text += " ";

        }
                        )
                            );
    }
- 1
- 2
- 3
- 4
- 5
- 6
- 7
- 8
- 9
- 10
- 11
- 12
- 13
- 14
- 15
至此,实现了串口通信的基本功能,包括打开串口、关闭串口以及读写操作。
扫描二维码关注公众号,回复:
15492700 查看本文章
