文章目录
前言
本文作为第一篇,会用实例来说明SpringSecurity在生产中的用法,扩展它的功能,每个方案都会有一个完整的实例代码,代码仓库于文末贴出。
该篇所涉及理论较少,以实例为主。
内存版(memory)
这个版本没什么技术,引入依赖就可以使用。
直接引入
<dependency>
    <groupId>org.springframework.boot</groupId>
    <artifactId>spring-boot-starter-web</artifactId>
</dependency>
<dependency>
    <groupId>org.springframework.boot</groupId>
    <artifactId>spring-boot-starter-security</artifactId>
</dependency>
- 在引入依赖后,可以直接启动项目
- 在控制台会生成随机密码,默认用户名是
user
Using generated security password: 2233be62-e65f-489b-a52c-4bba21bcfd14
-
设置用户密码
-
可以通过application.yml设置进去,或者通过config注入,明显使用yml更方便
spring:
  security:
    # 配置默认的 InMemoryUserDetailsManager 的用户账号与密码。
    user:
      name: ali
      password: 123456
      roles: admin
-
通过代码直接写死,这也有两种方式,同时两种也可混用
方式一:直接注入
InMemoryUserDetailsManager@Configuration @EnableWebSecurity public class SecurityWebCofnig extends WebSecurityConfigurerAdapter { @Bean public PasswordEncoder passwordEncoder() { return new BCryptPasswordEncoder(); } @Override protected void configure(AuthenticationManagerBuilder auth) throws Exception { auth.inMemoryAuthentication() .withUser("ali") .password(passwordEncoder().encode("123456")) .roles("admin"); } }方式二:面向接口的方式
@Configuration
@EnableWebSecurity
public class SecurityWebCofnig extends WebSecurityConfigurerAdapter {


    @Bean
    public PasswordEncoder passwordEncoder() {


        return new BCryptPasswordEncoder();
    }

    @Autowired
    private UserDetailsService userDetailsService;

    @Override
    protected void configure(AuthenticationManagerBuilder auth) throws Exception {


        auth.inMemoryAuthentication()
            .withUser("ali")
            .password(passwordEncoder().encode("123456"))
            .roles("admin");
        auth.userDetailsService(userDetailsService);
    }
}

@Component
public class CustomUserServiceImpl implements UserDetailsService {


    @Autowired
    private PasswordEncoder passwordEncoder;

    @Override
    public UserDetails loadUserByUsername(String username) throws UsernameNotFoundException {


        return new User("ali2", passwordEncoder.encode("123456"), AuthorityUtils.commaSeparatedStringToAuthorityList("admin"));
    }
}
-
数据库库版(jdbc)
这个版本,在内存版的基础上,升级了用户校验的功能,从内置的用户,扩展到了数据库,也是一个比较有限制的版本。
那么这里的重点就是实现userDetailService方法,返回一个UserDetail的子类就行,其他登录认证、重定向什么的都由security去做,
     <dependency>
            <groupId>com.baomidou</groupId>
            <artifactId>mybatis-plus-boot-starter</artifactId>
            <version>3.4.0</version>
        </dependency>
        <dependency>
            <groupId>mysql</groupId>
            <artifactId>mysql-connector-java</artifactId>
        </dependency>
@Data
@TableName("role")
public class Role implements Serializable {


    private static final long serialVersionUID = -27787294406430777L;

    @TableField("id")
    private Integer id;

    @TableField("name")
    private String name;

    @TableField("code")
    private String code;

    @TableField("status")
    private Integer status;

    @TableField("deleted")
    private Integer deleted;

}
@Data
@TableName("user")
public class SysUser {


    private String id;

    private String username;

    private String realName;

    private String password;

    @TableField(exist = false)
    private String[] roles;
}
@Data
@TableName("user_role")
public class UserRole implements Serializable {


    private static final long serialVersionUID = 180339547857105479L;

    @TableField("id")
    private Integer id;

    @TableField("role_id")
    private Integer roleId;

    @TableField("user_id")
    private Integer userId;
}
public interface SysUserService {


    SysUser getByUsername(String username);
}
@Service
@AllArgsConstructor
public class SysUserServiceImpl implements SysUserService {


    private SysUserRepository sysUserRepository;
    private UserRoleRepository userRoleRepository;
    private RoleRepository roleRepository;
    @Override
    public SysUser getByUsername(String username) {


        SysUser user = sysUserRepository.getByUsername(username);
        if (user == null) {


            return null;
        }
        List<UserRole> roles = userRoleRepository.getByUserId(user.getId());
        if (roles.isEmpty()) {


            return user;
        }
        List<Integer> roleIds = roles.stream().map(UserRole::getRoleId).collect(Collectors.toList());
        user.setRoles(roleRepository.listByIds(roleIds).stream().map(Role::getCode).collect(Collectors.toList()));
        return user;
    }
}
自定义的security查询用户方法
@Component
@AllArgsConstructor
public class CustomUserServiceImpl implements UserDetailsService {


    private SysUserService sysUserService;

    @Override
    public UserDetails loadUserByUsername(String username) throws UsernameNotFoundException {


        SysUser sysUser = sysUserService.getByUsername(username);
        if (sysUser == null) {


            return null;
        }
        return new User(sysUser.getUsername(), sysUser.getPassword(), AuthorityUtils.createAuthorityList(sysUser.getRoles()));
    }
}
这里注入的时候,保留了内存版的用户。
@Configuration
@EnableWebSecurity
public class SecurityWebConfig extends WebSecurityConfigurerAdapter {


    @Bean
    public PasswordEncoder passwordEncoder() {


        return new BCryptPasswordEncoder();
    }

    @Autowired
    private UserDetailsService userDetailsService;

    @Override
    protected void configure(AuthenticationManagerBuilder auth) throws Exception {


        auth.inMemoryAuthentication()
            .withUser("ali")
            .password(passwordEncoder().encode("123456"))
            .roles("admin");
        auth.userDetailsService(userDetailsService);
    }
}
我用的Mybatis plus,这里加上mapperScan
@MapperScan("com.liry.security.repository.mapper")
@SpringBootApplication
public class JdbcApp {


    public static void main(String[] args) {


        SpringApplication.run(JdbcApp.class);
    }
}
application.yml
spring:
  datasource:
    url: jdbc:mysql://localhost:3306/ali?useSSl=false&zeroDateTimeBehavior=CONVERT_TO_NULL&characterEncoding=utf-8&serverTimezone=Asia/Shanghai
    username: root
    password: root
    driver-class-name: com.mysql.cj.jdbc.Driver
    hikari:
      minimum-idle: 5
      idle-timeout: 600000
      maximum-pool-size: 10
      auto-commit: true
      pool-name: SsoHikariCP
      max-lifetime: 1800000
      connection-timeout: 30000
      connection-test-query: SELECT 1
  main:
    allow-bean-definition-overriding: true


mybatis-plus:
  global-config:
    db-config:
      logic-delete-field: deleted  # 全局逻辑删除的实体字段名(since 3.3.0,配置后可以忽略不配置步骤2)
      logic-delete-value: 1 # 逻辑已删除值(默认为 1)
      logic-not-delete-value: 0 # 逻辑未删除值(默认为 0)
      id-type: AUTO
  configuration:
    # 日志打印
    log-impl: org.apache.ibatis.logging.stdout.StdOutImpl
自定义登录 - 单体(custom-login-single)
这个版本在数据库版本上呢,升级了登录的自定义功能,可以根据项目设置自己的登录页、首页、登录处理的api,和登录成功与失败的回调处理;
题外话:前后不分离的方式好处就是快速开发,方便部署,但其缺点也是显而易见的,随着迭代项目也会越来越大,主流还是分布式的,单体项目现在也很少见了。
那么这里需要注意的是:
- 前端框架引入后,需要在application.yml进行配置(我这里使用themleaf)
- 继承
WebSecurityConfigurerAdapter类完成自定义配置- 成功登录页使用
defaultSuccessUrl设置,不要用successForwardUrl - 可以定义成功后置处理器和失败处理器,这两个会在认证后回调,可以做一些业务扩展
- 成功登录页使用
- 配置
loginProcessingUrl并不是将处理请求转到你定义的接口上,而是修改security内部的api地址
注意:
loginProcessingUrl:登录处理的api,这个只是定义api,并不是将认证改由自定义,还是由security控制
defaultSuccessUrl:登录成功后的跳转地址,这还有另一个successForwardUrl,但是只能用defaultSuccessUrl,使用successForwardUrl会出现405的报错
permitAll:允许所有请求方法
        <dependency>
            <groupId>org.springframework.boot</groupId>
            <artifactId>spring-boot-starter-thymeleaf</artifactId>
        </dependency>
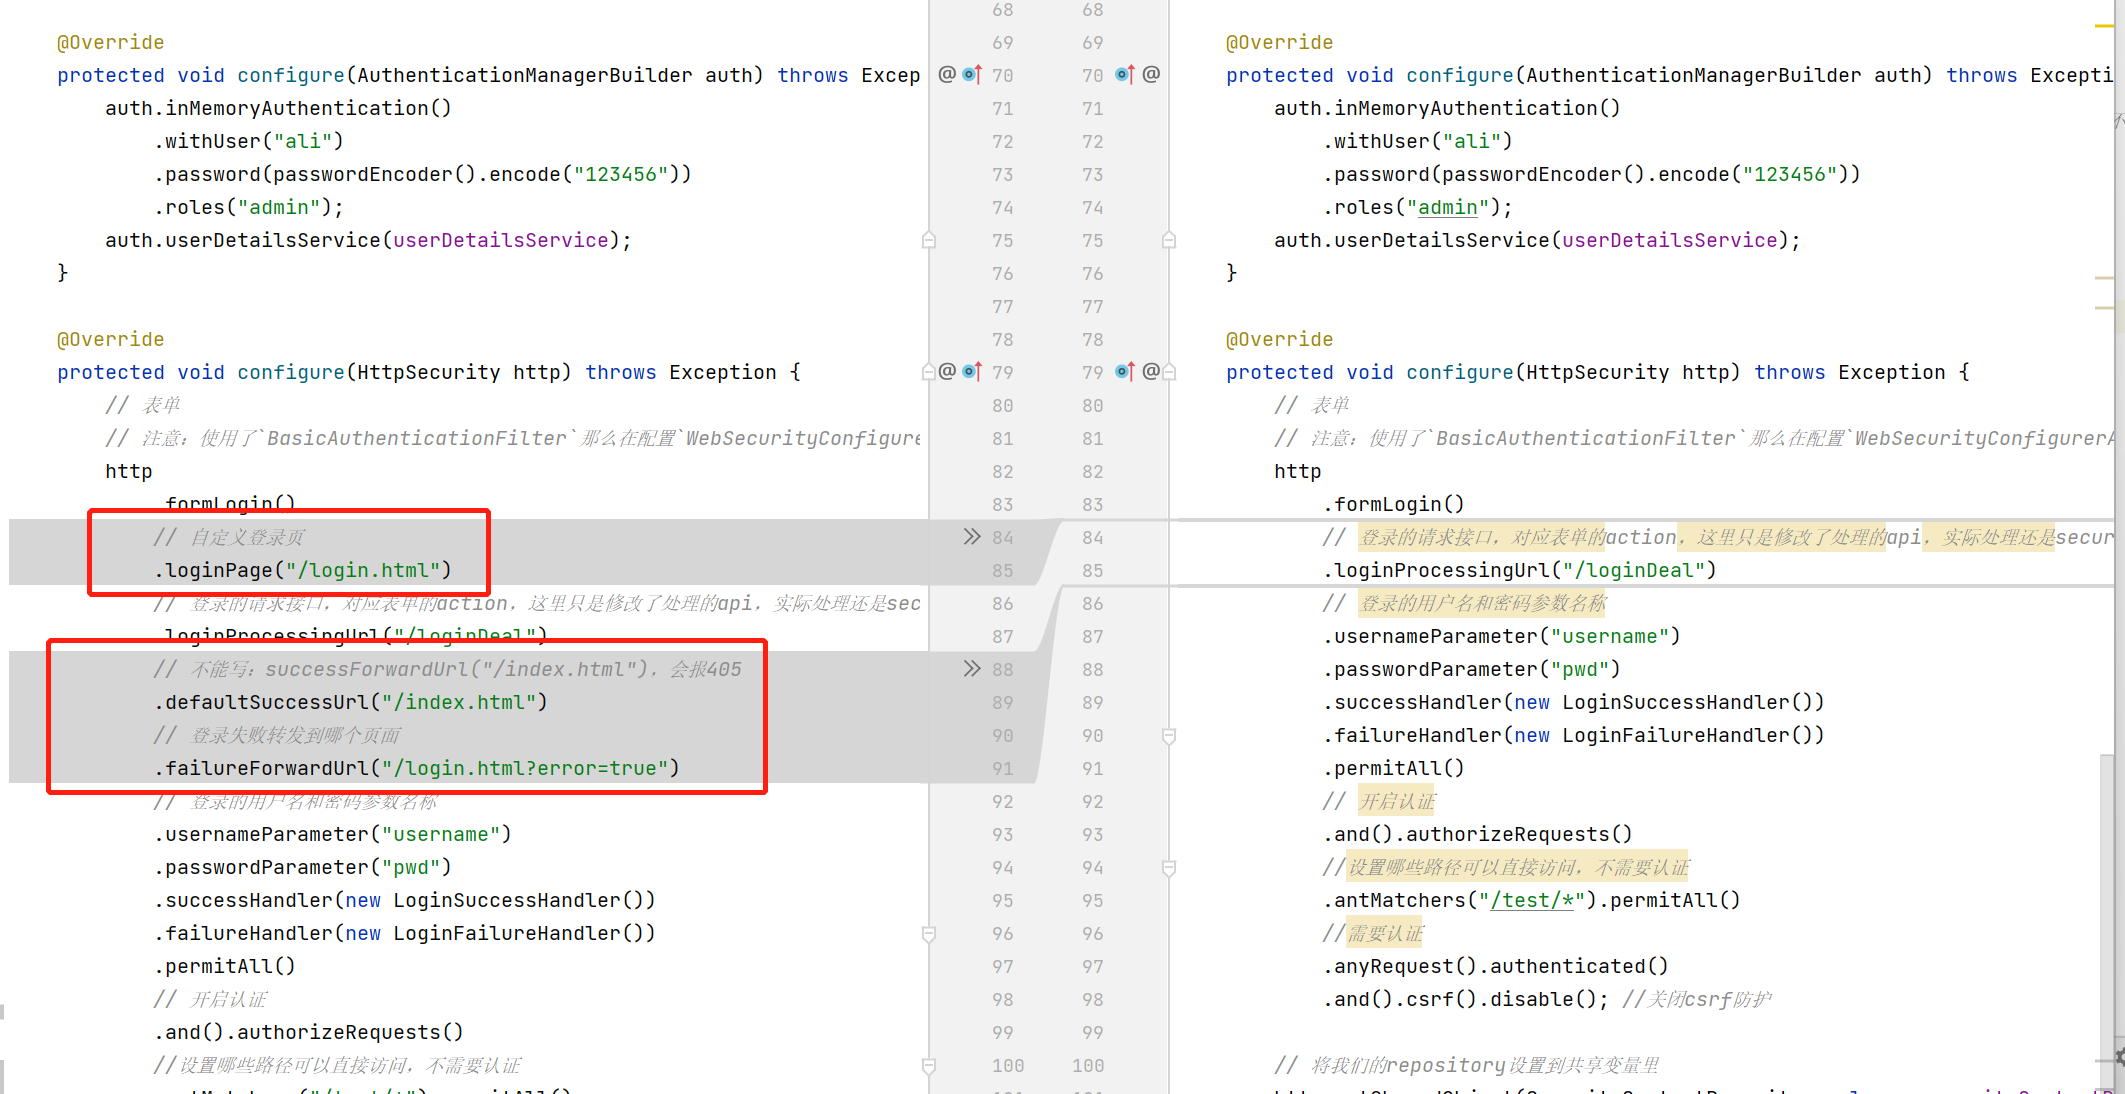
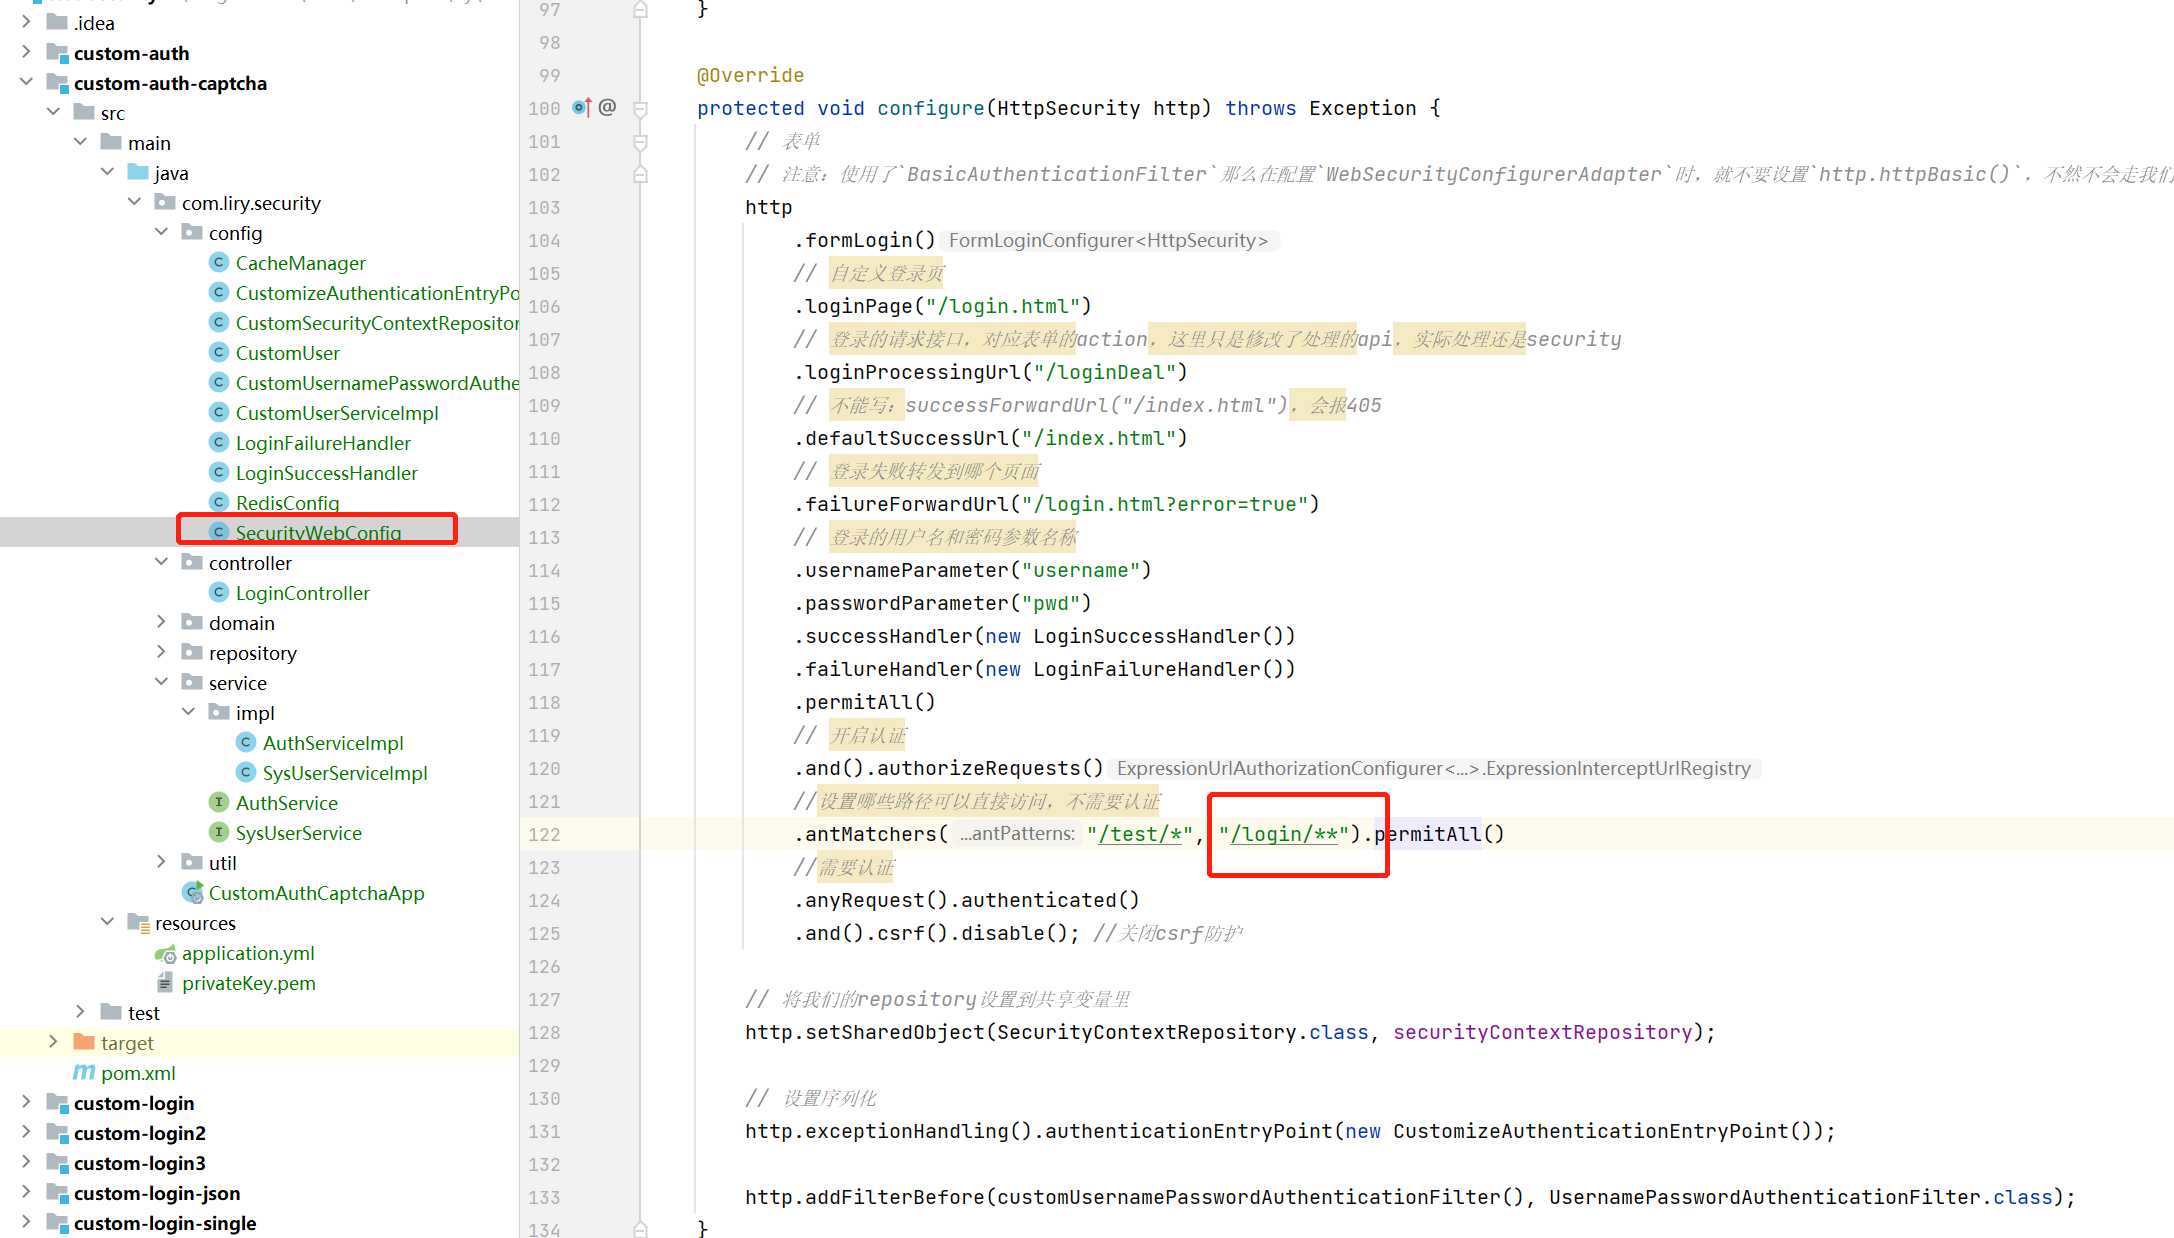
    @Override
    protected void configure(HttpSecurity http) throws Exception {


        // 表单
        http
            .formLogin()
            // 自定义登录页
            .loginPage("/login.html")
            // 登录的请求接口,对应表单的action,这里只是修改了处理的api,实际处理还是security
            .loginProcessingUrl("/loginDeal")
            // 不能写:successForwardUrl("/index.html"),会报405
            .defaultSuccessUrl("/index.html")
            // 登录失败转发到哪个页面
            .failureForwardUrl("/login.html?error=true")
            // 登录的用户名和密码参数名称
            .usernameParameter("username")
            .passwordParameter("pwd")
            .successHandler(new LoginSuccessHandler())
            .failureHandler(new LoginFailureHandler())
            .permitAll()
            // 开启认证
            .and().authorizeRequests()
            //设置哪些路径可以直接访问,不需要认证
            .antMatchers("/test/*").permitAll()
            //需要认证
            .anyRequest().authenticated()
            .and().csrf().disable(); //关闭csrf防护
    }
登录失败的回调
public class LoginFailureHandler implements AuthenticationFailureHandler {


    @Override
    public void onAuthenticationFailure(HttpServletRequest httpServletRequest, HttpServletResponse httpServletResponse,
                                        AuthenticationException e) throws IOException, ServletException {


        // 处理失败的后置操作
    }
}
登录成功的回调
public class LoginSuccessHandler implements AuthenticationSuccessHandler {


    @Override
    public void onAuthenticationSuccess(HttpServletRequest httpServletRequest, HttpServletResponse httpServletResponse,
                                        Authentication authentication) throws IOException, ServletException {


        // 处理成功的一个后置操作
    }
}
测试controller
@Controller
public class LoginController {


    @GetMapping("/login.html")
    public String loginPage() {


        return "login";
    }

    @GetMapping("/index.html")
    public String index() {


        return "index";
    }
}
测试的登录页(login.html)
<!DOCTYPE html>
<html lang="en">
<head>
    <meta charset="UTF-8">
    <title>登录</title>
</head>
<body>
    <div>
        <!-- 这里action对应的是在-->
        <form action="/loginDeal" method="POST" >
            用户名<input placeholder="输入用户名" name="username"></br>
            密  码<input placeholder="输入密码" name="pwd" type="password"></br>
            <button type="submit">登录</button>
        </form>
    </div>
</body>
</html>
测试的首页
<!DOCTYPE html>
<html lang="en">
<head>
    <meta charset="UTF-8">
    <title>首页</title>
</head>
<body>
<h2>首页</h2>
</body>
</html>
自定义登录 - 前后分离
和单体项目不同,前后分离的可扩展性大大增加,那么也意味着其面临的问题也会变多,比如跨域、会话一致性
-
自定义
CustomUserServiceImpl实现UserDetailsService加载用户信息方法 -
自定义
LoginSuccessHandler/LoginFailureHandler认证回调处理方法(登录成功,存入用户信息,响应序列化) -
创建缓存接口
CacheManager统一缓存 -
继承
WebSecurityConfigurerAdapter配置:
corsFilter(跨域)userDetailService(用户信息)passwordEncoder(加解密)securityContextRepository(认证信息管理)AuthenticationEntryPoint(响应序列号) -
会话一致性的处理方式多种,见仁见智,有利有弊,这里使用redis,如果没有大环境需求,一个前端一个后端,也是可以的
缓存管理,这里使用的redis的;
@Configuration
public class RedisConfig {


    @Bean
    public RedisTemplate<String, Object> redisTemplate(RedisConnectionFactory redisConnectionFactory) {


        RedisTemplate<String, Object> redisTemplate = new RedisTemplate<>();
        redisTemplate.setConnectionFactory(redisConnectionFactory);
        redisTemplate.setKeySerializer(new StringRedisSerializer());
        return redisTemplate;
    }

}
/**
 * @author ALI
 * @since 2023/6/4
 */
@Component
public class CacheManager {


    private static final int TIME_OUT = 4;
    @Autowired
    private RedisTemplate<String, Object> redisTemplate;

    public Object get(String key) {


        return redisTemplate.opsForValue().get(key);
    }

    public <T> T get(String key, Class<T> clazz) {


        Object value = get(key);
        if (value == null) {


            return null;
        }
        return (T) value;
    }

    public void set(String key, Object value) {


        if (value == null) {


            redisTemplate.delete(key);
            return;
        }
        redisTemplate.opsForValue().set(key, value, TIME_OUT, TimeUnit.HOURS);
    }

    public void set(String key, Object value, Long timeOut, TimeUnit timeUnit) {


        if (value == null) {


            redisTemplate.delete(key);
            return;
        }
        redisTemplate.opsForValue().set(key, value, timeOut, timeUnit);
    }

    public boolean containsKey(String key) {


        return Boolean.TRUE.equals(redisTemplate.hasKey(key));
    }

    public long getExpire(String key) {


        Long expire = redisTemplate.getExpire(key);
        if (expire == null) {


            return 0L;
        }
        return expire;
    }
}
/**
 * 认证的常量
 * @author ALI
 * @since 2023/6/10
 */
public class AuthConstant {


    public static final String LOGIN_PRE = "login:";
    public static final String CAPTCHA_PRE = "captcha:";

    public static String buildLoginKey(String key) {


        return LOGIN_PRE + key;
    }

    public static String buildCaptchaKey(String key) {


        return CAPTCHA_PRE + key;
    }
}
@Data
public class CustomUser implements UserDetails {


    private static final long serialVersionUID = 5469888959861441262L;

    protected String userId;

    protected String password;

    protected String username;

    protected Collection<? extends GrantedAuthority> authorities;

    public CustomUser() {


    }

    public CustomUser(SysUser sysUser) {


        this.userId = sysUser.getId();
        this.username = sysUser.getUsername();
        this.password = sysUser.getPassword();
        if (!CollectionUtils.isEmpty(sysUser.getRoles())) {


            this.authorities = sysUser.getRoles().stream().map(d -> new SimpleGrantedAuthority("ROLE_" + d)).collect(Collectors.toList());
        }
    }

    @Override
    public Collection<? extends GrantedAuthority> getAuthorities() {


        return authorities;
    }

    @Override
    public String getPassword() {


        return password;
    }

    @Override
    public String getUsername() {


        return username;
    }

    @Override
    public boolean isAccountNonExpired() {


        return true;
    }

    @Override
    public boolean isAccountNonLocked() {


        return true;
    }

    @Override
    public boolean isCredentialsNonExpired() {


        return true;
    }

    @Override
    public boolean isEnabled() {


        return true;
    }

}
响应对象
/**
 * 返回结果对象
 *
 * @author 李瑞益
 * @since 2019/9/25
 */
@Data
@Builder
@AllArgsConstructor
@NoArgsConstructor
public class ResponseData<T> implements Serializable {


    public static final String SUCCESS = "success";
    public static final String FAILED = "failed";

    private static final long serialVersionUID = -4304353934293881342L;

    /** 处理结果 */
    private boolean status;

    /** 信息 */
    private String message;

    /** 状态编码 */
    private String code;

    /** 数据对象 */
    private T data;

    public ResponseData(boolean status, T data) {


        this.status = status;
        this.data = data;
        this.code = status ? SUCCESS : FAILED;
    }

    public ResponseData(boolean status, T data, String message) {


        this.status = status;
        this.data = data;
        this.message = message;
        this.code = status ? SUCCESS : FAILED;
    }

    public ResponseData(Throwable e) {


        this.status = false;
        this.message = e.getMessage();
        this.code = FAILED;
    }

    public static ResponseData<Object> ok() {


        return new ResponseData<>(true, null);
    }


    public static ResponseData<Object> failed() {


        return new ResponseData<>(false, null);
    }

    public static ResponseData<Object> failed(Throwable e) {


        return new ResponseData<>(false, null, e.getMessage());
    }

    public static ResponseData<Object> failed(String message) {


        return new ResponseData<>(false, null, message);
    }
}
/**
 * 主要用来做响应体序列化
 * @author ALI
 * @since 2023/6/4
 */
public class CustomizeAuthenticationEntryPoint implements AuthenticationEntryPoint {


    @Override
    public void commence(HttpServletRequest httpServletRequest, HttpServletResponse httpServletResponse, AuthenticationException e) throws IOException, ServletException {


        httpServletResponse.setContentType("application/json;charset=utf-8");
        httpServletResponse.setStatus(HttpStatus.UNAUTHORIZED.value());
        ResponseData<Object> result = ResponseData.failed(e.getMessage());
        PrintWriter out = httpServletResponse.getWriter();
        out.write(JSON.toJSONString(result));
        out.flush();
        out.close();
    }
}
需要留意的是:
前面的我们的代码都是基于单体架构的服务,所以配置SecurityWebConfig时,会配置登录页,错误页这些,但是前后分离后遍不需要这些东西了。
会话一致性方案
说到会话一致性方案,这边提供三种方案,徐徐渐进。
方案一
直接在回调方法里使用redis缓存(custom-login)
该方案利用security登录成功的回调处理器,设置用户信息到redis,然后增加一个请求头拦截器,对请求头里的token进行拦截,通过token拿到redis里的用户信息,再设置到security的上下文SecurityContextHolder就行;该方案缺点是会保留两份缓存,而且代码量也多
- 自定义
CustomUserServiceImpl实现UserDetailsService加载用户信息方法 - 自定义
LoginSuccessHandler/LoginFailureHandler认证回调处理方法(登录成功,存入用户信息,响应序列化) - 创建缓存接口
CacheManager统一缓存 - 自定义
CustomizeAuthenticationEntryPoint实现AuthenticationEntryPoint序列化方法 - 自定义
CustomHeaderAuthFilter继承BasicAuthenticationFilter,完成请求头token的处理 LoginSuccessHandler增加用户缓存逻辑- 继承
WebSecurityConfigurerAdapter配置自定义的登录
注意:
-
使用了
BasicAuthenticationFilter那么在配置WebSecurityConfigurerAdapter时,就不要设置http.httpBasic(),不然不会走我们自定义的Filter -
这种方式会和security产生割裂,在自定义
CustomHeaderAuthFilter中,需要判断登录的api和ignore的api,避免被自己拦截
LoginSuccessHandler:用户登录成功后,设置用户信息到缓存,同时序列化json给前端
/**
* 登录成功处理器
* 序列化处理
*
* @author ALI
* @since 2023/6/1
*/
public class LoginSuccessHandler implements AuthenticationSuccessHandler {
private CacheManager cacheManager;
public LoginSuccessHandler(CacheManager cacheManager) {
this.cacheManager = cacheManager;
}
@Override
public void onAuthenticationSuccess(HttpServletRequest httpServletRequest, HttpServletResponse httpServletResponse,
Authentication authentication) throws IOException, ServletException {
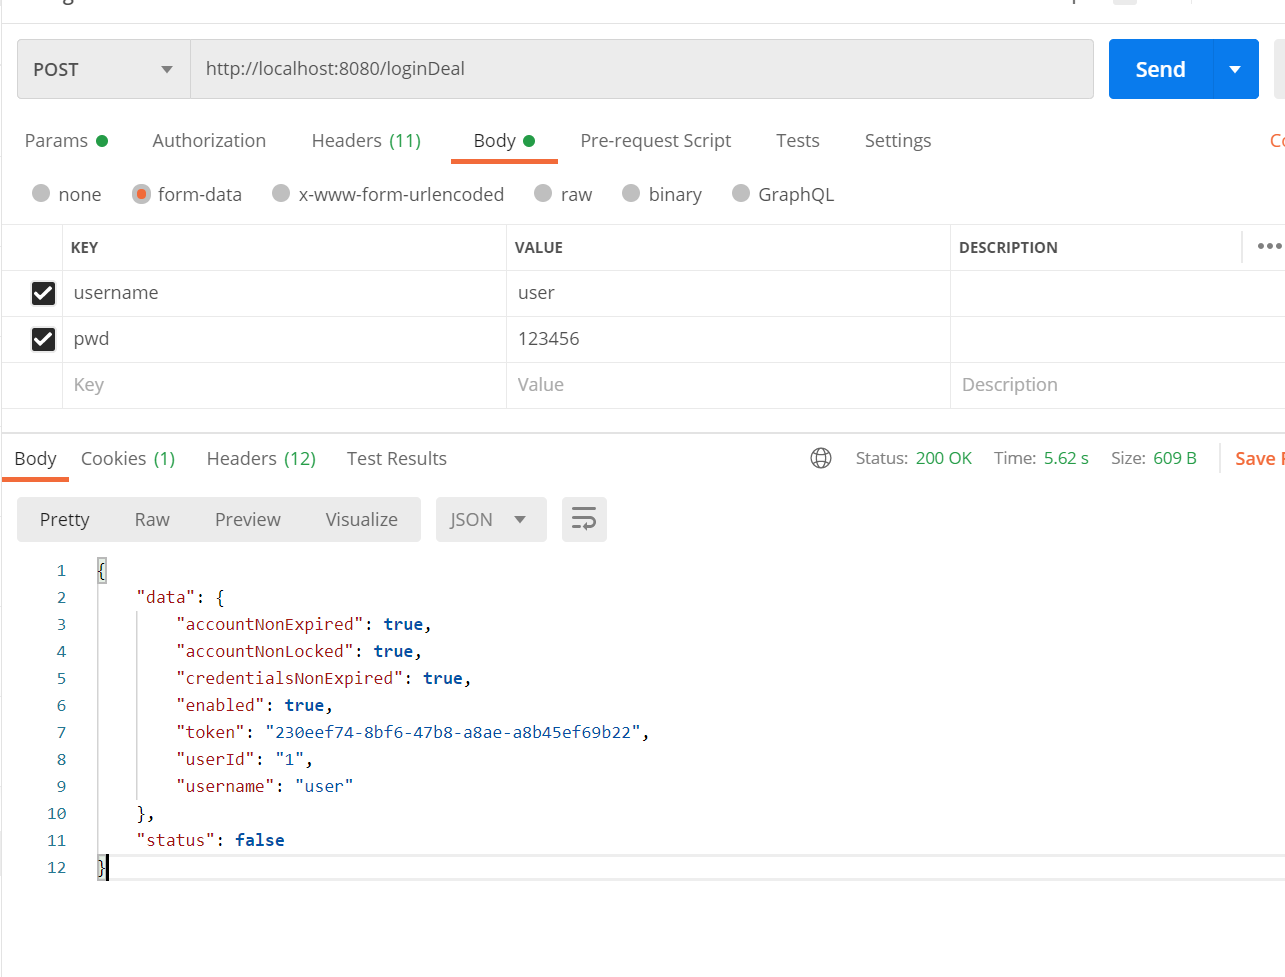
// 将成功后的会话id设置到响应,以便在链里的过滤器能够拿到
String token = UUID.randomUUID().toString();
httpServletResponse.setHeader(HttpHeaders.AUTHORIZATION, token);
// 设置响应的格式
httpServletResponse.setContentType("application/json;charset=utf-8");
ResponseData<CustomUser> result = new ResponseData<>();
CustomUser user = (CustomUser) authentication.getPrincipal();
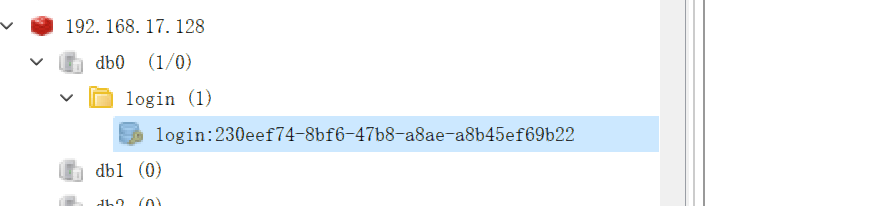
cacheManager.set(AuthConstant.buildLoginKey(token), user);
UserView temp = new UserView(user, token);
result.setData(temp);
PrintWriter writer = httpServletResponse.getWriter();
writer.write(JSON.toJSONString(result));
writer.flush();
}
}
CustomHeaderAuthFilter:自定义的请求头过滤器,会拦截请求头里的token header,这里相当于是我们自己主动的将认证给做了,那么这个过滤器要在UsernamePasswordAuthenticationFilter过滤器之前,认证后,需要把认证后的信息进行设置到security上下文中,同时因为我们这个过滤器相对于security有点独立,所以,我们要同步在SecurityWebConfig中配置忽略的api;
需要注意的是,这里全部一个try catch捕获,这样出现异常交由ExceptionTranslationFilter进行处理
/**
 * 主要用来拦截token的
 * <p>
 * 这里构造器我需要注入authenticationManager ,但是这个类在SecurityConfig里注入,所有我只有在用到的地方手动注入
 *
 * @author ALI
 * @since 2023/6/4
 */
public class CustomHeaderAuthFilter extends BasicAuthenticationFilter {


    private CacheManager cacheManager;

    public CustomHeaderAuthFilter(AuthenticationManager authenticationManager,
                                  AuthenticationEntryPoint authenticationEntryPoint, CacheManager cacheManager) {


        super(authenticationManager, authenticationEntryPoint);
        this.cacheManager = cacheManager;
    }

    private void doParse(HttpServletRequest request, HttpServletResponse response, FilterChain chain)
    throws IOException, ServletException {


        String header = request.getHeader(HttpHeaders.AUTHORIZATION);
        try {


            // 这个步骤是将redis的信息设置到security上下文
            if (header.startsWith("Bearer")) {


                String token = header.replace("Bearer ", "");
                CustomUser user = cacheManager.get(AuthConstant.buildLoginKey(token), CustomUser.class);
                if (user == null) {


                    throw new AccountExpiredException("token无效!");
                }
                UsernamePasswordAuthenticationToken authToken = new UsernamePasswordAuthenticationToken(user, user.getPassword(), user.getAuthorities());
                // 设置的上下文
                SecurityContextHolder.getContext().setAuthentication(authToken);
            }
        } catch (Exception e) {


            // 抛出 AuthenticationException AccessDeniedException 两个类型的异常给 ExceptionTranslationFilter
            throw new AccountExpiredException("登录失败!");
        }
        chain.doFilter(request, response);
    }

    @Override
    protected void doFilterInternal(HttpServletRequest httpServletRequest, HttpServletResponse httpServletResponse,
                                    FilterChain filterChain) throws ServletException, IOException {


        String authorization = httpServletRequest.getHeader(HttpHeaders.AUTHORIZATION);
        // 无token,和登录的走默认的逻辑
        // 还有被忽略的api
        if (httpServletRequest.getRequestURI().contains("/login") || httpServletRequest.getRequestURI().contains("/test")) {


            filterChain.doFilter(httpServletRequest, httpServletResponse);
            return;
        }
        this.doParse(httpServletRequest, httpServletResponse, filterChain);
    }
}
SecurityWebConfig:这里就是security的配置,需要注意的就是,别忘了把自定义的类注入,和配置上
/**
 * security认证配置
 *
 * @author ALI
 * @since 2023/5/29
 */
@Configuration
@EnableWebSecurity
public class SecurityWebConfig extends WebSecurityConfigurerAdapter {


    @Autowired
    private UserDetailsService userDetailsService;
    @Autowired
    private CacheManager cacheManager;
    @Bean
    public PasswordEncoder passwordEncoder() {


        return new BCryptPasswordEncoder();
    }

    @Bean
    public org.springframework.web.filter.CorsFilter corsFilter() {


        return new CorsFilter(corsConfigurationSource());
    }

    /**
     * 跨域设置
     */
    private CorsConfigurationSource corsConfigurationSource() {


        org.springframework.web.cors.UrlBasedCorsConfigurationSource source = new UrlBasedCorsConfigurationSource();
        CorsConfiguration config = new CorsConfiguration();
        // 允许cookies跨域
        config.setAllowCredentials(true);
        // 允许向该服务器提交请求的URI,* 表示全部允许,在SpringMVC中,如果设成*,会自动转成当前请求头中的Origin
        config.addAllowedOrigin("*");
        // 允许访问的头信息,* 表示全部
        config.addAllowedHeader("*");
        // 预检请求的缓存时间(秒),即在这个时间段里,对于相同的跨域请求不会再预检了
        config.setMaxAge(18000L);
        // 允许提交请求的方法,* 表示全部允许
        config.addAllowedMethod("GET");
        config.addAllowedMethod("PUT");
        config.addAllowedMethod("POST");
        config.addAllowedMethod("DELETE");
        source.registerCorsConfiguration("/**", config);
        return source;
    }

    @Override
    protected void configure(AuthenticationManagerBuilder auth) throws Exception {


        auth.inMemoryAuthentication()
            .withUser("ali")
            .password(passwordEncoder().encode("123456"))
            .roles("admin");
        auth.userDetailsService(userDetailsService);
    }

    @Override
    protected void configure(HttpSecurity http) throws Exception {


        // 表单
// 注意:使用了`BasicAuthenticationFilter`那么在配置`WebSecurityConfigurerAdapter`时,就不要设置`http.httpBasic()`,不然不会走我们自定义的Filter

        http
            .formLogin()
            // 登录的请求接口,对应表单的action,这里只是修改了处理的api,实际处理还是security
            .loginProcessingUrl("/loginDeal")
            // 登录的用户名和密码参数名称
            .usernameParameter("username")
            .passwordParameter("pwd")
            .successHandler(new LoginSuccessHandler(cacheManager))
            .failureHandler(new LoginFailureHandler())
            .permitAll()
            // 开启认证
            .and().authorizeRequests()
            //设置哪些路径可以直接访问,不需要认证
            .antMatchers("/test/*").permitAll()
            //需要认证
            .anyRequest().authenticated()
            .and().csrf().disable(); //关闭csrf防护

        http.exceptionHandling().authenticationEntryPoint(new CustomizeAuthenticationEntryPoint());

        http.addFilterBefore(
            new CustomHeaderAuthFilter(authenticationManager(), new CustomizeAuthenticationEntryPoint(), cacheManager),
            UsernamePasswordAuthenticationFilter.class);
    }
}
方案二
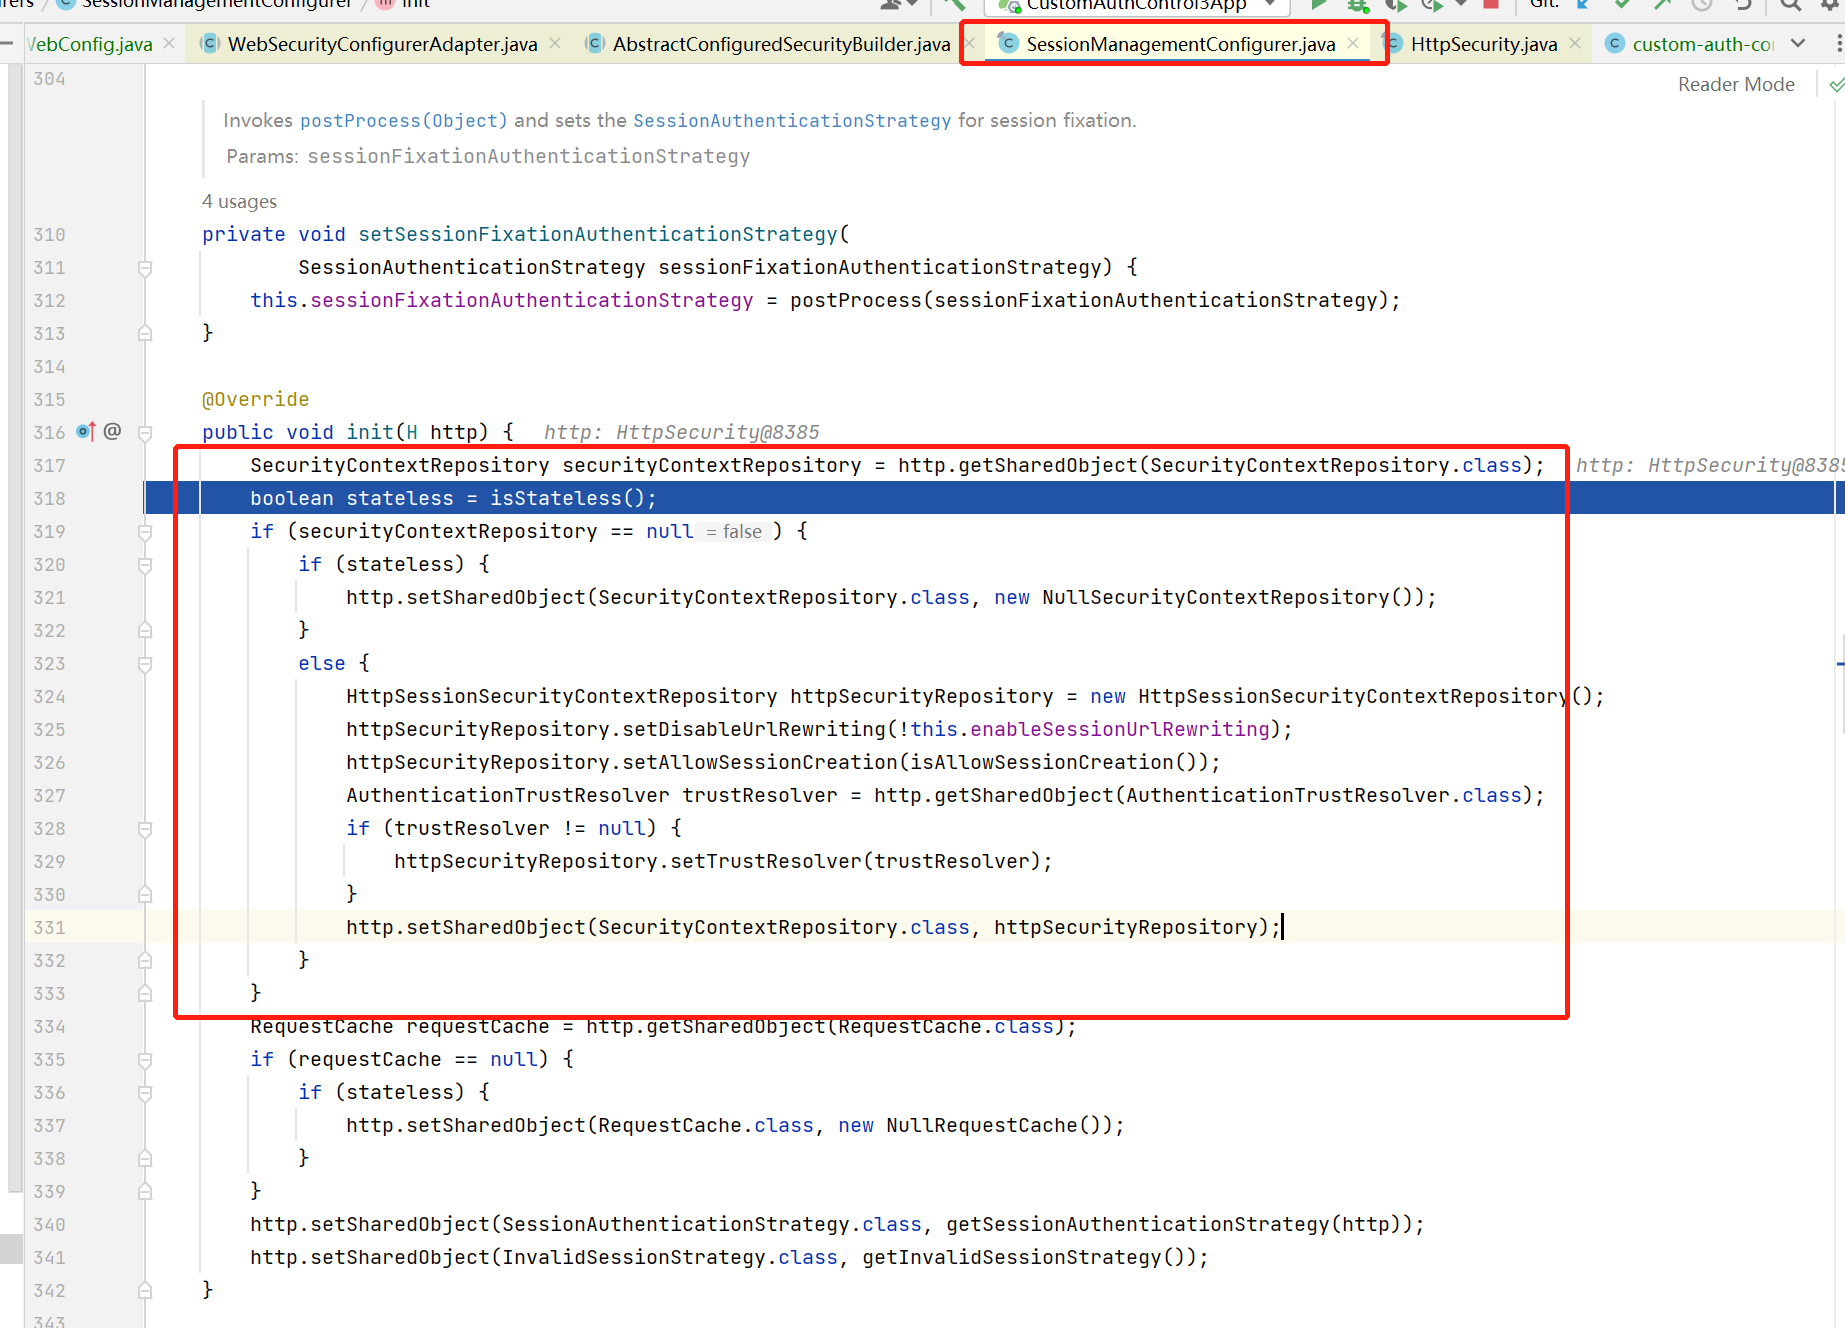
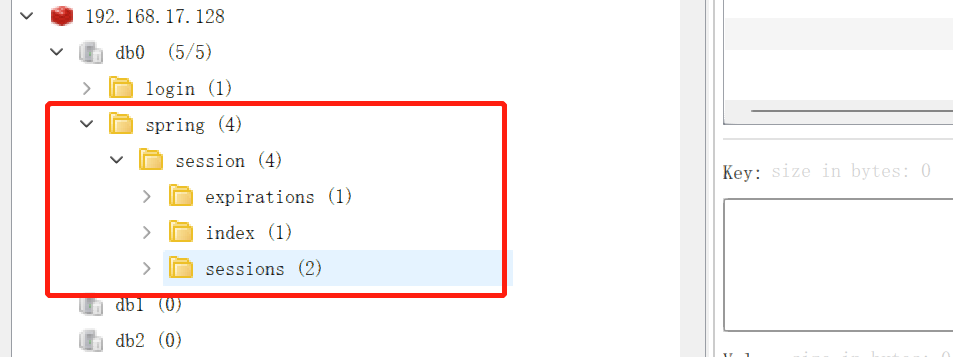
重写Spring Security 内部的缓存提供类SecurityContextRepository(custom-login2)
该方案从源码框架角度出发,替换执行bean已达到最终存取用户信息都是同一个缓存空间,从原理上来说很简单,但是这需要一些的源码功底,业务的需求是多变的,security虽然支持扩展,但是学习成本也不低,所以需要全局观来看待项目,但它的使用舒适度很好,并且代码量也很少,如果要查看内部使用可以查看SecurityContextPersistenceFilter。
- 自定义
CustomUserServiceImpl实现UserDetailsService加载用户信息方法 - 自定义
LoginSuccessHandler/LoginFailureHandler认证回调处理方法(响应序列化) - 创建缓存接口
CacheManager统一缓存 - 自定义
CustomizeAuthenticationEntryPoint实现AuthenticationEntryPoint序列化方法 - 自定义
CustomSecurityContextRepository继承SecurityContextRepository重写它的3个信息存取方法 - 继承
WebSecurityConfigurerAdapter配置自定义的登录
/**
 * 自定义的session存储器
 *
 * @author ALI
 * @since 2023/6/4
 */
@Component
public class CustomSecurityContextRepository implements SecurityContextRepository {


    @Autowired
    private CacheManager cacheManager;

    @Override
    public SecurityContext loadContext(HttpRequestResponseHolder requestResponseHolder) {


        HttpServletRequest request = requestResponseHolder.getRequest();
        String token = request.getHeader(HttpHeaders.AUTHORIZATION);
        if (StringUtils.isBlank(token)) {


            return generateNewContext();
        }
        token = token.replace("Bearer ", "");
        SecurityContextImpl s = cacheManager.get(AuthConstant.buildLoginKey(token), SecurityContextImpl.class);
        if (s == null) {


            return generateNewContext();
        }
        return s;
    }

    @Override
    public void saveContext(SecurityContext context, HttpServletRequest request, HttpServletResponse response) {


        String token = request.getHeader(HttpHeaders.AUTHORIZATION);
        if (StringUtils.isBlank(token)) {


            token = response.getHeader(HttpHeaders.AUTHORIZATION);
        }
        if (StringUtils.isBlank(token)) {


            return;
        }
        token = token.replace("Bearer ", "");
        // 登录成功和失败的回调(LoginSuccessHandler,LoginFailureHandler)是在UsernamePasswordAuthenticationFilter过滤器里执行的
        // 而这里的认证信息缓存是在`SecurityContextPersistenceFilter`的doFilter后执行的
        // `SecurityContextPersistenceFilter`的顺序比`UsernamePasswordAuthenticationFilter`的顺序小,
        // 那么doFilter之后的方法就晚与LoginSuccessHandler,LoginFailureHandler
        cacheManager.set(AuthConstant.buildLoginKey(token), context);
    }

    @Override
    public boolean containsContext(HttpServletRequest request) {


        String token = request.getHeader(HttpHeaders.AUTHORIZATION);
        if (StringUtils.isBlank(token)) {


            return false;
        }
        token = token.replace("Bearer ", "");
        return cacheManager.containsKey(AuthConstant.buildLoginKey(token));
    }

    protected SecurityContext generateNewContext() {


        return SecurityContextHolder.createEmptyContext();
    }

}
security配置
@Configuration
@EnableWebSecurity
public class SecurityWebConfig extends WebSecurityConfigurerAdapter {


    @Autowired
    private UserDetailsService userDetailsService;
    @Autowired
    private CustomSecurityContextRepository securityContextRepository;

    @Bean
    public PasswordEncoder passwordEncoder() {


        return new BCryptPasswordEncoder();
    }

    @Bean
    public org.springframework.web.filter.CorsFilter corsFilter() {


        return new CorsFilter(corsConfigurationSource());
    }

    /**
     * 跨域设置
     */
    private CorsConfigurationSource corsConfigurationSource() {


        org.springframework.web.cors.UrlBasedCorsConfigurationSource source = new UrlBasedCorsConfigurationSource();
        CorsConfiguration config = new CorsConfiguration();
        // 允许cookies跨域
        config.setAllowCredentials(true);
        // 允许向该服务器提交请求的URI,* 表示全部允许,在SpringMVC中,如果设成*,会自动转成当前请求头中的Origin
        config.addAllowedOrigin("*");
        // 允许访问的头信息,* 表示全部
        config.addAllowedHeader("*");
        // 预检请求的缓存时间(秒),即在这个时间段里,对于相同的跨域请求不会再预检了
        config.setMaxAge(18000L);
        // 允许提交请求的方法,* 表示全部允许
        config.addAllowedMethod("GET");
        config.addAllowedMethod("PUT");
        config.addAllowedMethod("POST");
        config.addAllowedMethod("DELETE");
        source.registerCorsConfiguration("/**", config);
        return source;
    }

    @Override
    protected void configure(AuthenticationManagerBuilder auth) throws Exception {


        auth.inMemoryAuthentication()
            .withUser("ali")
            .password(passwordEncoder().encode("123456"))
            .roles("admin");
        auth.userDetailsService(userDetailsService);
    }

    @Override
    protected void configure(HttpSecurity http) throws Exception {


        // 表单
        // 注意:使用了`BasicAuthenticationFilter`那么在配置`WebSecurityConfigurerAdapter`时,就不要设置`http.httpBasic()`,不然不会走我们自定义的Filter
        http
            .formLogin()
            // 登录的请求接口,对应表单的action,这里只是修改了处理的api,实际处理还是security
            .loginProcessingUrl("/loginDeal")
            // 登录的用户名和密码参数名称
            .usernameParameter("username")
            .passwordParameter("pwd")
            .successHandler(new LoginSuccessHandler())
            .failureHandler(new LoginFailureHandler())
            .permitAll()
            // 开启认证
            .and().authorizeRequests()
            //设置哪些路径可以直接访问,不需要认证
            .antMatchers("/test/*").permitAll()
            //需要认证
            .anyRequest().authenticated()
            .and().csrf().disable(); //关闭csrf防护

        // 将我们的repository设置到共享变量里
        http.setSharedObject(SecurityContextRepository.class, securityContextRepository);

        http.exceptionHandling().authenticationEntryPoint(new CustomizeAuthenticationEntryPoint());
    }
}
为什么要这样用: http.setSharedObject?
看SecurityContextConfigurer配置类,它会通过http.getSharedObject(SecurityContextRepository.class)获取到对应的实现类,内部由Map实现,所以,当我们通过http.setSharedObject设置我们自定义的repository就可以重写;在默认情况下,http.getSharedObject(SecurityContextRepository.class) = null,所以,它直接new HttpSessionSecurityContextRepository设置到SecurityContextPersistenceFilter
方案三
使用Spring session(custom-login3)
该方案使用到了spring的组件spring session,它也是原生的spring,也是针对会话管理而出的吧;同样,见仁见智。
        <dependency>
            <groupId>org.springframework.session</groupId>
            <artifactId>spring-session-data-redis</artifactId>
        </dependency>
然后打上注解@SpringBootApplication
然后就完成了,这种方式最为省力,毕竟这是由spring出的一个组件,对于spring框架来说是功能升级,这种方式不需要你去设置token和其他东西。
为什么不用JWT
其实吧解决会话一致性,还有一种解决方式,不过我不是很支持这种方式,那就是JWT,它被定义为一种无状态的登录,其核心含义就是通过JWT生成的信息就是登录信息,那么只要有这个信息,就可以通过这个JWT信息获取到登录数据。
这确实很不错,不过有几点我不是很喜欢:
- JWT生成的信息中有一个部分可以反解出用户信息;
- JWT无法主动过期,那么这就不能实现正真意思上的推出,那么要实现过期,就要缓存,那这和方案二一样,但方案二不用去写解密,验证JWT合法性,也不用去适配security;
- 这点和上面类似,就是如果业务要求做登录限制,比如同一个账号只能登录一个,那么还是需要缓存JWT;
以上3点足以让我不支持使用JWT。
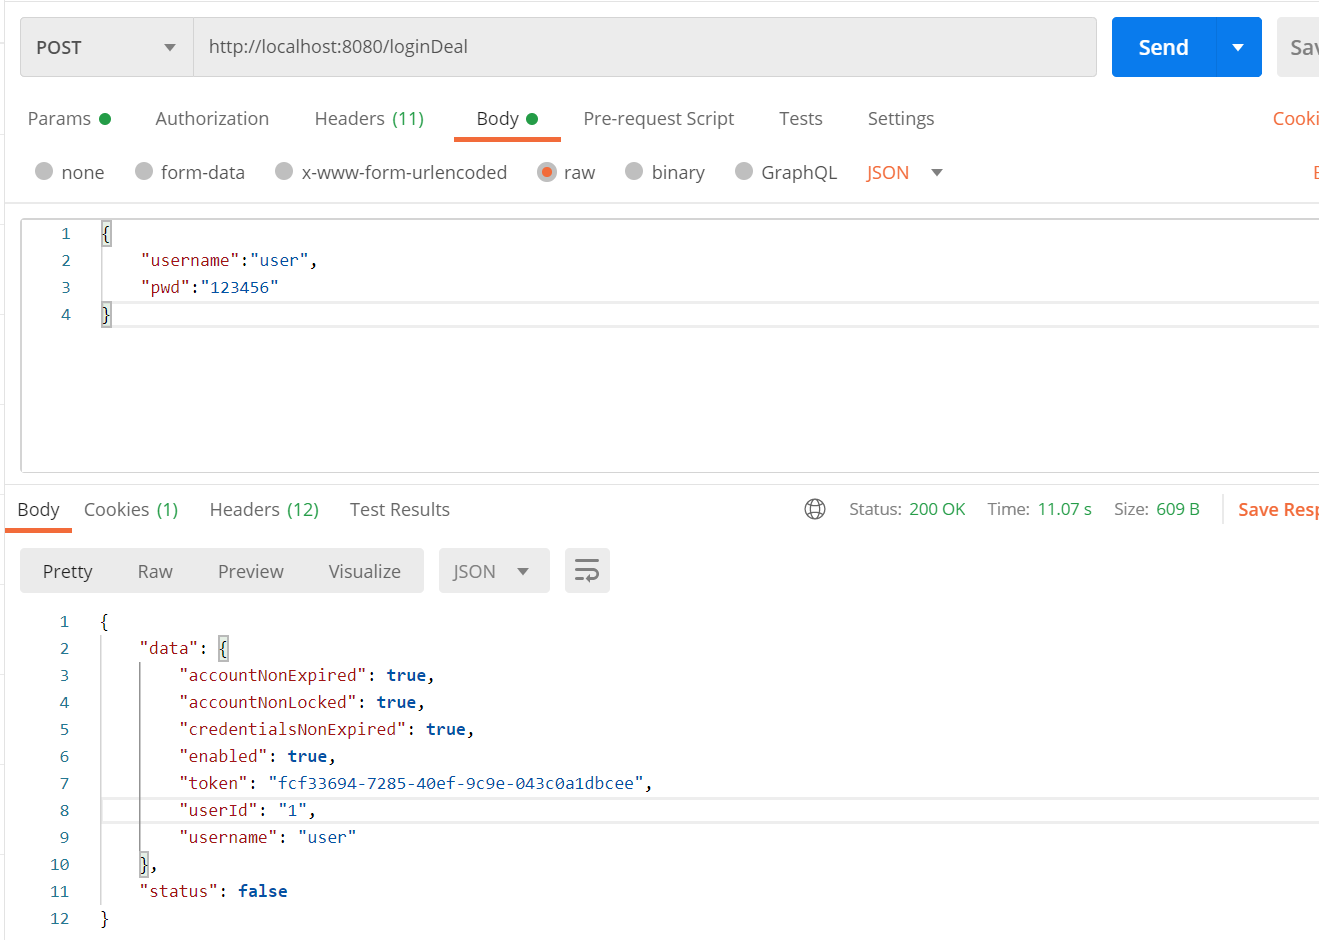
登录改json方式登录(custom-login-json)
security默认的登录,都是POST + form-data,如果使用json的话,就不能够获取到参数,但前端项目一般都是做的统一拦截处理,当然也可以让前端把登录改formData请求。
该登录有几个注意点:
-
默认的登录认证由
UsernamePasswordAuthenticationFilter完成,它取值不是json格式的,所以我们重写它的认证方法attemptAuthentication; -
将我们自定义的
UsernamePasswordAuthenticationFilter设置到HttpSecurity,因为是替换,所以要把有关UsernamePasswordAuthenticationFilter的配置复制过来,比如登录的参数名,登录处理的api,登录成功处理器和失败处理器(这个很重要); -
PasswordEncoder密码匹配是传入未加密的(前端传过来的)和已加密的(后端保存的)的密码,所以如果密码加密了,这里要进行解密;
自定义UsernamePasswordAuthenticationFilter完成json的认证
/**
 * 自定义json认证
 * @author ALI
 * @since 2023/6/7
 */
public class CustomUsernamePasswordAuthenticationFilter extends UsernamePasswordAuthenticationFilter {


    @Override
    public Authentication attemptAuthentication(HttpServletRequest request, HttpServletResponse response) throws AuthenticationException {


        try (InputStream inputStream = request.getInputStream()) {


            ObjectMapper objectMapper = new ObjectMapper();
            Map<String, String> loginRequest = objectMapper.readValue(inputStream, Map.class);
            String username = loginRequest.get(super.getUsernameParameter());
            String password = loginRequest.get(super.getPasswordParameter());
            UsernamePasswordAuthenticationToken authenticationToken = new UsernamePasswordAuthenticationToken(username, password);
            return this.getAuthenticationManager().authenticate(authenticationToken);
        } catch (IOException e) {


            throw new RuntimeException(e);
        }
    }
}
自定义配置加入HttpSecurity
    @Override
    protected void configure(HttpSecurity http) throws Exception {


        // 表单
        // 注意:使用了`BasicAuthenticationFilter`那么在配置`WebSecurityConfigurerAdapter`时,就不要设置`http.httpBasic()`,不然不会走我们自定义的Filter
        http
            // 开启认证
            .authorizeRequests()
            //设置哪些路径可以直接访问,不需要认证
            .antMatchers("/test/*").permitAll()
            //需要认证
            .anyRequest().authenticated()
            .and().csrf().disable(); //关闭csrf防护

        // 将我们的repository设置到共享变量里
        http.setSharedObject(SecurityContextRepository.class, securityContextRepository);

        // 设置序列化
        http.exceptionHandling().authenticationEntryPoint(new CustomizeAuthenticationEntryPoint());

        // 将我们自定义过滤器加入到原来UsernamePasswordAuthenticationFilter的前面
        http.addFilterBefore(customUsernamePasswordAuthenticationFilter(), UsernamePasswordAuthenticationFilter.class);

    }

    /**
     * 自定义的customUsernamePasswordAuthenticationFilter
     * 需要同步在HttpSecurity里的配置
     */
    public CustomUsernamePasswordAuthenticationFilter customUsernamePasswordAuthenticationFilter() throws Exception {


        CustomUsernamePasswordAuthenticationFilter result = new CustomUsernamePasswordAuthenticationFilter();
        result.setRequiresAuthenticationRequestMatcher(new AntPathRequestMatcher(loginApi));
        result.setAuthenticationManager(this.authenticationManager());
        result.setUsernameParameter(usernameParameter);
        result.setPasswordParameter(passwordParameter);
        result.setAuthenticationSuccessHandler(new LoginSuccessHandler());
        result.setAuthenticationFailureHandler(new LoginFailureHandler());
        return result;
    }
那么addFilterBefore这个方法是security提供给我们进行扩展的,如果我们自定义了一个UsernamePasswordAuthenticationFilter并放到前面的话,在我们的认证通过后,便不会继续走下面的过滤器,也就完成了我们的覆盖。
认证
这里的以custom-login-json项目为基础项目进行。
因为如果要攻克你的网站,第一可能就是试图破解密码,如果你的传输不是安全的,会被被人截取到,所以要加密,再者,如果攻击者通过暴力破解手段攻击的话,密码要求就需要复杂点,增加攻击者的穷举范围,降低命中率,同时增加账号的失败次数限制,还有ip限制,同时也可以设置验证码,增加破解难度。
密码加密登录(custom-auth)
网络安全也是我们程序员该考虑的事情,所以,这里我们做一个密码加密的和解密的,这里使用方案二(custom-login2)为基础项目,但下面的方案并不局限于某个方案,而是适用于所有security项目。
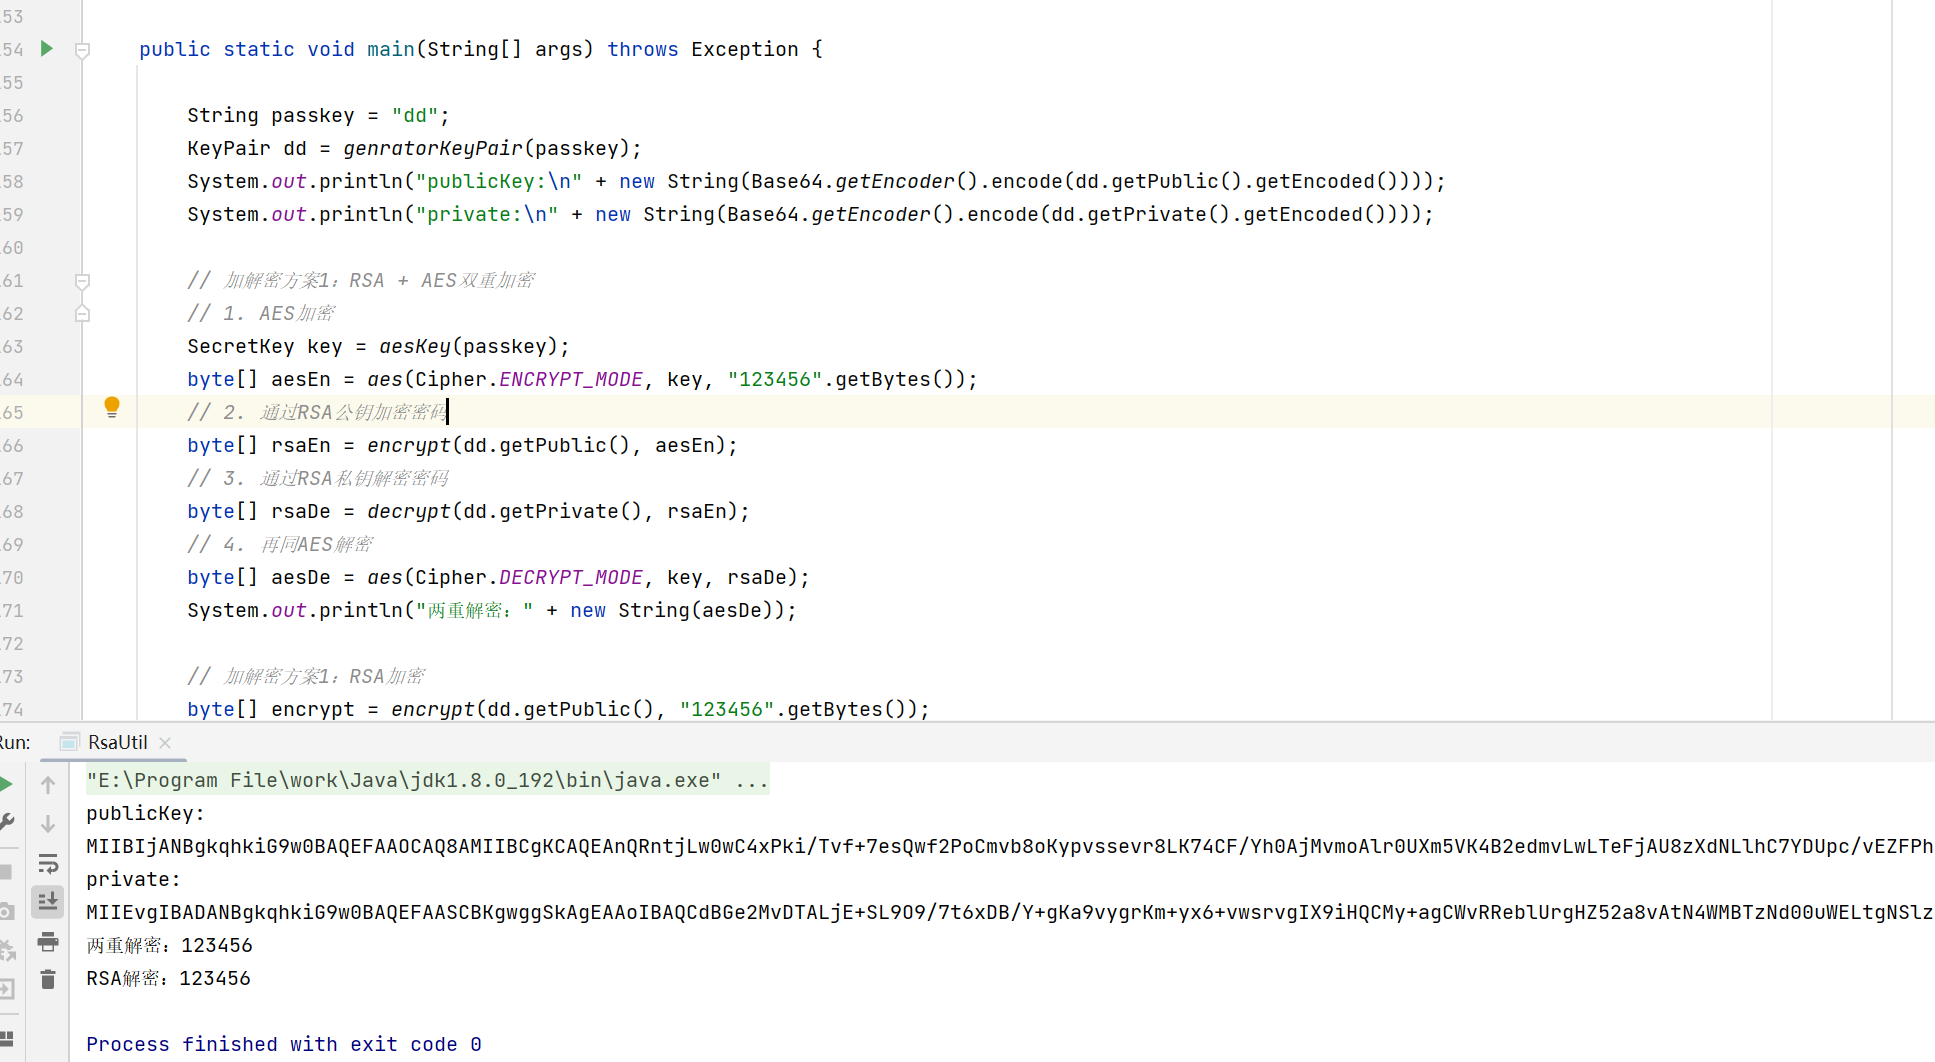
加密工具
这里使用RSA非对称加密算法,加解密都需要使用公钥和秘钥,安全性很高。
/**
 * rsa加密工具简化版
 *
 * @author ALI
 * @date 2021-09-25 15:44
 */
public class RsaUtil {


    private static final String RSA_ALGORITHM = "RSA";
    private static final String AES_ALGORITHM = "AES";

    private RsaUtil() {


    }

    /**
     * 生成密钥对
     *
     * @param passKey 关键密码
     * @return 密钥对
     */
    public static KeyPair genratorKeyPair(String passKey) throws NoSuchAlgorithmException {


        KeyPairGenerator keyPairGenerator = KeyPairGenerator.getInstance(RSA_ALGORITHM);
        SecureRandom secureRandom = new SecureRandom(passKey.getBytes());
        secureRandom.setSeed(passKey.getBytes());
        keyPairGenerator.initialize(2048, secureRandom);
        return keyPairGenerator.generateKeyPair();
    }

    /**
     * 加密密码
     *
     * @param password  密码
     * @param publicKey 公钥
     * @return 加密后的密文
     */
    public static byte[] encrypt(PublicKey publicKey, byte[] password) {


        try {


            Cipher cipher = Cipher.getInstance(RSA_ALGORITHM);
            cipher.init(Cipher.ENCRYPT_MODE, publicKey);
            return cipher.doFinal(password);
        } catch (Exception e) {


            throw new RuntimeException("RSA加密失败(RSA encrypt failed.)");
        }
    }

    /**
     * 解密密码
     *
     * @param encryptPassword 加密的密码
     * @param privateKey      私钥
     * @return 解密后的明文
     */
    public static byte[] decrypt(PrivateKey privateKey, byte[] encryptPassword) {


        try {


            Cipher cipher = Cipher.getInstance(RSA_ALGORITHM);
            cipher.init(Cipher.DECRYPT_MODE, privateKey);
            return cipher.doFinal(encryptPassword);
        } catch (Exception e) {


            throw new RuntimeException("RSA解密失败(RSA encrypt failed.)");
        }
    }

    /**
     * 密钥Base64
     *
     * @param privateKey 密钥
     * @return 结果
     */
    public static String getPrivateBase64(PrivateKey privateKey) {


        return Base64.getEncoder().encodeToString(privateKey.getEncoded());
    }

    /**
     * 公钥Base64
     *
     * @param publicKey 公钥
     * @return 结果
     */
    public static String getPublicBase64(PublicKey publicKey) {


        return Base64.getEncoder().encodeToString(publicKey.getEncoded());
    }

    /**
     * 根据公钥字符串获取公钥对象
     *
     * @param publicKeyString 公钥字符串
     * @return 结果
     */
    public static PublicKey getPublicKey(String publicKeyString)
    throws NoSuchAlgorithmException, InvalidKeySpecException {


        byte[] decode = Base64.getDecoder().decode(publicKeyString);
        return KeyFactory.getInstance(RSA_ALGORITHM).generatePublic(new X509EncodedKeySpec(decode));
    }

    /**
     * 根据密钥字符串获取密钥对象
     *
     * @param privateKeyString 密钥字符串
     * @return 结果
     */
    public static PrivateKey getPrivateKey(String privateKeyString)
    throws NoSuchAlgorithmException, InvalidKeySpecException {


        byte[] decode = Base64.getDecoder().decode(privateKeyString);
        return KeyFactory.getInstance(RSA_ALGORITHM).generatePrivate(new PKCS8EncodedKeySpec(decode));
    }

    /**
     * 对称加密AES 对称key生成
     *
     * @param passKey 关键密码
     * @return 生成aes的key
     * @throws NoSuchAlgorithmException 算法找不到异常
     */
    public static SecretKey aesKey(String passKey) throws NoSuchAlgorithmException {


        KeyGenerator keyGenerator = KeyGenerator.getInstance(AES_ALGORITHM);
        SecureRandom secureRandom = new SecureRandom();
        secureRandom.setSeed(passKey.getBytes());
        keyGenerator.init(secureRandom);
        return keyGenerator.generateKey();
    }

    /**
     * @param mode      加解密模式:Cipher.ENCRYPT_MODE / Cipher.DECRYPT_MODE
     * @param secretKey 对称key
     * @param password  执行的密码
     */
    public static byte[] aes(int mode, SecretKey secretKey, byte[] password) {


        try {


            Cipher instance = Cipher.getInstance(AES_ALGORITHM);
            instance.init(mode, secretKey);
            return instance.doFinal(password);
        } catch (Exception e) {


            throw new RuntimeException(String.format("AES执行失败,Cipher.mode:%s(AES encrypt failed.)", mode));
        }
    }

    public static void main(String[] args) throws Exception {


        String passkey = "dd";
        KeyPair dd = genratorKeyPair(passkey);
        String pu = new String(Base64.getEncoder().encode(dd.getPublic().getEncoded()));
        String en = new String(Base64.getEncoder().encode(dd.getPrivate().getEncoded()));
        System.out.println("publicKey:\n" + pu);
        System.out.println("private:\n" + en);

        // 加解密方案1:RSA + AES双重加密
        // 1. AES加密
        SecretKey key = aesKey(passkey);
        byte[] aesEn = aes(Cipher.ENCRYPT_MODE, key, "123456".getBytes());
        // 2. 通过RSA公钥加密密码
        byte[] rsaEn = encrypt(dd.getPublic(), aesEn);
        // 3. 通过RSA私钥解密密码
        byte[] rsaDe = decrypt(dd.getPrivate(), rsaEn);
        // 4. 再同AES解密
        byte[] aesDe = aes(Cipher.DECRYPT_MODE, key, rsaDe);
        System.out.println("两重解密:" + new String(aesDe));

        // 加解密方案2:RSA加密
        byte[] encrypt = encrypt(RsaUtil.getPublicKey(pu), "123456".getBytes());
        byte[] decrypt = decrypt(RsaUtil.getPrivateKey(en), encrypt);
        System.out.println("RSA解密:" + new String(decrypt));
    }
}
生成密钥对
执行RsaUtil里的main方法,生成publicKey和privateKey,然后把privateKey保存在后端,publicKey给前端,之后前端给后端传密码时,就先通过RSA和publicKey进行加密;
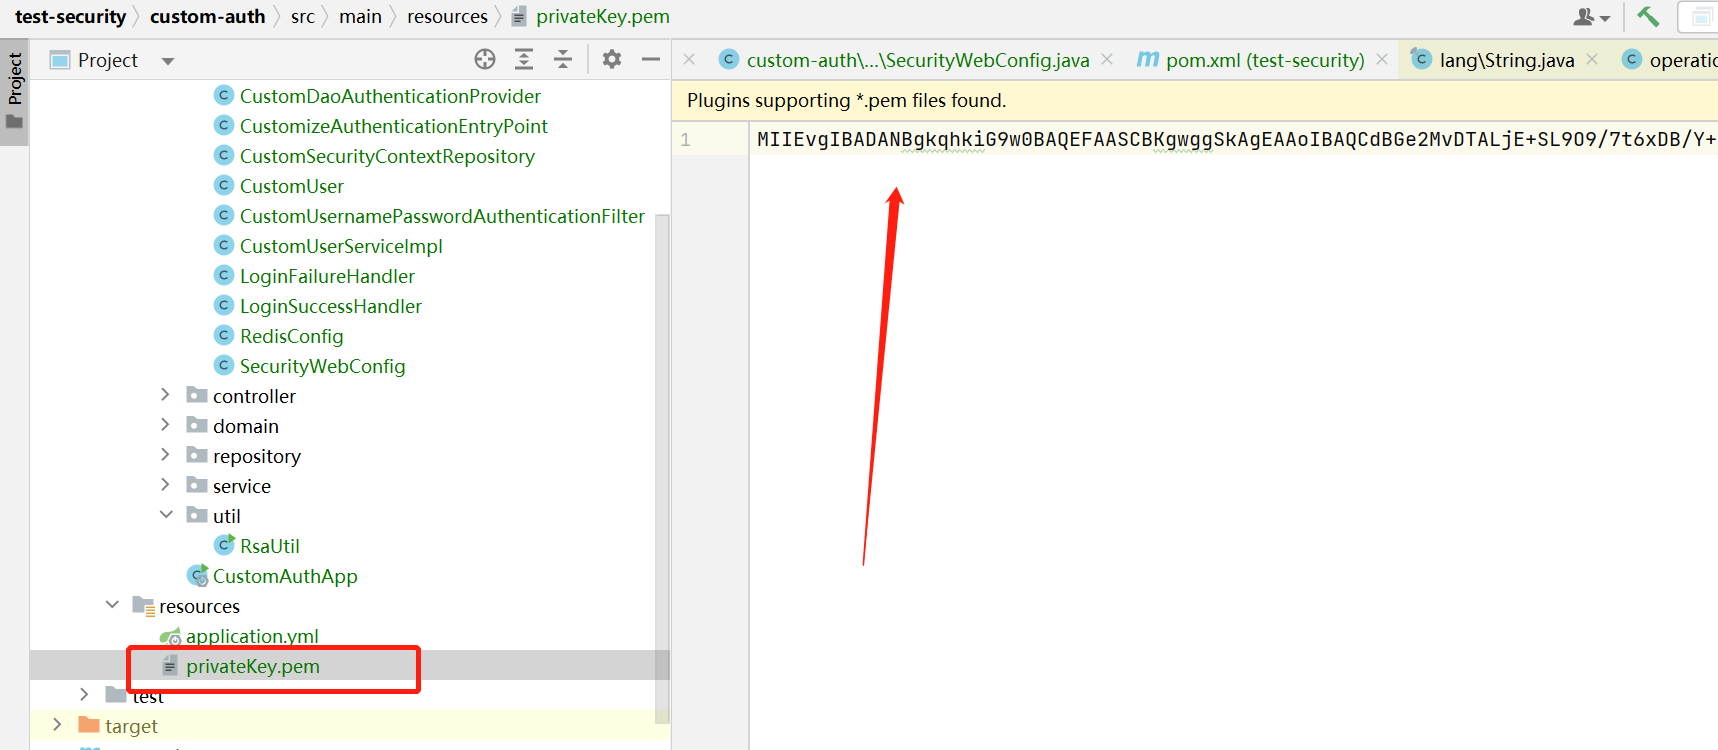
私钥放到文件:privateKey.pem
,使用pem或者der后缀格式的文件存储,不然解析会有问题
读取私钥
SecurityWebConfig增加构造器,用于在初始化时读取私钥(该方法可用于打包,可以放心使用);
privateKey设置成public,可以在项目中任何地方调用。
    public static PrivateKey privateKey;

    public  SecurityWebConfig() throws Exception {


        try(InputStream is = this.getClass().getClassLoader().getResourceAsStream("privateKey.pem")) {


            if (is == null) {


                throw  new RuntimeException("没有读取的密钥!!!");
            }
            byte[] data = new byte[2048];
            int length = is.read(data);
            String privateKeyString = new String(data, 0, length);
            privateKey = RsaUtil.getPrivateKey(privateKeyString.trim());
        }
    }
过滤器解密
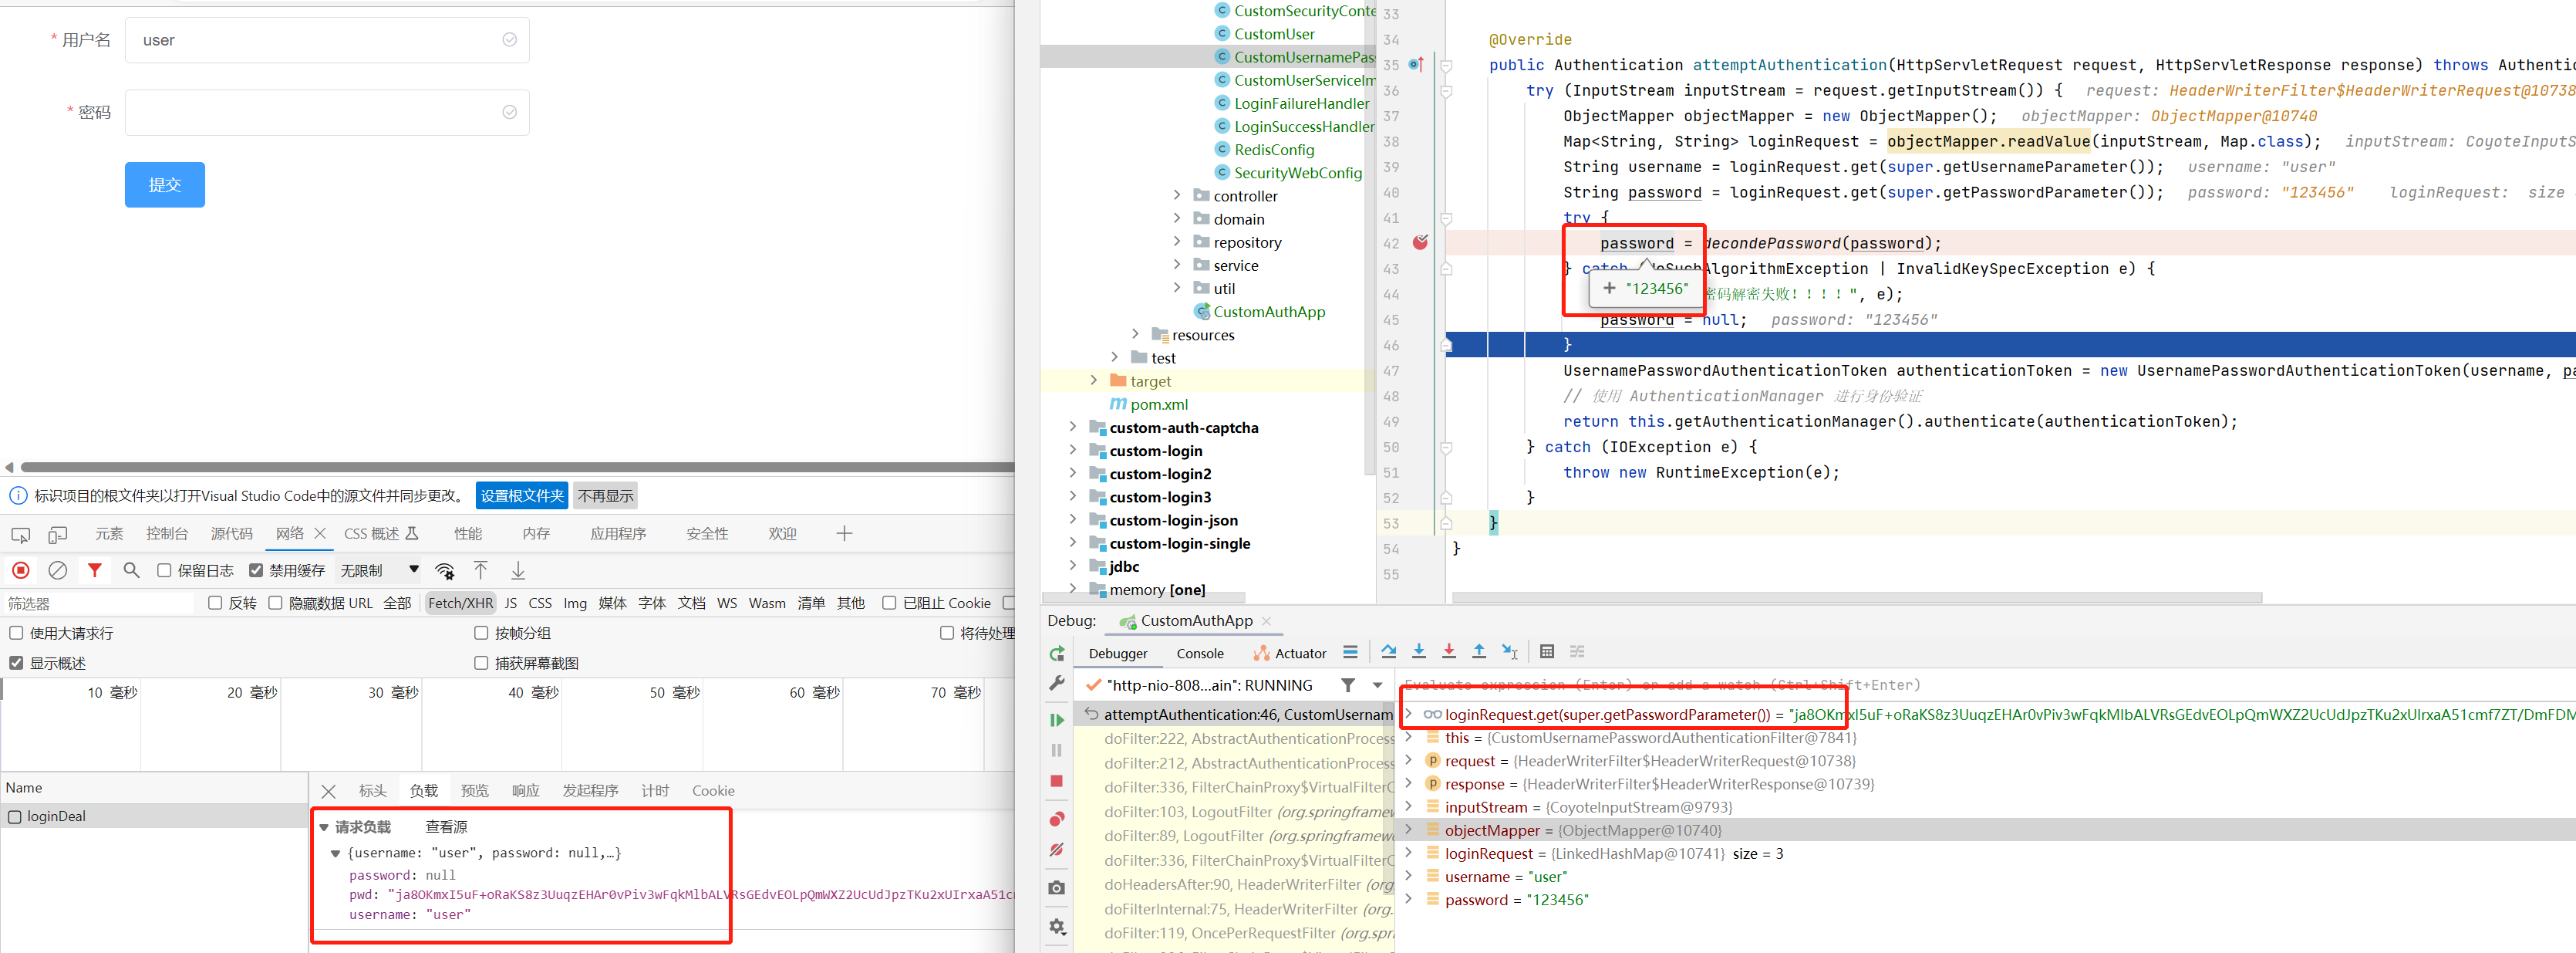
在自定义的CustomUsernamePasswordAuthenticationFilter这里进行密码解密,然后设置的authenticationToken里,因为后面的验证方法matches是需要加密前密码和加密码后面进行匹配的;
@Slf4j
public class CustomUsernamePasswordAuthenticationFilter extends UsernamePasswordAuthenticationFilter {


    private static String decondePassword(String password) throws NoSuchAlgorithmException, InvalidKeySpecException {


        byte[] decode = Base64.getDecoder().decode(password.getBytes());
        return new String(RsaUtil.decrypt(SecurityWebConfig.privateKey, decode));
    }

    @Override
    public Authentication attemptAuthentication(HttpServletRequest request, HttpServletResponse response) throws AuthenticationException {


        try (InputStream inputStream = request.getInputStream()) {


            ObjectMapper objectMapper = new ObjectMapper();
            Map<String, String> loginRequest = objectMapper.readValue(inputStream, Map.class);
            String username = loginRequest.get(super.getUsernameParameter());
            String password = loginRequest.get(super.getPasswordParameter());
            try {


                password = decondePassword(password);
            } catch (NoSuchAlgorithmException | InvalidKeySpecException e) {


                log.error("密码解密失败!!!!", e);
                password = null;
            }
            UsernamePasswordAuthenticationToken authenticationToken = new UsernamePasswordAuthenticationToken(username, password);
            // 使用 AuthenticationManager 进行身份验证
            return this.getAuthenticationManager().authenticate(authenticationToken);
        } catch (IOException e) {


            throw new RuntimeException(e);
        }
    }
}
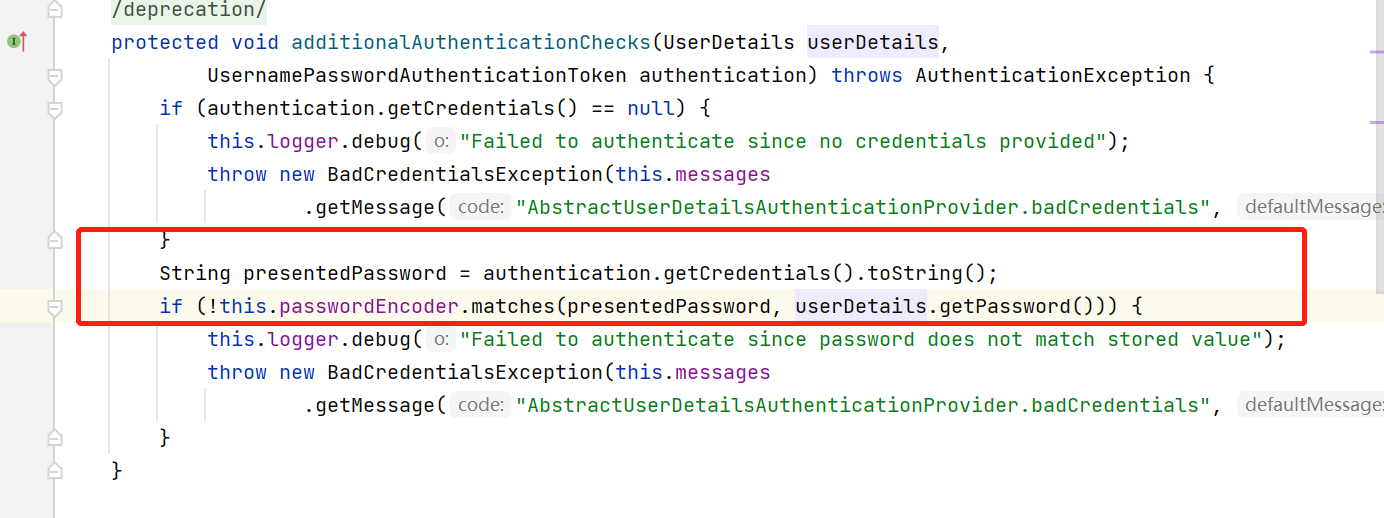
当然解密这个过程,也可以在真正匹配的地方进行解密,重写org.springframework.security.authentication.dao.DaoAuthenticationProvider#additionalAuthenticationChecks方法,一样的逻辑,就不写代码了。
自定义过滤器加入security
    @Override
    protected void configure(HttpSecurity http) throws Exception {


        // 表单
        // 注意:使用了`BasicAuthenticationFilter`那么在配置`WebSecurityConfigurerAdapter`时,就不要设置`http.httpBasic()`,不然不会走我们自定义的Filter
        http
            .formLogin()
            // 登录的请求接口,对应表单的action,这里只是修改了处理的api,实际处理还是security
            .loginProcessingUrl("/loginDeal")
            // 登录的用户名和密码参数名称
            .usernameParameter("username")
            .passwordParameter("pwd")
            .successHandler(new LoginSuccessHandler())
            .failureHandler(new LoginFailureHandler())
            .permitAll()
            // 开启认证
            .and().authorizeRequests()
            //设置哪些路径可以直接访问,不需要认证
            .antMatchers("/test/*").permitAll()
            //需要认证
            .anyRequest().authenticated()
            .and().csrf().disable(); //关闭csrf防护

        // 将我们的repository设置到共享变量里
        http.setSharedObject(SecurityContextRepository.class, securityContextRepository);

        // 设置序列化
        http.exceptionHandling().authenticationEntryPoint(new CustomizeAuthenticationEntryPoint());


        // 自定义过滤器加入security
        http.addFilterBefore(customUsernamePasswordAuthenticationFilter(), UsernamePasswordAuthenticationFilter.class);
    }
前端配置与登录
这里使用模板项目(),git下来后,安装加密工具
npm install jsencrypt
npm install
-
修改
axios.js末尾Axios.interceptors.response.,改成下面的:Axios.interceptors.response.use((res) => { if (res.config.direct) { return res.data } return Promise.resolve(res) }, (error) => { Message.error(error.response.data) return Promise.reject(error.response.data) }) -
增加登录方法
export function login (data, success, error) { http.post('/loginDeal', data, success, error) } -
将密钥配置到环境变量中
这里只
dev.env.js和prod.env.js中都要配置,dev是开发时的环境,prod是生产环境。注意:这里变量值是打了一个双引号和一个单引号的,这样在使用时,不至于在
webpack编译时直接替换导致语法错误。module.exports = merge(prodEnv, { NODE_ENV: '"development"', PUBLIC_KEY: '"MIIBIjANBgkqhkiG9w0BAQEFAAOCAQ8AMIIBCgKCAQEAnQRntjLw0wC4xPki/Tvf+7esQwf2PoCmvb8oKypvssevr8LK74CF/Yh0AjMvmoAlr0UXm5VK4B2edmvLwLTeFjAU8zXdNLlhC7YDUpc/vEZFPhh2jvUMjOe0LAJb+FOv5oMGpAxuj8PC9Cz4L05T/gOI7w8FPwCJjXJacWPhhSAK+dViXHLZVqNeIo4YRUT8C2s5e+vz03FByd511YaydVTbBGRB7+QVFJ5f6Rt9buxn9gDK5CcZ27ScQvdc88w9NF0bfmNRh8xec3Cz9uMyRVhy5d3pJM9a6jTEHcbOTapUAjssq2cVr+qx5DGv87u4I8qKqJQIhvu40Vd3foR0JQIDAQAB"' })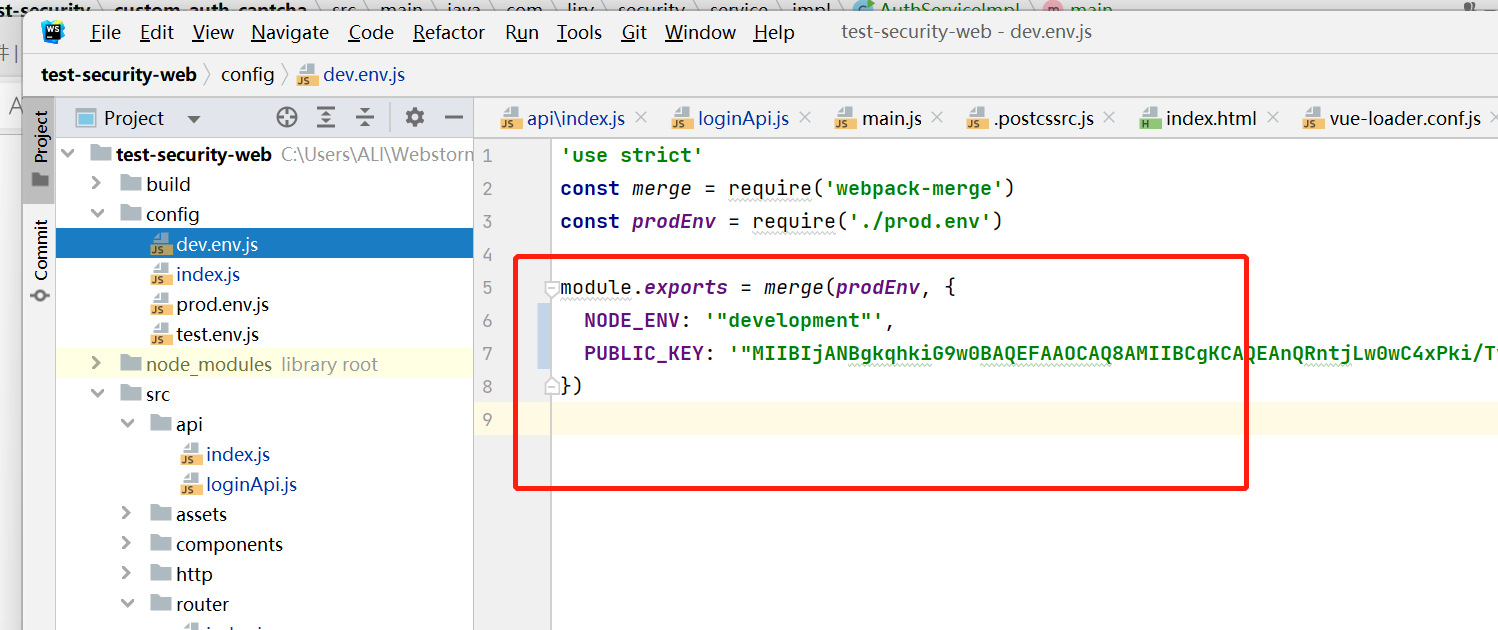
-
创建
login.vue(这里的我简单的配置了下)登录表单,我是把用户输入的密码字段和传输给后端的密码字段分开了,这是为了提高用户体验感。
<template> <div> <el-row> <el-col :span="6"> <el-form :model="form" status-icon :rules="rules" ref="ruleForm" label-width="100px" class="demo-ruleForm"> <el-form-item label="用户名" prop="username"> <el-input type="text" v-model="form.username"></el-input> </el-form-item> <el-form-item label="密码" prop="password"> <el-input type="password" v-model="form.password"></el-input> </el-form-item> <el-form-item> <el-button type="primary" @click="submitForm('ruleForm')">提交</el-button> </el-form-item> </el-form> </el-col> </el-row> </div> </template> <script> import {loginApi} from '../api' import {JSEncrypt} from 'jsencrypt' export default { name: 'login', data () { return { form: { username: '', password: '', pwd: '' }, rules: { password: [ {required: true, trigger: 'blur', message: '请输入密码'} ], username: [ {required: true, trigger: 'blur', message: '请输入用户名'} ] } } }, methods: { submitForm (formName) { this.$refs[formName].validate((valid) => { if (valid) { // 加密密码 this.form.pwd = this.encryptedData(process.env.PUBLIC_KEY, this.form.password) this.form.password = null loginApi.login(this.form, success => { this.$message.success('登录成功') // 存储token信息,和用户信息 // 跳转指定页面 console.log(success) }) } else { this.$message.info('表单验证失败') return false } }) }, // 加密密码 encryptedData (publicKey, data) { // 新建JSEncrypt对象 let encryptor = new JSEncrypt() // 设置公钥 encryptor.setPublicKey(publicKey) // 加密数据 return encryptor.encrypt(data) } } } </script> <style scoped> </style> -
route/index.js增加路由{ path: '/login', name: 'login', component: login } -
npm run dev -
浏览器
http://localhost:8080/#/login
结果
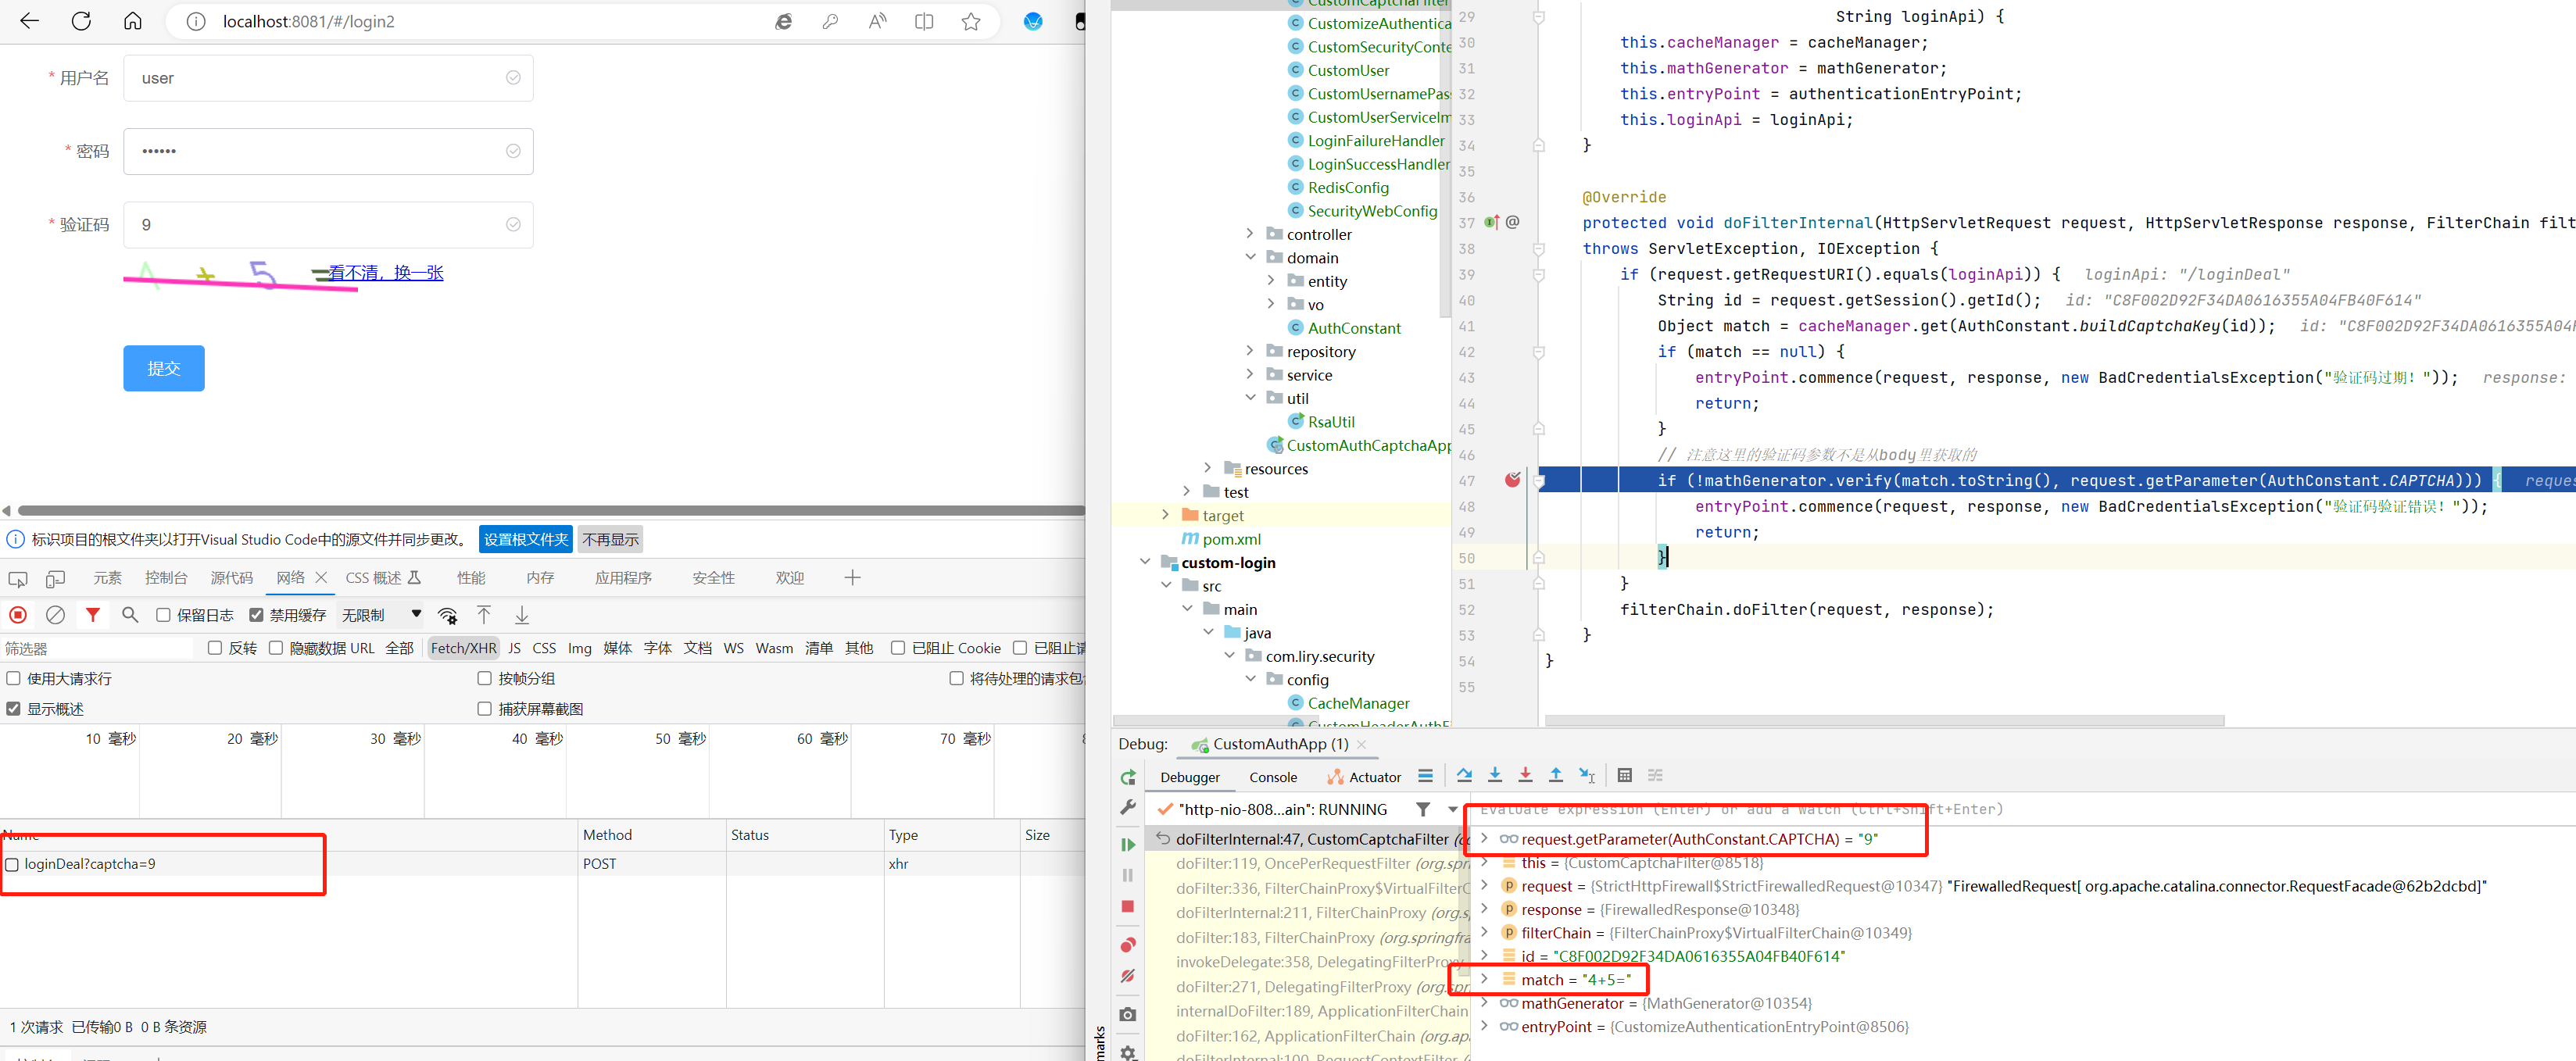
验证码登录(custom-auth-captcha)
以上一个加解密的例子继续完成。
其原理是,后端随机生成一串数字,保存,再生成图片给前端,或者随机一个简单的运算公式,如:1+8=,然后计算出值,保存,再将这个公式生成图片给前端,重点是前后要如何关联上,我这里使用sessionId。
注意,验证码也不是可以一直用的,需要通过时间和验证策略提供验证码的随机性。
生成验证码
这里验证码工具使用Hutool的工具,
    <dependency>
            <groupId>cn.hutool</groupId>
            <artifactId>hutool-captcha</artifactId>
            <version>5.8.15</version>
        </dependency>
这里我把算法生成的工具注入为单例,之后在验证时使用,然后验证码过期时间2分钟
/**
 * 认证
 *
 * @author ALI
 * @since 2023/6/10
 */
@Service
public class AuthServiceImpl implements AuthService {


    @Autowired
    private CacheManager cacheManager;

    @Autowired
    private MathGenerator mathGenerator;

    @Override
    public void captcha(HttpServletRequest request, HttpServletResponse response) {


        ShearCaptcha captcha = CaptchaUtil.createShearCaptcha(200, 45, 4, 4);
        // 自定义验证码内容为四则运算方式
        captcha.setGenerator(mathGenerator);
        // 重新生成code
        captcha.createCode();
        String code = captcha.getCode();
        String id = request.getSession().getId();
        cacheManager.set(AuthConstant.buildCaptchaKey(id), code, 2L, TimeUnit.MINUTES);
        try (ServletOutputStream os = response.getOutputStream()) {


            // 这里通过base64加密再返回给前端,前端就不用处理了
            os.write(Base64.getEncoder().encode(captcha.getImageBytes()));
        } catch (IOException e) {


            throw new RuntimeException("验证码异常!");
        }
    }
}
这里我没有直接用hutool工具里的captcha.write(os);,因为如果这样做,他会把字节流直接写给前端,那么前端还需要再做处理,所以这里我是拿到字节后,用Base64加密了一遍,再写给前端的,这样前端只需要在结果前拼一个data:image/png;base64,就可以使用了。
提供验证码接口
    @GetMapping("/login/captcha")
    public String captcha(HttpServletRequest request, HttpServletResponse response) {


        authService.captcha(request, response);
        return null;
    }
创建验证码过滤器
自定义个过滤器,并加入到security拦截链中。
这里自定义的验证码过滤器,继承OncePerRequestFilter,只会走一次,当然也只要走一次就行,验证成功后删除key;
/**
 * 自定义的验证码过滤器
 *
 * @author ALI
 * @since 2023/6/10
 */
public class CustomCaptchaFilter extends OncePerRequestFilter {


    public String loginApi;
    private CacheManager cacheManager;
    private MathGenerator mathGenerator;
    private AuthenticationEntryPoint entryPoint;

    public CustomCaptchaFilter(CacheManager cacheManager, MathGenerator mathGenerator, AuthenticationEntryPoint authenticationEntryPoint,
                               String loginApi) {


        this.cacheManager = cacheManager;
        this.mathGenerator = mathGenerator;
        this.entryPoint = authenticationEntryPoint;
        this.loginApi = loginApi;
    }

    @Override
    protected void doFilterInternal(HttpServletRequest request, HttpServletResponse response, FilterChain filterChain)
    throws ServletException, IOException {


        if (request.getRequestURI().equals(loginApi)) {


            String id = request.getSession().getId();
            String key = AuthConstant.buildCaptchaKey(id);
            Object match = cacheManager.get(key);
            if (match == null) {


                entryPoint.commence(request, response, new BadCredentialsException("验证码过期!"));
                return;
            }
            // 注意这里的验证码参数不是从body里获取的
            if (!mathGenerator.verify(match.toString(), request.getParameter(AuthConstant.CAPTCHA))) {


                entryPoint.commence(request, response, new BadCredentialsException("验证码验证错误!"));
                return;
            }
             // 验证成功删除
            cacheManager.delete(key);
        }
        filterChain.doFilter(request, response);
    }
}
过滤器加入security
@Configuration
@EnableWebSecurity
public class SecurityWebConfig extends WebSecurityConfigurerAdapter {


    private static final String loginApi = "/loginDeal";
    private static final String usernameParameter = "username";
    private static final String passwordParameter = "pwd";

    public static PrivateKey privateKey;

    @Autowired
    private UserDetailsService userDetailsService;
    @Autowired
    private CustomSecurityContextRepository securityContextRepository;
    @Autowired
    private CacheManager cacheManager;

    public SecurityWebConfig() throws Exception {


        try (InputStream is = this.getClass().getClassLoader().getResourceAsStream("privateKey.pem")) {


            if (is == null) {


                throw new RuntimeException("没有读取的密钥!!!");
            }
            byte[] data = new byte[2048];
            int length = is.read(data);
            String privateKeyString = new String(data, 0, length);
            privateKey = RsaUtil.getPrivateKey(privateKeyString.trim());
        }
    }

    @Bean
    public PasswordEncoder passwordEncoder() {


        return new BCryptPasswordEncoder();
    }

    @Bean
    public CorsFilter corsFilter() {


        return new CorsFilter(corsConfigurationSource());
    }

    // 注入算法生成工具
    @Bean
    public MathGenerator mathGenerator() {


        return new MathGenerator(1);
    }

    /**
     * 自定义的customUsernamePasswordAuthenticationFilter
     * 需要同步在HttpSecurity里的配置
     */
    public CustomUsernamePasswordAuthenticationFilter customUsernamePasswordAuthenticationFilter() throws Exception {


        CustomUsernamePasswordAuthenticationFilter result = new CustomUsernamePasswordAuthenticationFilter();
        result.setRequiresAuthenticationRequestMatcher(new AntPathRequestMatcher(loginApi));
        result.setAuthenticationManager(this.authenticationManager());
        result.setUsernameParameter(usernameParameter);
        result.setPasswordParameter(passwordParameter);
        result.setAuthenticationSuccessHandler(new LoginSuccessHandler());
        result.setAuthenticationFailureHandler(new LoginFailureHandler());
        return result;
    }

    /**
     * 跨域设置
     */
    private CorsConfigurationSource corsConfigurationSource() {


        UrlBasedCorsConfigurationSource source = new UrlBasedCorsConfigurationSource();
        CorsConfiguration config = new CorsConfiguration();
        // 允许cookies跨域
        config.setAllowCredentials(true);
        // 允许向该服务器提交请求的URI,* 表示全部允许,在SpringMVC中,如果设成*,会自动转成当前请求头中的Origin
        config.addAllowedOrigin("*");
        // 允许访问的头信息,* 表示全部
        config.addAllowedHeader("*");
        // 预检请求的缓存时间(秒),即在这个时间段里,对于相同的跨域请求不会再预检了
        config.setMaxAge(18000L);
        // 允许提交请求的方法,* 表示全部允许
        config.addAllowedMethod("GET");
        config.addAllowedMethod("PUT");
        config.addAllowedMethod("POST");
        config.addAllowedMethod("DELETE");
        source.registerCorsConfiguration("/**", config);
        return source;
    }

    @Override
    protected void configure(AuthenticationManagerBuilder auth) throws Exception {


        auth.inMemoryAuthentication()
            .withUser("ali")
            .password(passwordEncoder().encode("123456"))
            .roles("admin");
        auth.userDetailsService(userDetailsService);
    }

    @Override
    protected void configure(HttpSecurity http) throws Exception {


        // 表单
        // 注意:使用了`BasicAuthenticationFilter`那么在配置`WebSecurityConfigurerAdapter`时,就不要设置`http.httpBasic()`,不然不会走我们自定义的Filter
        http
            .formLogin()
            // 自定义登录页
            .loginPage("/login.html")
            // 登录的请求接口,对应表单的action,这里只是修改了处理的api,实际处理还是security
            .loginProcessingUrl("/loginDeal")
            // 不能写:successForwardUrl("/index.html"),会报405
            .defaultSuccessUrl("/index.html")
            // 登录失败转发到哪个页面
            .failureForwardUrl("/login.html?error=true")
            // 登录的用户名和密码参数名称
            .usernameParameter("username")
            .passwordParameter("pwd")
            .successHandler(new LoginSuccessHandler())
            .failureHandler(new LoginFailureHandler())
            .permitAll()
            // 开启认证
            .and().authorizeRequests()
            //设置哪些路径可以直接访问,不需要认证
            .antMatchers("/test/*", "/login/**").permitAll()
            //需要认证
            .anyRequest().authenticated()
            .and().csrf().disable(); //关闭csrf防护

        // 将我们的repository设置到共享变量里
        http.setSharedObject(SecurityContextRepository.class, securityContextRepository);

        // 设置序列化
        http.exceptionHandling().authenticationEntryPoint(new CustomizeAuthenticationEntryPoint());

        http.addFilterBefore(customUsernamePasswordAuthenticationFilter(), UsernamePasswordAuthenticationFilter.class);

        // 添加验证码过滤器
        http.addFilterBefore(new CustomCaptchaFilter(cacheManager, mathGenerator(), entryPoint, loginApi), WebAsyncManagerIntegrationFilter.class);
    }
}
这里的验证码过滤器我加到了WebAsyncManagerIntegrationFilter前面,它是第一个过滤器,验证码验证方第一个很合理,同时通过CustomizeAuthenticationEntryPoint直接写会,不再走security逻辑。
前端显示验证码(login2.vue)
<template>
  <div>
    <el-row>
      <el-col :span="6">
        <el-form :model="form" status-icon :rules="rules" ref="ruleForm" label-width="100px" class="demo-ruleForm">
          <el-form-item label="用户名" prop="username">
            <el-input type="text" v-model="form.username"></el-input>
          </el-form-item>
          <el-form-item label="密码" prop="password">
            <el-input type="password" v-model="form.password"></el-input>
          </el-form-item>
          <el-form-item label="验证码" prop="captcha">
            <el-input type="text" v-model="form.captcha"></el-input>
            <el-row>
              <el-col :span="12" ><img :src="captchaImage" alt="0"/></el-col>
              <el-col :span="12" ><a href="javascript:void(0)" @click="renewCaptcha">看不清,换一张</a></el-col>
            </el-row>
          </el-form-item>
          <el-form-item>
            <el-button type="primary" @click="submitForm('ruleForm')">提交</el-button>
          </el-form-item>
        </el-form>
      </el-col>
    </el-row>
  </div>
</template>

<script>
import {

    loginApi} from '../api'
import {

    JSEncrypt} from 'jsencrypt'
export default {


  name: 'login2',
  data () {


    return {


      form: {


        username: '',
        password: '',
        pwd: '',
        captcha: ''
      },
      captchaImage: null,
      rules: {


        password: [
          {

    required: true, trigger: 'blur', message: '请输入密码'}
        ],
        username: [
          {

    required: true, trigger: 'blur', message: '请输入用户名'}
        ],
        captcha: [
          {

    required: true, trigger: 'blur', message: '请输入验证码'}
        ]
      }
    }
  },
  mounted () {


    this.getCaptchaPic()
  },
  methods: {


    submitForm (formName) {


      this.$refs[formName].validate((valid) => {


        if (valid) {


          // 加密密码
          this.form.pwd = this.encryptedData(process.env.PUBLIC_KEY.toString(), this.form.password)
          this.form.password = null
          loginApi.login(this.form, success => {


            this.$message.success('登录成功')
            // 存储token信息,和用户信息
            // 跳转指定页面
            console.log(success)
          }, error => {


            // 验证码过期就刷新验证码
            if (error.message.indexOf('过期') > 0) {


              this.getCaptchaPic()
            }
          })
        } else {


          this.$message.info('表单验证失败')
          return false
        }
      })
    },
    // 加密密码
    encryptedData (publicKey, data) {


      // 新建JSEncrypt对象
      let encryptor = new JSEncrypt()
      // 设置公钥
      encryptor.setPublicKey(publicKey)
      // 加密数据
      return encryptor.encrypt(data)
    },
    getCaptchaPic () {


      loginApi.captcha(null, success => {


        this.captchaImage = 'data:image/png;base64,' + success.data
      })
    },
    // 验证码刷新
    renewCaptcha () {


      this.getCaptchaPic()
    }
  }
}
</script>

<style scoped>

</style>
这里把验证码放到url上,这样后端取验证码就可以直接获取了
export function login (data, success, error) {


  http.post('/loginDeal?captcha=' + data.captcha, data, success, error)
}
结果
接口方式的验证码
这个方案的话,就需要在登录的时候,先进行验证码验证
后端
 @GetMapping("/login/captcha/valid")
    public Boolean validCaptcha(HttpServletRequest request) {


        return authService.validCaptcha(request);
    }
这里同样的,验证成功后就删除这个验证码;
   @Override
    public boolean validCaptcha(HttpServletRequest request) {


        String id = request.getSession().getId();
        String key = AuthConstant.buildCaptchaKey(id);
        Object match = cacheManager.get(key);
        if (match == null) {


            throw new RuntimeException("验证码过期!");
        }
        // 注意这里的验证码参数不是从body里获取的
        boolean captcha = mathGenerator.verify(match.toString(), request.getParameter("captcha"));
        if (captcha) {


            cacheManager.delete(key);
        }
        return captcha;
    }
前端(login3.vue)
export function validCaptcha (data, success, error) {


  http.get('/login/captcha/valid?captcha=' + data, null, success, error)
}
这里登录,改由先验证验证码,成功后再调用登录,方法千千万,我这里也是举例一种。
   submitForm (formName) {


      this.$refs[formName].validate((valid) => {


        if (valid) {


          // 加密密码
          this.form.pwd = this.encryptedData(process.env.PUBLIC_KEY.toString(), this.form.password)
          this.form.password = null
          this.validCaptchaAndLogin(this.form.captcha)
        } else {


          this.$message.info('表单验证失败')
          return false
        }
      })
    },
    validCaptchaAndLogin (captcha) {


      loginApi.validCaptcha(captcha, success => {


        loginApi.login(this.form, success => {


          this.$message.success('登录成功')
          // 存储token信息,和用户信息
          // 跳转指定页面
          console.log(success)
        }, error => {


          // 验证码过期就刷新验证码
          if (error.message.indexOf('过期') > 0) {


            this.getCaptchaPic()
          }
        })
      }, error => {


        console.log(error)
        this.getCaptchaPic()
      })
    }
授权/权限控制(custom-auth-control)
权限的响应序列化
同CustomizeAuthenticationEntryPoint一样,需要进行配置序列化
/**
 * 访问拒绝处理器
 * @author ALI
 * @since 2023/6/11
 */
public class CustomAccessDeniedHandler implements AccessDeniedHandler {


    private AuthenticationEntryPoint entryPoint;
    @Override
    public void handle(HttpServletRequest request, HttpServletResponse response, AccessDeniedException accessDeniedException)
    throws IOException, ServletException {


        response.setContentType("application/json;charset=utf-8");
        response.setStatus(HttpServletResponse.SC_FORBIDDEN);

        ResponseData<Object> result = ResponseData.failed("无权限访问");
        PrintWriter writer = response.getWriter();
        writer.write(JSON.toJSONString(result));
        writer.flush();
    }
}
SecurityWebConfig修改配置
        // 设置序列化
        http.exceptionHandling().authenticationEntryPoint(new CustomizeAuthenticationEntryPoint())
                .accessDeniedHandler(new CustomAccessDeniedHandler());
权限的配置
将我们表里的角色信息保存到security时,需要做一点处理,下面是自定义用户信息的构造器,这里将用户角色的code增加了前缀ROLE_,这个是security框架默认的一个方式。
    public CustomUser(SysUser sysUser) {


        this.userId = sysUser.getId();
        this.username = sysUser.getUsername();
        this.password = sysUser.getPassword();
        if (!CollectionUtils.isEmpty(sysUser.getRoles())) {


            this.authorities = sysUser.getRoles().stream().map(d -> new SimpleGrantedAuthority("ROLE_" + d)).collect(Collectors.toList());
        }
    }
开启注解方式拦截
@Configuration
@EnableGlobalMethodSecurity(prePostEnabled = true, securedEnabled = true, jsr250Enabled = true)
public class SecurityAuthConfig {


}
路径权限
这个通过继承WebSecurityConfigurerAdapter实现void configure(HttpSecurity http) throws Exception完成;
    @Override
    protected void configure(HttpSecurity http) throws Exception {


        // 表单
        // 注意:使用了`BasicAuthenticationFilter`那么在配置`WebSecurityConfigurerAdapter`时,就不要设置`http.httpBasic()`,不然不会走我们自定义的Filter
        http
            .formLogin()
            // 登录的请求接口,对应表单的action,这里只是修改了处理的api,实际处理还是security
            .loginProcessingUrl("/loginDeal")
            // 登录的用户名和密码参数名称
            .usernameParameter("username")
            .passwordParameter("pwd")
            .successHandler(new LoginSuccessHandler())
            .failureHandler(new LoginFailureHandler())
            .permitAll()
            .and().csrf().disable(); //关闭csrf防护

        // 将我们的repository设置到共享变量里
        http.setSharedObject(SecurityContextRepository.class, securityContextRepository);

        // 设置序列化
        http.exceptionHandling().authenticationEntryPoint(new CustomizeAuthenticationEntryPoint())
                .accessDeniedHandler(new CustomAccessDeniedHandler());

        http.addFilterBefore(customUsernamePasswordAuthenticationFilter(), UsernamePasswordAuthenticationFilter.class);

        http.authorizeRequests()
            // 路径/test /login多级的都可以放行
            .antMatchers("/test/*", "/login/**").permitAll()
            // 访问getData2 需要角色dev
            .antMatchers("/getData2").hasRole("dev")
             // 访问getData3 需要角色 admin
            .antMatchers("/getData3").hasRole("admin")
             // 访问getData4 需要角色dev test1
            .antMatchers("/getData4").hasAnyRole("test1","dev")
             // 访问getData5 需要角色test1
            .antMatchers("/getData5").hasAuthority("ROLE_test1")
             // 访问getData6 需要为127.0.0.1
            .antMatchers("/getData6").hasIpAddress("127.0.0.1")
             // 访问getData7 需要角色test2 test3
            .antMatchers("/getData7").hasAnyAuthority("ROLE_test2", "ROLE_test3")
            .anyRequest().authenticated();
    }
在security中呢,角色会默认加上前缀ROLE_,所以使用时hasRole,hasAnyRole是要省略前缀ROLE_,在判断时,它会补上,而遇到包含Authority的需要加上ROLE_它不会补上。
方法权限
通过注解的方式去控制权限,支持类上注解,同时存在取最近的注解。
5个spring提供的权限注解:
- @PreAuthorize
- @PostAuthorize
- @PreFilter
- @PostFilter
- @Secured
JSR-250协议注解:
- @RolesAllowed
- @PermitAll
- @DenyAll
这些注解要能使用需要@EnableGlobalMethodSecurity
@EnableGlobalMethodSecurity(prePostEnabled = true, securedEnabled = true, jsr250Enabled = true)
prePostEnabled = true:开启@PreAuthorize,@PostAuthorize,@PreFilter ,@PostFilter4个注解
securedEnabled = true:开启@Secured注解
jsr250Enabled = true:开启@RolesAllowed,@PermitAll,@DenyAll注解
spring权限注解
使用注解需要开启@EnableGlobalMethodSecurity(prePostEnabled = true)
@PreAuthorize
一般都会使用这个注解,这个注解也比较简单,当值为true时有访问权限;
    // 这种方式匹配的是ROLE_dev,内部会默认添加ROLE_
    @PreAuthorize("hasRole('dev')")
    @GetMapping("/method1")
    public String method1() {


        return "method1";
    }

    // 匹配ROLE_dev
    @PreAuthorize("hasAuthority('ROLE_dev')")
    @GetMapping("/method2")
    public String method2() {


        return "method2";
    }

    // 只能由用户名带后缀 _ad 的访问
    @PreAuthorize("principal.username.endsWith('_ad')")
    @GetMapping("/method4")
    public String method4() {


        return "method4";
    }

    // 只能由用户名和参数相等
    @PreAuthorize("principal.username.equals(#name)")
    @GetMapping("/method44")
    public String method44(String name) {


        return "method44";
    }

    // 新增的用户,用户名只能是 _ad 结尾
    @PreAuthorize("#user.username.endsWith('_ad')")
    @PostMapping("/method5")
    public String method5(@RequestBody SysUser user) {


        return "method5";
    }

 	// 是否是 admin 的角色,无关大小写
    // principal 为内置对象
    @PreAuthorize("principal?.isAdmin()")
    @GetMapping("/method7")
    public String method7() {


        return "method7";
    }
额外的还有一个角色继承
@Bean
static RoleHierarchy roleHierarchy() {


    return new RoleHierarchyImpl("ROLE_admin > ROLE_dev");
}
    // 配置了 ROLE_admin > ROLE_dev
    // dev 继承了admin 的权限,使用admin的用户访问
    @PreAuthorize("hasRole('dev')")
    @GetMapping("/method6")
    public String method6() {


        return "method6";
    }
@PostAuthorize
该注解的作用是在方法执行完后检查权限,当值为true时有访问权限;
    // 返回的用户id必须 =10
    // principal 为内置对象
    @PostAuthorize("returnObject.id.equals('10')")
    @GetMapping("/method8")
    public SysUser method8() {


        SysUser result = new SysUser();
        result.setId("10");
        return result;
    }
@PreFilter
@PreFilter可以对集合类型的参数进行过滤,当值为false时移除元素。
   // 过滤出 id= 1 的元素
    // filterObject 内置对象,表示集合中的每一个元素
    // userList 集合对象
    @PreFilter(value = "filterObject.id.equals('1')", filterTarget = "userList")
    @PostMapping("/method9")
    public List<SysUser> method9(@RequestBody List<SysUser> userList) {


        return userList;
    }
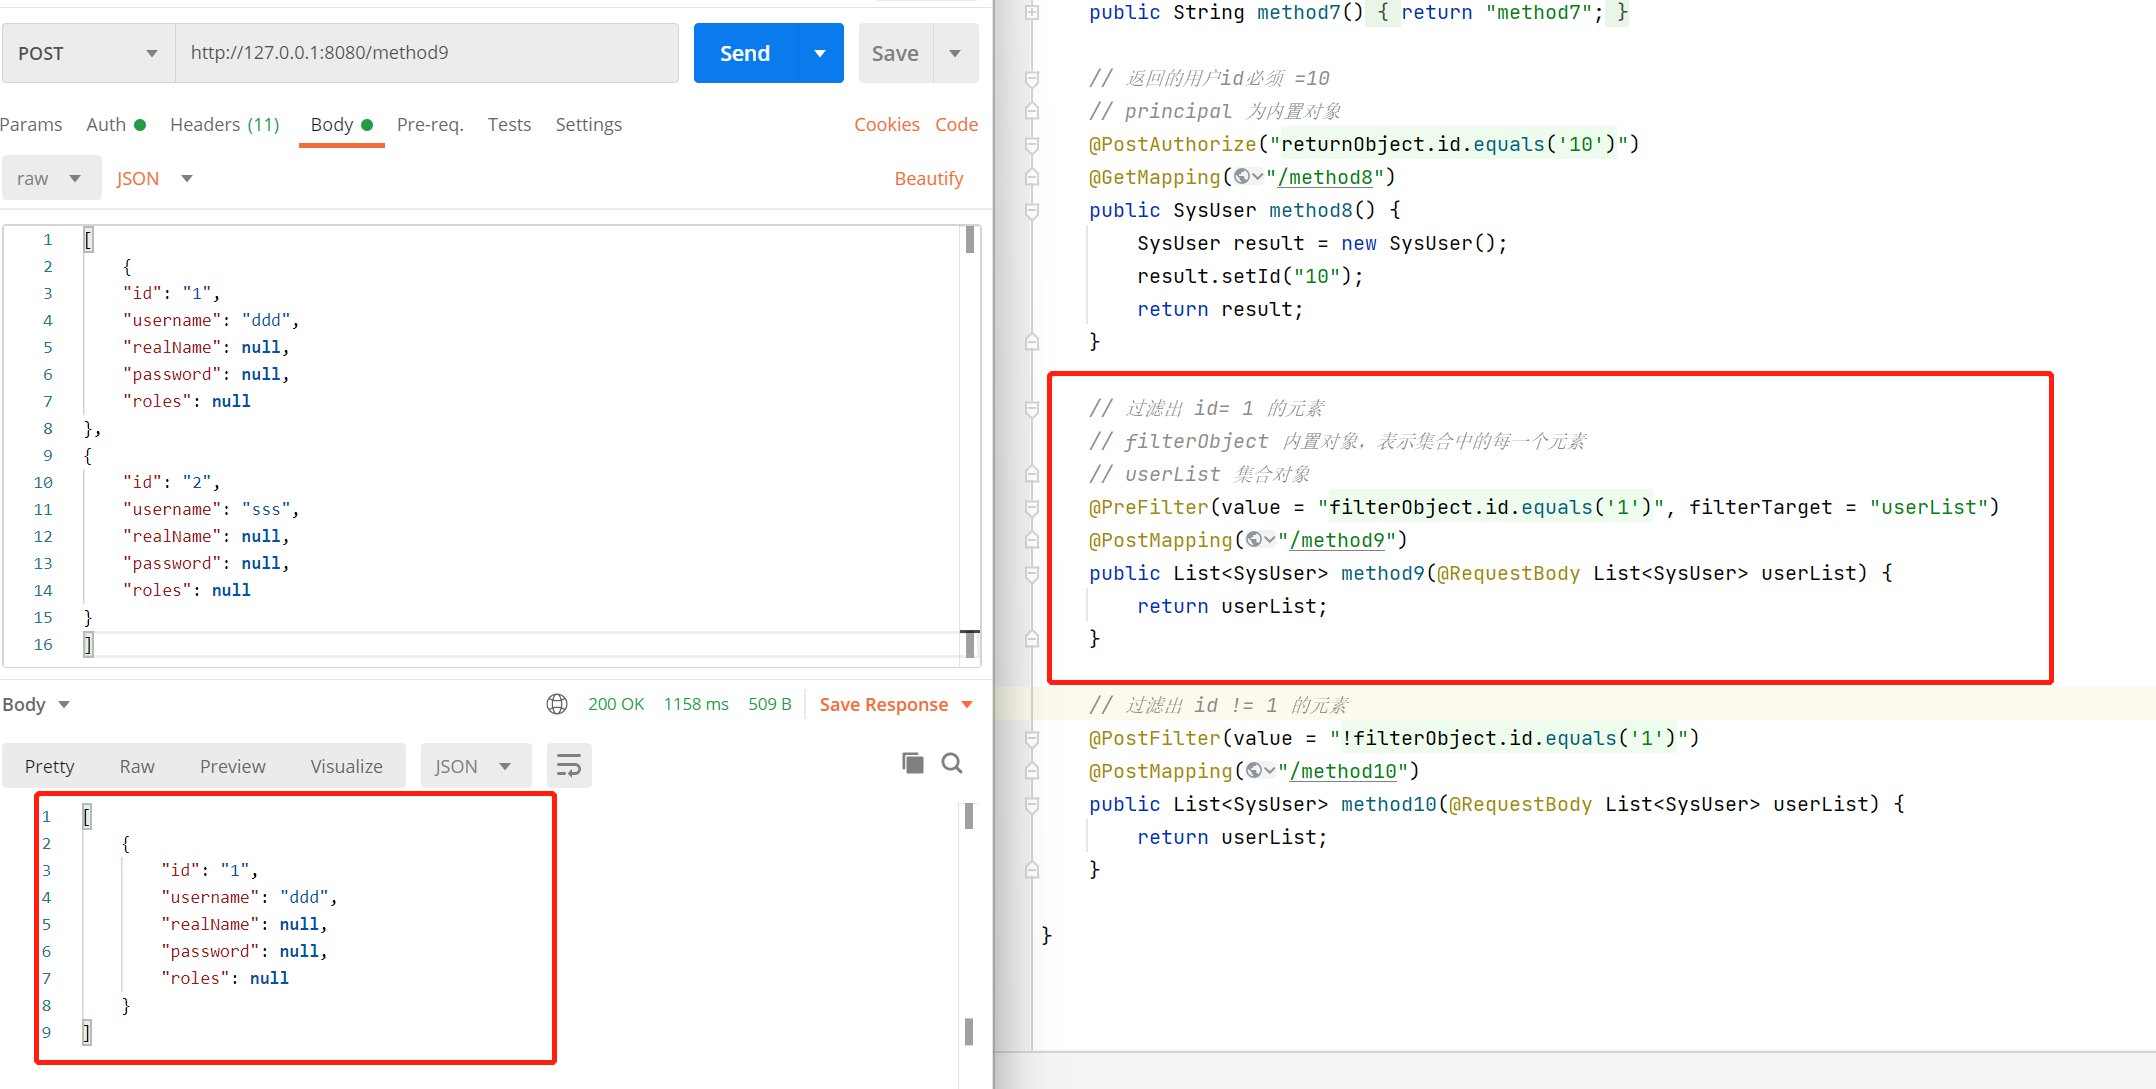
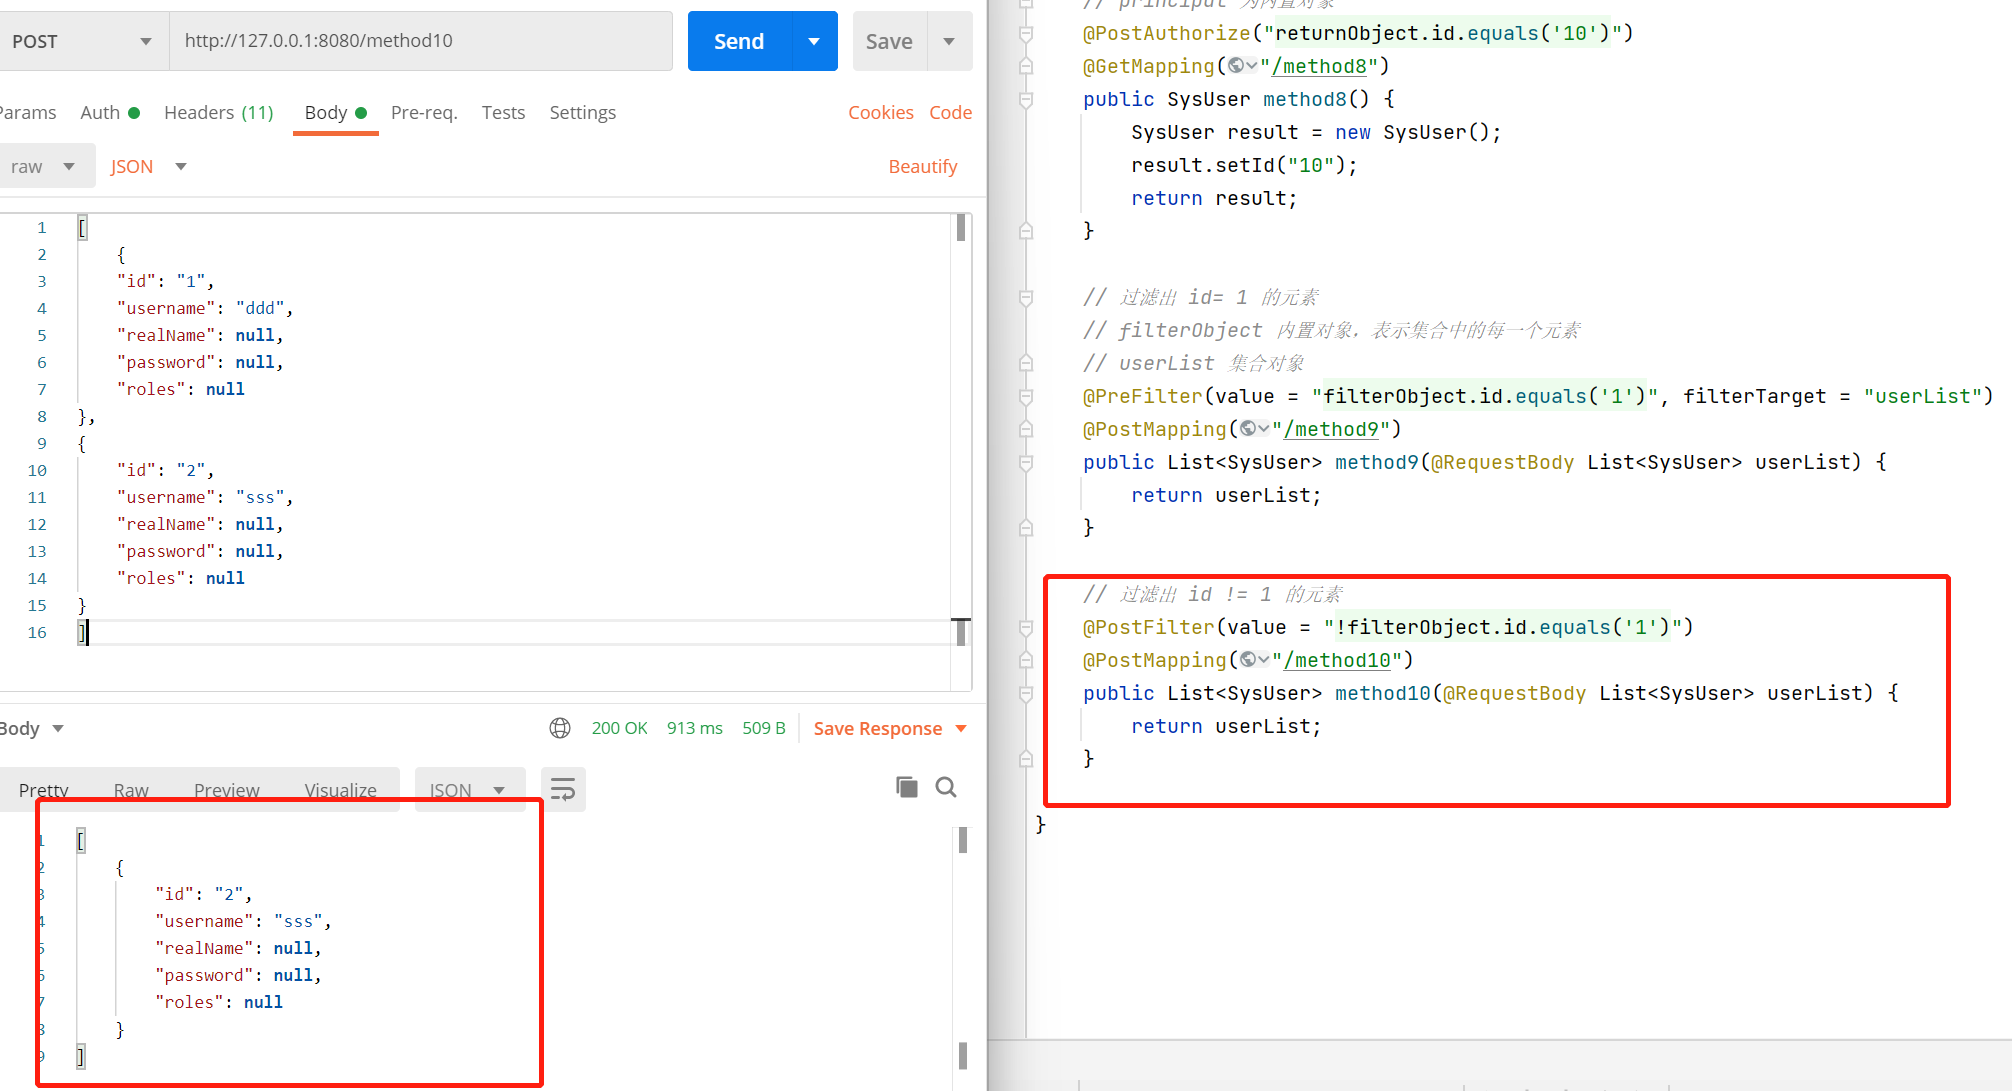
@PostFilter
@PostFilter可以对集合类型的响应进行过滤,当值为false时移除元素。
    // 过滤出 id != 1 的元素
    @PostFilter(value = "!filterObject.id.equals('1')")
    @PostMapping("/method10")
    public List<SysUser> method10(@RequestBody List<SysUser> userList) {


        return userList;
    }
@Secured
这个注解是专门用来判断是否用户是否具有该角色;值是角色名称,记得加前缀ROLE_
    // 只允许角色为 ROLE_admin 的用户访问
    @Secured("ROLE_admin")
    @PostMapping("/method11")
    public List<SysUser> method11(@RequestBody List<SysUser> userList) {


        return userList;
    }
JSR-250注解
@RolesAllowe
值是角色名称数组,记得加ROLE_
    // 允许角色为 ROLE_admin ROLE_dev 的用户访问
    @RolesAllowed({

    "ROLE_admin", "ROLE_dev"})
    @PostMapping("/method12")
    public List<SysUser> method12(@RequestBody List<SysUser> userList) {


        return userList;
    }
@PermitAll
直接放行,不进行权限验证,可以与@RolesAllowed混用,不能与spring定义的权限注解一起使用;
@RolesAllowed("ROLE_test1")
@RestController
@RequestMapping("/method2")
public class MethodController2 {


    @PermitAll
    @GetMapping("/get1")
    public String method1() {


        return "get1";
    }
}
@DenyAll
与@PermitAll 相反,任何人都不能访问
    @DenyAll
    @GetMapping("/get2")
    public String method2() {


        return "get2";
    }
动态权限
原理:
权限的实现,可以细化到url,即菜单权限,当然按钮级的权限也属于菜单权限,菜单权限又挂载于角色,所以,通过登录的用户信息就可以拿到这些菜单权限,那么在访问拦截器里就可以实现权限的控制。
方案一
创建角色与权限查询列表
@Data
public class RolePermission {


    private Integer roleId;

    private String roleName;

    private String roleCode;

    private Integer permissionId;

    private Integer parentPermissionId;

    private String permissionCode;

    private String permissionName;

    private String permissionUrl;
}
    @Select("select a.id as role_id,a.name as role_name,a.code as role_code,b.name as permission_name,b.code as permission_code,b.id as permission_id , b.parent_id as parent_permission_id,b.url as permission_url "
        + "from sys_role a inner join sys_permission b on a.id = b.role_id where a.deleted = 0")
    List<RolePermission> roleList();
启动项目后,将角色与角色进行缓存,方便获取;
如果这样做了,那么在修改角色权限时,需要更新缓存;
@Service
@AllArgsConstructor
public class RoleServiceImpl implements RoleService , InitializingBean {


    private CacheManager cacheManager;
    private RoleRepository roleRepository;

    @Override
    public void afterPropertiesSet() throws Exception {


        List<RolePermission> roleList = roleRepository.roleList();
        if (roleList.isEmpty()) {


            return;
        }
        Map<String, List<RolePermission>> permissionMap = roleList.stream().collect(Collectors.groupingBy(RolePermission::getRoleCode));
        for (Map.Entry<String, List<RolePermission>> entry : permissionMap.entrySet()) {


            String key = AuthConstant.ROLE_PRE + entry.getKey();
            List<String> collect = entry.getValue().stream().map(RolePermission::getPermissionUrl)
                                        .filter(StringUtils::isNoneBlank).collect(Collectors.toList());
            String value = JSON.toJSONString(collect);
            cacheManager.set(key, value);
        }
    }
}
创建单次过滤器PermissionFilter判断,请求是否有权限;
public class PermissionFilter extends OncePerRequestFilter {


    private final CacheManager cacheManager;

    public PermissionFilter(CacheManager cacheManager) {


        this.cacheManager = cacheManager;
    }

    @Override
    protected void doFilterInternal(HttpServletRequest servletRequest, HttpServletResponse servletResponse, FilterChain filterChain)
    throws ServletException, IOException {


        Authentication authentication = SecurityContextHolder.getContext().getAuthentication();
        if (authentication == null || authentication.getPrincipal() == null) {


            filterChain.doFilter(servletRequest, servletResponse);
            return;
        }
        if (authentication.getPrincipal() instanceof String) {


            filterChain.doFilter(servletRequest, servletResponse);
            return;
        }
        // 获取认证信息
        Collection<? extends GrantedAuthority> authorities = authentication.getAuthorities();
        if (authorities.isEmpty()) {


            throw new AccessDeniedException("无权限!");
        }
        // 获取权限信息
        Set<String> permissions = new HashSet<>();
        for (GrantedAuthority authority : authorities) {


            Object o = cacheManager.get(authority.getAuthority());
            if (o != null) {


                List<String> collect = JSONArray.parseArray(o.toString()).stream().map(Object::toString).collect(Collectors.toList());
                permissions.addAll(collect);
            }
        }
        if (permissions.isEmpty()) {


            throw new AccessDeniedException("无权限!");
        }
        // 判断是否有权限访问
        String api = servletRequest.getRequestURI();
        if (!permissions.contains(api)) {


            throw new AccessDeniedException("无权限!");
        }
        filterChain.doFilter(servletRequest, servletResponse);
    }
}
然后将权限过滤器加入到FilterSecurityInterceptor前面,ExceptionTranslationFilter的后面;
http.addFilterAfter(new PermissionFilter(cacheManager), FilterSecurityInterceptor.class);
方案二
custom-auth-control2
这个方案时修改security内部的决策管理器实现,尽量不动security的东西;
先自定义访问决策管理器
/**
 * 自定义访问决策管理器
 * @author ALI
 * @since 2023/6/16
 */
public class CustomAccessDecisionManager implements AccessDecisionManager {


    private final CacheManager cacheManager;

    public CustomAccessDecisionManager(CacheManager cacheManager) {


        this.cacheManager = cacheManager;
    }
    @Override
    public void decide(Authentication authentication, Object object, Collection<ConfigAttribute> configAttributes)
    throws AccessDeniedException, InsufficientAuthenticationException {


        // 获取认证信息
        Collection<? extends GrantedAuthority> authorities = authentication.getAuthorities();
        if (authorities.isEmpty()) {


            throw new AccessDeniedException("无权限!");
        }
        // 获取权限信息
        Set<String> permissions = new HashSet<>();
        for (GrantedAuthority authority : authorities) {


            Object o = cacheManager.get(authority.getAuthority());
            if (o != null) {


                List<String> collect = JSONArray.parseArray(o.toString()).stream().map(Object::toString).collect(Collectors.toList());
                permissions.addAll(collect);
            }
        }
        if (permissions.isEmpty()) {


            throw new AccessDeniedException("无权限!");
        }
        FilterInvocation filterInvocation = (FilterInvocation) object;
        // 判断是否有权限访问
        String api = filterInvocation.getRequestUrl();
        if (!permissions.contains(api)) {


            throw new AccessDeniedException("无权限!");
        }
    }

    @Override
    public boolean supports(ConfigAttribute attribute) {


        return true;
    }

    @Override
    public boolean supports(Class<?> clazz) {


        return true;
    }
}
修改security配置SecurityWebConfig
    @Override
    public void init(WebSecurity web) throws Exception {


        HttpSecurity http = getHttp();
        web.addSecurityFilterChainBuilder(http).postBuildAction(() -> {


            FilterSecurityInterceptor securityInterceptor = http.getSharedObject(FilterSecurityInterceptor.class);
            securityInterceptor.setAccessDecisionManager(new CustomAccessDecisionManager(cacheManager));
            web.securityInterceptor(securityInterceptor);
        });
    }
这里设置还有另一种方式:spring官方推荐的配置方式(Java Configuration :: Spring Security),它提供了我们可以直接修改内部对象属性,比起上面的方式,这个可以修改几乎所有的对象,包含:config,filter,handler,interceptor,provider,strategy,point,voter
http.anyRequest().authenticated()
            .withObjectPostProcessor(new ObjectPostProcessor<FilterSecurityInterceptor>() {


                public <O extends FilterSecurityInterceptor> O postProcess(O fsi) {


                    fsi.setPublishAuthorizationSuccess(true);
                    fsi.setAccessDecisionManager(new CustomAccessDecisionManager(cacheManager));
                    return fsi;
                }
            });
完整配置:
@Configuration
@EnableWebSecurity
public class SecurityWebConfig extends WebSecurityConfigurerAdapter {


    private static final String loginApi = "/loginDeal";
    private static final String usernameParameter = "username";
    private static final String passwordParameter = "pwd";

    public static PrivateKey privateKey;

    @Autowired
    private UserDetailsService userDetailsService;
    @Autowired
    private CustomSecurityContextRepository securityContextRepository;
    @Autowired
    private CacheManager cacheManager;

    public SecurityWebConfig() throws Exception {


        try (InputStream is = this.getClass().getClassLoader().getResourceAsStream("privateKey.pem")) {


            if (is == null) {


                throw new RuntimeException("没有读取的密钥!!!");
            }
            byte[] data = new byte[2048];
            int length = is.read(data);
            String privateKeyString = new String(data, 0, length);
            privateKey = RsaUtil.getPrivateKey(privateKeyString.trim());
        }
    }

    @Bean
    public PasswordEncoder passwordEncoder() {


        return new BCryptPasswordEncoder();
    }

    @Bean
    public CorsFilter corsFilter() {


        return new CorsFilter(corsConfigurationSource());
    }

    @Bean
    public MathGenerator mathGenerator() {


        return new MathGenerator(1);
    }

    /**
     * 自定义的customUsernamePasswordAuthenticationFilter
     * 需要同步在HttpSecurity里的配置
     */
    public CustomUsernamePasswordAuthenticationFilter customUsernamePasswordAuthenticationFilter() throws Exception {


        CustomUsernamePasswordAuthenticationFilter result = new CustomUsernamePasswordAuthenticationFilter();
        result.setRequiresAuthenticationRequestMatcher(new AntPathRequestMatcher(loginApi));
        result.setAuthenticationManager(this.authenticationManager());
        result.setUsernameParameter(usernameParameter);
        result.setPasswordParameter(passwordParameter);
        result.setAuthenticationSuccessHandler(new LoginSuccessHandler());
        result.setAuthenticationFailureHandler(new LoginFailureHandler());
        return result;
    }

    /**
     * 跨域设置
     */
    private CorsConfigurationSource corsConfigurationSource() {


        UrlBasedCorsConfigurationSource source = new UrlBasedCorsConfigurationSource();
        CorsConfiguration config = new CorsConfiguration();
        // 允许cookies跨域
        config.setAllowCredentials(true);
        // 允许向该服务器提交请求的URI,* 表示全部允许,在SpringMVC中,如果设成*,会自动转成当前请求头中的Origin
        config.addAllowedOrigin("*");
        // 允许访问的头信息,* 表示全部
        config.addAllowedHeader("*");
        // 预检请求的缓存时间(秒),即在这个时间段里,对于相同的跨域请求不会再预检了
        config.setMaxAge(18000L);
        // 允许提交请求的方法,* 表示全部允许
        config.addAllowedMethod("GET");
        config.addAllowedMethod("PUT");
        config.addAllowedMethod("POST");
        config.addAllowedMethod("DELETE");
        source.registerCorsConfiguration("/**", config);
        return source;
    }

    @Override
    protected void configure(AuthenticationManagerBuilder auth) throws Exception {


        auth.inMemoryAuthentication()
            .withUser("ali")
            .password(passwordEncoder().encode("123456"))
            .roles("admin");
        auth.userDetailsService(userDetailsService);
    }

    @Override
    public void init(WebSecurity web) throws Exception {


        HttpSecurity http = getHttp();
        web.addSecurityFilterChainBuilder(http).postBuildAction(() -> {


            // 因为FilterSecurityInterceptor是在其他配置完成后执行的,所以只能在这里修改
            // 详细看 org.springframework.security.config.annotation.web.builders.WebSecurity#performBuild
            // 配置 CustomAccessDecisionManager 方式一
            FilterSecurityInterceptor securityInterceptor = http.getSharedObject(FilterSecurityInterceptor.class);
            securityInterceptor.setAccessDecisionManager(new CustomAccessDecisionManager(cacheManager));
            web.securityInterceptor(securityInterceptor);
        });
    }

    @Override
    protected void configure(HttpSecurity http) throws Exception {


        // 表单
        // 注意:使用了`BasicAuthenticationFilter`那么在配置`WebSecurityConfigurerAdapter`时,就不要设置`http.httpBasic()`,不然不会走我们自定义的Filter
        http
            .formLogin()
            // 登录的请求接口,对应表单的action,这里只是修改了处理的api,实际处理还是security
            .loginProcessingUrl("/loginDeal")
            // 登录的用户名和密码参数名称
            .usernameParameter("username")
            .passwordParameter("pwd")
            .successHandler(new LoginSuccessHandler())
            .failureHandler(new LoginFailureHandler())
            .permitAll()
            .and().csrf().disable(); //关闭csrf防护

        // 将我们的repository设置到共享变量里
        http.setSharedObject(SecurityContextRepository.class, securityContextRepository);

        // 设置序列化
        http.exceptionHandling().authenticationEntryPoint(new CustomizeAuthenticationEntryPoint())
            .accessDeniedHandler(new CustomAccessDeniedHandler());

        http.addFilterBefore(customUsernamePasswordAuthenticationFilter(), UsernamePasswordAuthenticationFilter.class);

        http.authorizeRequests()
            .antMatchers("/test/*", "/login/**").permitAll()
            .antMatchers("/getData2").hasRole("dev")
            .antMatchers("/getData3").hasRole("admin")
            .antMatchers("/getData4").hasAnyRole("test1")
            .antMatchers("/getData5").hasAuthority("ROLE_test1")
            .antMatchers("/getData6").hasIpAddress("127.0.0.1")
            .antMatchers("/getData7").hasAnyAuthority("ROLE_test2", "ROLE_test3")
            .anyRequest().authenticated()
            // 配置 CustomAccessDecisionManager 方式二
//            .withObjectPostProcessor(new ObjectPostProcessor<FilterSecurityInterceptor>() {


//                public <O extends FilterSecurityInterceptor> O postProcess(O fsi) {


//                    fsi.setPublishAuthorizationSuccess(true);
//                    fsi.setAccessDecisionManager(new CustomAccessDecisionManager(cacheManager));
//                    return fsi;
//                }
//            })
        ;
    }
}
仓库地址
https://gitee.com/LIRUIYI/test-security.git
https://gitee.com/LIRUIYI/test-security-web.git