vue框架学习
day2
1.8事件处理
<!DOCTYPE html>
<html lang="en">
<head>
    <meta charset="UTF-8">
    <title>Document</title>
    <script src="../js/vue.js"></script>

</head>
<body>
    <!--
        事件的基本使用:
            1.使用v-on:xxx 或 @xxx 绑定事件。其中 xxx 是事件名
            2.事件的回调需要配置在methods对象中,最终会在vm上
            3.methods中配置的函数,不要用箭头函数,否则this就不是vm了,而是window
            4.methods中配置的函数,都是被Vue所管理的函数,this的指向是vm 或组件实例对象
            5.@click='demo' 和 @click='demo($event)'效果一致,但后者可以传参
     -->

    <div id="root">
       <h2>欢迎来到{

   {name}}</h2>
       <button v-on:click="showInfo1">点我提示信息</button>
       <button @click="showInfo2">点我提示信息</button>
       <button @click="showInfo3(66,$event)">点我提示信息</button>
    </div>
</body>
<script>
    Vue.config.productionTip = false

    const vm = new Vue({


        el:'#root',
        data:{


            name:'609'
        },
        methods: {


            showInfo1(event){


                //console.log(event.target.innerText)
                console.log(this) //此处的this是vm
                //alert('你好')
            },
            showInfo2(event1){


                console.log(this)
            },
            showInfo3(number,a){


                console.log(number,a)
            }
        },
    })
</script>
</html>
1…prevent:阻止事件的默认行为event.preventDefault()
2…stop:停止事件冒泡event.stopPropagation()
<!DOCTYPE html>
<html lang="en">
<head>
    <meta charset="UTF-8">
    <meta http-equiv="X-UA-Compatible" content="IE=edge">
    <meta name="viewport" content="width=device-width, initial-scale=1.0">
    <title></title>
    <!-- 引入Vue -->
    <script src="../js/vue.js"></script>
    <style>
        *{


            margin-top: 20px;
        }
        .demo1{


            height: 50px;
            background-color: skyblue;
        }
        .box1{


            padding: 5px;
            background-color: skyblue;
        }
        .box2{


            padding: 5px;
            background-color: orange;
        }
        .list{


            width: 200px;
            height: 200px;
            background-color: peru;
            overflow: auto;
        }
        li{


            height: 100px;
        }
    </style>
</head>
<body>
    <!--
        Vue中的事件修饰符:
            1.prevent:阻止默认事件(常用)
            2.stop:阻止事件冒泡(常用)
            3.once:事件只触发一次(常用)
            4.capture:使用事件的捕获模式
            5.self:只有event.target是当前操作的元素时才触发事件
            6.passive:事件的默认行为立即执行,无需等待事件回调执行完毕
     -->

    <!-- 准备好一个容器 -->
    <div id="root">
        <h2>欢迎来到{

   {name}}</h2>
        <!-- 阻止默认事件(常用) -->
        <a href="http://www.baidu.com" @click.prevent="showInfo">点我提示信息</a>
        <!-- 阻止事件冒泡(常用) -->
        <div class="demo1" @click="showInfo">
            <button @click.stop="showInfo">点我提示信息</button>
        </div>
        <!-- 事件只触发一次 -->
        <button @click.once="showInfo">点我提示信息</button>
        <!-- 使用事件的捕获模式 -->
        <div class="box1" @click.capture="showMsg(1)">
            div1
            <div class="box2" @click="showMsg(2)">
                div2
            </div>
        </div>

        <!-- 只有event.target是当前操作的元素时才触发事件 -->
        <div class="demo1" @click.self="showInfo">
            <button @click="showInfo">点我提示信息</button>
        </div>

        <!-- 事件的默认行为立即执行,无需等待事件回调执行完毕 -->
        <ul @wheel.passive="demo" class="list">
            <li>1</li>
            <li>2</li>
            <li>3</li>
            <li>4</li>
        </ul>
    </div>

    <script type="text/javascript">
        Vue.config.productionTip = false // 阻止 vue 在启动时生成生产提示

        // 创建Vue实例
        new Vue({


            el:'#root',
            data:{


                name:'world123',
            },
            methods: {


                showInfo(e){


                    //e.preventDefault()
                    alert('同学你好')
                },
                showMsg(msg){


                    console.log(msg)
                },
                demo(){


                    console.log('@')
                }
            },
        })


    </script>
</body>
</html>
1.keycode:操作的是某个keycode值的键
2…keyName:操作的某个按键名的键(少部分)
<!DOCTYPE html>
<html lang="en">
<head>
    <meta charset="UTF-8">
    <meta http-equiv="X-UA-Compatible" content="IE=edge">
    <meta name="viewport" content="width=device-width, initial-scale=1.0">
    <title></title>
    <!-- 引入Vue -->
    <script src="../js/vue.js"></script>

</head>
<body>
    <!--
        1.Vue中常用的按键别名:
            回车 => enter
            删除 => delete (捕获“删除”和“退格”键)
            退出 => esc
            空格 => space
            换行 => tab
            上 => up
            下 => down
            左 => left
            右 => right

        2.Vue未提供别名的按键,可以使用按键原始的key值去绑定,但注意要转为kebab-case(短横线命名)

        3.系统修饰键(用法特殊):ctrl,alt,shift,meta
            (1).配合keyup使用:按下修饰键的同时,再按下其他键,随后释放其他键,事件才被触发
            (2).配合keydown使用:正常触发事件。

        4.也可以使用keyCode去=指定具体的按键(不推荐)

        5.Vue.config.keyCodes.自定义键名 = 键码,可以去定制按键别名
     -->

    <!-- 准备好一个容器 -->
    <div id="root">
       <h2>欢迎来到{

   {name}}</h2>
       <input type="text" placeholder="按下回车提示输入" @keyup.enter="showInfo">
    </div>

    <script type="text/javascript">
        Vue.config.productionTip = false // 阻止 vue 在启动时生成生产提示

        // 创建Vue实例
        new Vue({


            el:'#root',
            data:{


                name:'world123',
            },
            methods: {


                showInfo(e){


                    //if(e.keyCode !== 13) return
                    console.log(e.target.value)
                }
            },
        })


    </script>
</body>
</html>
1.9计算属性与监视
<!DOCTYPE html>
<html lang="en">
<head>
    <meta charset="UTF-8">
    <title>Document</title>
    <script src="../vue.js"></script>

</head>
<body>
    <div id="root">
        姓:<input type="text" v-model="firstName"><br><br>
        名:<input type="text" v-model="lastName"><br><br>
        姓名:<span>{

   {firstName.slice(0,3)}}-{

   {lastName}}</span>
    </div>
</body>
<script>
    Vue.config.productionTip = false

    new Vue({


        el:'#root',
        data:{


            firstName:'张',
            lastName:'三',
        }
    })
</script>
</html>
<!DOCTYPE html>
<html lang="en">
<head>
    <meta charset="UTF-8">
    <title>Document</title>
    <script src="../vue.js"></script>

</head>
<body>
    <div id="root">
        姓:<input type="text" v-model="firstName"><br><br>
        名:<input type="text" v-model="lastName"><br><br>
        姓名:<span>{

   {fullName()}}</span>
    </div>
</body>
<script>
    Vue.config.productionTip = false

    new Vue({


        el:'#root',
        data:{


            firstName:'张',
            lastName:'三',
        },
        methods:{


            fullName(){


                return this.firstName+this.lastName
            }
        },
    })
</script>
</html>
1.要显示的数据不存在,要通过计算得来。
2.在computed对象中定义计算属性。
3.在页面中使用{
{方法名}}来显示计算的结果。
<!DOCTYPE html>
<html lang="en">
<head>
    <meta charset="UTF-8">
    <title>Document</title>
    <script src="../vue.js"></script>

</head>
<body>
    <!--
        计算属性:
            1.定义:要用的属性不存在,要通过已有属性计算得来
            2.原理:底层借助了Object.defineproperty方法提供的getter和setter
            3.get函数什么时候执行?
                (1).初次读取时会执行一次
                (2).当依赖的数据发生改变时会被再次调用
            4.优势: 与methods相比,内部有缓存机制(复用),效率更高,调试更方便
            5.备注:
                1.计算属性最终会出现在vm上,直接读取使用即可
                2.如果计算属性要被修改,那必须写set函数去响应修改,且set中要引起计算时依赖的数据发生改变
     -->
    <div id="root">
        姓:<input type="text" v-model="firstName"><br><br>
        名:<input type="text" v-model="lastName"><br><br>
        姓名:<span>{

   {fullName}}</span>
    </div>
</body>
<script>
    Vue.config.productionTip = false

    const vm = new Vue({


        el:'#root',
        data:{


            firstName:'张',
            lastName:'三',
        },
        computed:{


            fullName:{


                //get有什么作用?当有人读取fullName时,get就会被调用,且返回值就作为fullName的值
                //get什么时候调用?1.初次读取fullName时。2.所依赖的数据发生变化时
                get(){


                    console.log('get被调用了')
                    // console.log(this) //此处的this就是vm
                    return this.firstName + '-' + '-' + this.lastName
                },
                //set什么时候被调用?当fullName被修改时
                set(value){


                    console.log('set',value)
                    const arr = value.split('-')
                    this.firstName = arr[0]
                    this.lastName = arr[1]
                }
            }
        },
    })
</script>
</html>
<!DOCTYPE html>
<html lang="en">
<head>
    <meta charset="UTF-8">
    <title>Document</title>
    <script src="../vue.js"></script>

</head>
<body>
    <div id="root">
        姓:<input type="text" v-model="firstName"><br><br>
        名:<input type="text" v-model="lastName"><br><br>
        姓名:<span>{

   {fullName}}</span>
    </div>
</body>
<script>
    Vue.config.productionTip = false

    new Vue({


        el:'#root',
        data:{


            firstName:'张',
            lastName:'三',
        },
        computed:{


            //完整写法
            /* fullName:{
                get(){
                    return this.firstName+'-'+this.lastName
                },
                set(value){
                    console.log('set',value)
                    const arr=value.split('-')
                    this.firstName=arr[0]
                    this.lastName=arr[1]
                }
            } */
            //简写,前提是只读不改,即只有get,没有set
            //fullname()实际上是返回了一个值给vm
            fullName(){


                console.log('get被调用了')
                return this.firstName+'-'+this.lastName
            }
        }
    })
</script>
</html>
1.10监视属性
1.通过通过vm对象的$watch()或watch配置来监视指定的属性
2.当属性变化时,回调函数自动调用,在函数内部进行计算
<!DOCTYPE html>
<html lang="en">
<head>
    <meta charset="UTF-8">
    <title>Document</title>
    <script src="../vue.js"></script>

</head>
<body>
    <div id="root">
        <h2>今天天气很{

   {info}} {

   {x}}</h2>
        <button @click="changeWeather">切换天气</button>
    </div>
</body>
<script>
    Vue.config.productionTip = false

    new Vue({


        el:'#root',
        data:{


            isHot:true,
            x:1,

        },
        computed:{


            info(){


                return this.isHot ? '炎热' : '凉爽'
            }
        },
        methods: {


            changeWeather(){


                this.isHot=!this.isHot
                this.x++
            }
        },
    })
</script>
</html>
<!DOCTYPE html>
<html lang="en">
<head>
    <meta charset="UTF-8">
    <title>Document</title>
    <script src="../vue.js"></script>

</head>
<body>
    <!--
        监视属性watch:
            1.当被监视的属性发生变化时,回调函数自动调用,进行相关操作
            2.监视的属性必须存在,才能进行监视!!!
            3.监视的两种写法:
                (1).new Vue时传入watch配置
                (2).通过vm.$watch监视
     -->
    <div id="root">
        <h2>今天天气很{

   {info}} {

   {x}}</h2>
        <button @click="changeWeather">切换天气</button>
    </div>
</body>
<script>
    Vue.config.productionTip = false

    const vm = new Vue({


        el:'#root',
        data:{


            isHot:true,
            x:1,

        },
        computed:{


            info(){


                return this.isHot ? '炎热' : '凉爽'
            }
        },
        methods: {


            changeWeather(){


                this.isHot=!this.isHot
                this.x++
            }

        },
        //第一种监视方法
        watch:{


            isHot:{


                immediate:true,//初始化时让handler调用一下
                //handler什么时候被调用?当isHot发生改变时
                handler(newValue,oldValue){


                    console.log('isHot被修改了',newValue,oldValue)
                }
            }
        },
    })

    //第二种监视方法
    vm.$watch('isHot',{


        immediate:true,//初始化时让handler调用一下
        //handler什么时候被调用?当isHot发生改变时
        handler(newValue,oldValue){


            console.log('isHot被修改了',newValue,oldValue)
    }})
</script>
</html>
<!DOCTYPE html>
<html lang="en">
<head>
    <meta charset="UTF-8">
    <title>Document</title>
    <script src="../vue.js"></script>

</head>
<body>
    <!--
        深度监视:
            (1).Vue中的watch默认不监测对象内部值的改变(一层)
            (2).配置deep:true可以监测对象内部值改变(多层)
        备注:
            (1).Vue自身可以监测对象内部值的改变,但Vue提供的watch默认不可以!
            (2).使用watch时根据数据的具体结构,决定是否采用深度监视
     -->
    <div id="root">
        <h2>今天天气很{

   {info}}</h2>
        <button @click="changeWeather">切换天气</button>
        <hr>
        <h3>a的值是:{

   {numbers.a}}</h3>
        <button @click="numbers.a++">点我让a+1</button>
        <h3>b的值是:{

   {numbers.b}}</h3>
        <button @click="numbers.b++">点我让b+1</button>
    </div>
</body>
<script>
    Vue.config.productionTip = false

    const vm = new Vue({


        el:'#root',
        data:{


            isHot:true,
            numbers:{


                a:1,
                b:1
            }
        },
        computed:{


            info(){


                return this.isHot ? '炎热' : '凉爽'
            }
        },
        methods: {


            changeWeather(){


                this.isHot=!this.isHot
                this.x++
            }

        },
        watch:{


            isHot:{


                //immediate:true,//初始化时让handler调用一下
                //handler什么时候被调用?当isHot发生改变时
                handler(newValue,oldValue){


                    console.log('isHot被修改了',newValue,oldValue)
                }
            },
            //监视多级结构中某个属性的变化,原始写法是要加引号的
            /* 'numbers.a':{
                handler(){
                    console.log('a被改变了')
                },
            } */
            //监视多级结构中所有属性的变化
            numbers:{


                deep:true,//进行深度监视,默认不开启是因为追求效率
                handler(){


                    console.log('numbers改变了')
                }
            }
        },
    })
</script>
</html>
!DOCTYPE html>
<html lang="en">
<head>
    <meta charset="UTF-8">
    <title>Document</title>
    <script src="../vue.js"></script>

</head>
<body>
    <div id="root">
        <h2>今天天气很{

   {info}}</h2>
        <button @click="changeWeather">切换天气</button>
    </div>
</body>
<script>
    Vue.config.productionTip = false

    const vm = new Vue({


        el:'#root',
        data:{


            isHot:true,
        },
        computed:{


            info(){


                return this.isHot ? '炎热' : '凉爽'
            }
        },
        methods: {


            changeWeather(){


                this.isHot=!this.isHot
                this.x++
            }

        },
        watch:{


            //正常写法
            /* isHot:{
                //immediate:true,//初始化时让handler调用一下
                //deep:true,//深度监视
                //handler什么时候被调用?当isHot发生改变时
                handler(newValue,oldValue){
                    console.log('isHot被修改了',newValue,oldValue)
                }
            }, */
            //简写:当配置项只有handler时可以开启简写形式
            /* isHot(newValue,oldValue){
                console.log('isHot被修改了',newValue,oldValue)
            } */
        },
    })

    //正常写法
    /* vm.$watch('isHot',{
        immediate:true,
        deep:true,
        handler(newValue,oldValue){
            console.log('isHot被修改了',newValue,oldValue)
        }
    }) */

    //简写
    vm.$watch('isHOt',function(newValue,oldValue){


        console.log('isHot被修改了',newValue,oldValue)
    })
</script>
</html>
<!DOCTYPE html>
<html lang="en">
<head>
    <meta charset="UTF-8">
    <title>Document</title>
    <script src="../vue.js"></script>

</head>
<body>
    <!--
        computed和watch之间的区别:
            1.computed能完成的功能,watch都可以完成
            2.watch能完成的功能,computed不一定能完成,例如:watch可以进行异步操作
        两个重要的小原则:
            1.所被Vue管理的函数,最好写成普通函数,这样this的指向才是vm 或 组件实例对象
            2.所有不被Vue所管理的函数(定时器的回调函数,ajax的回调函数等),最好写成箭头函数
              这样this的指向才是vm 或 组件实例对象
     -->
    <div id="root">
        姓:<input type="text" v-model="firstName"><br><br>
        名:<input type="text" v-model="lastName"><br><br>
        姓名:<span>{

   {fullname}}</span>
    </div>
</body>
<script>
    Vue.config.productionTip = false

    new Vue({


        el:'#root',
        data:{


            firstName:'张',
            lastName:'三',
            fullname:'张-三',
        },
        computed:{


        },
        watch:{


            //监测姓
            firstName(val){


                //延迟一秒修改,在监测属性里面可以开启异步任务,但是计算属性里面不行
                //计算属性里面靠的是fullname的返回值,而watch里面靠的是你自己去修改的值
                setTimeout(() => {


                    this.fullname = val + '-' +lastName
                }, 1000);
            },
            //监测名
            lasttName(val){


                this.fullname = this.firstName + '-' + val
            }
        }
    })
</script>
</html>
1.11绑定样式
class与style绑定
1.理解
1.在应用界面中,某个(些)元素的样式是变化的
2.class/style绑定就是专门用来实现动态样式效果的技术
2.class绑定
1.:class=‘xxx’
2.表达式是字符串:‘classA’
3.表达式是对象:{classA:isA,classB:isB}
4.表达式是数组:[‘classA’,‘classB’]
3.style绑定
1.:style="{color:activeColor,fontSize:fontSize+‘px’}"2.其中activeColor/fontSize是data属性
<!DOCTYPE html>
<html lang="en">
<head>
    <meta charset="UTF-8">
    <title>Document</title>
    <style>
        .basic{


            width: 400px;
            height: 100px;
            border: 1px solid black;
        }

        .happy{


            border: 4px solid red;
            background-color: rgb(255, 255, 0,0.644);
            background: linear-gradient(30deg,yellow,pink,orange,yellow);
        }
        .sad{


            border: 4px solid blue;

        }
        .normal{


            border: 4px solid yellow;

        }

        .atguigu1{


            border: 4px solid green;

        }
        .atguigu2{


            border: 4px solid gray;
        }
        .atguigu3{


            border: 4px solid black;
        }
    </style>
    <script src="../js/vue.js"></script>

</head>
<body>
    <!--
        绑定样式:
            1.class样式
                写法:class="xxx" xxx可以是字符串,对象,数组
                    字符串写法适用于:类名不确定,要动态获取
                    对象写法适用于:要绑定多个样式,个数不确定,名字也不确定
                    数组写法适用于:要绑定多个样式,个数确定,名字也确定,但不确定要不要用
            2.style样式
                :style="{fontSize: xxx}"其中xxx是动态值
                :style="[a,b]"其中a,b是样式对象
     -->

    <div id="root">
        <!-- 绑定class样式--字符串写法,适用于:样式的类名不确定,需要动态指定 -->
        <div class="basci" :class="mood" @click="changeMood">{

   {name}}</div><br><br>

        <!-- 绑定class样式--数组写法,适用于:要绑定的样式个数不确定,名字也不确定 -->
        <div class="basci" :class="arr">{

   {name}}</div><br><br>

        <!-- 绑定class样式--对象写法,适用于:要绑定的样式个数确定,名字也确定,但要动态决定用不用 -->
        <div class="basci" :class="classobj">{

   {name}}</div>

        <!-- 绑定style样式--对象写法 -->
        <div class="basci" :style="styleobj">{

   {name}}</div>
        <!-- 绑定style样式--数组写法 -->
        <div class="basci" :style="[styleobj,styleobj2]">{

   {name}}</div>
    </div>
</body>
<script>
    Vue.config.productionTip = false

    const vm = new Vue({


        el:'#root',
        data:{


            name:'尚硅谷',
            mood:'normal',
            arr:['atguigu1','atguigu2','atguigu3'],
            classobj:{


                atguigu1:false,
                atguigu2:false,
            },
            styleobj:{


                fontSize:'40px',
                color:'orange',
            },
            styleobj2:{


                backgroundColor:'red',
            },
        },
        methods: {


            changeMood(){


                const arr =['happy','sad','normal']
                const index = Math.floor(Math.random()*3)
                this.mood = arr[index]
            }
        },
    })
</script>
</html>
1.12条件渲染
1.条件渲染指令
1.v-if与v-else
2.v-show
2.比较v-if与v-show
1.如果需要频繁切换v-show较好
2.当条件不成立时,v-if的所有子节点不会解析(项目中使用)
<!DOCTYPE html>
<html lang="en">
<head>
    <meta charset="UTF-8">
    <title>Document</title>
    <script src="../js/vue.js"></script>

</head>
<body>
    <!--
        条件渲染:
            1.v-if
                写法:
                    (1).v-if="表达式"
                    (2).v-else-if="表达式"
                    (3).v-else="表达式"
                适用于:切换频率较低的场景
                特点:不展示的DOM元素直接被移除
                注意:v-if可以和:v-else-if,v-else一起使用,但要求结构不能被“打断”

            2.v-show
                写法:v-show="表达式"
                适用于:切换频率较高的场景
                特点:不展示的DOM元素未被移除,仅仅是使用样式隐藏掉

            3.备注:使用v-if时,元素可能无法获取到,而使用v-show一定可以获取到
     -->

    <div id="root">
        <!-- <h2 v-show="false">欢迎来到{

    {name}}</h2> -->
        <h2>当前的n值是:{

   {n}}</h2>
        <button @click="n++">点我n+1</button>

        <!-- <div v-show="n === 1">Angular</div>
        <div v-shwo="n === 2">React</div>
        <div v-show="n === 3">Vue</div> -->

        <template v-if="n === 1">
                <h2>你好</h2>
                <h2>尚硅谷</h2>
                <h2>北京</h2>
        </template>
    </div>
</body>
<script>
    Vue.config.productionTip = false

    const vm = new Vue({


        el:'#root',
        data:{


            name:'尚硅谷',
            n:0,
        }
    })
</script>
</html>
1.13列表渲染
列表显示指令
遍历数组:v-for/index
遍历对象:v-for/key
<!DOCTYPE html>
<html>
	<head>
		<meta charset="UTF-8" />
		<title>基本列表</title>
		<script type="text/javascript" src="../js/vue.js"></script>
	</head>
	<body>
		<!--
				v-for指令:
						1.用于展示列表数据
						2.语法:v-for="(item, index) in xxx" :key="yyy"
						3.可遍历:数组、对象、字符串(用的很少)、指定次数(用的很少)
		-->
		<!-- 准备好一个容器-->
		<div id="root">
			<!-- 遍历数组 -->
			<h2>人员列表(遍历数组)</h2>
			<ul>
				<li v-for="(p,index) of persons" :key="index">
					{

   {p.name}}-{

   {p.age}}
				</li>
			</ul>

			<!-- 遍历对象 -->
			<h2>汽车信息(遍历对象)</h2>
			<ul>
				<li v-for="(value,k) of car" :key="k">
					{

   {k}}-{

   {value}}
				</li>
			</ul>

			<!-- 遍历字符串 -->
			<h2>测试遍历字符串(用得少)</h2>
			<ul>
				<li v-for="(char,index) of str" :key="index">
					{

   {char}}-{

   {index}}
				</li>
			</ul>

			<!-- 遍历指定次数 -->
			<h2>测试遍历指定次数(用得少)</h2>
			<ul>
				<li v-for="(number,index) of 5" :key="index">
					{

   {index}}-{

   {number}}
				</li>
			</ul>
		</div>

		<script type="text/javascript">
			Vue.config.productionTip = false

			new Vue({


				el:'#root',
				data:{


					persons:[
						{

      id:'001',name:'张三',age:18},
						{

      id:'002',name:'李四',age:19},
						{

      id:'003',name:'王五',age:20}
					],
					car:{


						name:'奥迪A8',
						price:'70万',
						color:'黑色'
					},
					str:'hello'
				}
			})
		</script>
</html>
<!DOCTYPE html>
<html>
<head>
<meta charset="UTF-8" />
<title>key的原理</title>
<script type="text/javascript" src="../js/vue.js"></script>
</head>
<body>
<!--
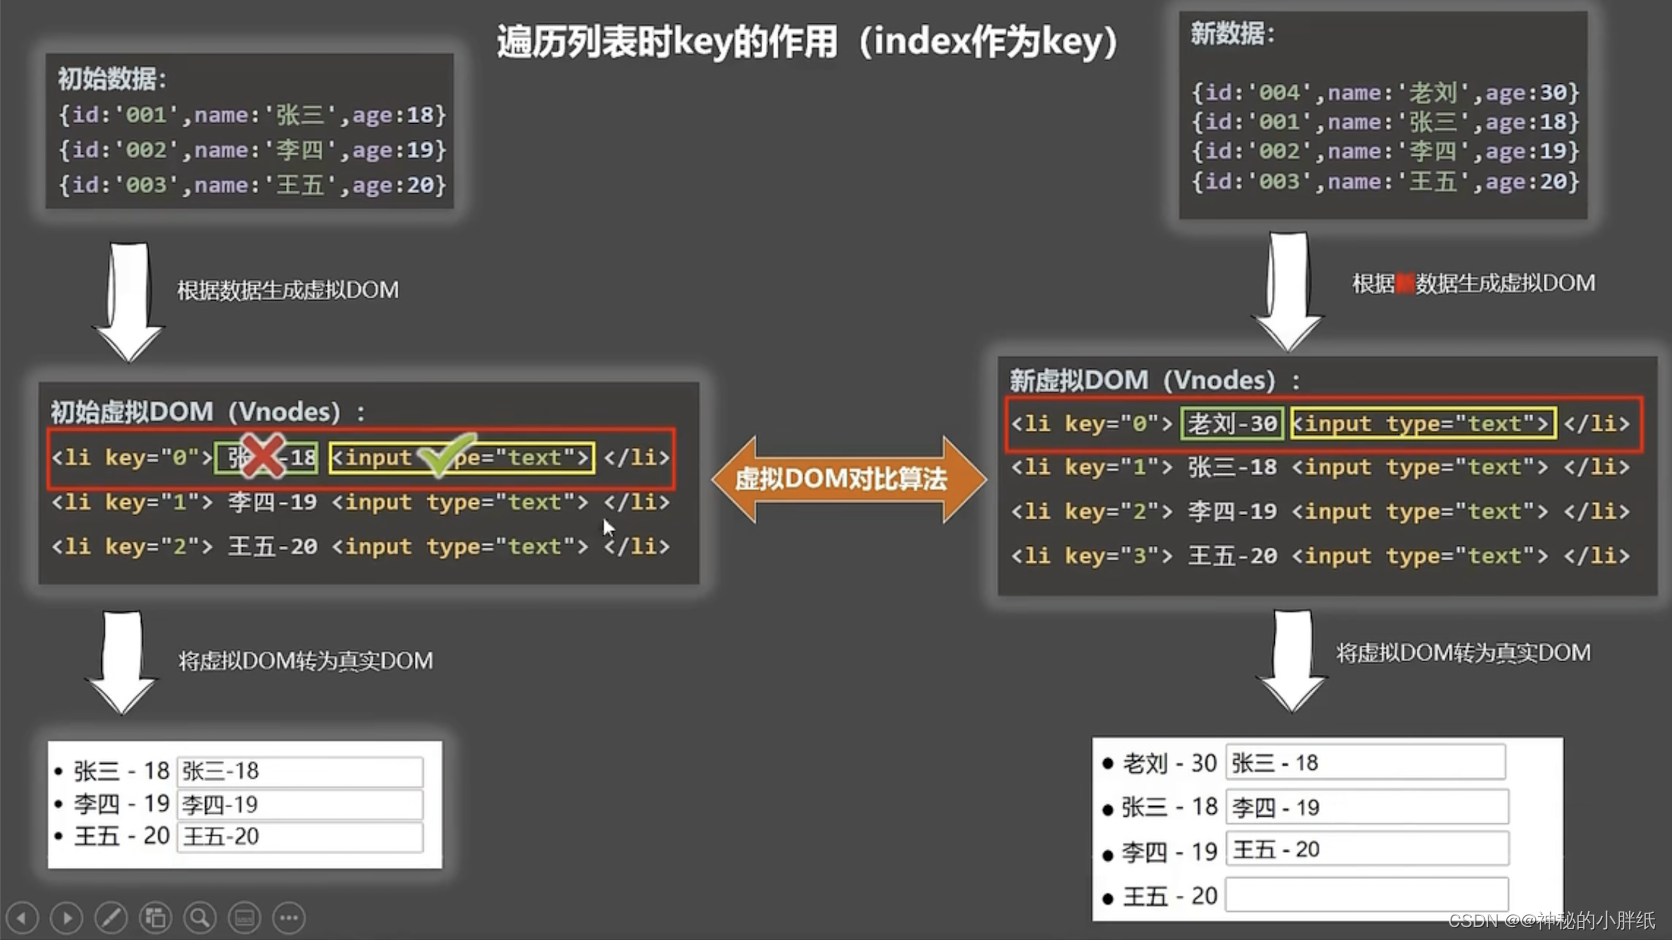
面试题:react、vue中的key有什么作用?(key的内部原理)
1. 虚拟DOM中key的作用:
key是虚拟DOM对象的标识,当数据发生变化时,Vue会根据【新数据】生成【新的虚拟DOM】,
随后Vue进行【新虚拟DOM】与【旧虚拟DOM】的差异比较,比较规则如下:
2.对比规则:
(1).旧虚拟DOM中找到了与新虚拟DOM相同的key:
①.若虚拟DOM中内容没变, 直接使用之前的真实DOM!
②.若虚拟DOM中内容变了, 则生成新的真实DOM,随后替换掉页面中之前的真实DOM。
(2).旧虚拟DOM中未找到与新虚拟DOM相同的key
创建新的真实DOM,随后渲染到到页面。
3. 用index作为key可能会引发的问题:
1. 若对数据进行:逆序添加、逆序删除等破坏顺序操作:
会产生没有必要的真实DOM更新 ==> 界面效果没问题, 但效率低。
2. 如果结构中还包含输入类的DOM:
会产生错误DOM更新 ==> 界面有问题。
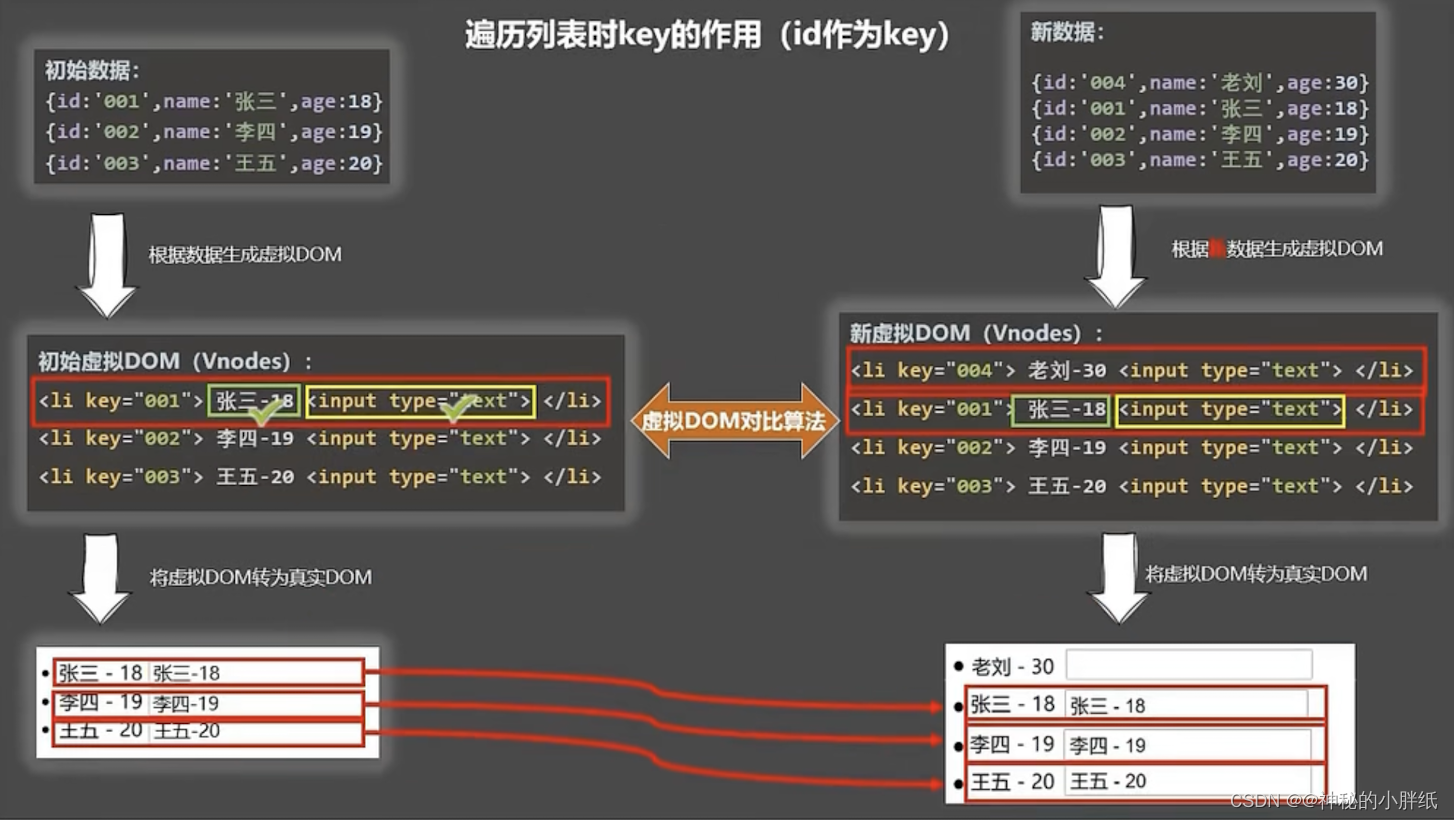
4. 开发中如何选择key?:
1.最好使用每条数据的唯一标识作为key, 比如id、手机号、身份证号、学号等唯一值。
2.如果不存在对数据的逆序添加、逆序删除等破坏顺序操作,仅用于渲染列表用于展示,
使用index作为key是没有问题的。
-->
<!-- 准备好一个容器-->
<div id="root">
<!-- 遍历数组 -->
<h2>人员列表(遍历数组)</h2>
<button @click.once="add">添加一个老刘</button>
<ul>
<li v-for="(p,index) of persons" :key="index">
{
{p.name}}-{
{p.age}}
<input type="text">
</li>
</ul>
</div>
<script type="text/javascript">
Vue.config.productionTip = false
new Vue({
el:'#root',
data:{
persons:[
{
id:'001',name:'张三',age:18},
{
id:'002',name:'李四',age:19},
{
id:'003',name:'王五',age:20}
]
},
methods: {
add(){
const p = {
id:'004',name:'老刘',age:40}
this.persons.unshift(p)
}
},
})
</script>
</html>
<!DOCTYPE html>
<html>
	<head>
		<meta charset="UTF-8" />
		<title>列表过滤</title>
		<script type="text/javascript" src="../js/vue.js"></script>
	</head>
	<body>
		<!-- 准备好一个容器-->
		<div id="root">
			<h2>人员列表</h2>
			<input type="text" placeholder="请输入名字" v-model="keyWord">
			<ul>
				<li v-for="(p,index) of filPerons" :key="index">
					{

   {p.name}}-{

   {p.age}}-{

   {p.sex}}
				</li>
			</ul>
		</div>

		<script type="text/javascript">
			Vue.config.productionTip = false

			//用watch实现
			//#region
			/* new Vue({
				el:'#root',
				data:{
					keyWord:'',
					persons:[
						{id:'001',name:'马冬梅',age:19,sex:'女'},
						{id:'002',name:'周冬雨',age:20,sex:'女'},
						{id:'003',name:'周杰伦',age:21,sex:'男'},
						{id:'004',name:'温兆伦',age:22,sex:'男'}
					],
					filPerons:[]
				},
				watch:{
					keyWord:{
						immediate:true,
						handler(val){
							this.filPerons = this.persons.filter((p)=>{
								return p.name.indexOf(val) !== -1
							})
						}
					}
				}
			}) */
			//#endregion

			//用computed实现
			new Vue({


				el:'#root',
				data:{


					keyWord:'',
					persons:[
						{

      id:'001',name:'马冬梅',age:19,sex:'女'},
						{

      id:'002',name:'周冬雨',age:20,sex:'女'},
						{

      id:'003',name:'周杰伦',age:21,sex:'男'},
						{

      id:'004',name:'温兆伦',age:22,sex:'男'}
					]
				},
				computed:{


					filPerons(){


						return this.persons.filter((p)=>{


							return p.name.indexOf(this.keyWord) !== -1
						})
					}
				}
			})
		</script>
</html>
<!DOCTYPE html>
<html>
	<head>
		<meta charset="UTF-8" />
		<title>列表排序</title>
		<script type="text/javascript" src="../js/vue.js"></script>
	</head>
	<body>
		<!-- 准备好一个容器-->
		<div id="root">
			<h2>人员列表</h2>
			<input type="text" placeholder="请输入名字" v-model="keyWord">
			<button @click="sortType = 2">年龄升序</button>
			<button @click="sortType = 1">年龄降序</button>
			<button @click="sortType = 0">原顺序</button>
			<ul>
				<li v-for="(p,index) of filPerons" :key="p.id">
					{

   {p.name}}-{

   {p.age}}-{

   {p.sex}}
					<input type="text">
				</li>
			</ul>
		</div>

		<script type="text/javascript">
			Vue.config.productionTip = false

			new Vue({


				el:'#root',
				data:{


					keyWord:'',
					sortType:0, //0原顺序 1降序 2升序
					persons:[
						{

      id:'001',name:'马冬梅',age:30,sex:'女'},
						{

      id:'002',name:'周冬雨',age:31,sex:'女'},
						{

      id:'003',name:'周杰伦',age:18,sex:'男'},
						{

      id:'004',name:'温兆伦',age:19,sex:'男'}
					]
				},
				computed:{


					filPerons(){


						const arr = this.persons.filter((p)=>{


							return p.name.indexOf(this.keyWord) !== -1
						})
						//判断一下是否需要排序
						if(this.sortType){


							arr.sort((p1,p2)=>{


								return this.sortType === 1 ? p2.age-p1.age : p1.age-p2.age
							})
						}
						return arr
					}
				}
			})

		</script>
</html>
<!DOCTYPE html>
<html>
	<head>
		<meta charset="UTF-8" />
		<title>更新时的一个问题</title>
		<script type="text/javascript" src="../js/vue.js"></script>
	</head>
	<body>
		<!-- 准备好一个容器-->
		<div id="root">
			<h2>人员列表</h2>
			<button @click="updateMei">更新马冬梅的信息</button>
			<ul>
				<li v-for="(p,index) of persons" :key="p.id">
					{

   {p.name}}-{

   {p.age}}-{

   {p.sex}}
				</li>
			</ul>
		</div>

		<script type="text/javascript">
			Vue.config.productionTip = false

			const vm = new Vue({


				el:'#root',
				data:{


					persons:[
						{

      id:'001',name:'马冬梅',age:30,sex:'女'},
						{

      id:'002',name:'周冬雨',age:31,sex:'女'},
						{

      id:'003',name:'周杰伦',age:18,sex:'男'},
						{

      id:'004',name:'温兆伦',age:19,sex:'男'}
					]
				},
				methods: {


					updateMei(){


						// this.persons[0].name = '马老师' //奏效
						// this.persons[0].age = 50 //奏效
						// this.persons[0].sex = '男' //奏效
						// this.persons[0] = {id:'001',name:'马老师',age:50,sex:'男'} //不奏效
						this.persons.splice(0,1,{

      id:'001',name:'马老师',age:50,sex:'男'})
					}
				}
			})

		</script>
</html>
<!DOCTYPE html>
<html>
	<head>
		<meta charset="UTF-8" />
		<title>总结数据监视</title>
		<style>
			button{


				margin-top: 10px;
			}
		</style>
		<!-- 引入Vue -->
		<script type="text/javascript" src="../js/vue.js"></script>
	</head>
	<body>
		<!--
			Vue监视数据的原理:
				1. vue会监视data中所有层次的数据。

				2. 如何监测对象中的数据?
								通过setter实现监视,且要在new Vue时就传入要监测的数据。
									(1).对象中后追加的属性,Vue默认不做响应式处理
									(2).如需给后添加的属性做响应式,请使用如下API:
													Vue.set(target,propertyName/index,value) 或
													vm.$set(target,propertyName/index,value)

				3. 如何监测数组中的数据?
									通过包裹数组更新元素的方法实现,本质就是做了两件事:
										(1).调用原生对应的方法对数组进行更新。
										(2).重新解析模板,进而更新页面。

				4.在Vue修改数组中的某个元素一定要用如下方法:
							1.使用这些API:push()、pop()、shift()、unshift()、splice()、sort()、reverse()
							2.Vue.set() 或 vm.$set()

				特别注意:Vue.set() 和 vm.$set() 不能给vm 或 vm的根数据对象 添加属性!!!
		-->
		<!-- 准备好一个容器-->
		<div id="root">
			<h1>学生信息</h1>
			<button @click="student.age++">年龄+1岁</button> <br/>
			<button @click="addSex">添加性别属性,默认值:男</button> <br/>
			<button @click="student.sex = '未知' ">修改性别</button> <br/>
			<button @click="addFriend">在列表首位添加一个朋友</button> <br/>
			<button @click="updateFirstFriendName">修改第一个朋友的名字为:张三</button> <br/>
			<button @click="addHobby">添加一个爱好</button> <br/>
			<button @click="updateHobby">修改第一个爱好为:开车</button> <br/>
			<button @click="removeSmoke">过滤掉爱好中的抽烟</button> <br/>
			<h3>姓名:{

   {student.name}}</h3>
			<h3>年龄:{

   {student.age}}</h3>
			<h3 v-if="student.sex">性别:{

   {student.sex}}</h3>
			<h3>爱好:</h3>
			<ul>
				<li v-for="(h,index) in student.hobby" :key="index">
					{

   {h}}
				</li>
			</ul>
			<h3>朋友们:</h3>
			<ul>
				<li v-for="(f,index) in student.friends" :key="index">
					{

   {f.name}}--{

   {f.age}}
				</li>
			</ul>
		</div>
	</body>

	<script type="text/javascript">
		Vue.config.productionTip = false //阻止 vue 在启动时生成生产提示。

		const vm = new Vue({


			el:'#root',
			data:{


				student:{


					name:'tom',
					age:18,
					hobby:['抽烟','喝酒','烫头'],
					friends:[
						{

      name:'jerry',age:35},
						{

      name:'tony',age:36}
					]
				}
			},
			methods: {


				addSex(){


					// Vue.set(this.student,'sex','男')
					this.$set(this.student,'sex','男')
				},
				addFriend(){


					this.student.friends.unshift({

      name:'jack',age:70})
				},
				updateFirstFriendName(){


					this.student.friends[0].name = '张三'
				},
				addHobby(){


					this.student.hobby.push('学习')
				},
				updateHobby(){


					// this.student.hobby.splice(0,1,'开车')
					// Vue.set(this.student.hobby,0,'开车')
					this.$set(this.student.hobby,0,'开车')
				},
				removeSmoke(){


					this.student.hobby = this.student.hobby.filter((h)=>{


						return h !== '抽烟'
					})
				}
			}
		})
	</script>
</html>
1.14收集表单数据
<!DOCTYPE html>
<html>
	<head>
		<meta charset="UTF-8" />
		<title>收集表单数据</title>
		<script type="text/javascript" src="../js/vue.js"></script>
	</head>
	<body>
		<!--
			收集表单数据:
					若:<input type="text"/>,则v-model收集的是value值,用户输入的就是value值。
					若:<input type="radio"/>,则v-model收集的是value值,且要给标签配置value值。
					若:<input type="checkbox"/>
							1.没有配置input的value属性,那么收集的就是checked(勾选 or 未勾选,是布尔值)
							2.配置input的value属性:
									(1)v-model的初始值是非数组,那么收集的就是checked(勾选 or 未勾选,是布尔值)
									(2)v-model的初始值是数组,那么收集的的就是value组成的数组
					备注:v-model的三个修饰符:
									lazy:失去焦点再收集数据
									number:输入字符串转为有效的数字
									trim:输入首尾空格过滤
		-->
		<!-- 准备好一个容器-->
		<div id="root">
			<form @submit.prevent="demo">
				账号:<input type="text" v-model.trim="userInfo.account"> <br/><br/>
				密码:<input type="password" v-model="userInfo.password"> <br/><br/>
				年龄:<input type="number" v-model.number="userInfo.age"> <br/><br/>
				性别:
				男<input type="radio" name="sex" v-model="userInfo.sex" value="male">
				女<input type="radio" name="sex" v-model="userInfo.sex" value="female"> <br/><br/>
				爱好:
				学习<input type="checkbox" v-model="userInfo.hobby" value="study">
				打游戏<input type="checkbox" v-model="userInfo.hobby" value="game">
				吃饭<input type="checkbox" v-model="userInfo.hobby" value="eat">
				<br/><br/>
				所属校区
				<select v-model="userInfo.city">
					<option value="">请选择校区</option>
					<option value="beijing">北京</option>
					<option value="shanghai">上海</option>
					<option value="shenzhen">深圳</option>
					<option value="wuhan">武汉</option>
				</select>
				<br/><br/>
				其他信息:
				<textarea v-model.lazy="userInfo.other"></textarea> <br/><br/>
				<input type="checkbox" v-model="userInfo.agree">阅读并接受<a href="http://www.atguigu.com">《用户协议》</a>
				<button>提交</button>
			</form>
		</div>
	</body>

	<script type="text/javascript">
		Vue.config.productionTip = false

		new Vue({


			el:'#root',
			data:{


				userInfo:{


					account:'',
					password:'',
					age:18,
					sex:'female',
					hobby:[],
					city:'beijing',
					other:'',
					agree:''
				}
			},
			methods: {


				demo(){


					console.log(JSON.stringify(this.userInfo))
				}
			}
		})
	</script>
</html>
1.15过滤器
1.功能:对要显示的数据进行特定格式化后再显示
2.注意:并没有改变原本的数据,是产生新的对应的数据
<!DOCTYPE html>
<html>
	<head>
		<meta charset="UTF-8" />
		<title>过滤器</title>
		<script type="text/javascript" src="../js/vue.js"></script>
		<script type="text/javascript" src="../js/dayjs.min.js"></script>
	</head>
	<body>
		<!--
			过滤器:
				定义:对要显示的数据进行特定格式化后再显示(适用于一些简单逻辑的处理)。
				语法:
						1.注册过滤器:Vue.filter(name,callback) 或 new Vue{filters:{}}
						2.使用过滤器:{

    { xxx | 过滤器名}}  或  v-bind:属性 = "xxx | 过滤器名"
				备注:
						1.过滤器也可以接收额外参数、多个过滤器也可以串联
						2.并没有改变原本的数据, 是产生新的对应的数据
		-->
		<!-- 准备好一个容器-->
		<div id="root">
			<h2>显示格式化后的时间</h2>
			<!-- 计算属性实现 -->
			<h3>现在是:{

   {fmtTime}}</h3>
			<!-- methods实现 -->
			<h3>现在是:{

   {getFmtTime()}}</h3>
			<!-- 过滤器实现 -->
			<h3>现在是:{

   {time | timeFormater}}</h3>
			<!-- 过滤器实现(传参) -->
			<h3>现在是:{

   {time | timeFormater('YYYY_MM_DD') | mySlice}}</h3>
			<h3 :x="msg | mySlice">尚硅谷</h3>
		</div>

		<div id="root2">
			<h2>{

   {msg | mySlice}}</h2>
		</div>
	</body>

	<script type="text/javascript">
		Vue.config.productionTip = false
		//全局过滤器
		Vue.filter('mySlice',function(value){


			return value.slice(0,4)
		})

		new Vue({


			el:'#root',
			data:{


				time:1621561377603, //时间戳
				msg:'你好,尚硅谷'
			},
			computed: {


				fmtTime(){


					return dayjs(this.time).format('YYYY年MM月DD日 HH:mm:ss')
				}
			},
			methods: {


				getFmtTime(){


					return dayjs(this.time).format('YYYY年MM月DD日 HH:mm:ss')
				}
			},
			//局部过滤器
			filters:{


				timeFormater(value,str='YYYY年MM月DD日 HH:mm:ss'){


					// console.log('@',value)
					return dayjs(value).format(str)
				}
			}
		})

		new Vue({


			el:'#root2',
			data:{


				msg:'hello,atguigu!'
			}
		})
	</script>
</html>
可能用到的网站
免费的,提供第三方库的网站BootCDN:https://www.bootcdn.cn