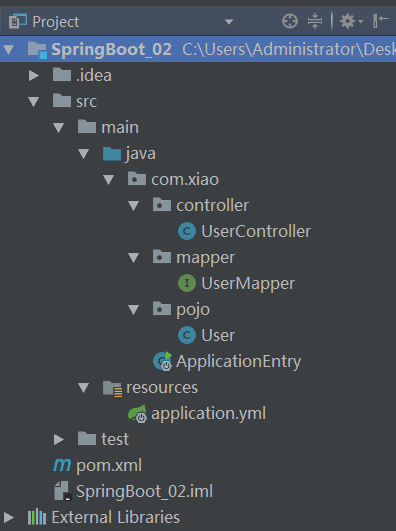
一.工程目录如下
二.在pom.xml文件中引入相应依赖
<?xml version="1.0" encoding="UTF-8"?>
<project xmlns="http://maven.apache.org/POM/4.0.0"
         xmlns:xsi="http://www.w3.org/2001/XMLSchema-instance"
         xsi:schemaLocation="http://maven.apache.org/POM/4.0.0 http://maven.apache.org/xsd/maven-4.0.0.xsd">
    <modelVersion>4.0.0</modelVersion>

    <groupId>com.xiao</groupId>
    <artifactId>SpringBoot_02</artifactId>
    <version>1.0-SNAPSHOT</version>
    <packaging>jar</packaging>

    <parent>
        <groupId>org.springframework.boot</groupId>
        <artifactId>spring-boot-starter-parent</artifactId>
        <version>1.5.12.RELEASE</version>
        <relativePath/>
    </parent>

    <properties>
        <project.build.sourceEncoding>UTF-8</project.build.sourceEncoding>
        <project.reporting.outputEncoding>UTF-8</project.reporting.outputEncoding>
        <java.version>1.8</java.version>
    </properties>

    <dependencies>
        <!-- web组件-->
        <dependency>
            <groupId>org.springframework.boot</groupId>
            <artifactId>spring-boot-starter-web</artifactId>
        </dependency>
        <!-- Mybatis组件-->
        <dependency>
            <groupId>org.mybatis.spring.boot</groupId>
            <artifactId>mybatis-spring-boot-starter</artifactId>
            <version>1.3.0</version>
        </dependency>
        <!-- Mysql驱动-->
        <dependency>
            <groupId>mysql</groupId>
            <artifactId>mysql-connector-java</artifactId>
        </dependency>
    </dependencies>

</project>
三.在application.yml文件中配置数据库连接信息
spring:
  datasource:
    url: jdbc:mysql://localhost:3306/demo?characterEncoding=utf-8
    driver-class-name: com.mysql.jdbc.Driver
    username: root
    password: root
四.书写实体类User.java
package com.xiao.pojo;

public class User {

	private int id;
	private String userName;
	private String userPassword;
	//省略get/set方法

}
五.书写mapper接口UserMapper
package com.xiao.mapper;

import com.xiao.pojo.User;
import org.apache.ibatis.annotations.Select;
/**
 * @Author 笑笑
 * @Date 19:35 2018/05/03
 */
public interface UserMapper {

    @Select("select * from tb_user where id = #{id}")
     User getUser(Integer id) throws Exception;

}
六.书写用户控制器UserController
为了方便演示,直接在controller中注入mapper
package com.xiao.controller;

import com.xiao.mapper.UserMapper;
import com.xiao.pojo.User;
import org.springframework.beans.factory.annotation.Autowired;
import org.springframework.web.bind.annotation.RequestMapping;
import org.springframework.web.bind.annotation.RestController;
/**
 * @Author 笑笑
 * @Date 19:38 2018/05/03
 */
@RestController
public class UserController {

    //直接注入mapper
    @Autowired
    private UserMapper userMapper;

    @RequestMapping(value = "/getUser")
    public User getUser(Integer id) throws  Exception{

        User user = userMapper.getUser(id);
        return user;
    }

}
七.在启动类中使用@MapperScan注解
package com.xiao;

import org.mybatis.spring.annotation.MapperScan;
import org.springframework.boot.SpringApplication;
import org.springframework.boot.autoconfigure.SpringBootApplication;

/**
 * @Author 笑笑
 * @Date 19:31 2018/05/03
 */
@SpringBootApplication
@MapperScan(basePackages = "com.xiao.mapper")
public class ApplicationEntry {

    public static void main(String[] args){
        SpringApplication.run(ApplicationEntry.class,args);
    }
}
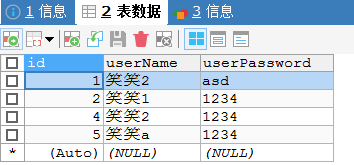
数据库信息如下:
八.启动工程,浏览器访问地址http://localhost:8080/getUser?id=1
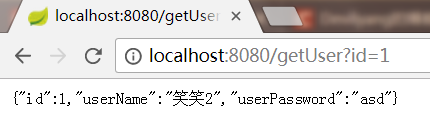
成功!