前言:我之前在学JavaScript的时候,基本上都是看的《JavaScript高级程序设计》,而锻炼JS的例子也基本上是书上的小例子,每章看完了也很容易忘记一些知识点,缺乏实战的锻炼,于是就在网上找一些实例做做并且根据例子做一些拓展实例会比单纯的了解理论知识好多了,于是就有了这个专题文章《JavaScript实例每日一练》,和我一起通过实例深入了解JavaScript的“奥秘”吧[qq:72],本专题文章不定期更新~
JS实现轮播图片
一、简单介绍
轮播图片是一组为了向浏览网页的用户展示图片信息的会自动播放的图片。在许多网站中你都会看到它的身影。
例如:

二、特点
轮播图片一般具备以下几个特点:
1、点击左右两边的箭头切换图片
2、当鼠标移出图片范围,自动切换下一张图片;当鼠标移入图片范围,停止切换下一张图片
3、切换到某一张图片时,底部的按钮样式也跟着改变
4、点击按钮即会切换到相应位置的图片
三、轮播图片原理
一系列的大小相等的图片平铺,利用CSS布局只显示一张图片,其余隐藏。通过计算偏移量利用定时器实现自动播放,或通过手动点击事件切换图片。
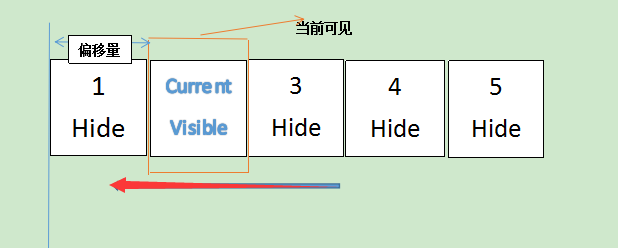
图片来源:https://www.cnblogs.com/LIUYANZUO/p/5679753.html
四、让我们开始吧
本次实例的最终效果为(点击链接查看):
https://augustwuli.github.io/JSDaily/PlayImage/
文件目录
-index.html
-main.css
-main.js
1、HTML结构
index.html
首先我们用父容器“container”存放所有的内容,子容器“list”存放图片,子容器“buttons”存放按钮
<!DOCTYPE html>
<html>
    <head>
        <meta charset="UTF-8">
        <title>实现简单的轮播图片</title>
        <link rel="stylesheet" href="css/main.css" />
    </head>
    <body>
        <div id="container">
            <div id="list" style="left:0px">
                <img src="img/1.png" alt="1"/>
                <img src="img/2.png" alt="2"/>
                <img src="img/3.png" alt="3"/>
                <img src="img/4.png" alt="4"/>
                <img src="img/5.png" alt="5"/>
            </div>
            <div id="buttons">
                <span index="1" class="on"></span>
                <span index="2"></span>
                <span index="3"></span>
                <span index="4"></span>
                <span index="5"></span>
            </div>
            <a href="javascript:;" class="arrow" id="prev"><</a>
            <a href="javascript:;" class="arrow" id="next">></a>
        </div>
        <script src="main.js"></script>
    </body>
</html>
2、CSS样式
*{
    margin: 0;
    padding: 0;
    text-decoration: none;
}
#container{
    margin:20px auto;
    width: 600px;/*此宽度根据图片宽度调整*/
    height: 483px;/*此高度根据图片高度调整*/
    border: 3px solid #333;
    overflow: hidden; /*为了将图片隐藏*/
    position: relative;
}
#list{
    width: 4200px;/*图片总宽度*/
    height: 483px;
    position: absolute;
    z-index: 1;
}
#list img{
    float: left;
    width: 600px;
    height: 483px;
}
#buttons{
    position: absolute;
    height: 10px;
    width: 100px;
    z-index: 2;/*将buttons放在list上层*/
    bottom: 20px;
    right: 250px;
}
#buttons span {
       cursor: pointer;
       float: left;
       border: 1px solid #fff;
       border-radius: 50%;
       height: 10px;
       width: 10px;
       margin-right: 5px;
       background: #E98352;
}
#buttons .on {
       background: #474550;
}
.arrow{
    display: none;
    cursor: pointer;
    line-height: 40px;
    text-align: center;
    font-size: 30px;/*设置箭头的大小*/
    width: 40px;
    height: 40px;
    position: absolute;
    z-index: 2;/*将arrow放在list上层*/
    top: 180px;
    color: #fff;
    background:#474550 ;
}
.arrow:hover {
    background-color: #E98352;
}
#container:hover .arrow {
    display: block;
}
#pre {
    left: 20px;
}
#next {
    right: 20px;
}
3、JS实现功能
(1)点击左右两边的箭头切换图片
window.onload = funtion(){
    var list = document.getElementById("list");
    var prev = document.getElementById("prev");
    var next = document.getElementById("next");
    function animate(offset){
    /*获取的style.left,是相对左边获取距离,所以第一张图后style.left都为负值*/
    /*且style.left获取的是字符串,需要用parseInt()取整转化为数字。*/
    var newLeft = parseInt(list.style.left) +offset;
    list.style.left = newLeft + "px";
    }
    prev.onclick = function(){
    animate(600);
    }
    next.onclick = function(){
    animate(-600);
    }
}
运行后会发现,一直点击右箭头,在第5张图片之后会出现空白,无法切换回第1张。
可以按F12打开控制台查看list容器的left变化。
如图:
每张图片的list容器left值如下图:
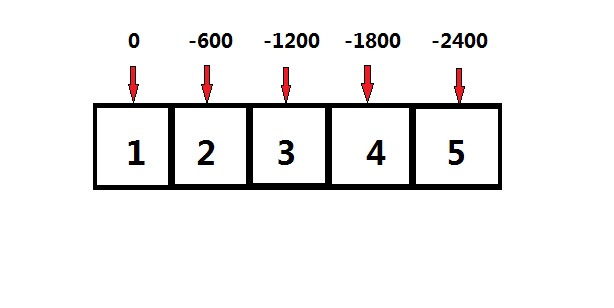
当left值小于2400时,因为没有第6张图片就出现空白,所以这里我们需要对偏移量做一个判断。
应该在animate函数内加上:
if(newLeft<-2400){
      list.style.left = -600 + 'px';
 }
 if(newLeft>0){
      list.style.left = -2400 + 'px';
 }
(2)当鼠标移出图片范围,自动切换下一张图片;当鼠标移入图片范围,停止切换下一张图片。
这个功能我们需要用到window对象的setInterval()间歇调用方法,所谓的间歇调用就是每隔指定的时间就执行一次代码。
在这我们需要鼠标移出图片范围,每隔指定时间就切换到下一张图片。
在代码中插入:
var timer;//设置定时器
    function autoplay(){
    /*setInterval返回的是定时器的ID*/
        timer = setInterval(function(){
            next.onclick()
        },3000);
    }
autoplay();
当鼠标移入图片范围时,清除定时器
var container = document.getElementById('container');
function stopplay(){
        clearInterval(timer);
    }
container.onmouseover = stopplay;
container.onmouseout = autoplay;
(3)切换到某一张图片时,底部的按钮样式也跟着改变
var buttons = document.getElementById('buttons').getElementsByTagName('span');
var index = 1;
function showButton(){
        //清除之前的样式
        for(let i = 0;i<buttons.length;i++){
            if(buttons[i].className == 'on'){
                buttons[i].className = '';
            }
        }
        buttons[index-1].className = 'on';
    }
    prev.onclick = function() {
        index-=1;
        if(index < 1){
            index = 5;
        }
        showButton();
        animate(600);
    }
    next.onclick = function() {
        index+=1;
        if(index > 5){
            index = 1;
        }
        showButton();
        animate(-600);
    }
(4)点击按钮即会切换到相应位置的图片
for(var i = 0;i<buttons.length;i++){
        buttons[i].onclick = function() {
            var clickIndex = parseInt(this.getAttribute('index'));
            var offset = 600*(index - clickIndex);
            animate(offset);
            index = clickIndex;
            showButton();
        }
    }
至此,我们就完成了轮播图片的基本功能。
(5)扩展功能
为轮播图片增加切换的动画效果
function animate(offset) {
        //获取的是style.left,是相对左边获取距离,所以第一张图后style.left都为负值,
        //且style.left获取的是字符串,需要用parseInt()取整转化为数字。
        var newLeft = parseInt(list.style.left) + offset;
        list.style.left = newLeft + 'px';
        /*只需在这添加一行代码*/
        list.style.transition='300ms ease';
        /*添加css的transition*/
        if(newLeft < -2400){
            list.style.left = 0 + 'px';
        }
        if(newLeft > 0){
            list.style.left = -2400 + 'px';
        }
    }
五、扩展实例
本篇文章的扩展实例为b站首页的登录处的模拟弹幕。
如图所示:

此实例也是运用了和轮播图片一样的原理,都是用css隐藏图片,然后用js实现切换图片。
六、源码下载
(喜欢的话记得star一下仓库哦)
轮播图片和扩展实例代码下载地址:
轮播图片:
https://github.com/Augustwuli/JSDaily/tree/master/PlayImage
扩展实例:
https://github.com/Augustwuli/JSDaily/tree/master/bilibiliLogin

七、参考博客
手把手原生js简单轮播图: