目录
一、概述:
学习过程中就学习两大块,要保护哪个资源,要为这个资源匹配什么规则。
- 资源:Java中一切皆资源 -- 简单说就是一个微服务访问路径的 rest 接口
- 规则:流量规则 、熔断规则、负载规则等
如果要保护哪个资源,就在哪个微服务中引入sentinel。
如果要为这个资源匹配规则,就需要引入 sentinel dashboard仪表盘组件,这个组件可以是全局的。
二、原理:
在保护的微服务(资源)中引入sentinel,在全局引入sentinel dashboard仪表盘,在sentinel dashboard页面中配置规则及资源和规则的对应关系,例如 /rest/select(资源)==> 流量控制(规则)。当配置完规则,sentinel dashboard会与 微服务中的 sentinel 组件进行通信,当sentinel 组件感知到这个规则时候,就会在自己的内存中形成这样的规则,当有请求再访问这个微服务时候,会先检测这个微服务中是否有这个规则,如果有就应用该规则。将来如果高峰期我们对哪个资源要进行保护,就对哪个资源配置规则,如果高峰期过了,可以删除对此资源保护的规则即可。
三、sentinel应用入门案例
此案例中以订单服务和商品服务作为被保护的资源为案例。
1.创建基础环境
见 第十六章 Spring Cloud Alibaba 基础环境搭建
2.创建两个服务提供者和一个服务消费者模块,分别为:
cloudalibaba-product-server9001
cloudalibaba-product-server9002
cloudalibaba-order-server9000
3. 引入 sentinel 依赖
- 服务提供者和服务消费者引入 sentinel 依赖
引入服务提供者 cloudalibaba-product-server9001 与 cloudalibaba-product-server9002 及服务消费者 cloudalibaba-order-server9000 的 sentinel 依赖。
服务消费者(order-server)引入 sentinel 依赖
<?xml version="1.0" encoding="UTF-8"?>

<project xmlns="http://maven.apache.org/POM/4.0.0" xmlns:xsi="http://www.w3.org/2001/XMLSchema-instance"
         xsi:schemaLocation="http://maven.apache.org/POM/4.0.0 http://maven.apache.org/xsd/maven-4.0.0.xsd">
    <parent>
        <artifactId>springcloudalibaba</artifactId>
        <groupId>com.hwadee.springcloud2022</groupId>
        <version>0.0.1-SNAPSHOT</version>
    </parent>
    <modelVersion>4.0.0</modelVersion>

    <groupId>com.hwadee.springcloud</groupId>
    <artifactId>cloudalibaba-order-server9000</artifactId>

    <dependencies>
        <!-- 引入 sentinel 依赖 -->
        <dependency>
            <groupId>com.alibaba.cloud</groupId>
            <artifactId>spring-cloud-starter-alibaba-sentinel</artifactId>
        </dependency>
        <!-- 引入Nacos Config  Client 配置中心客户端依赖 -->
        <dependency>
            <groupId>com.alibaba.cloud</groupId>
            <artifactId>spring-cloud-starter-alibaba-nacos-config</artifactId>
        </dependency>
        <dependency>
            <groupId>org.springframework.cloud</groupId>
            <artifactId>spring-cloud-starter-bootstrap</artifactId>
        </dependency>

        <!-- openfeign相关 开始 -->
        <!--告诉微服务注册中心我是微服务的client端 openfeign 需要和eureak整合-->
        <dependency>
            <groupId>org.springframework.cloud</groupId>
            <artifactId>spring-cloud-starter-openfeign</artifactId>
        </dependency>
        <dependency>
            <groupId>org.springframework.cloud</groupId>
            <artifactId>spring-cloud-loadbalancer</artifactId>
        </dependency>
        <!-- openfeign相关 结束 -->

        <!-- 引入Nacos Client 客户端依赖 -->
        <dependency>
            <groupId>com.alibaba.cloud</groupId>
            <artifactId>spring-cloud-starter-alibaba-nacos-discovery</artifactId>
        </dependency>

        <!--web依赖-->
        <dependency>
            <groupId>org.springframework.boot</groupId>
            <artifactId>spring-boot-starter-web</artifactId>
        </dependency>
        <!-- 管理公共api -->
        <dependency>
            <groupId>com.hwadee.springcloud</groupId>
            <artifactId>springcloud-api</artifactId>
            <version>0.0.1-SNAPSHOT</version>
        </dependency>
    </dependencies>
</project>
服务提供者(product-server)引入 sentinel 依赖
<?xml version="1.0" encoding="UTF-8"?>

<project xmlns="http://maven.apache.org/POM/4.0.0" xmlns:xsi="http://www.w3.org/2001/XMLSchema-instance"
         xsi:schemaLocation="http://maven.apache.org/POM/4.0.0 http://maven.apache.org/xsd/maven-4.0.0.xsd">
  <parent>
    <artifactId>springcloudalibaba</artifactId>
    <groupId>com.hwadee.springcloud2022</groupId>
    <version>0.0.1-SNAPSHOT</version>
  </parent>
  <modelVersion>4.0.0</modelVersion>

  <groupId>com.hwadee.springcloud</groupId>
  <artifactId>cloudalibaba-product-server9001</artifactId>

  <dependencies>
    <!-- 引入 sentinel 依赖 -->
    <dependency>
      <groupId>com.alibaba.cloud</groupId>
      <artifactId>spring-cloud-starter-alibaba-sentinel</artifactId>
    </dependency>

    <!-- 引入Nacos Config  Client 配置中心客户端依赖 -->
    <dependency>
      <groupId>com.alibaba.cloud</groupId>
      <artifactId>spring-cloud-starter-alibaba-nacos-config</artifactId>
    </dependency>
    <dependency>
      <groupId>org.springframework.cloud</groupId>
      <artifactId>spring-cloud-starter-bootstrap</artifactId>
    </dependency>

    <!-- 引入Nacos Client 客户端依赖 -->
    <dependency>
      <groupId>com.alibaba.cloud</groupId>
      <artifactId>spring-cloud-starter-alibaba-nacos-discovery</artifactId>
    </dependency>

    <!--web依赖-->
    <dependency>
      <groupId>org.springframework.boot</groupId>
      <artifactId>spring-boot-starter-web</artifactId>

    </dependency>
    <!-- 管理公共api -->
    <dependency>
      <groupId>com.hwadee.springcloud</groupId>
      <artifactId>springcloud-api</artifactId>
      <version>0.0.1-SNAPSHOT</version>
    </dependency>
  </dependencies>

</project>
4.编写配置
服务注册到 Nacos 中心,并指定端口,连接到 sentinal daboard,开启 sentinal
配置服务消费者(order-server)
spring:
  cloud:
    nacos:
      config:
        #客户端指定 要拉取文件的配置中心的地址
        server-addr: localhost:8848 # 配置nacos server 配置中心地址
        group:  DEFAULT_GROUP # 指定拉取的组
        name: order-prod # 指定拉取的文件名字
        file-extension: yaml
    sentinel:
      enabled: true #开启sentinel保护
      transport:
        dashboard: 192.168.56.21:8080 #配置连接到 dashboard 的web的地址
        port: 8719 #指定sentinel组件与 sentinel dashboard的TCP通信地址192.168.56.21:8719 默认是8719,如果过被占用,会自动从8719开始+1,直到找到未占用的端口号为止
配置服务提供者(product-server)
spring:
  cloud:
    nacos:
      config:
        #客户端指定 要拉取文件的配置中心的地址
        server-addr: localhost:8848 # 配置nacos server 配置中心地址
        group: DEFAULT_GROUP # 指定拉取的组
        name: product-prod # 指定拉取的文件名字
        file-extension: yaml
    sentinel:
      enabled: true #开启sentinel保护
      transport:
        dashboard: 192.168.56.21:8080 #配置连接到 dashboard 的web的地址
        port: 8719 #指定sentinel组件与 sentinel dashboard的TCP通信地址192.168.56.21:8719 默认是8719,如果过被占用,会自动从8719开始+1,直到找到未占用的端口号为止
5.创建主启动类
创建服务提供者和服务消费者的主启动类,分别如下:
- OrderServerApplication
@SpringBootApplication
@EnableFeignClients
public class OrderServerApplication {
    public static void main(String[] args) {
        SpringApplication.run(OrderServerApplication.class, args);
    }
}- ProductServerApplication
@SpringBootApplication
public class ProductServerApplication {
    public static void main(String[] args) {
        SpringApplication.run(ProductServerApplication.class, args);
    }
}
6. 编写消费者 OpenFegin 接口
import com.hwadee.springcloud.entity.Product;
import org.springframework.cloud.openfeign.FeignClient;
import org.springframework.stereotype.Component;
import org.springframework.web.bind.annotation.PathVariable;
import org.springframework.web.bind.annotation.RequestMapping;

@Component // 让 spring 可以识别,不加也行,但是在注入的时候 IDEA 会报错,不会影响运行,但有条红线让自己不舒服
@FeignClient("PRODUCT-SERVICE-PROVIDER")
public interface IOrderFeignService {
    @RequestMapping(value = "/product/buy/{id}")
    Product findOrderById(@PathVariable Long id);
}
7.创建controller
编写消费者 order-service9000 和 product-server9001 分别如下:
- OrderController
在订单服务中创建 OrderController ,在 OrderController 中注入 IOrderFeignService 接口,通过 IOrderFeignService 接口方法 调用远端服务,代码如下:
import com.hwadee.springcloud.entity.Product;
import com.hwadee.springcloud.service.IOrderFeignService;
import org.springframework.beans.factory.annotation.Autowired;
import org.springframework.web.bind.annotation.PathVariable;
import org.springframework.web.bind.annotation.RequestMapping;
import org.springframework.web.bind.annotation.RestController;

@RestController
@RequestMapping("/order")
public class OrderController {

    @Autowired
    IOrderFeignService orderFeignService;

    @RequestMapping("/buy/{id}")
    public Product buy(@PathVariable Long id) {
        Product product = orderFeignService.findOrderById(id);
        return product;
    }

    @RequestMapping("/select/{id}")
    public Product selectById(@PathVariable Long id) {
        Product product = new Product();
        product.setName("selectById 执行");
        System.out.println(product);
        return product;
    }
}- ProductController
import com.hwadee.springcloud.entity.Product;
import org.springframework.beans.factory.annotation.Value;
import org.springframework.web.bind.annotation.PathVariable;
import org.springframework.web.bind.annotation.RequestMapping;
import org.springframework.web.bind.annotation.RestController;
import java.math.BigDecimal;

@RestController
@RequestMapping("/product")
public class ProductController {
    //方便后面讲负载均衡,查看ip,此处获取配置中的端口号和ip
    @Value("${server.port}")
    private String port;
    @Value("${spring.cloud.client.ip-address}")
    private String ip;

    @RequestMapping("/buy/{id}")
    public Product findById(@PathVariable Long id) {
        Product product = new Product();
        product.setId(id);
        // 后面需要测试负载均衡,所以返回 ip 地址及端口号
        product.setName("当前访问服务地址:" + ip + ":" + port+"  "+"查询商品订单,订单号:"+id);
        product.setPrice(new BigDecimal(10000.0));
        System.out.println(product);
        return product;
    }
}
8.启动测试
- 启动Nacos
- 启动sentinel dashboard
- 启动服务消费者order-server
- 启动服务提供者product-server
- 访问 http://localhost:9000/order/buy/1 或者 http://localhost:9001/product/buy/1
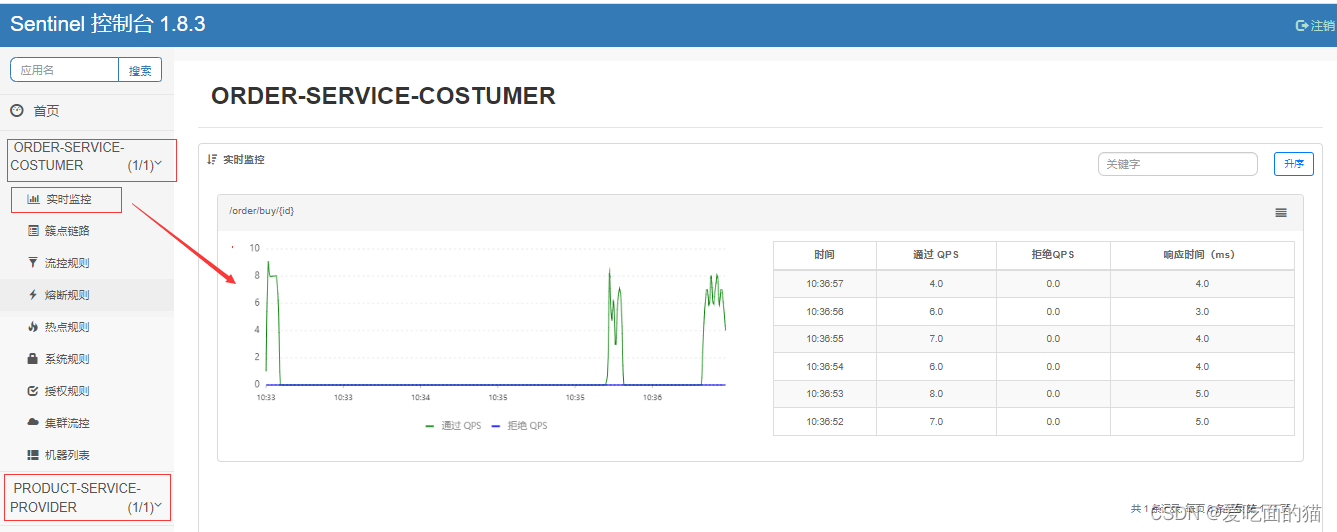
- 注意:因为sentinel dashboard是延时加载形式,只油访问一次才能在界面显示。
- 对 http://localhost:9000/order/buy/1 多次刷新
- 访问 http://localhost:8080/#/dashboard 查看结果