版权声明:本文为博主原创文章,未经博主允许不得转载。 https://blog.csdn.net/u011171125/article/details/86349732
Spring入门学习(基于XML文件的方式配置事务)
XML方式配置事务
- 复制之前的包,去掉相关的注解,新建Spring配置文件如下:
测试方法如下:<?xml version="1.0" encoding="UTF-8"?> <beans xmlns="http://www.springframework.org/schema/beans" xmlns:xsi="http://www.w3.org/2001/XMLSchema-instance" xmlns:context="http://www.springframework.org/schema/context" xmlns:tx="http://www.springframework.org/schema/tx" xsi:schemaLocation="http://www.springframework.org/schema/beans http://www.springframework.org/schema/beans/spring-beans.xsd http://www.springframework.org/schema/tx http://www.springframework.org/schema/tx/spring-tx-4.1.xsd http://www.springframework.org/schema/context http://www.springframework.org/schema/context/spring-context-4.1.xsd"> <!-- 导入资源文件 --> <context:property-placeholder location="classpath:db.properties"/> <!-- 配置c3p0数据源 --> <bean id="dataSource" class="com.mchange.v2.c3p0.ComboPooledDataSource"> <property name="user" value="${jdbc.user}"></property> <property name="password" value="${jdbc.password}"></property> <property name="jdbcUrl" value="${jdbc.jdbcUrl}"></property> <property name="driverClass" value="${jdbc.driverClass}"></property> <property name="initialPoolSize" value="${jdbc.initPoolSize}"></property> <property name="maxPoolSize" value="${jdbc.maxPoolSize}"></property> </bean> <!-- 配置Spring的JdbcTemplete --> <bean id="jdbcTemplete" class="org.springframework.jdbc.core.JdbcTemplate"> <property name="dataSource" ref="dataSource"></property> </bean> <!-- 配置Bean --> <bean id="bookShopDao" class="com.fafa.spring.tx.xml.BookShopDaoImpl"> <property name="jdbcTemplate" ref="jdbcTemplete"></property> </bean> <bean id="bookShopService" class="com.fafa.spring.tx.xml.BookShopServiceImpl"> <property name="bookShopDao" ref="bookShopDao"></property> </bean> <bean id="cashier" class="com.fafa.spring.tx.xml.CashierImpl"> <property name="bookShopService" ref="bookShopService"></property> </bean> </beans>
此时设置余额为30,两本书的库存为10本,执行public class SpringTransactionTest { private ApplicationContext ctx = null; private BookShopDao bookShopDao = null; private BookShopService bookShopService = null; private Cashier cashier = null; { ctx = new ClassPathXmlApplicationContext("classpath:applicationContext-tx-xml.xml"); bookShopDao = ctx.getBean(BookShopDao.class); bookShopService = ctx.getBean(BookShopService.class); cashier = ctx.getBean(Cashier.class); } @Test public void testBookShopService() { bookShopService.purchase("AA", "1001"); } @Test public void testTansactionPropagation() { cashier.checkout("AA", Arrays.asList("1001","1002")); } }testBookShopService后由于目前还没有事务控制,所以提示余额不足后,1001的库存仍然会减1。


- 添加事务管理
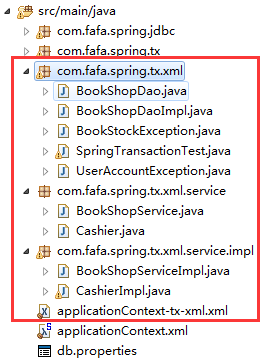
再次执行<!-- 1.配置事务管理器 --> <bean id="transactionManager" class="org.springframework.jdbc.datasource.DataSourceTransactionManager"> <property name="dataSource" ref="dataSource"></property> </bean> <!-- 2.配置事务属性(隔离级别,只读) --> <tx:advice id="txAdvice" transaction-manager="transactionManager"> <tx:attributes> <tx:method name="*"/> </tx:attributes> </tx:advice> <!-- 3.配置事务切入点及把事务切入点和事务属性关联起来 --> <aop:config> <aop:pointcut expression="execution(* com.fafa.spring.tx.xml.BookShopService.*(..))" id="txPointCut"/> <aop:advisor advice-ref="txAdvice" pointcut-ref="txPointCut"/> </aop:config>testBookShopService方法后,由于事务管理,所以当余额不足时,事务会发生回滚,库存不变。 - 修改包结构如下(记得修改xml文件中引入的包名):
事务的切点可以修改如下:<!-- 3.配置事务切入点及把事务切入点和事务属性关联起来 --> <aop:config> <aop:pointcut expression="execution(* com.fafa.spring.tx.xml.service.*.*(..))" id="txPointCut"/> <aop:advisor advice-ref="txAdvice" pointcut-ref="txPointCut"/> </aop:config> - 测试
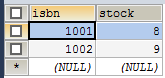
修改余额为300,库存都为10,执行testTansactionPropagation方法购买两本书:
购买成功,余额-170,库存各自-1。
- 我们再测试事务的传播属性,为
purchase方法添加属性,修改配置如下:
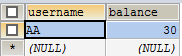
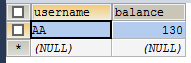
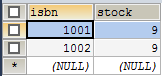
测试再来测试<!-- 2.配置事务属性(隔离级别,只读) --> <tx:advice id="txAdvice" transaction-manager="transactionManager"> <tx:attributes> <!-- 根据方法名指定事务的属性 --> <tx:method name="purchase" propagation="REQUIRES_NEW"/> <tx:method name="get*" read-only="true"/> <tx:method name="find*" read-only="true"/> <tx:method name="*"/> </tx:attributes> </tx:advice>testTansactionPropagation方法:
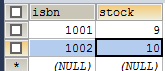
结果为余额不变,1001的库存-1。