此文章是本人在学习React的时候,写下的学习笔记,在此纪录和分享。此为第十篇,主要介绍React非常重要的组件的生命周期(旧)。要学习react新的生命周期,那必须先学习旧的生命周期。
目录
1.1.1案例卸载功能与ReactDOM.unmountComponentAtNode
1.1.2案例透明的渐变功能与componentDidMount(){}
1.1.3案例透明的渐变功能与componentWillUnmount(){}
1.引出生命周期概念
1.1案例
首先我们写一个小案例,慢慢的引出生命周期的概念。案例:写一个文字标题,一直处于透明度变化当中,透明度由1慢慢变成0,然后瞬间变成1,再慢慢变成0,以此反复,而且是一打开页面就开始变化了。再写一个按钮,点击这个按钮,就会把标题带着按钮一起消失,就是把组件给干掉了(卸载)。
首先在react官网中对生命周期的介绍:
当 Clock 组件第一次被渲染到 DOM 中的时候,就为其设置一个计时器。这在 React 中被称为“挂载(mount)”。
同时,当 DOM 中 Clock 组件被删除的时候,应该清除计时器。这在 React 中被称为“卸载(unmount)”。
所以我们有了两个概念,挂载(mount)和卸载(unmount)。
1.1.1案例卸载功能与ReactDOM.unmountComponentAtNode
首先我们写按钮的功能,也就是卸载组件:
1.我们给按钮添加了点击事件,事件的回调函数是death。在death内,引用了一个react的api,这个api名字非常长,但语义化非常强,ReactDOM.unmountComponentAtNode(被卸载的组件)。
document.getElementById('test1'),找到挂载在test1上面的组件,便可以使用此api对组件卸载。
class Life extends React.Component {
     death = ()=>{
     //卸载组件
          ReactDOM.unmountComponentAtNode(document.getElementById('test1'))
      }
      render() {
          return (
               <div>
                   <h2>React学不会怎么办?</h2>
                   <button onClick={this.death}>不活了</button>
               </div>
           )
       }
}
ReactDOM.render(<Life />, document.getElementById('test1'))
1.1.2案例透明的渐变功能与componentDidMount(){}
然后我们想办法,让标题处于时刻渐变的状态。
状态(state)可以驱动页面的显示和更新,所以在透明度改变这种事上,我们得先定义一个state。
state = {opacity:0.3}
然后为h2标签写上style:<h2 style={ {opacity:this.state.opacity}}>React学不会怎么办?</h2>
如此,页面上的标题的透明度,就会变成我们state里面写的透明度。
但我们得想办法,让透明的一直变化。从完全可见到彻底消失,耗时两秒。透明度由1到0,耗时是2s,如果我们使用间隔定时器,那么每次给200毫米,减少0.1。
那么我们把间隔定时器写在哪呢?我们尝试写在render函数里面(这样写是有问题的,大家不要跟着写,这里只是展示错误)。代码如下:
render() {
      setInterval(()=>{
      //获取原状态
      let {opacity} = this.state
      //减少0.1
      opacity -= 0.1
      if(opacity <= 0){
            opacity = 1
      }
            this.setState({opacity})
      },200)
       return (
            <div>
               <h2 style={

   {opacity:this.state.opacity}}>React学不会怎么办?</h2>
               <button onClick={this.death}>不活了</button>
            </div>
      )
}
这样写后,页面我们写的标题,透明度会改变的越来越快,和闪烁一样,不是我们想要的情况。电脑温度会逐渐增高。
这个错误,是因为我们引发了一个无限的递归,render函数会执行1+n次,1是我们组件初次挂载到页面上,render会执行一次,而n是state发生更新,render就会重新执行一次,state更新了n次,render就重新执行n次。间隔定时器200毫秒执行一次,定时器里面有state的更新,这就说明200毫秒state就更新一次,引发render更新,而且定时器是写在render里面的,render走一次又开启一个定时器,定时器又在更新state,形成一个无限的递归,计算量呈指数爆炸。
所以我们得改写定时器的位置,不能放在render里面。在组件初次挂载到页面上时,react会自动调用一次render,也会自动调用一个api,叫做componentDidMount(){},语义化非常强,叫做页面组件挂载后,也就是说这个api只会在组件挂载完毕调用一次。抽象点,我们可以把render和componentDidMount(){}看作同一级别的兄弟。
所以,我们将定时器放到componentDidMount(){}里面。
 componentDidMount() {
      setInterval(() => {
      //获取原状态
      let { opacity } = this.state
      //减少0.1
      opacity -= 0.1
      if (opacity <= 0) {
           opacity = 1
      }
          this.setState({ opacity })
      }, 200)
}
如此,页面标题渐变的功能便实现了。
但我们在点击按钮,卸载组件试试,如图控制台报错:“我不能在被卸载的组件里面,执行状态的更新。”
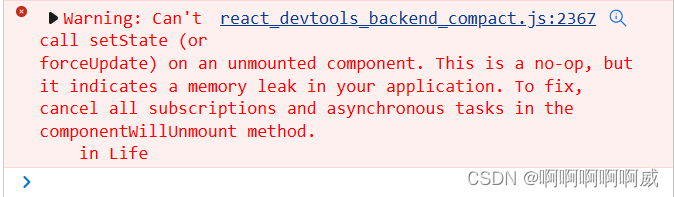
因为自从打开定时器,到页面被卸载,定时器没有被关闭。我们得想办法,在点击按钮卸载组件的时候,关了定时器。
在componentDidMount(){}中,我们给定时器写:this.time = setInterval(()=>{},200),将定时器命名为time,挂载到组件实例上。在按钮点击的回调方法death里面,直接clearInterval(this.time)清空定时器。因为death是箭头函数,this指向组件实例,因此this.time可以访问到定时器。
1.1.3案例透明的渐变功能与componentWillUnmount(){}
我们想一想,在组件将要被卸载前的时候,有没有一个api在此时被react调用执行,进行收尾性的工作?我们把清空定时器的代码,写在这个api里面,岂不更好?
有,它叫: componentWillUnmount(){},语义化表示,它的意思是组件将要被卸载。我们直接把清空定时器的代码放里面。
整个代码如下:
 class Life extends React.Component {
            state = { opacity: 0.3 }
            death = () => {
                //卸载组件
                ReactDOM.unmountComponentAtNode(document.getElementById('test1'))
            }
            //组件挂载完毕
            componentDidMount() {
                this.time = setInterval(() => {
                    //获取原状态
                    let { opacity } = this.state
                    //减少0.1
                    opacity -= 0.1
                    if (opacity <= 0) {
                        opacity = 1
                    }
                    this.setState({ opacity })
                }, 200)
            }
            //组件将要被卸载的时候
            componentWillUnmount(){
                 //清除定时器
                 clearInterval(this.time)
            }
            render() {
                return (
                    <div>
                        <h2 style={

   { opacity: this.state.opacity }}>React学不会怎么办?</h2>
                        <button onClick={this.death}>不活了</button>
                    </div>
                )
            }
        }
        ReactDOM.render(<Life />, document.getElementById('test1'))
1.2案例总结
由此可见,在react一个组件,从挂载到卸载,到了每个关键点,react就会调用一个函数,你可以在这个函数内写代码,从而在关键点内进行相应的操作。
react的组件生命周期,如同一个人的人生的关键点一样,从挂载到卸载,如同人从出生,到死亡。人将要出生,就给这个人先起名字,人出生了,我们给这个婴儿买奶粉,婴儿车....到这个人去世我们给这个人处理后事。组件挂载了,react调用componentDidMount(){},我们在这个函数内写代码对组件这个时间点进行处理,组件卸载前,react调用 componentWillUnmount(){},我们在这个函数内写代码,对组件这个时间点进行处理。
所以,标准叫做生命周期回调函数,又叫做生命周期钩子函数,也可以简言生命周期函数,生命周期钩子。
由此我们引出了生命周期这个概念。
2.生命周期(旧)
生命周期理解
1.组件从创建到死亡会经历一些特定的阶段。
2.React组件中包含一系列钩子函数(生命周期回调函数),会在特定的时刻调用。
3.我们在定义组件时,会在特定的生命周期回调函数中,做特定的工作。
2.1react生命周期图(旧)
2.1.1生命周期图片
生命周期图如下: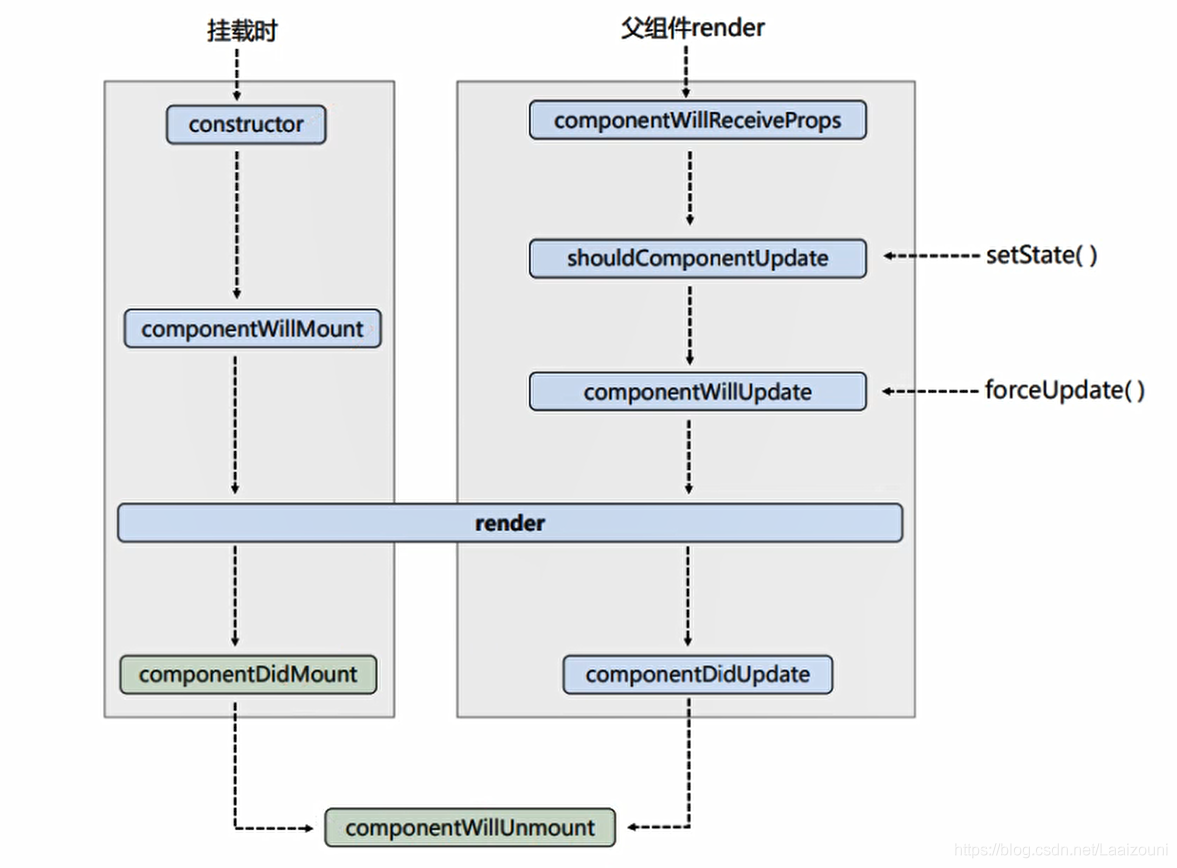
2.2生命周期函数执行顺序研究
2.2.1挂载时顺序
按照生命周期的图片来看,一个组件被挂载时,先是构造器constructor被调用,然后依次是,componentWillMount,render等。
我们先写一个案例,研究一下生命周期函数的执行顺序。
案例:正常写一个组件,此组件内写上constructor,componentWillMount,componentDidMount,componentWillUnmount,render,观察其输出顺序。
 class Count extends React.Component {

            //构造器
            constructor(props) {
                console.log('Count---constructor')
                super(props)
                //初始化状态
                this.state = { count: 0 }
            }
            //增加方法的函数
            add = () => {
                //状态的获取
                const { count } = this.state
                //状态的更新
                this.setState({ count: count + 1 })
            }
            //卸载组件按钮的回调
            death = ()=>{
                ReactDOM.unmountComponentAtNode(document.getElementById('test1'))
            }
            //组件将要挂载的钩子
            componentWillMount() {
                console.log('count---componentWillMount');
            }
            //组件挂载完毕的钩子
            componentDidMount() {
                console.log('count--- componentDidMount');
            }
            //组件将要卸载的钩子
            componentWillUnmount(){
                console.log('cont---componentWillUnmount');
            }
            render() {
                console.log('count---render');
                const { count } = this.state
                return (
                    <div>
                        <h2>当前求和为:{count}</h2>
                        <button onClick={this.add}>点我+1</button>
                        <button onClick={this.death}>卸载组件</button>
                    </div>
                )
            }
        }
        ReactDOM.render(<Count />, document.getElementById('test1'))
输出结果:

点击卸载组件按钮后:

可见与图片顺序一致。
2.2.2setState更新时顺序
先看图片:首先有三条路线,在图片上标出,这三条线路分别是状态更新的不同路线。
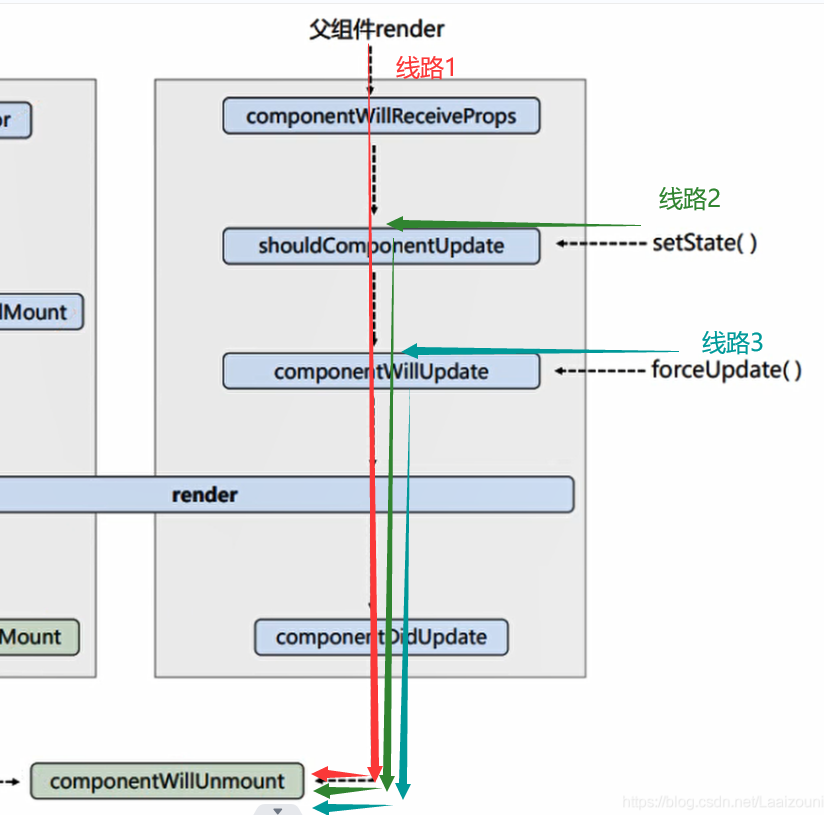
1.先看线路2,这条线路比较简单。
调用setState,就会更新状态,先经过shouldComponentUpdate(),见面知意,它的意思就是“组件是否应该被更新”,它会返回true或者false,如果返回true,就表示可以更新,此路通,否则返回false就是不可以更新,此路堵死不可通行。而且如果不写这个钩子,系统会默认给你补写,补写的默认返回是true,我们可以手写一个,给它返回true或者false,系统就不会在多给你写一个。
代码如下,记得shouldComponentUpdate()必须返回一个true或者false,否则会报错。
shouldComponentUpdate(){
     console.log('count---shouldComponentUpdate');
     return true
}
如果我们返回false:如图我们点击了19次“+1”按钮,结果页面仍然是显示0。控制台打印了19次的
count---shouldComponentUpdate,说明
1.每次状态更新都要调用shouldComponentUpdate()
2.如果shouldComponentUpdate()返回值为false,那么状态更新就会被阻止,剩下的生命周期函数就不会再走了。
所以我们也可以把shouldComponentUpdate()当作控制组件更新的阀门。

然后我们再在代码中加入componentWillUpdate()和componentDidUpdate(),看看其执行顺序。
//组件将要被更新
componentWillUpdate(){
    console.log('count---componentWillUpdate');
}
//组件已经被更新
componentDidUpdate(){
    console.log('count---componentDidUpdate');
}
输出结果:符合生命周期图片顺序。
2.2.3forceUpdate()更新时顺序
forceUpdate()这条路是强制更新的路,正常情况下,我们对状态进行更改引起更新,走的是setState()这条路,需要shouldComponentUpdate同意更新。forceUpdate()就是对状态不进行修改,仍然可以更新,并且不再经过shouldComponentUpdate。
强制更新forceUpdate()的使用情况:我们直接在上面的案例上多加一个按钮
<button onClick={this.force}>不更改状态,强制更新</button>然后写上forceUpdate(),强制更新的回调
//强制更新按钮的回调
force = ()=>{
    this.forceUpdate()
    console.log('forceUpdate');
}
记得关上shouldComponentUpdate
shouldComponentUpdate(){
      console.log('count---shouldComponentUpdate');
      return false
}
点击强制更新按钮效果如下: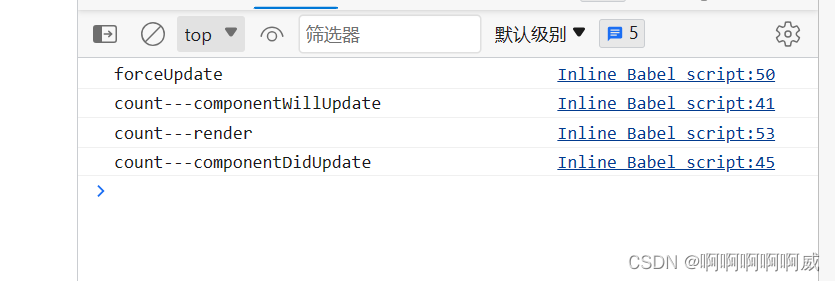
可见,直接跳过shouldComponentUpdate进行了更新。
2.2.4父组件render流程
我们现在来看父组件render的流程,首先我们得写父组件和子组件的案例。我们写一个父组件A和子组件B,A中有按钮,当点击按钮时候,A的state里面的数据发生改变,然后在B中显示。记得将生命周期函数都写上,观察其执行顺序。
代码如下:
class A extends React.Component{
            state = {carName:'大奔'}
            changeCar = ()=>{
                this.setState({carName:'宝马'})
            }
            render(){
                return(
                    <div>
                        <div>我是A组件</div>
                        <button onClick={this.changeCar}>换车</button>
                        <B carName={this.state.carName}/>
                    </div>
                )
            }
        }
        class B extends React.Component{
            //组件将要接收新的props的钩子
            componentWillReceiveProps(props){
                console.log('B---componentWillReceiveProps',props);
            }
            //组件更新的阀门
            shouldComponentUpdate(){
                console.log('count---shouldComponentUpdate');
                return true
            }
            //组件将要被更新
            componentWillUpdate(){
                console.log('count---componentWillUpdate');
            }
            //组件已经被更新
            componentDidUpdate(){
                console.log('count---componentDidUpdate');
            }
            render(){
                return(
                    <div>我是B组件,接收到的车是:{this.props.carName}</div>
                )
            }
        }
        ReactDOM.render(<A />, document.getElementById('test1'))
效果如下:首先我们进入页面的时候,发现控制台没有任何打印。表明了,在进入页面子组件初次接收父组件传值的时候,componentWillReceiveProps是不会执行的。只有在父组件状态更新,传值给子组件,这个时候componentWillReceiveProps就会执行了。
点击按钮:

生命周期函数执行顺序:
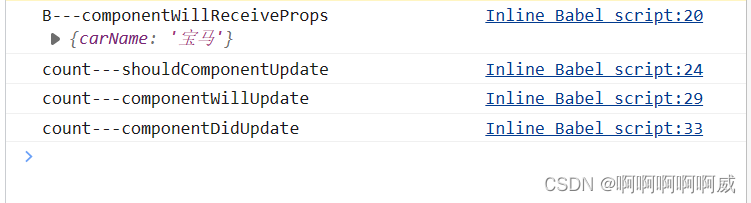
如图可见,生命周期函数的执行顺序,如生命周期图片上一致。
3.总结生命周期(旧)
生命周期大体分为三个阶段:
1.初始化阶段:由ReactDOM.render()触发--初次渲染
1.constructor()
2.componentWillMount()
3.render()
4.componentDidMount()
2.更新阶段:由组件内部this.setState()或父组件重新render触发
1.shouldComponentUpdate()
2.componentWillUpdate()
3.render()
4.componentDidUpdate()
3.卸载组件:由ReactDOM.unmountComponentAtNode()触发
1.componentWillUnmount()
三个常用的生命周期函数:
1.componentDidMount()这个生命周期函数比较常用,一般在这个钩子内做一些初始化的事情,如:开启定时器,发送网络请求,订阅消息。
2.componentWillUnmount()也比较常用,在这个钩子做一些收尾的事情,如:关闭定时器,取消订阅消息。
3.render是必须使用的一个钩子。